Every owner of a private home sooner or later faces a problem related to the issue of high-quality insulation of his home.
This question may arise at the design stage or when the purchased house requires some modifications to make living in it comfortable.
Why is the air temperature inside a living space not always comfortable? This is due to the following factors:
- The heating system does not function well enough;
- there are many cracks in the walls through which cold air penetrates;
- poor thermal insulation of walls (this is the most common reason).
You can insulate your home in one of several ways. Experts strongly advise insulating walls from the outside ; carrying out such work from the inside is recommended in extreme cases.
This is due to the following reasons:
- If the house is insulated from the outside, the walls will be protected not only from heat leakage, but also from the destructive effects of moisture . The heat that comes from inside the house warms the walls, and when moisture gets on them and condensation forms, it favors their rapid drying.
- By insulating the walls of the house from the outside, you will not only protect the room from the cold, but also preserve the usable area of the rooms .
On the modern building materials market there is a large selection of products designed for insulating walls and ceilings. Each of the materials offered by various manufacturers has many attractive qualities. But it often happens that the choice of product depends on one important detail - the cost of the product.
Naturally, building a house is not a cheap pleasure, and sometimes at the final stage of construction work, the homeowner’s wallet becomes much thinner. Therefore, we have to resort to various tricks in order to somehow get out of this situation with dignity. As for thermal insulation, there are many options to reduce the cost of construction, one of which is the use of alternative materials.
Materials for insulation can be:
In this article we will dwell in detail on one of the possible options for wall insulation - thermal insulation using sawdust .
If you use this method correctly, you can achieve good results. This will cost significantly less money, but you need to be prepared for the fact that you will have to do a much larger amount of work.
For this technique, carpentry workshop waste is suitable. This material has both positive and negative properties. Therefore, before making the final decision to begin measures to thermally protect walls with sawdust, you need to carefully weigh everything and study this issue to the smallest detail.
Insulating walls with sawdust: pros and cons
, wood waste from hardwood , namely ash, spruce, pine, etc., is most often
For this purpose, oak sawdust is considered the most suitable option. These raw materials are expensive, but they help preserve heat in the house even in 30 degree frost.
The best option is pine shavings - it contains resin that repels rodents and bugs.
It is best to take sawdust of the medium fraction, since small ones will produce a lot of dust, and large ones will have little effect.
After the sawdust is completely dry, it is worth adding a mixture of copper sulfate and slaked lime (10% by weight).
Insulating external walls with sawdust has its advantages:
- it is easy to work with;
- getting sawdust will not be difficult for you. There are wood processing enterprises in many localities;
- long service life;
- high efficiency;
- environmental Safety;
- low specific gravity;
- excellent noise-absorbing and heat-insulating properties;
- This product can be purchased at the sawmill for free or for a nominal fee.
Disadvantages of the material:
- The insulating layer is of considerable thickness . If the sawdust layer is small, then their effectiveness as insulation will be minimized;
- high fire hazard of the material . Wood shavings readily burn. Using sawdust as insulation for walls greatly increases the likelihood of a fire occurring and spreading;
- the material is not resistant to moisture, it absorbs it well . As soon as liquid gets on the insulating layer, it is fraught with negative consequences: dampness, mold will appear, and harmful insects will appear.
Therefore, if you decide to install such a structure, you need to pay special attention to vapor and waterproofing . If these layers are made without following the technology, the insulation will quickly become unusable. To prevent sawdust from being exposed to moisture, they are treated with special reagents.
But the cost of such material becomes many times higher, and it also becomes toxic and can even cause an allergic reaction. It is not safe to use processed sawdust as a thermal insulation material in a residential frame house.
Insulation of walls with sawdust and lime
In order to make wall insulation, which includes lime and sawdust, you need to take these ingredients in a ratio of 1:10 . You need to add a little antiseptic solution (25g per 1 bucket) to the prepared mixture.
Then the mixture must be poured into the walls and compacted. Sawdust treated in this way does not sag and bugs do not grow in them.
Modern materials
Previously, sand, clay and sawdust were used as the main material in the plaster solution. However, now they have been replaced by more durable components - gypsum, cement, lime. Thanks to them, the plaster acquires a certain strength, durability and protection from water.
But making a plaster solution based on cement rather than clay will be a little more difficult and expensive, but you can make high-quality plaster in the bathroom or outside the house.
Wall pie device
One of the most important factors when building a house is the correct design of the walls. It doesn’t matter whether you carry out all the construction work yourself, or order a ready-made option, in any case, you must know the correct composition of the “pie” of a frame house.
Layers of the correct “pie” of the wall:
- Frame made of wooden beams.
- There should be insulation between the racks.
- Fiberboard (OSB).
- Horizontal sheathing.
- Insulation.
- Multifunctional membrane.
- Vertical lathing.
- Finishing.
- Vapor barrier.
- Internal lining.
If you use sawdust as wall insulation, you need to make a lathing.
First of all, you need to mount the frame. Then, at a certain distance, you need to attach wooden slats to the wall and lay the sheathing on them.
Criterias of choice
It is possible to provide high-quality thermal insulation for a room if you choose the right insulation materials. Clay resembles ordinary plasticine - it is plastic. For construction work, it is best to use red clay: it is more pliable, hardens faster, and absorbs less liquid. If such material is not available, you can use other varieties (for example, white). This will not affect the final result, but the finished surface will subsequently have to be looked after more carefully.
Red clay is best suited for insulation work because it has high plasticity and minimally absorbs moisture Source kamtehnopark.ru
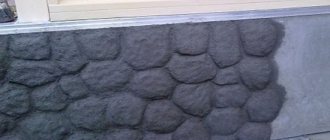
Detailed installation diagram of sawdust with clay
If you make a mixture consisting of clay and sawdust , you will get an excellent material with waterproofing and thermal insulation properties.
It is well suited for insulating the walls of a house built in any region.
This mixture will keep the house warm in severe frost and will not allow the room to warm up during the summer heat.
Insulating walls using sawdust-clay material is not as simple as it might seem at first glance.
Therefore, during the work process, you must strictly adhere to the following recommendations:
- When preparing the mixture, you must adhere to the exact quantitative ratios of the ingredients.
- The finished mixture must be applied to the walls at a certain thickness. This is the only way you can achieve maximum effect.
- For thermal insulation of walls, you need to make slabs from clay and small sawdust.
Lathing for insulation
A mixture of clay and sawdust can be made and laid in several ways; we will consider one option, that is, laying the wet substance on a sheathing pre-fixed to the wall.
What proportions must be maintained to make the mixture plastic?
Clay diluted with water should be mixed with sawdust in a shallow metal container. You can use a concrete mixer to mix the composition . The finished composition must be applied to the walls.
You can also insulate the walls with such a mixture by pouring it into the formwork attached to the frame wall . If you fix shingles on the wall, then you can spread the clay in a layer of no more than 30mm.
After the sawdust-clay layer has dried, it needs to be leveled with cement-sand mortar and only then plastered.
Manufacturing and laying of slabs
Soak
Dry packaged clay purchased in a store should be soaked. To work, you need a wide container (trough), tank or other vessel:
- The container is filled 80% with clay.
- Fill the container up to the sides with clean water so that it completely covers the material.
- After a day, the solution is stirred. If there is not enough water, add it again and leave the clay to soak for another day.
- The soaked material is transferred to another container.
Clay extracted from a quarry yourself is soaked in the same way. If the material is wet, it is also soaked, since it usually does not contain enough water.
Advantages and disadvantages
Recently, the popularity of environmentally friendly construction without the use of artificial materials and without harm to the environment has been increasing. Clay is an affordable material, and sawdust is a waste-free way to use wood. Sawdust has very low thermal conductivity and can retain heat for a long time. Clay is a binder and gives sawdust the opportunity to retain its properties for a long time.
- Insulating walls with sawdust will be very cheap or even free.
- You can repair finished insulation yourself and very quickly. It is enough to mix a small amount of the mixture and troubleshoot.
- The resulting material is an excellent sound insulator on par with the most modern inventions in the construction industry.
- Walls with clay “breathe”, condensation does not form on them, and they do not require the installation of a vapor barrier layer.
Clay mixture cannot always be used as insulation. Before starting work, you should familiarize yourself with the shortcomings of the material and how to eliminate them:
How to plaster a wooden wall with your own hands: step-by-step instructions, video
How to plaster a wooden wall with your own hands without proper experience, and is it possible? This question is often asked by those who have decided to decorate their home themselves for the first time. It should be noted that this task is quite painstaking and responsible, because without providing a reliable coating, the frame will quickly deteriorate, especially if it is exposed to moisture.
To plaster wooden walls with your own hands, you can use a variety of materials, both natural and inorganic powder type. Their application will take place on the same principles, since adhesion to the surface and hardening is based on special astringent components of the composition. We'll look at how to use them in more detail later.
Why is plaster necessary?
Plastering the walls of a wooden house is very important. You can perform almost all stages of the repair with your own hands, which will significantly affect its final cost. It performs protective functions, remarkably prevents the occurrence of putrefactive processes, the appearance of fungus, and prevents the penetration of harmful insects. As a result, the house will last much longer, and the wood will not dry out, which will help avoid the appearance of dampness and cold passing through the resulting cracks.
Technology
The process of insulating walls with sawdust concrete is a difficult and labor-intensive process that requires great physical strength, endurance and patience. One person can complete all the work, but with assistants the process will take much less time.
Clay is a heaving material, which means that when it freezes in a water-saturated state, it will swell and collapse greatly. It is recommended to carry out insulation of walls in the summer, then before the first cold weather the mixture will have time to dry and gain strength.
Formation of the rough layer
Sawdust provides reliability to the plaster mortar. If they are not available, in order to apply the rough composition to the gypsum surface, you will need to attach a reinforcing nylon mesh. It is better to fix it directly with a solution; when used to secure nails, the integrity of the wall is compromised and the strength deteriorates. It is practical to treat clay walls with plaster with an assistant who will point out places that need improvement. The process includes the following steps:
- To work, you will need a grater board or spatula.
- Two or three mounds of plaster are applied to the working tool.
- The tool with the solution is pressed tightly and distributed over the surface.
- The direction of movement is from bottom to top. You should try to distribute the plaster as evenly as possible.
- The flat surface of the wall is checked using a building level. Identified irregularities are eliminated immediately after detection.
If the wall is relatively flat, a starting layer of 1 cm is sufficient. If there are significant unevenness on the clay surface, the plaster layer can increase to 3-5 cm.
Advice! When processing large areas of clay walls with your own hands, it is much more convenient to apply plaster using beacons. This will speed up the entire work process and increase the quality of the finish.
After applying the rough layer of plaster solution, time is required for it to dry completely. The entire process takes on average 4-6 weeks. The approximate drying period for a 1 cm thick layer at room temperature is 5 days, and it is not recommended to speed up the process using a technical hair dryer or heaters. Therefore, it is better to plan the work for the warm period. It is optimal when the initial finishing begins in late spring - early summer, although it all depends on the region where the house with clay walls is located. Professional steps for applying plaster to walls can be seen in the following video:
How to prepare the solution?
Clay with sawdust works well as wall insulation only if the materials are selected, prepared and applied correctly. The process of insulating a house begins with preparing a solution and selecting materials. Both components of the mixture can be obtained for free. But it is worth paying attention to their quality.
Clay
The material is available, inexpensive, and in some cases can be obtained for free. You should pay attention to the quality of the material: the presence of foreign objects in the material is not allowed.
You can use clay that you just brought, but to obtain the ideal consistency of the mixture and the durability of the insulation, you need to prepare the clay. To do this, fill it with water, mix it and leave it for the winter. During this time, the material goes through several cycles of thawing and freezing. Natural heaving forces the material to expand and contract again several times, the clay becomes homogeneous and plastic.
Clay can be “skinny” or “fat”; plasticity depends on the fat content. When using “oily” (plastic) clay, it is necessary to add a little sand to the insulation composition.
Clay for preparing the solution
Before starting work, the clay must be prepared: left for the winter in a water-saturated state.
Sawdust
Sawdust is a waste product from the wood processing industry. They can be specially purchased at a low price at any enterprise. To insulate walls, you can use different sawdust, which have their own beneficial properties:
- Oak almost does not change its size and density under the influence of moisture, almost does not rot, and is resistant to bacteria.
- Coniferous sawdust is less susceptible to mold formation than other types of wood due to its high content of essential oils.
When insulating walls, you can use a mixture of several types of sawdust.
Before starting work, sawdust must be prepared:
- First, the sawdust is removed from impurities, sifted and washed.
- After this, the sawdust is thoroughly dried.
- Dry sawdust must be impregnated with compounds that protect the wood from rot, mold and fire.
Sawdust for preparing the mixture
You can use mixed sawdust to obtain better properties of the thermal insulation material.
Preparation of the solution
To properly prepare the mixture, you need a set of tools:
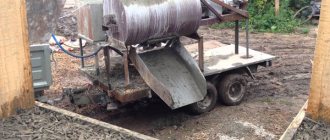
First, the clay is soaked in one of the barrels. Leave it for several hours and stir occasionally until it becomes homogeneous. After this, 1–2 buckets of clay are poured into a concrete mixer and sawdust is gradually added there in a ratio of 3:2, respectively.
To achieve better thermal insulation properties, technical salt is added to the mixture, but in this case the proportion of clay and sawdust changes to 1:1.
After a short stay in the concrete mixer, the mixture is ready for use; it is poured into a second barrel or installation begins immediately.
Application
To apply insulation to the walls, you can use formwork, but this method is very labor-intensive; it is much easier to prepare slabs from insulation:
- To make slabs, you need to make several molds for them in advance. Their size will depend on the parameters of the wall. You can prepare the forms yourself by assembling them from plywood and blocks using nails and a hammer. The thickness of the insulation boards will depend on the average winter temperature and the presence of technical salt in the mixture.
- The mold is filled with the prepared solution in small portions and periodically leveled. It is advisable to minimize the number of air bubbles and thicken the mixture.
- The installation of the slabs is carried out after the material has hardened; you can use slabs that are not completely dried, it is enough that they simply hold their shape.
- The plates are installed close to each other and secured.
- The joints, chipped corners and gaps are covered with the remains of the clay mixture.
Installation of clay slabs with sawdust
For installation, wooden guides are used, slabs are placed between them and then the joints are rubbed with the remainder of the clay mixture.
This technology for home insulation ensures cleanliness in the room during installation. Raw clay is a very dirty material that is difficult to clean. It is not recommended to use it in rooms where installation work has already been completed. The slabs can be prepared in another place, keeping the room clean.
It is very important to dry insulation boards correctly. When the slabs dry quickly, a dense dry crust forms on the surface, preventing the water inside from escaping, which leads to uneven drying, damage and loss of thermal insulation properties. To dry the slabs evenly, they must be left in a room with sufficient humidity and protected from direct sunlight.
Preparing the mixture
Making cement plaster yourself involves mixing all the necessary components and adding plasticizers to improve the quality of the mixture. The use of sand as a filler is traditional. Such a solution acquires the properties of strength and resistance to cracking, which is so necessary for the surface.
Let's find out how to properly make cement mortar for plastering walls yourself and learn tips from professionals:
- A novice master has no idea what cement brands mean. Therefore, when choosing them, proceed from the specifics of your work. For regular wall plastering, M400 is suitable; for work rooms, garages and where you need to save money, choose M300, but for the basement of a building and places with high humidity you should buy Portland cement M500
- The mixture begins to dry within 10-15 minutes after application to the base, so there is no need to hesitate when spraying and smoothing. It will take 10 to 12 hours for the plaster to dry completely. If you want to maximize the strength of the plastered wall, then you will need to exclude all additional finishing and mechanical influences for about a month
- You need to choose the right sand fraction for cement mortar - it can be from 0.2 to 0.5 mm and from 0.5-2 mm. Make sure that there is no organic impurity in the sand, otherwise it will cause rotting in the future
Table of proportions depending on the brand of cement:
| Cement brands | Brands of solution | ||||
| 200 | 150 | 100 | 75 | 50 | |
| 300 | — | 1:2,5:0,1 | 1:3,5:0,2 | 1:4:0,3 | 1:6:0,6 |
| 400 | 1:2,5:0,1 | 1:3:0,2 | 1:4,5:0,4 | 1:5,5:0,5 | 1:8:0,9 |
| 500 | 1:3:0,2 | 1:4:0,3 | 1:5,5:0,5 | 1:7:0,8 | — |
Most people are interested in how long it will take for cement plaster to dry on a wall? First of all, the drying process depends on the ambient temperature - for interior spaces it is prohibited to use artificial drying and allow drafts. For external walls, it will take approximately 24 hours to dry, but the strength indicators will gain strength about a month after finishing. In what sequence to prepare cement plasters and how to make the correct solution yourself:
- The main components in dry form must be taken in equal parts, then mix them well together
- To improve the quality of the plaster, it is necessary to sift the resulting mixture through a sieve.
- At the next stage, water is added to the mixture - the resulting solution should be homogeneous
- Cement plasters are not plastic, so there is one trick in which washing liquids are added to the plasters at the rate of 30-50 ml per 5 liters of water
How to properly prepare a solution for plastering walls
Finishing
The slabs of clay with sawdust themselves have an uneven surface; it can be leveled using a special plaster mixture made from sawdust - wood concrete.
The mixture is applied after the insulation boards have completely dried. Plastering of walls occurs in 2 layers: first, rough rough plaster, then grouting without adding sawdust.
To prepare the solution you need to take small sawdust, water and clay with lime. The materials are mixed using the previously described technology and immediately applied to the walls, further increasing thermal insulation. Apply the solution with a spatula and level it as much as possible. The layer thickness is 2–3 mm.
The final layer will be the same solution, but without adding sawdust; it is carefully applied to the walls, leveled and soon hardens. After this, the room can be wallpapered or painted. The material is durable, reliable and easy to repair; the insulation will serve the owners for many years.
Hello, our dear readers.
We live in difficult times. The cost of living is growing exponentially every day, forcing you to save on literally everything, or at least try to do so. Of course, it was time for building materials. So, some are trying to find out what kind of insulation clay is.
The product is essentially a “ball” product, you don’t have to buy it in a construction store, just take it and dig, there are places for this in any village. Let’s also look for the truth, because if the “Kulibins” are right, then there is no point in buying environmentally questionable foam plastics.
Specifications
By thermal conductivity
Clay-sawdust coating ranks second after gypsum-perlite mortar - its thermal conductivity is 29 W/m ×°C. In its pure form, the thermal conductivity of clay is 69 W/m × °C, that is, almost 1.5 times lower than that of a cement-sand mixture.
Another important indicator for plaster is vapor permeability
. After all, moisture must be removed from the premises to avoid condensation. Vapor permeability coefficient for clay = 0.11-0.15 mg/(m*hour*Pa). This is more than that of log walls. Therefore, clay is excellent for plastering wooden houses.
Density
(mass to volume ratio) for clay is 1700 kg/cubic. m. Brick has a similar density.
Consumption of clay plaster
with a layer thickness of 1 cm it is equal to 15 kg per 1 sq. m.
A little physics
Before delving into the technological aspects of using the product, let’s look at its physical and technical characteristics. And they are not too happy. Thus, the density of hardened clay is 1600-2400 kg/m3 (slightly less than that of concrete), and the thermal conductivity is 0.7-0.9 W/m°C.
It turns out that clay as a wall insulation is, to put it mildly, useless, so why is it still used?
The fact is that this material is an excellent binder, the strength of which is not affected in any way by the sucrose found in organic fillers (it is destructive for concrete), and this, in turn, opens up the widest scope for maneuver.
Clay with sawdust as insulation
One of the most popular options is clay with sawdust for insulation on the ceiling. Wooden shavings, especially in their loose state, retain heat well, and you can collect them in any carpentry shop for a nominal fee.
There is only one drawback: over time, the loose mass sags, losing part of its thermal insulation properties.
But if it is mixed with gypsum or liquid clay, the “fluffy” structure will remain for a long time, which means that the use of such technology is not without meaning.
Using various additives
If the plaster composition is not prepared correctly, its adhesion to concrete or brick surfaces will be poor. With the correct consistency, the solution will slide off the trowel in 8 seconds in one mass. If the mixture drips or sticks firmly to the trowel, then the preparation was done incorrectly.
To increase the adhesion of the solution, special additives are used, corbocellulose or polyacetate adhesives; they have a powdery form and dissolve in water. Such additives are capable of displacing air from the surface of the plaster composition. As a result, the plastered surface has a smooth and even structure.
Also, to prepare the surface and prepare plaster, KMS compositions in liquid form are used, they are used for priming walls, and added to the solution.
To improve the plasticity of a solution based on 400 cement, use ordinary washing powder or liquid detergent on a synthetic basis, adding 70 grams per 50 liters of the composition.
Fatty clay has a similar effect; add 100 grams to 15 liters of water. It is thoroughly ground in liquid and then added to a mixture of cement and sand. In this case, the plaster composition takes longer to dry than a regular mortar. If too much clay is added, the surface may crack after drying.
Instead of clay, you can use lime paste; this solution is prepared for plastering external walls or basements. If the surface is subject to temperature changes, then you need to use an additive made from chopped fiber material, which is based on a polymer - glass fiber.
Recipe
If you are interested in clay with sawdust as insulation, the proportions here are simple. For three buckets of clay, take two buckets of wood shavings, mix it all and fill the space between the joists with the resulting mass.
You can easily not only walk on such insulation, but also dance, but you can’t call it too effective. Of course, the proportion of wood material can always be increased, but then the insulation will lose strength, which means that some kind of floor will have to be invented on top of it.
Adobe as insulation
Another interesting option for using clay is adobe. Previously, it served as the main structural material for the construction of walls, but today it is used only as insulation.
Here the filler is no longer sawdust, but straw. Again, an environmentally friendly product with excellent thermal insulation properties and, again, the purchase of which will not ruin your budget.
To acquire adobe, you only need to have a wooden mold and the desire to work. Kneading (clay and straw are kneaded with feet) is usually done right next to the clay quarry, where the resulting mass is filled into molds, and the blocks dry there.
The whole process is quite labor-intensive, but if this point doesn’t bother you, you can get a material with a thermal conductivity of 0.1 W/m°C, and this is already a pretty good indicator.
Decorative clay plaster.
Clay is not inferior to other binders: it can be used in almost all decoration techniques. No plasticizing additives required.
To speed up its drying, cement or gypsum is mixed into the clay-sand mortar. In the first case, the plaster becomes more durable and wear-resistant. In the second, it sets and dehydrates faster.
Clay plaster easily absorbs primers and has high adhesion to paints. But, if there is a need to preserve its ability to regulate the microclimate in the room, only “breathing” paints are used. Otherwise, the vapors will not be able to freely saturate the wall and leave it when the air dries.
Preparation for painting may include sanding with emery cloth.
To obtain the smoothest possible base, the finest sand is used to mix the covering mortar. data-matched-content-ui-type=”image_stacked” data-matched-content-rows-num=”2″ data-matched-content-columns-num=”3″ data-ad-format=”autorelaxed”>
Expanded clay as insulation
But still, the best filler should be considered not sawdust or straw, but ordinary air. The developers of expanded clay were probably guided by these principles when they created their product.
Yes, if anyone didn’t know, expanded clay is foamed and fired clay. This insulation is proven and, especially in Soviet times, was used everywhere in construction. Among its disadvantages are its rather significant weight (and in private construction, every kilogram counts) and fear of water.
By the way, hydrophobia is a common disadvantage for all clay insulation, so if you plan to use them in a humid environment, you can abandon this idea right now - nothing good will come of it anyway.
Unfortunately, you won’t be able to make expanded clay at home, but its market value is not too high anyway, so if the strength of the floors allows it, take note of the material.
Well, that's practically all. We have dealt with clay as an insulation material. Tips on how to use this wonderful natural product were given. It's time to say goodbye. Goodbye and see you soon on the pages of our blog.