Monolithic ribbed floors are capable of dividing the space between apartments and floors of residential buildings and industries.
An important quality of rib products is the uniform distribution of load for all types of structures, the weight of the slab itself, people and furniture so that there is no overload on the foundation.
At the same time, the strength characteristics of the interfloor space are reliably preserved. What types of ribbed floors exist, how the rules for calculating them are carried out, what the installation process is and other nuances, read more in the presented article.
Ribbed monolithic flooring and its use in private construction
If the house under construction has more than one floor, the issue of laying floors cannot be avoided.
Ribbed monolithic ceiling is one of the best options. Functionally, it is entrusted with the task of separating floors and carrying a payload in the form of its own weight, people and furniture located on them. Consequently, its strength and load-bearing capacity should be sufficient, but it is highly desirable to reduce their total weight, since excess loads are undesirable for either the walls or the foundation.
To lighten the weight while maintaining strength characteristics, a variety of designs are used, including so-called ribbed floors.
Cons according to professionals
When it comes to residential premises, builders immediately warn that the lower part of the ribbed ceiling between floors needs additional covering, since the appearance is extremely unaesthetic. It is not always convenient to additionally cover the ceiling with veneer, plasterboard or any other material in order to hide the concrete ribs.
Professionals also consider it a disadvantage that creating temporary formwork takes a lot of time, and renting ready-made formwork from contractors erases the material benefit and makes this type more expensive compared to other options.
Experts also note the need for a separate layer of sound insulation, and ideally thermal insulation too.
Another disadvantage the builders note is that installation work must be carried out continuously, since debris, foreign objects, dirt, and precipitation are not allowed to get into the ceiling. It will be difficult to work independently in this mode.
Structural features of a ribbed monolithic floor
Let's figure out what this type of structure is and what are the prospects for its use in private construction.
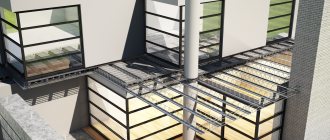
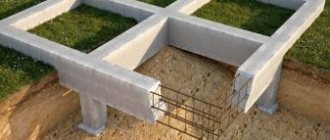
Ribbed monolithic floors consist of beams that can go in one or two directions, and a slab connected to the beams into a single structure (i.e., the beams work together with the slab resting on them). Such structures are used in the construction of buildings with large spans (industrial buildings, shopping centers, subways, water protection, utility structures, etc.).
The use of a flat reinforced concrete slab instead is due to a decrease in concrete consumption during the construction of the floor and, as a consequence, a decrease in the load on load-bearing walls and foundations. Reducing the load on the building's load-bearing structures allows architects to create structures that are more interesting in design.
Not a minor factor is the reduction in costs for pouring concrete and reinforcement. To create ribbed floors, concrete of class B15-B25 and reinforcement of the following classes are used: A240, A300, A400, B500. The choice of class depends on the implementation of a specific design task.
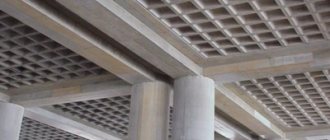
The production of this type of interfloor slabs is no different from other reinforced concrete structures, with the exception of the principle of using special removable formwork. You can see the schematic diagram and appearance of the structure in the figure. It is due to the shape of the formwork that the “ribs” are ultimately created.
Interfloor ceilings on wooden beams - environmental friendliness combined with savings.
We have understood the general concepts. Now let's talk about the applicability of ribbed monolithic floors in the construction of cottages and country houses for permanent residence. There is a fairly large amount of information on the Internet about creating such structures with your own hands. Such attention to the presence of “ribs” in the interfloor reinforced concrete floor is determined, first of all, by the desire to save on its construction. However, it is worth considering the following points:
- A competent design calculation is required;
- Construction companies offer for rental removable formwork and racks necessary for the production of ribbed slabs, but ordering such formwork for rent will cost much more than for a classic monolithic flat slab, which can ultimately offset the savings on concrete;
- Creating formwork with your own hands (for example, from boards or OSB boards) is a rather lengthy and labor-intensive process, i.e. you will have to take into account the high labor intensity of the work;
- In addition, the appearance of a ceiling with beams will not fit into every interior. It may have to be subsequently covered with plasterboard or other materials.
Properly laid reinforced concrete floor beams will make the structure reliable.
What do you need to consider?
The design must comply with the specified parameters:
- the slab must withstand dynamic and static loads. In private construction, the average load is 350-400 kg/m²;
- under the influence of external forces, the ceiling should not be deformed, that is, appropriate rigidity must be ensured;
- depending on the installation location of the ceiling (basement, floors, attic) and the function of the room, sound insulation is installed, blocking both airborne and impact noise;
- if the slab separates rooms with different temperature conditions, for example, an attic or basement from the floor, thermal protection must be provided;
- the connection of the structure with the external walls should not create cold bridges, which provokes heat loss and the formation of condensation;
- the installation of monolithic floors can be implemented taking into account fire resistance.
If a builder is erecting monolithic floors, the technology for carrying out the work follows the specified sequence.
DIY construction stages
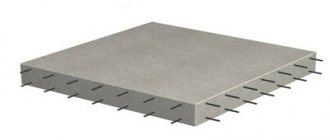
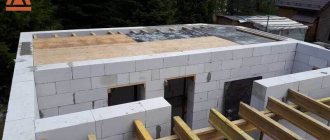
The final design of the ribbed monolithic floor should be a slab, completely flat on top, and in the lower part having a beam reinforcing structure. Moreover, the slab and beams are poured simultaneously, forming a single monolithic structure, which is why it gains the maximum possible strength.
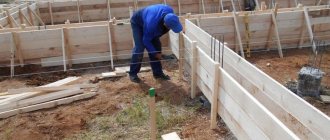
Most often, when self-constructing, special boxes made of impact-resistant plastic are used as formwork. Formwork can also be made from sheets of foam plastic fastened together. They are laid on a specially constructed flooring, which is supported from below by racks - this will prevent the flooring from sagging from the moment the concrete mixture is poured until it completely sets.
In order to save money, you can use timber for the flooring and racks, which will subsequently be used for the construction of the roof. A more expensive option would be inventory formwork.
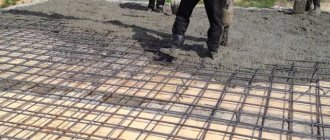
The openings that form the beams are laid along the entire length with a reinforcement cage, consisting of reinforcement rods with a diameter of 12-16mm (depending on the expected loads) and strapping (approximately 6-8mm). The entire upper flat part is reinforced with reinforcing mesh (2 layers) in increments of 10-20cm.
The reinforcement is laid so that it is covered on all sides by a protective layer of concrete at least 20 mm thick. After all the components of the future floor have been laid and securely secured with racks, concrete pouring begins.
The ideal floor is one whose surface was poured in one go, so mixing the mortar yourself in a concrete mixer is highly undesirable. This will lead to the fact that the slab will not have the same strength over the entire area and, consequently, hazardous areas will appear.
In order to obtain a reliable floor with a maximum safety margin, use purchased concrete delivered to the construction site in a “mixer” (it is quite difficult to independently maintain the correct dosage of all components of the concrete mixture). This way, you can fill the slab in one go, and it will be absolutely reliable.
Installation of slabs: calculating the distance between beams
Features of installing a ribbed surface are as follows:
- A layer of cement mortar is applied to the ends of the surface of walls, piles, beams intended for mounting 3x6 slabs, which is necessary to make the joint tight and durable. You should not allow the composition to harden ahead of time, which will compromise the integrity of the entire structure.
- A spider hook with 4 slings is attached to the crane hook, at the ends of which the same hooks are located. They are securely inserted into the hinges and raise the surface in a horizontal position.
- In addition to the crane operator, the installation is carried out by several slingers, who level the position of the suspended slabs and ensure the accuracy of the installation is calculated.
- All GOST slabs have a technological slope, due to which the upper part is smaller than the lower. For this reason, there are gaps of 50-70 mm between adjacent panels, which are filled with mortar.
- Hinges for installation that are in contact with each other are connected to each other using a steel rod, the edges of which are turned inward and then welded. In this case, the calculation of the action must be correct.
An edge should remain outside the structure, the dimensions of which should not be less than 0.15 m for brickwork. The same distance should be between the plane of contact of the slabs with the load-bearing beams.
[custom_ads_shortcode3]
Conclusion
The ribbed floor allows you to obtain a durable structure separating the floors, with proper design and execution. Structural features allow you to save building material and lighten the load on the walls and foundation of the house, however, the process of constructing formwork will be much more labor-intensive and expensive than with other flooring options, which is also worth taking into account.
This do-it-yourself ceiling option is more suitable for those who have a lot of free time and labor. In other cases, in our opinion, it will be more effective to purchase factory-made reinforced concrete slabs. And for small spans, a more rational solution would be to simply pour a flat slab.
Material characteristics and types
In case of significant loads, the coatings, which are necessary for the stability of the structure, are supplied with additional and reinforced ribs. They are mainly used when installing attic floors, in industrial structures, and to a lesser extent for the construction of residential buildings, due to the processing of the slab from below. Coatings are used in cold areas with high humidity due to their high technical characteristics. Slabs are required for equipping rooms with chemical or fire aggressiveness.
Coatings produced by building material manufacturers can be divided into several types;
- Smooth, flat - PG, with special holes necessary for ventilation - PV, lighting PS, PF and roof release - this is PL.
- Vaulted slabs, with the same conditions. They have markings such as POF, POV, POL, POS. In addition to the letter designation, the documents indicate the reinforcement used, concrete, the distance between through parts, features and permissible load - resistance to natural phenomena and moving soils.
[custom_ads_shortcode1]
Communities › Construction (and everything connected with it) › Blog › Frequently ribbed monolithic floor
People had a lot of questions regarding USP, both in the post and in PM. I think this post will arouse just as much curiosity. Here is a link to the original, there are many reports on fillings and everything is chewed in detail, with its own FAQ: www.forumhouse.ru/threads/99017/ The often ribbed ceiling captivates self-builders because the use of heavy equipment is not required, it can even be done in one hands (for maniacs), the load-bearing capacity of the floor can be increased by increasing the diameter of the reinforcement, the height of the ribs, or reducing the pitch between the ribs. Here's the construct I used:
I continue to fill the ceiling step by step.
For self-builders - a good calculator for calculating the proportions of concrete preparation www.gvozdem.ru/stroim-dom...aschet-sostava-betona.php
Tags: monolithic ceiling, one-handed.
Comments 60
good evening! This is not the first time I’ve read your works with interest, I learned something and decided to add it to my bookmarks... I was surprised to find that I was blocked and could not subscribe... if it doesn’t bother you, please explain what’s actually wrong?!))
how will the ceiling be finished? And the emptiness in it?
Whoever wants more - a suspended ceiling, plasterboard, you can finish the surface of the slab, and decorate the ribs with wooden beams (I am considering this option for myself).
young people are doing great, but the overlaps are too small
fix it in the future and good luck
Wouldn't it be cheaper to order concrete all at once?
health and money are on your way. Well done.
This is not for you, this is not for you! Oh, hard peasant work, even horses die from it!
Good luck and patience. Building on your own is not about playing around with goodies.
Thank you. This is true, but only look after yourself.
Thank you! Very interesting and visual!
Let's develop the community!
With such a span, a 160mm slab is enough, without any ribs.
I agree with the thesis that all markers have different tastes and colors.
Stiffeners are usually used in long-span buildings! Guys, read the standards to calm your soul and don’t waste your time, energy and money!
With such a span, a 160mm slab is enough, without any ribs.
I figured it out on my fingers: there is enough reinforcement in the beams (with the 14th - approximately double the reserve), only the question of the transverse clamps is a large step (larger than the cross-section of the beam) + the overlap of the reinforcement is also small, especially when the concrete is of what grade. I didn’t consider it unsteady - I’m lazy, but here, most likely, there won’t be any problems. I won’t say anything about the “crust” in the ceiling itself, because the concrete doesn’t carry anything there, and the mesh from Vr-ka will take on something there. and yes, if the floor beams are considered separately, then the height of 210mm is quite bold for a span of 4 meters
This is not homemade, everything was calculated by the person whose link is given in the post. The fittings were supposed to be 12th, they brought 14th for the same price - should I refuse or what? The clear width of the boiler room is 1.5 meters, is the reinforcement anchored in concrete by bending? There is no special meaning for 1.5 meters at all. The width of the beam has been increased from 150 mm to 200 mm.
Is there no point in anchoring? Oh well. Well, it just depends on the quality of the concrete and the diameter - the shitter the concrete, the greater the anchoring and overlap, and you have an overlap of reinforcement in the photo, well, it’s good if it’s 30cm, but you need at least 470mm. If the span is 1.5 meters, then the height of the beam is 210mm with a margin, I considered the maximum span to be 4m, there should be about 400mm. Quote across the cross: Beams with a height of more than 15 cm, where the lateral force is absorbed only by concrete (grillage tape, MZLF tape) - The pitch is no more than ¾ of the section height and no more than 50 cm - your clamp pitch according to the photo is 20+cm.
No question - come and jump. The pitch of the clamps is 23-25 cm, that's right. At the same time, you can calculate the USP, otherwise in Russia no one calculates it, they believe that such a foundation cannot survive, although it was considered in Robot by Misha Sudorgin.
Why should I jump? for example: a standard working washing machine at its peak weighs almost 2 tons (a favorite story from a thermotech teacher). And I myself can calculate for you anything with any numbers :) the spacing of the clamps is a constructive requirement, and not a whim of calculation :) anchoring is also a constructive requirement, and not a whim of calculation.
Is there no point in anchoring? Oh well. Well, it just depends on the quality of the concrete and the diameter - the shitter the concrete, the greater the anchoring and overlap, and you have an overlap of reinforcement in the photo, well, it’s good if it’s 30cm, but you need at least 470mm. If the span is 1.5 meters, then the height of the beam is 210mm with a margin, I considered the maximum span to be 4m, there should be about 400mm. Quote across the cross: Beams with a height of more than 15 cm, where the lateral force is absorbed only by concrete (grillage tape, MZLF tape) - The pitch is no more than ¾ of the section height and no more than 50 cm - your clamp pitch according to the photo is 20+cm.
Initial data: Beam 1.5 meters, concrete m 300, 2 rows of reinforcement, load 8 kN:
Calculation of the crossbar for strength using normal sections Distributed load on the beam: 8 kN Beam length: 150 cm Beam concrete grade: 300 kgf Maximum bending moment in the middle of the beam will be: 2.24 kN Calculated beam height: 0.13 m Calculated beam width: 0 .07 m Volume of the beam in concrete: 0.01 m3 6 pieces of reinforcement were collected, a total of 169.8 mm, rod diameter selected = 6 mm Reinforcement required mm = 103.631 Calculation of the crossbar for strength along inclined sections Transverse shearing force on the beam support = 5 .99 kN Diameter of transverse reinforcement 8 mm, 3 pieces per step... Spacing of transverse reinforcement in the support areas = 0.25 m Spacing of transverse reinforcement in the middle of the span = 0.5 m Force in transverse reinforcement per unit beam length = 172.03 kN Required load-bearing capacity of the reinforcement = -0.04 kN Required intensity of forces in the transverse reinforcement = -0.24 kN The condition for the load-bearing capacity of the transverse reinforcement is met, the strength along the inclined section of the purlin is ensured For the washing machine - of course, this is not calculated in dynamics, however, 4x meter-long PKshki at peak should no longer hold the washing machine.
Options
The sizes of ribbed floor slabs may vary. According to regulatory documents, the height of the slabs can be 30 or 40 centimeters. But the length and width are significantly different. The width varies between 1.5-3 meters, length - 6-18 meters. A very important parameter is weight, which depends on the dimensions of the slab and the density of the concrete.
For slabs with a height of 30 centimeters, the following standard values are established:
- Length – 5.65 meters
- Width – 0.94-3 meters
- Weight – for light trains 1.16-3.08 tons, for heavy trains 1.45-3.85.
- Standard dimensions are 3 x 6 meters, 3 x 12, 1.6 x 6.1, as well as 3 x 18.1 and 1.6 x 12.2 meters.
Slabs 40 centimeters high:
- Length – 5-6 meters
- Width – 0.75-3 meters
- Weight – light concrete 1.1-3.8 tons, heavy concrete 1.37-4.73.
Ribbed monolithic ceiling
- ordinary user
- Group: Users
- Posts: 519
Here's what happened: they removed the formwork and took out the polystyrene foam.
Well, this - call me a moron - they installed pallets with blocks 10 days after pouring. Estimated floor load 550 kg/sq.m. They were placed on load-bearing walls and along the edges. It's scary, of course, but it seems to hold up...
Overall, I consider my experience successful. If anyone is interested, I will answer any questions.
- ordinary user
- Group: Users
- Posts: 519
Post edited by Ivan_A: 06/17/2014 - 15:36
- Our credo is always!
- Group: Users
- Posts: 934
- ordinary user
- Group: Users
- Posts: 519
Boba Kandalupsky (06/12/2014 - 16:50) wrote:
Post edited by gdv1969: 06/12/2014 - 18:15
- Our credo is always!
- Group: Users
- Posts: 934
- Idea?! Where I am.
- Group: Moderators
- Posts: 32,968
- ordinary user
- Group: Users
- Posts: 519
- venerable theronosaurus
- Group: Users
- Posts: 2,839
- ordinary user
- Group: Users
- Posts: 519
- venerable theronosaurus
- Group: Users
- Posts: 2,839
krg (16.06.2014 - 19:56) wrote:
- Our credo is always!
- Group: Users
- Posts: 934
Post edited by Boba Kandalupsky: 06/16/2014 - 21:11
Monolithic reinforced concrete ribbed floor. Ribbed monolithic reinforced concrete floor
For example, there is a room with internal dimensions of 5x8 meters. If you make a solid monolithic slab in such a room, supported along the contour, then the possible height of such a slab is h = 15 cm. In this case, only the mass of the slab will be
m = 2500·5.4·8.4·0.15 = 17010 kg or about 17 tons
where 5.4 and 8.4 are the full dimensions of the slab taking into account the supporting sections in meters, ρ = 2500 kg/m 3 - the approximate specific weight of 1 cubic meter of reinforced concrete on coarse crushed stone aggregate and with the percentage of reinforcement Example of calculation of a monolithic ribbed floor with beam slabs
We will leave the initial data the same as when calculating a monolithic solid slab supported along the contour, for greater clarity, i.e. Let us take the maximum value of the temporary uniformly distributed load to be equal to 400 kg/m 2.
For the manufacture of the slab and beams, the same B20 class concrete will be used, having a calculated compressive strength R b = 11.5 MPa
or
117 kgf/cm 2
and class AIII reinforcement, with a design tensile strength
R s = 355 MPa
or
3600 kgf/cm 2
.
Thin-walled ceiling cast sheets are also used to design ceiling structures. By connecting sections of sheet metal, various types of thin-walled ceilings can be created. The alternative to welded beams is that the beams crack. Its height is much higher, and the best static parameters are the rays.
They are used in three main structural alternatives: - Steel plate ceilings transfer all loads applied to them; - Reinforced concrete ceiling made of profiled sheet metal: Profiled sheets serve as lost formwork for reinforced concrete ribbed track - Coated steel alloys: designed to interact with the uncoated slab, the sheet metal is involved in the transmission, the concrete transfers the pressure. They are based on the principle of steel and reinforced concrete slabs. Reinforced concrete structure is also suitable for multi-story and high-rise buildings.
Required:
Select the reinforcement section for the slab based on the beams and more accurately determine the geometric parameters of the beams.
Solution:
Beam calculations
If the beams are concreted separately from the floor slab, then the calculation of such beams is no different from the calculation of conventional reinforced concrete beams of rectangular cross-section. And if both the beams and the slab are concreted at the same time, then such beams can already be considered as T-section beams, in which the slab is the flange of the T-section, and the beam itself is the edge of the T-section. In this case, not only does the height of the beam increase, but also the area of the compressed zone of concrete increases, which ultimately results in significant savings. An example of calculating a T-beam for the floor under consideration is given separately. As a result, we have the following preliminary floor parameters necessary for calculating the slab:
The decisive problem is to ensure the interaction of steel and concrete parts using connecting elements that transmit shear stress: - steel spindles and plugs - welded reinforced concrete reinforcements - profiled sheet metal profiles.
Steel concrete beam ceilings are clamped together with spindles and these are clamped either directly onto the top flange of the beam or, in the case of folding, with profiled sheets welded to the plates. Fonts are placed in one or two rows at a distance from the static calculation. Once the concrete has been cast, a T-section is formed in which the steel beam is transferred and the concrete slab interacts to bear the pressure at the top of the cross-section.
In Figure 313.1. a) the dimensions are indicated in millimeters, but for further calculations it is more convenient to use centimeters.
Calculation of a monolithic slab - a multi-span continuous beam.
The main differences between the calculation of a multi-span beam and a single-span beam can be briefly formulated as follows:
2.1. A multi-span continuous beam is statically indeterminate and the degree of static indetermination depends on the number of spans. In this case there will be 5 spans, which means the beam will be statically indeterminate four times. And in a multi-span beam, moments arise at intermediate supports. And since reinforced concrete is a composite material in which the concrete works in compression and the reinforcement works in tension, then in a multi-span beam, reinforcement only in the lower section zone is not enough. On supports where tension will occur in the upper zone of the section, reinforcement will also be required in the upper zone.
Steel concrete slabs made from profiled sheet metal are composed of profiled sheet metal and a cast plate. During assembly, the sheet transfers the load of fresh concrete, and after the concrete hardens, the profiled sheet helps to transfer tensile loads and tensile stress to the concrete slab across the friction cross-section. The cutout between the profiled sheet and the reinforced concrete slab is provided either by profiled sheet metal profiles, or by friction joints in self-locking sections, or by welded reinforcement mesh.
2.2. The value of the moment in spans will be influenced by the nature of the load application. And if for a single-span beam with supports A and F the load application options shown in Fig. 313.1. d) and e) will simply mean a decrease in normal stresses in the cross sections of the beam, then for a multi-span continuous beam such a change in the load application can lead to the fact that instead of compressive stresses in the sections under consideration, tensile stresses will act and vice versa. Shown in Fig. 313.1. d) and e) the options for applying the load are still quite simple. In reality, temporary loads will most likely be relatively concentrated - from furniture, from engineering equipment, from people. In addition, it should be taken into account that housewives like to rearrange the furniture in the house in order to change the design, and therefore there should be much more calculation schemes.
Do you mean translation? This column under the dart? if that's the case, it's okay, as long as it's not really necessary. Each blanket that screams should be tilted slightly to 15mm in length. Because every scarf will fall, every such drop will fall. Rather, it will help simple drawing or photography. If you had done this in the beginning it would probably have been quite ok, the problem is that you were forced to do it and when it was done. how many now?
Will it continue even when it was exposed from the bottom in the middle of the column hall? and what else do you think about it? When it is under the spine and the ball is pushed out and the carrier has a suitable top notch, it can break. It's just that the board has no dimensions and the media is completely indescribable.
2.3. The beams, which we take in this case as intermediate supports, will bend under the influence of the load, and this deflection should be taken into account in the calculations, since the deflection affects the values of bending moments on the supports and in the spans.
2.4. In the outer spans with the selected design scheme, the values of bending moments will be greater than in the rest. This will require the installation of reinforcement of a larger cross-section, and for a concrete structure, a change in the cross-section of the reinforcement with unchanged geometric parameters of the cross-section means a change in rigidity. In addition, the formation of cracks in the tension zone of the section also means a change in the moment of inertia along the length of the slab. And the change in rigidity should also be taken into account in the calculations.
You need to look at the statics. If they inserted these tweezers into this sensor, it may well be sufficient. Insert normal plaster into the crack and see if it will continue to crack or if the crack growth will be sealed. At least 2-3 centimeters of durable cement mortar is laid on the top of the wall and leveled between two leveling boards. The ceiling must still be connected to the walls and reinforced with a concrete beam with a rim, made on all load-bearing walls and concreted at the same time as the ceiling.
The wreath connects the ceiling to the walls and strengthens the building. A monolithic ceiling requires complete formwork from below. They can be made from boards, but it is more convenient to use a reusable planting system, which will greatly simplify and speed up the work. Ceiling and rim reinforcing bars are installed in the formwork, the type and location of which must be strictly defined in the design.
As we can see, just listing the problems that arise when calculating a multi-span continuous beam can forever discourage the desire to engage in calculations of such structures. Nevertheless, it is still possible to get through the jungle of calculations. For example, calculating a slab according to clauses 2.1 and 2.2 will give the following results:
Ceiling reinforcement usually consists of larger diameter rods and thinner, laterally spaced rods. Some of the main rods should be bent at the walls and secured into the ceiling rim. You can order ready-made reinforcement segments to avoid errors during assembly.
Attention! After the reinforcement is prepared, a concrete surface with the height specified in the design is laid over the entire floor surface using a rim. You don't need a full planting to make a dense ribbed floor—just support the floor joists. Wooden posts and beams or adjustable damper posts are used for support. Once the beams are laid, the supports are leveled. If the ceiling is more than 5 m long, the ceiling beams support the center 1 cm above the wall level.
We knit reinforcement cages.
There is still a nuance on how to do it. If you do it over the entire area at once, then this is a multi-span ceiling (with emphasis on the middle and outer walls), see fig. higher. If you do the overlap in parts. First, one half from the outer wall to the inner, then the other, then this is a single-span ceiling. The reinforcement of single-span and multi-span floors is different.
A caveat needs to be made here. The fact is that if you use a multi-span scheme for one span, then everything will be fine except for the excessive consumption of reinforcement. The Windera scheme is just that (universal with “foolproofing”).
Which single-span or multi-span floor to choose is decided depending on the initial length of your reinforcement in order to lay it as economically as possible and with less cuttings. It also depends on the concreting technology. It may be more convenient or possible to pour concrete in parts, then we choose a single-span design.
Places where reinforcement can be torn and extended have also been identified. On the foundation floor (we have a single-span floor), on one half of the house there is F12 reinforcement (span 3.4 m), and on the other half F14 (span 4.4 m).
But above the first floor, the reinforcement in the beam parts over the large span goes F14 without breaks over the middle wall and should still go a quarter of the next span, but mine is a little shorter. The A500 F12 reinforcement goes over the smaller span and is tied to F14.
Clamps from A500 F6 first go for a quarter of the span on each side with a step of 200mm, then closer to the center with a step of 400mm (saved a little). The overlap of the clamp should be at the top of the frame.
Bay window area. You can see the bay window, the F18 reinforcement of which is bent in both directions onto the wall and connected to the rest of the frame.
To prevent the stands for the reinforced mesh made of BP 5mm 100x100 from denting into the foam, ordinary lids for cans are placed under them.
On the ground I made frames from reinforcement to cover the foundation. When covering the first floor, the frames were knitted in place.
It is quite a tedious task to knit frames for the ceiling.
Frame close up. All photos are clickable, click to enlarge.
The bay window beam, on the other hand, extends onto the wall by more than a meter and is linked to the general reinforcement. To ensure that there is no cold bridge in the support area, 5+2 cm EPS insulation is used. Places with insulation are reinforced with boards during pouring.
Double beams are made above the flight of stairs. That is, the reinforcement is twice as large and so is the width. It’s like two ordinary beams side by side.
Single-span ceiling above the foundation. You can just see the permanent formwork made of aerated concrete in the center of the inner ribbon of the grillage (foundation).
The ceiling support is calculated to be 15 cm. Although on such short spans more is possible (Winder recalculated).
We laid out the foam and reinforced frames. There was a strong wind, so we had to throw up some boards. The boards were removed as the first layer of mesh was laid out.
We raised a mesh from VR F5mm 1 by 2 meters, cell 100x100mm, to the second floor. There was no larger size available at that time. It is more convenient to use a 2m x 3m grid. We cut 1.3m x 3m and 0.7m x 3m. We lay 1.3m down, overlapping and between the two ribs, and put 0.7m up above the rib. That is, without scraps and without joints between the ribs.
They placed boards so that the polyethylene over the foam would not tear.
Reinforcement in the stairwell area with double ribs.
Continuous mesh of the first row. The overlap was made at least one and a half cells, almost everywhere, about two turned out. It is better to install more stands, otherwise the mass of concrete, even with lids, puts a lot of pressure on the foam.
A multi-span ceiling above the first floor, here the reinforced frames of the ribs pass over the internal wall of the house. To ensure a gap between the meshes, a 25mm HDPE pipe was cut. Cheap and effective.
Such rings are attached using knitting wire. We bend a piece of wire in half, wrap it around the bottom mesh bar, pass both ends through the HDPE ring and twist it over the top mesh bar.
Hatches and holes can be made in a ribbed monolithic ceiling anywhere between the ribs
.
The perimeter reinforcement scheme depends on the distance remaining to the edge.
I haven’t found any photos of the heated floor pipes yet, I’ll add them later.
Monolithic ceiling with your own hands: stages and subtleties of the work
Monolithic flooring has a lot of advantages, among which the main role is given to high technical and operational characteristics. Reliability and durability are, of course, good, but besides them, there are other advantages that many people simply forget about. For example, the possibility of making them yourself, which undoubtedly leads to a reduction in the construction budget. This is exactly what will be discussed in this article, in which, together with the site stroisovety.org, we will study the question of how to make a monolithic ceiling with your own hands? We will study in detail the sequence of work and pay special attention to the subtleties and nuances of this process.
Do-it-yourself monolithic ceiling photo
Important development points
Ribbed reinforced concrete floors are very often made by hand, since there are no serious difficulties in the procedure for creating such a structure. However, do not forget that the construction of a new floor and interfloor ceilings is quite a serious job, and some details should certainly be taken into account.
Any design must be properly calculated. In this case, it is necessary to take into account what load the floor will put on the foundation of the house, the dimensions of the ribbed floor, the load on load-bearing walls, the amount of materials and other factors. When calculating, you need to carefully study all the details and it is advisable to count with a reserve.
Considering that ribbed floors are the most affordable option, you need to remember that the support and removable formwork, which are offered for rent, can completely cover the savings on concrete, and the cost of the structure will be very high.
Monolithic ceiling with your own hands: formwork
Naturally, there can be no talk of any special horizontal formwork in the process of self-manufacturing floors - if you also purchase special panels and jacks, then there will be no savings. You will have to make the formwork for a monolithic floor yourself, and this should be done from available materials or the most affordable materials. This is wood and some sheet material, for example, OSB or corrugated board - both materials are inexpensive, but differ from each other in structure. A monolithic ceiling on corrugated sheets does not at all make the ceiling even and smooth - this material is good only in that it produces a so-called ribbed monolithic ceiling, which is distinguished by its ability to withstand heavy loads. This is an ideal option for interfloor floors, characterized by a large surface plane - if we talk about attic floors, the load on which is low, then it is better to fill a flat floor and use OSB sheets for these purposes.
Formwork for monolithic ceiling photo
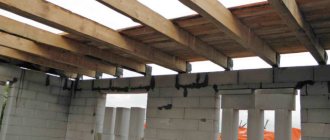
We have sorted out this issue, now it’s a matter of installing horizontal formwork for floors. Everything here is quite simple, although I won’t say it’s easy - in fact, you will have to build a whole forest of racks made of timber or metal pipe (it is more preferable, since it can withstand a larger load and less of it will be needed). Such racks are mounted quite often - approximately every meter. They need to be installed in rows and a horizontal beam should be laid on top of them, which will serve as a support for the sheet material. The whole problem with installing such formwork is that all its posts need to be well strengthened so that they do not fall prematurely - this is another reason that speaks in favor of a metal pipe for posts. In principle, wood is easier to fasten, but this will require a little more material. This means that the use of metal is not important. Moreover, metal pipes are more difficult to install in subsequent construction and finishing, but wood can be used on the same roof, floors and other similar elements of the house.
When all the racks with beams have been assembled and installed in their places, sheet material is laid on top of them - there is no need to fasten it, otherwise problems will arise during the dismantling of the formwork. Here, special attention will need to be paid to the rigidity of the structure; if, when walking on the formwork, you feel that it is bending, then it will behave in the same way under the influence of concrete. It is possible that in order to strengthen the supporting horizontal beams, you will have to reduce the distance between them - in the language of roof installers, you will need to make a counter-lattice, laying it perpendicular to the main horizontal supports in increments of 0.5 m. Such a system will definitely not allow the sheet material to sag.
Ribbed monolithic ceiling photo
After the flooring is ready, there will be very little left - to put together a boundary around the perimeter of the walls from the board and you can move on. It would not be amiss to remind you that installing a monolithic floor will require you to install the formwork at a clear level of the horizon - you will have to tinker with this a little. This, one might say, is the only drawback of homemade horizontal formwork, which, unlike a similar factory design, does not have the ability to be adjusted in height.
Scope of use
Ribbed monolithic floors are used where necessary: to form a load-bearing floor for a large-panel industrial facility, to create an attic-type floor in an administrative/residential building. During the installation process, be sure to maintain the interval between the load-bearing supports and take into account the design loads.
The ribbed floor slab can be used:
- At temperatures up to +50C where the corresponding features of the technological cycle are observed in industrial enterprises
- At temperatures down to -40C in the construction of buildings that are constantly exposed to naturally low temperatures (due to climate conditions)
- In regions where seismicity reaches 9 points (but no more)
- Under conditions of exposure to moderately aggressive gaseous compounds that affect reinforced concrete
- In heated rooms where the temperature is stable
- Under temperature conditions below -40C and above +50C, if the overlap was made according to a special order, which is necessarily reflected in the documentation
Monolithic floor technology: reinforcement
Let's face it - the work is tedious, but not difficult. In fact, at this stage of solving the question of how to make a monolithic ceiling with your own hands, you will need to knit a volumetric frame 150 mm high from reinforcement and wire. Moreover, it will also need to be correctly distributed inside the formwork and positioned in height - it should be located inside the concrete, and not along its very edge. If we talk about other subtleties of performing this work, then in addition the following points can be highlighted.
- Reinforcement of a monolithic floor is made by knitting, and not by welding reinforcement. Welding, of course, is a good option, and it makes the work much easier, but at the same time it gives the floors unnecessary rigidity, which will cause the slab to crack if the house shrinks even slightly. The reinforcement is connected to each other with a thin knitting wire - there are even special devices for this, but at home, as, in general, at a construction site, it is quite possible to get by with ordinary wire cutters and pliers.
- The second point concerns the cell and the size of the reinforcement - the standard cell for the manufacture of such structures is 100 by 100 mm. As for the reinforcement, its cross-section is calculated based on the floor area - in principle, the cell is also a calculated value, and if you do not want problems, then it is better to perform these calculations. This is done by specialists based on various parameters. In general, building a house, hoping for a Russian one, is somehow wrong - at least there should be some kind of design documentation that guarantees the capital construction. This means that all these details related to the monolithic floor are laid down at the design stage of the house.
Reinforcement of a monolithic floor photo
In all other respects, knitting reinforcement is a fairly simple process, in which another important point that ensures ease of use is the sequence of actions. It looks like this: first, a flat frame of reinforcement is knitted over the entire surface of the floors. Then it is raised about two centimeters above the formwork, after which short pieces of reinforcement are tied to it, which in some way can be called racks. Then the second tier of the frame is attached to these racks, which can be tied in sections in advance. In general, that’s all – as you can see, there is nothing complicated here, and you can really do this work with your own hands.
Beamless monolithic floor: concreting
This is precisely the case in which it is highly not recommended to save money and resort to the technology of preparing the concrete mixture yourself. Not because there are doubts about the correct preparation of concrete (this is not difficult to deal with), but because it is unlikely that you will be able to prepare concrete in the required quantity at once, so as to fill the floors in one go. And it is precisely this point that is fundamental, it is even reflected in the name of this type of ceiling - monolithic, which means whole, united and indivisible. What kind of solidity can we talk about if the floors will be poured in parts as the concrete is prepared? You yourself understand that in this regard, pouring a monolithic floor should be done from concrete purchased and prepared immediately in the required volume. Moreover, to supply it upstairs you will need a concrete pump (some concrete mixers are equipped with one).
Pouring a monolithic ceiling photo
But in general, the direct process of pouring floors is very simple, and there are practically no subtleties here - only one point can be highlighted. This is vibrocompression of concrete in formwork, which is performed with a special deep vibrator. In the absence of one, you can get by with the old, as they say, antiquated method - an ordinary stick with which concrete is deposited.
In conclusion, I will say a few words about the control of concrete hardening, without which a monolithic ceiling with your own hands may turn out to be of poor quality. Concrete must take a long time to dry - to do this, it is artificially deprived of the ability to release moisture into the atmosphere. It is simply covered with a thin cellophane film immediately after it can be walked on without fear of leaving marks. But before covering the concrete with cellophane, it must be moistened generously with water.
It is important to know
When erecting a monolithic ceiling with your own hands, it requires a fairly large knowledge base. Only the correct selection and installation of formwork cannot guarantee that there will be no problems with the structure in the future.
Proper installation of a concrete slab does not end with its pouring. It is important to provide care while the concrete mixture is curing. To prevent cracking, the surface of the slab must be periodically moistened. To gain full strength of concrete between pouring and further work, you must wait 4 weeks. This is exactly the time it will take for concrete to gain full strength.
If you follow the technology of doing the work yourself in a private house, you can significantly save on construction without sacrificing quality.