Let's look at which concrete bit is best suited for drilling holes for socket boxes.
In the article you will find the answer:
- If you are an installer and are asking this question, so as not to waste money and explore everything empirically;
- If you want to save money and do the electrical installation in your apartment or house yourself;
- You need to install a couple more sockets in the apartment and you don’t have any tools.
Based on my experience in electrical installation, I have tried a lot of things and can give clear recommendations on the best way to make holes for socket boxes. Although the request states that the crown is for concrete, we will analyze several types of wall materials, as well as all the pros and cons.
In this article we will look at crowns for concrete:
- Pobedit bit for the SDS+ hammer drill - the price is 350-900 rubles per piece;
- Diamond bit for an SDS+ hammer drill - price 2500-6000 rubles; there’s no point in looking at it;
- Pobedit bit for the SDS max rotary hammer with a screw-on shank - issue price 900-4000;
- Professional pobedit bit for the SDS max hammer drill, the shank is made on a cone - the cost together with the shank is 6500-15000 rubles;
- Professional diamond bit for diamond cutting. Hilti and others like them. Here, the cost of the crown itself may not be so high relative to the cost of additional equipment. 3000-10000.
So, which concrete crown is best suited for a particular job, taking into account the amount of money saved. The calculation will be simple: divide the cost of the crown by the number of holes made in highly reinforced concrete (monolithic brick house).
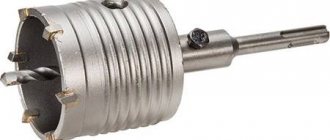
Pobedite bit SDS+
First and in order, a pobedit crown, which you can easily buy at any hardware store. Of course, it will chew gas/foam concrete without any problems, but if you need to drill more than 5-7 holes in concrete, then you should give up and buy a more convenient tool. The average survivability of such a crown is no more than 10 holes, with an average cost of 700 rubles, we get the cost of one at 70 rubles, the time for one hole is 20-30 minutes. It seems inexpensive, but very long and tedious. The hammer drill will cool down more than it works. Suitable for those who need to make a very modest volume.
Drilling steps
When drilling holes in concrete structures, a certain procedure must be followed. It includes the following steps:
- Selection of suitable crowns and tools.
- Applying preliminary markings.
- Removing interior items from the room that may become dusty. Heavy furniture can be covered with fabric or film.
- Use of protective equipment: respirator, overalls, glasses, gloves.
- Enabling drilling mode on the hammer drill panel.
- Drilling holes according to the markings. The tool should be positioned level and without distortion; there is no need to press it into the material.
- Any fragments remaining in the hole can be removed with a chisel or hammer.
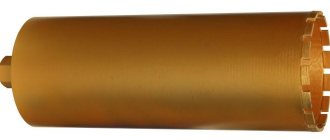
Diamond bit for hammer drill
The diamond bit for the SDS+ hammer drill is essentially a leader for inexpensive repairs with huge potential. The service life of such a crown is 100 socket boxes in heavily reinforced concrete; this number includes two or three reinforcement bars that you can cut with it. The cost of one hole is about 40 rubles, the time is about 8-12 minutes.
Pros: relatively inexpensive, suitable for a small hammer drill, can cut reinforcement, dry cutting, cuts without impact (less noise), good survivability.
Disadvantages: in a panel house - useless, requires a fairly good hammer drill: the Chinese one will not be able to handle a large volume, red brick and wet plaster will get very stuck.
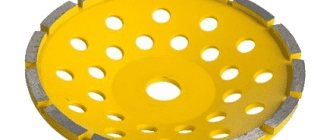
Scope of application
A diamond bit is an accessory for a power tool, with the help of which it is possible to make a hole in the plane of the working surface. The nozzle device includes:
- connecting element;
- cover;
- trunk;
- segment.
Thanks to the presence of diamond segments, which, under the influence of a power tool, come into a circular motion, concrete or brick is sampled in an area strictly designated by the parameters of the crown. The rate of formation of the depression depends, among other things, on the force of pressure.
Diamond segments are used as cutting elements. There may be several of them. A design in the form of a ring with diamond coating is also produced.
Equipment is available in different diameters. A certain size is suitable for each type of work. When choosing a crown, it is important to pay attention to the type of shank. It must match the chuck of the power tool.
Diamond bits are used in repair and construction work and public utilities. With its help, the installation of socket boxes is carried out. Other work performed using a crown includes:
- laying communication pipes;
- arrangement of distribution boxes;
- making technical holes in porcelain stoneware finishes and ceramic tiles;
- drilling of metals, cement mortar;
- making holes for dowels;
- drilling limestone, building blocks, sandstone;
- connection of utility networks to the central highway.
Geological surveys are carried out using drilling tools. One of the consumables is a diamond crown. With its help, a well is laid and rock is taken for further research. This type of crown has a certain thickness of diamond coating, corresponding to the density of the natural mineral.
When using diamond equipment, there is no destruction of concrete structures, which is due to the lack of impact force.
Professional pobedite crown SDS max
Professional pobedit bit for the SDS max hammer drill, the shank is made on a cone. This is a machine for those who like to make noise. Barbaric approach to neighbors. No class of concrete will stop it. D.BOR crown resource 250 sockets in concrete, aerated concrete about 500 shank broke (1500 rubles) with a new one another 250 in concrete - the teeth are all in place, wear is about 20 -30%, we can judge that the cost of one hole is about 20 rubles at its cost 10000, time 3-4 minutes.
Cons: Will not accept reinforcement thicker than 6 mm.
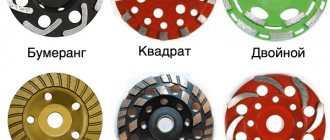
Varieties
Cutting any tile is quite difficult if you don't know which tool to choose. On the Russian market, experts identify the two most common and sought-after types of crowns. This is a diamond-coated nozzle with tungsten carbide coating.
Let's look at each type in more detail, learn about their areas of application, advantages and disadvantages:
Diamond coated crowns
This type has a coating of diamond chips along the edge, which is in contact with the working surface. This composition is highly durable and allows for better processing of hard tile surfaces. The industry produces diamond-coated crowns of various diameters: from 10 mm and more. They are often sold in sets of several pieces of varying sizes.
To work with such a part, you can use a regular drill, but in this case the holes often turn out uneven, and the edges need to be refined. So the best option would be to use a stationary machine, provided it is cooled with water. In addition, to achieve the best result, the tool operates at low speeds, and the cutters are fixed using special attachments. They allow you to securely fasten the crown in the proper place.
Of course, working with such tools requires some experience. However, if you glue paper adhesive tape to the work surface, the crown will not slide off the smooth surface. In general, diamond-coated crowns are considered the most reliable and effective, especially for ceramic tiles. The only drawback is their cost, which is higher than other types.
Tungsten carbide coated crowns
Designs of this type are distinguished by the presence of a centering carbide drill, which allows the use of a simple electric drill. More often than others, this type is sold in a set of three or four nozzles of different diameters with one base.
Unlike a diamond-coated drill, a tungsten carbide-coated product is generally cheaper. Prices also depend on the diameter - the larger the size, the more expensive any type of crown. Another advantage is that there is no need for constant liquid cooling. But, like the other type, it requires the use of a drill speed below 500 rpm.
Which concrete crown is better? Comparison table:
| No. | Name | Hole cost | Time for 1 hole (concrete) | Note |
| 1 | Pobeditovaya SDS+ | 70 | 25 | For local repairs |
| 2 | Pobeditovaya SDS max | 250 | 10 | Not worth the money |
| 3 | Diamond dry cut | 40 | 10 | The best choice |
| 4 | Professional victorious SDS max | 20 | 3 | For professionals |
| 5 | Diamond wet cut | 30-50 | 15 | Not convenient |
I hope the article was useful to you. Now the question is: Which concrete crown is better? — it’s finally resolved, if not, ask questions in the comments. And here you can read how to install socket boxes in a concrete wall.
Add the article to your bookmarks and share with friends. Ready to answer your questions.
Safety precautions at work
When drilling into concrete walls is quite dangerous, it is very important to follow certain safety rules:
- You should not drill into the walls with cutting elements after the plaster has been applied - you can hit a whole bunch of different cables.
- Use an impact drill or a so-called two-handed hammer drill to avoid injury.
- You also need to lean on something when you use special bits; under no circumstances lean on the steps of a wooden ladder, otherwise, due to the inertia force from the hammer drill chuck, it is quite possible to fall and get injured.
- Never press the hammer drills hard against the wall; increase the feed gradually.
- The use of crowns should be preceded by a thorough study of safety regulations.
Remember, the quality of the work performed depends not only on the tools, but also on the professionalism and experience of the workers
It is very important that all work is carried out only by specialists, because there are many nuances in this work
Marking
Mark the center of the axis on the wall where the wires will be laid and holes for sockets will be placed. To do this work we use a pencil and a tape measure.
If in the future you need to install adjacent sockets or an entire block of devices, you must maintain a certain distance between the mechanisms. The recommended gap is 7.1 centimeters (average center-to-center distance of socket boxes).
In the center we draw 2 axes: vertical and horizontal. The lines should be long enough - this will allow the socket box to be installed as evenly as possible.
Installation in high-strength concrete with reinforcement
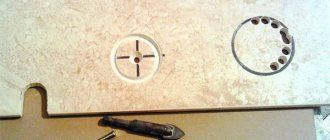
If the concrete turns out to be highly durable, you start drilling and realize that this will take a long time, you can make your work much easier.
To do this, make several holes along the circle you started with an 8mm drill. You should end up with something similar to a revolver drum.
After this, continue with diamond or impact drilling. From there it should go like clockwork.
If you hit a large piece of reinforcement and you don’t want to ruin the new crown, then you can get out of the situation in two ways:
- switch the hammer drill to the chipper mode and knock it out with a chisel
True, this can greatly contribute to the appearance of new cracks in the plaster.
- remove a good crown and put in an old used one, then, without sparing it, chew through a metal rod (do not throw away the old ones, they may still be useful)
Knock out the concrete from the niche (using a chisel and hammer or a hammer drill), while providing a bevel for inserting the cable into the socket box.
Use a vacuum cleaner to remove all debris and dust.
How to install a socket box in brick walls and foam block walls
Most often in our apartments and houses there are walls made of brick or concrete, and in new buildings it is not uncommon to see walls made of foam blocks. How to install socket boxes in such walls. Correct marking of the wall for socket boxes.
An apartment in a secondary building, a private house or a new building that we have just moved into - we have brick walls in front of us and since we are thinking about updating the electrical system, or making it anew, sooner or later we will have to install socket boxes in them.
There are no difficulties in installing socket boxes in brick walls. The main thing is to correctly follow the rules of the technological process and carry out each stage of work responsibly and carefully. If all conditions are met, everything will turn out beautifully and efficiently, even if you are doing it for the first time. Of course, it’s better to entrust such work to professionals, but it doesn’t always make sense when you need to make a couple of socket boxes. And some people just like to do everything themselves.
Let's first figure out at what point we should start installing socket boxes and at what point we can start doing this? Many people do it differently and motivate it in their own way.
- Installation of socket boxes before laying the cable - first we make crowns for the socket boxes and only then lay the cable to them
- Installing socket boxes after laying the cable - most often done this way
- Installation of socket boxes after rough finishing work - first the cable routing is done, then the finishers apply a leveling layer of plaster and only after that the socket boxes are installed.
Over time, we came to the latter option. This is especially true for brick walls and walls made of foam blocks. Why in this order? Everything is very simple. If possible, in the process of communicating with the finishing team, we agree that the guys install beacons so that we can see where a groove is needed and where we can do without it. Why should customers pay extra money, and why should we do absolutely unnecessary work? Immediately after installing the beacons, we install the electrical wiring and secure the cable terminals where the socket boxes will later be located. Finishers perform rough finishing work, after which we come and install the socket boxes.
Why is this option best?
- We already have a final plane of the wall and the socket box will no longer sink into it. After all, it often happens that the layer of plaster, especially in the old foundation, is 3-10 cm long. If we install the socket box before the plaster, there is every chance that we simply won’t find it later, and it will no longer perform its functions. And in our case, all socket boxes will be installed correctly.
- If you install the socket boxes before plaster, then you will then have to rake out a bunch of this frozen plaster from the socket boxes, and why do this if you don’t have to do it.
- It’s just more convenient for us and everything looks much more beautiful. And contemplating your own work should bring pleasure.
So let’s imagine that the plastering work has been completed and in front of us is a wall with protruding cable leads. Where to start and what are our next steps?
Let's start by preparing the tools and everything we will need in the process.
- Crown for brick socket boxes. The diameter of the crown can be 68 mm and 80 mm. Why can you use crowns with a diameter of 80 mm, because the diameter of most crowns is 68 mm? It's simple - to make installation of the socket box easier, we make the hole a little larger than necessary. A group of socket boxes fit into such holes just fine; there is enough space for maneuvers, cable insertion, and adjustments. With 68 mm crowns it is somewhat more difficult. Our walls are brick and making holes for socket boxes in them is quite simple, so an 80 mm crown will not complicate our task at all.
- Level - regular or laser in order to align groups of socket boxes horizontally.
- Measuring tool - ruler or tape measure for marking
- Socket boxes for bricks - prepare the required number of socket boxes in advance, and how to choose them, read the article about socket boxes.
- Construction vacuum cleaner - making holes for socket boxes is a rather dusty process. You can make 2 - 4 crowns and look like a hedgehog in the fog. A construction vacuum cleaner will make the job cleaner and save your lungs.
- Spatulas are necessary for fixing the socket boxes; you should also prepare in advance a container in which you will mix the gypsum mixture. Small containers in which mixtures for 2 to 4 sockets are mixed are very convenient.
What it is?
Drilling bits are attachments for a drill in the form of a cylinder. On the one hand, these drills have devices for fastening in a hammer drill or drill. On the other hand, there are teeth, on top of which spraying of various compositions is often applied. Such cutters are used for cutting ceramic, porcelain stoneware, tile or mosaic tiles.
Cutting with a crown on tiles is only possible in conjunction with a special drill or a special hammer drill. The first should have the option of low speed, and the second should have the function of turning off the “impact mechanism”. Thanks to this, drilling holes, for example, for a switch or socket, will be easier and more efficient. By the way, the most popular crown diameters are 40, 68, 100 and 110 mm. This is enough to carry out all the work in the bathroom.
Installation of accessories
After finishing the finishing work, we begin installing the socket mechanisms. Before starting work, check that there is no power in the network. It is recommended to shut off the current supply directly at the distribution board. To do this, you need to turn off the circuit breakers.
We connect wires to the socket depending on the type of socket (screw, spring). Here we will look at installing a socket with spring terminals.
We prepare the wires by removing the outer protective sheath of the power cable. We strip the ends of the cores by 10 - 12 millimeters. We direct the wires to the terminals of the socket mechanism. We insert the yellow-green ground wire into the central terminal, send the blue wire (zero) to the left terminal, and connect the white wire (phase) to the right terminal.
Working with wiring requires certain qualifications, and it is not recommended for non-specialists to undertake it. However, if you have basic knowledge of electrical engineering and the necessary tools, then, subject to safety precautions, it is quite possible to independently install an outlet in a concrete wall.
Types of socket boxes
For concrete walls, a plastic version without presser feet is suitable.
Those that have such claws are used for plasterboard walls or plastic panels.
There are all-block options for different numbers of seats - from two to five.
Their main advantage is that they do not bend or deform during installation. Moreover, they can be used both in plasterboard and in a regular wall.
Well, the most scarce option today is a metal socket box for wooden walls. It can be either with or without a bottom.
If there is hidden electrical wiring in a wooden house, only such specimens are allowed to be buried in the tree.
The depth of the socket box also plays a role. It can be standard and in-depth.
Standard depth 45mm. Recessed version 60mm.
If you plan, in addition to the socket or switch itself, to also disconnect wires in it (soldering to other sockets, etc.), then you only need to buy a recessed one.
Advantages and disadvantages
When choosing a remedy to get rid of hair loss, first of all you need to study all the disadvantages and advantages. This will help you make a choice and purchase the most effective drug.
From the above, the following advantages of using Cora shampoo can be noted:
- quick relief from hair loss;
- strengthening;
- restoration of damaged structure;
- no contraindications or side effects;
- improving the appearance of curls;
- awakening and stimulation of dormant bulbs;
- enrichment with nutrients and moisture;
- acceleration of growth.
The product has no disadvantages. The only thing that can be considered a slight minus is the high cost, although this is also considered a controversial issue. The bottle capacity is 400 ml; the procedure will require about 20 ml, so the shampoo usually lasts for 2 months.