A socket is not only a mandatory functional element of electrical wiring, used to connect electrical household appliances, but also a significant interior detail.
The trouble-free operation of the outlet, as well as its neat appearance, depend to a large extent on how well the installation is done, right? To make the correct installation, it is necessary to take into account a number of nuances that are present in this work, one of which is the correct installation of socket boxes.
Have you never installed a socket box and are afraid of making mistakes? We will help you understand all the features - the article discusses in detail the types of installation boxes and the intricacies of installing each of them.
Attention is also paid to the installation of socket boxes in common types of bases - concrete, plasterboard, tiled wall. The material is supplemented with visual photos and useful videos.
Basic rules for installing socket boxes
Before installing the socket box, you must select the location for its installation. But since the socket is a source of increased danger, its placement in some rooms is subject to special requirements specified in the “Rules for Electrical Installations” (PUE).
According to the PUE:
- there must be a distance of at least 50 cm from the electrical outlet to the pipe through which the gas passes;
- sockets in the bathroom can be installed at a distance of at least 60 cm from the source of splashes (sink, shower, bath);
- It is recommended to install switches on the side where the door handle is located, and the distance from the device to the floor should be up to 100 cm;
- You cannot install sockets in saunas, baths, or rooms where laundry is done.
There are no special rules for other premises. Sockets should be placed in such a way that their use is convenient for all family members.
It is also necessary to follow safety requirements and install devices taking into account the location of electrical appliances in the house so that their cords reach the outlets without the use of extension cords.
You may also be interested in information about the nuances of installing an outlet for a washing machine or an outlet for an electric stove.
Recommended installation locations for sockets and switches in the room from the point of view of practicality and convenience
Connecting wires
The ends of the wires in the socket boxes should be immediately insulated. Now we turn off the electricity and remove the old sockets. In one of the articles, I wrote about how to connect wires correctly. The junction of the wires must be carefully insulated and secured in a niche from the old outlet, and then clogged with a solution. Once finished, you can turn on the electricity and check for voltage at the ends of the new wires. Don’t forget to check their position a few minutes after fixing the socket boxes in the wall. They could have been squeezed out by the solution or wires.
I am sure that you will not have any difficulties, and after everything you have read, you will successfully install sockets throughout your apartment. After all, there are never too many sockets. In the kitchen of one of the apartments where I once worked, I thus installed 14 sockets, one for each electrical appliance. Of course, the devices were not used all at once, but it’s great that you don’t have to pull out one plug and plug in another. Plus, no extension cords under your feet or on the walls.
You can also read about how to fix an old socket on the wall.
Installing a box in hollow walls
Socket boxes designed for walls made of composite materials, in particular plasterboard, have a slightly different design than installation boxes for concrete and brick bases.
Fixing the glass in the wall is done without gypsum mortar, which makes installing the socket box into plasterboard much faster and easier.
To make holes, it is better to use a wood crown, as they are smooth and neat, which makes the process of installing the socket box easier.
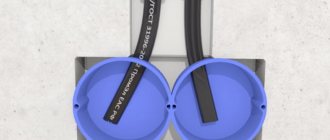
At the top of the glass there are four screws arranged in pairs. Two of them protrude slightly outward and are intended for attaching a switch or socket.
The other two are slightly recessed into the socket body. On the bottom of each screw there is a metal or plastic tab, which, when the screw is turned, moves and fixes the box in the drywall.
Before inserting the glass into the wall, run the electrical wire through the pre-made hole in the back of the box
Before installing the socket box, make markings as described above. Making a hole in drywall is much easier than making a hole in a concrete wall. You can simply cut a circle with a knife or drill along the contour with a drill, and then cut it with the same knife.
However, when using these methods, the edges are not very smooth. In addition, drywall is a rather fragile material and can break.
It is best to do the job using a wood crown. After the hole is prepared, bring the wire out into it and insert the socket so that the screws are positioned horizontally. Secure the cup into the drywall by tightening the two recessed screws clockwise.
Image gallery
Photo from
Preparing a socket box for drywall
Features of mounting mounting cups
Rules for tightening clamping screws
Forming holes for wiring entry
Making holes
There are three ways to create holes in a wall:
- Using a concrete crown.
- Using an impact drill, hammer drill and pobedit drill.
- Using a grinder (angle grinder).
First option (crown for concrete)
This method can be considered the most frequently used. To make holes, a special device is used - a concrete crown, put on a hammer drill.
The cutting element of the crown is a diamond-coated part. You can use pobedite nozzles. Heavy-duty material makes it easy to destroy any hard surface. The cut is smooth and round. In the inner part of the nozzle there is a concrete drill, designed for centering the cutting element.
Note! The nozzle must have a larger diameter than the dimensions of the installed socket box. We place the drill at a given point and begin to immerse the crown into the material
When the cut is completed, we hollow out the remaining concrete. To do this we use a hammer and chisel
We place the drill at a given point and begin to immerse the crown into the material. When the cut is completed, we hollow out the remaining concrete. To do this we use a hammer and chisel.
Second option (drill, hammer drill, pobedit drill)
If you don’t have a concrete bit, you can make a hole for the socket using a Pobedit drill bit. It is best to make a hole with a hammer drill, and if a tool is not available, an impact drill will do. In the latter case, the process will be more labor-intensive.
The circle is drilled along a pre-drawn line. The step is taken as small as possible. To control the depth of penetration, it is recommended to use electrical tape tied to the drill. As in the first option, we finish the work using a hammer and chisel.
Third option (Bulgarian)
A grinder is not the best way to make round holes, but is more suitable for creating squares. However, if you don’t have any other tool, you can make a hole for a socket in the wall using a grinder.
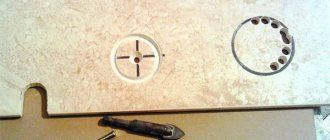
We select a special disc for concrete. Draw a square instead of a circle. We make 4 cuts in the wall along the drawn lines. The depth of the cuts slightly exceeds the size of the socket box. We remove the remaining concrete with a hammer and chisel.
Adjusting the hole to the size of the socket box
When the hole is made, we check how well the socket box fits under it. Since the hole was initially made larger than the diameter of the socket box, problems with the width should not arise. The main effort is usually put into adjusting the desired depth.
We bring the hole to a depth at which the socket box will be buried in the niche by about 5 millimeters. The depth reserve is provided taking into account the placement of fixing material (gypsum or alabaster mortar) into the hole. In addition, a certain place will be occupied by the bend of the wire suitable for the device.
Advice! To make further work easier, it is recommended to trim the edge from the edges of the hole. We do this using a knife.
By adjusting the depth, the installed socket box will be hidden in the hole along with the outer skirt. This will allow you to install the device in the same plane with the wall. If the skirt is not recessed, you will end up with a gap of 1 - 2 millimeters between the rosette frame and the wall.
Installation of socket boxes in ceramic tiles
If it is necessary to install a socket or switch in a wall that is supposed to be tiled, marking and making holes in the concrete should be done before finishing work begins. Electrical wires are laid in advance in the resulting recesses.
After laying the tiles, markings are made again and holes of the required depth are drilled in it. It is best to drill the tile with a diamond core bit, periodically cooling it with water.
A gypsum solution is placed in the recesses, it is also applied to the back of the socket box, and then the box is pressed into the hole and leveled.
To install several sockets, a template is made in advance, according to which the wall is first marked, and then after facing it is applied to the tile, and holes are drilled along it
Tools and consumables
A set of tools and materials necessary for installing socket boxes in concrete surfaces:
- electric hammer drill equipped with an SDS Plus or SDS Max chuck;
- a drill designed for drilling walls in concrete (diameter from 5 to 8 mm, length from 60 mm);
- safety glasses and mask;
- chisel and hammer (you can use a special steel blade for a hammer drill);
- bit for drilling concrete surfaces, equipped with an SDS Plus or SDS Max shank;
- a special bit with diamond cutting edges (used for hammerless drilling of concrete surfaces);
- spatula for applying gypsum mixture;
- container for mixing the mixture;
- dry solution (the mass of the substance depends on the expected amount of work);
- drill mixer used when mixing the solution.
It is necessary to install socket boxes after laying the wiring; it is allowed to run an additional cable to the installation site. In concrete walls, cables are laid in channels (grooves) of rectangular cross-section, cut into the wall. To make grooves, a special tool (wall chaser) is used, equipped with a window for removing generated dust with a construction vacuum cleaner.
The nuances of installing a multibox on a plinth
What should you do if your house has already undergone high-quality repairs, but you need another point to connect electrical household appliances?
In this case, it is not at all necessary to rip off the new wallpaper and ditch the wall; you can make a socket directly on the baseboard.
Multiboxes fit all types of standard single sockets. They can accommodate not only electrical, but also telephone sockets, as well as Internet cable connectors.
However, it should be noted that this method can only be used on collapsible plastic skirting boards with a cable channel. Before installing the socket box, it is necessary to lay the wire inside the baseboard.
To do this, remove the cover from the part where the socket will be located. This operation is performed from a corner or from a nearby plug; simply pry the cover with a screwdriver and carefully remove it.
Cut the baseboard so that there is a gap the width of which matches the size of the plastic trim. Insert the multibox into it, thread the wire through the hole in its body, and secure the socket box with dowels.
Required tools and materials
When large-scale electrical wiring work is being carried out, all the necessary tools will most likely already be at hand, but if the only thing on the agenda is the installation of socket boxes, then you will need the following:
- Pencil and level - for marking the wall and leveling the socket block (if one needs to be installed).
- Drill with bits for drilling socket boxes. If there are no crowns, then just a drill for concrete (or wood, in that rare case when hidden wiring is installed in a wooden wall). A hammer drill or its mode on a drill can also be useful.
- A spray bottle (you can make it homemade) for watering the crown while drilling. Prevents the appearance of dust and prevents cracking of tiles if the socket box is mounted on a kitchen apron.
- Alabaster, gypsum or cement mortar - to secure the socket box in the wall.
- A trowel or spatula with which the alabaster will be applied. Its size should allow the mixture to be placed inside the hole for the socket box.
- Socket boxes of the required design - selected depending on the wall material.
- Dowels are needed in rare cases, if the wall material is soft and installing socket boxes without additional fasteners is problematic.
A detailed overview of the tools required for installation of socket boxes in this video:
The rest does not apply to the work itself, but a broom, cleaning rags and, possibly, a vacuum cleaner will also come in handy.
Who keeps things burning and who doesn't?
All “experimental” ones were produced in Russia or Ukraine. And as you know, we can have very different types of plastic, and the result is unpredictable. I will simulate heating of the wiring and fire.
To do this, it is enough to first warm them up slightly and see how they behave under heat. And then expose them to open fire. After heating them evenly with a burner for literally 20 seconds, the plastic of all cases began to melt. And after another 20 seconds it easily caught fire.
Absolutely everything is burning. And they burn and spread fire beautifully. They are not self-extinguishing. And even Schneider and Legrand are on fire. If your wiring starts to heat up, it will heat up the plastic until it catches fire, they will support it perfectly...
The only thing that has a positive effect on burnout time is the thickness of the plastic wall. Those that are more expensive and thicker ignite later than others and burn longer. And what does not spread combustion is not true. Our producers surprised me. Everything burns almost the same. There's no difference.
We can only hope that you have high-quality automation that will work before the socket warms up to ignite. Here, of course, it is better to take thick-walled models.
Sequence
Due to my inexperience, I had to spend a week (one-room apartment), although initially it seemed to me that I could do it in a day or two.
The sequence of work depends on the degree of preparedness of the walls. It is better to lay wiring on a bare wall and install socket boxes after the plaster beacons have been installed. It often happens that the first rough layer of plaster has already been applied. Then you need to ditch and wall up before applying the last layer of plaster. The worst thing is if the plasterers are in a hurry to apply the last layers of plaster and the sockets have to be walled up after them. The bad thing is not that the grooves will need to be made deeper and that they need to be plastered again, but that vibration when drilling holes and dust can ruin the finished finishing plaster. There may be cracks, and the walls will need to be vacuumed to remove dust (before painting or wallpapering). The dust from the grinder is so finely dispersed (like powder) that it penetrates into all the smallest pores and, by the way, causes skin irritation.
Useful tips
- If in the future tiles or other covering will be laid on the wall, then when installing the socket box, do not push it in all the way. It’s better to cut a niche after installing the facing materials.
- Do not remove all the plugs from the case at once. Mortar will leak through unused openings.
- To ensure that the socket box fits tightly into the hollow wall, you can remove a small chamfer from its edges.
- When purchasing a socket box, do not hesitate to try on your own socket for it. Better yet, buy them together.
Now you know that installing a socket box, with proper skill and the availability of tools, can be done independently. So, you will save a significant amount on the services of a specialist. But don't worry if something suddenly goes wrong
Mounting the socket
After making sure that the power is turned off using an indicator screwdriver, you can begin installing the product. First you need to prepare the wires. If the ends are too long, you need to shorten them (up to 10 cm). The ends of the wires should be stripped of insulation (0.5 cm). After the actions will be like this:
- Remove the decorative part from the outside of the product and set aside.
- Loosen the fastening bolts on the socket contacts.
- Insert the socket into the socket box, do not fix it.
Connecting wires
On the inside of the product you can see 3 terminals - phase, neutral, ground. They are connected to the corresponding cables of the apartment's three-wire wiring. The wires vary in color: phase is black, red, brown, ground is always yellow-green, neutral is white, white-blue. Sometimes there is a fourth terminal of sockets - the device duplicates the ground wire for a more comfortable connection.
To connect, you need to insert the cleaned ends of the wires into the terminals and secure them with screws. It is very important not to mix up the wires, as this will lead to a short circuit. If there is no place for grounding, which is common in old houses and dachas, then the ground wire should be insulated and hidden in a box.
Afterwards, you can firmly fix all the fasteners and install the socket and socket in a level position. At the end of the work, you need to place the front panel of the product and snap it into place.
Popular manufacturers
The most popular and high-quality devices from manufacturers are:
The mounting box for hidden assembly of the popular Swedish-Swiss socket 2332 UJBS is made of high-quality plastic. The socket box can be installed either in a concrete wall or mounted in a plasterboard sheet, and the socket box is firmly secured using special “ears”.
The installation box GUSI ELECTRIC 6.8 cm is a Russian product. It is one of the most inexpensive and fairly high-quality products on the domestic market. It is used in walls made of concrete, brick and plasterboard.
Installation box Dr. HD (ID 9288) Chinese. These are high-quality products, which are characterized by the square shape of the device, which makes it possible to connect several socket boxes into a block at once to place sockets in one row.
Mounting box HEGEL 6.8 by 6 cm KU1205 is a Russian product, which was founded in 2006. It is engaged in the production of high-quality electrical products and these socket boxes are a clear confirmation of this. A special feature of this product is the presence of metal claws, which allow for high-quality fastening in an empty plasterboard wall. Moreover, there is the option of connecting several pieces into a single module, which makes it possible to install a block of sockets in the kitchen without much effort.
Socket box SP 80 for 45 GSK Ruvinil 10174 is a brand of the domestic manufacturer Ruvinil. High-quality socket box used in concrete and plasterboard walls. Relatively low price, but decent quality. If necessary, it can be combined into modules for installation in a block.
GUSI SZM1.1 is also a product of a domestic developer, which is distinguished by high-quality plastic and the ability to be installed in concrete walls and plasterboard partitions.
S3E3 is a socket box from a Russian manufacturer. Ideal for electrical work in hollow plasterboard walls
It is made of fire-resistant polypropylene, which is very important in the process of installing power electrical parts of a 220 V network. The device is equipped with two self-tapping screws to secure it in plasterboard walls using “ears”.
Additional video instruction
Having sufficiently admired the result of your labor, you can begin connecting the socket mechanism. It can be secured in the socket box either using sliding legs or with simple screws, for screwing which there are threaded holes on the walls of the box. Inexperienced home electricians are better off using screws, because... The fixation with the paws is not very reliable and can disappoint due to the azimuthal misalignment. This means we’ll attach it with screws, close it with a decorative cover on top, and we’ll be happy to use the electrical point we installed ourselves.
Do-it-yourself installation of plastic windows - step-by-step installation technology in photographs
Gas stoves for baths: learning to choose the right ones + rules for self-installation
Installing an electricity meter: rules and subtleties of electrical installation