This information may be useful to anyone who has ever encountered or will encounter the installation of socket boxes. We will describe as briefly and concisely what a socket box is , how to install it correctly and how much its installation may cost. You will also learn how to put back a fallen socket and what can be used instead.
- Installation Rules
- Socket sizes
- Installation in concrete
- Grilling
- Installation in drywall
- The socket doesn't stay in place
- Installing socket boxes in tiles
Remember three basic rules for a quality installation:
| Rule #1. A correctly installed socket box should not protrude or be too recessed into the wall, that is, it should be built flush with the finished wall. A finished wall is considered to be a wall that has already been prepared for painting. We will consider cases when it is planned to lay tiles or some other false panels on the wall below. |
| Rule #2. Socket boxes must be installed strictly level, even if there is only one socket box, it must be set level to avoid difficulties in the further installation of sockets or switches. |
| Rule #3. A correctly installed socket box should hold very tightly in the socket. |
You can also add a few nuances that will help you understand what kind of electrical outlets you need; how to prepare holes (sockets) for them; how to properly insert a cable into a socket box; and how to install it correctly.
Additional video instruction
Having sufficiently admired the result of your labor, you can begin connecting the socket mechanism. It can be secured in the socket box either using sliding legs or with simple screws, for screwing which there are threaded holes on the walls of the box. Inexperienced home electricians are better off using screws, because... The fixation with the paws is not very reliable and can disappoint due to the azimuthal misalignment. This means we’ll attach it with screws, close it with a decorative cover on top, and we’ll be happy to use the electrical point we installed ourselves.
Do-it-yourself installation of plastic windows - step-by-step installation technology in photographs
Gas stoves for baths: learning to choose the right ones + rules for self-installation
Installing an electricity meter: rules and subtleties of electrical installation
Socket sizes
Everything about the size of the socket boxes is simple, the most common size of the socket box is 70mm in diameter. In the vast majority of cases, they all have the same size. And most modern sockets and switches are designed specifically for these sizes.
Types of socket boxes
It is important not to forget about such a parameter as the depth of the socket box . But even in this case, everything is simple, if you plan to connect several wires in the socket box, in addition to the socket or switch itself (for example, use a socket box instead of a junction box), then you will need a deeper socket box. If possible, use deep socket boxes; they are then easier to work with and install sockets in.
Switching wires in a socket box instead of a junction box
Remember! - Once installed correctly, the socket box never reminds of itself again.
Low radiators
All heating devices whose center distance is less than 400 mm can be considered low. And here they offer many different models.
Steel panel radiators can be very low
In the cast iron group, the BOLTON 220 model with an installation height of 330 m has the minimum center distance, slightly higher than the Hellas 270 from Viadrus: it has an installation height of 340 mm. All the rest are taller - with an axle distance of 300-350 mm or so.
Among aluminum radiators, Sira has the smallest ones; their mounting height is 245 mm, and the center distance is 200 mm. These are Alux and Rovall models with a depth of 80 mm and 100 mm. Another well-known manufacturer Global has models of similar dimensions - the Gl-200/80/D model, and the Russian Rifar has the Base 200 and Forza 200.
All manufacturers have slightly larger aluminum batteries (with a center distance of 300 mm or more). There is a wide choice here.
The same Rifar and Sira have bimetallic low radiators: height 245 mm and 264 mm, respectively. But most of all there are models with connecting dimensions of 350 mm. Any manufacturer has them. This distance can also, in fact, be considered standard - everyone has it.
There is even more choice in the group of steel radiators. The smallest panel panels are produced by Purmo - Purmo Planora and Ramo Compact - their center distance is 150 mm and their height is 200 mm.
For all other manufacturers, the height starts from 300 mm. Moreover, the length can be up to 3 meters (the step of its change is 100 mm).
Radiators in the floor - the lowest of all possible
Tubular radiators are also very small: from 150 mm sizes Delta Laserline (manufacturer Purmo). For Arbonia, the height of all models of tubular radiators starts from 180 mm, for Zehnder from 190 mm (Charleston model), for the Russian KZTO from 300 mm.
There are low copper and copper-aluminum radiators. They are produced mainly in small sizes - they have great power, and the price is also rather high. The lowest models are: Ukrainian “Thermia” - height from 200 m, Polish Regulus-sistem - all models from 215 mm in height; Russian “IzoTerm” - from 215 mm; Chinese Mars (sectional type) with a height of 385 mm.
And the lowest can be considered convectors built into the floor. They do not protrude above the floor level at all, but are installed to heat continuous glazing, or are built into the window sills of panoramic windows. They are available in different capacities and purposes; they can be used as additional or main heating.
Installing a socket box in concrete
What needs to be done to install a socket box in concrete? Right! - Make a hole under the socket box! For this, it is best to use a drill with a diamond bit, but this is not the best option in terms of cheapness. A more convenient and practical option is a hammer drill with a concrete impact bit, or simply cut out the concrete with a grinder and a stone disc (but this is a very dirty method, and dust will be absolutely everywhere: in the ears, eyes and in the entrance).
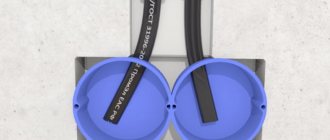
It should be noted that when gating, a lot of fine dust is generated in the room, and first of all, installers should take care of their health and purchase standard protective equipment: masks, respirators, headphones and a construction vacuum cleaner.
Future holes must first be marked. We draw a line along the level and place marks on the wall. If you have 2 or more socket boxes, then the distance between the centers of the circles is 71 mm . This is a distance calculated empirically by professional electricians, tested with sweat and blood! Remember 71mm!
The easiest way to make marks is to attach a group of sockets to the wall.
Tools and materials for installation
Preparation for installation is as important as the electrical work itself. You can significantly reduce the completion time if you collect all the necessary materials and tools in advance
Standard set including:
- Pencil, marker and building level for marking walls in places of future installation. When socket boxes are installed, their alignment is done using a level.
- A hammer drill or electric drill, as well as crowns of the required diameter. In the absence of crowns, you can use drills with a working part made of hard alloys. When installing into wooden structures, wood drills are used.
- A spray bottle or other homemade device for water cooling of crowns during the drilling process. As a result of watering, dust does not form and the tiles do not crack.
- Construction mixtures or cement mortar for fixing socket boxes into a concrete wall. They cover all the gaps and cracks.
- Spatula or trowel for applying the mortar. The tool must be sized to fit freely into the mounting hole.
- Socket boxes. The design and model are selected in accordance with the wall material.
- Dowels. May be needed as additional fastening of installation boxes in soft wall materials.
After construction work, the room will need to be cleaned up, so you need to stock up on cleaning equipment and a vacuum cleaner in advance.
Hole cutting
After marking, in the marked centers of the circle it is necessary to make a hole using a drill with a slightly larger diameter than the crown drill (for example, an 8-10mm drill). We drill a hole with a margin, taking into account the length of the drill bit of the crown itself (but do not forget about neighbors and thin walls). This method is also suitable when working with a diamond core bit in drilling mode.
The process of gating. After drilling holes in the center of the future circle, you need to use a crown to go deeper into the wall a few millimeters (this only applies to the method of working with a hammer drill!). Along the intended circle, you need to drill the maximum possible number of holes to make it easier for the crown to “gnaw” the concrete.
With a diamond crown, you just need to drill - without chiselling, periodically letting the crown cool. It is worth noting that if a diamond bit gets on the reinforcement, its service life is significantly reduced.
When working with an angle grinder, the whole task comes down to making cuts in the wall to the required depth and hollowing out the area where the socket boxes will be located.
What to do if, while drilling, a drill or bit gets into the reinforcement?
There are several ways to remove rebar. One of the fastest and most painless is knocking out the reinforcement with a chisel - an attachment for a hammer drill. If the crown gets into the reinforcement (an indirect sign of it getting into the reinforcement is sparks or a clear slowdown in the drilling process), it is better to remove this reinforcement, otherwise you will ruin the crown.
The second less convenient way is to use an old crown. It doesn’t matter which way you do it, with a diamond or a drill bit, in both cases we simply drill out the reinforcement. The reinforcement metal is very soft and can be easily broken through with a hammer drill. And the third, dirty way, is to simply drill out the reinforcement using a grinder with a diamond disc on the stone.
Embedding a socket box in concrete
The best way to secure socket boxes is to embed them in the hole using alabaster or rotband. A small life hack - so that the solution does not harden too quickly and you do not have to wait a day - you need to mix alabaster with rotband.
First, use a vacuum cleaner to remove all dust from the hole and moisten (prime) the hole with water. And only after this, we apply the solution with a small spatula, spreading it along the inner walls of the hole. The solution should be thick enough not to leak out of the wells. It is important to understand that the area of contact between the solution and the socket box should be maximum! Plus, coat the socket boxes themselves with the mixture. The solution will envelop the socket box from all sides and adhere well to the base of the wall, only then can we say that the socket box is installed efficiently!
Using a large spatula, remove excess mortar while leveling the surface of the wall. Before this procedure, it is necessary to remove or screw in all the screws of the socket box.
https://www.instagram.com/p/CU3DCTZqssQ/
Laying the cable in the socket box. It is best to lay the cable in an already installed socket box; the windows for the cable are easily knocked out with a screwdriver, and it is better to make channels for pulling the cable between the socket boxes in advance. When the solution has cooled, you can safely insert the cable into pre-made holes or recesses.
If you don’t have that much time and the cable needs to be installed together with the socket box, try to align the socket boxes as accurately as possible. You can insert the cable into any hole, but it is better not to use the side windows for this, so that there are no difficulties with the subsequent installation of sockets.
Important! The entry of the cable into the socket box should not in any way interfere with the future socket, especially from the side of the spacers. A very common mistake when installing socket boxes is to break the wires with a spacer from the socket - in this case, a dangerous potential may appear on the socket body, or a short circuit may occur when the electricity is turned on.
Drilling
The main condition for the correct production of concrete with a hammer drill is that the direction of the centering drill must be strictly perpendicular to the plane of the wall. If you don’t have enough experience, then it’s better to practice on unnecessary areas of concrete fences.
This video clearly shows the design of socket boxes:
The dimensions of the standard crown coincide with the external dimensions of the concrete sockets. Therefore, when drilling, the crown is completely recessed into the wall. At the end of the work, a concrete cylinder with a hole in the middle remains in the hole. It is easily knocked out with a chisel installed in the hammer drill in jackhammer mode.
If there is no crown, proceed as follows:
- The socket box is leaned with its bottom against the central marking point and the body of the box is outlined with a pencil;
- I lean the socket box against the drill and mark the height of the glass with insulating tape;
- inside the marking contour, drill the maximum number of holes in perforation mode, recessing the drill to the insulating mark;
- knock out the opening with a chisel in the same way as in the previous case.
Drilling out a seat for a socket box Source electrikmaster.ru
This video shows the installation of socket boxes:
Preparing socket boxes
Before installation, the side window is broken out in the box. Wires are pulled through the resulting opening to a length of about 10 cm. The ends of the wires are stripped and crimped with a terminal block. Contact elements are necessary for stranded conductors. Shaggy twists often lead to a short circuit and, even worse, can cause a fire in the wiring.
Perforated openings in the glass are located on four sides on the side of the PR. This is done so that you can pull the wire into the box from any direction without creating unnecessary twisting of the wiring.
PR installation
- The hole in the concrete is cleaned of dust and moistened with water to increase the adhesion of the concrete surface of the nest.
- Gypsum or alabaster is diluted with water in a ratio of 1:2.
- The solution is applied with a spatula in a circle inside the hole.
- The box with the stretched wire is inserted into the seat.
- The squeezed out solution is removed.
Removing excess solution Source www.sibelektrika.ru
Connection and installation of fittings
After the alabaster hardens, the following actions are performed:
- the stripped ends of the wires or terminals are secured to the switch block or socket;
- Usually the terminals are secured with screws and washers.
- There are fittings with self-clamping fasteners. The ends of the wires are inserted into the holes, and spring-loaded bars clamp them;
- the wire is laid on the bottom of the socket box and the fittings are inserted;
- The pad pad with the holes is put on the PR screws and turned until it is level. The screws are tightened with a screwdriver;
- the side screws of the block are tightened until the sliding legs reach maximum contact with the surface of the glass;
- The switch keys are inserted into the sockets of the block. Then the front frame is attached. The front panel of the socket is screwed to the block with a screw.
Fastening the socket fittings in the socket box Source sense-life.com
Watch the video to see how to install the socket:
At what stage of repair (finishing) is it better to lay a socket box?
This is one of the most pressing issues that not everyone thinks about at the beginning, but understands how important it is in the end. Ideally, you need to follow RULE No. 1 , but this does not always work out.
Therefore, you need to know in advance how much the layer of plaster or other layer (plasterboard, tiles, etc.) will protrude before installing the socket box. As a last resort, you can break this rule and install the socket box flush with the bare concrete wall. But in this case, when plastering the walls, the socket boxes will be recessed into the wall, to the depth of the plaster layer. It will not be easy to properly install sockets in such a socket box, but our electricians know how to do it correctly.
Products
Standard floor boxes
Floor boxes are suitable for large office spaces where it is not possible to place desks in close proximity to the walls. Standard floor boxes are easily installed in any type of floor (with concrete screed or raised floors) and go well with laminate and carpet. The boxes are attractively shaped and finished in a variety of configurations depending on the wiring requirements and quantity of wiring accessories.
Installation of socket boxes in gypsum board
When working with drywall, the cable is laid in advance or pulled through using technical holes and broaches. In the places of future switching (connections) of the cable, or in those places where there should be a socket box, leave a supply of cable, and mark outside where this cable is located. Mark the location of the future hole for the socket box in any way convenient for you, for example, screw in a self-tapping screw in this place.
Markings for socket boxes are made in the same way as markings on concrete. The distance between the centers of the circle is the same 71mm . It is important to consider that a drilled hole cannot be fixed (or rather, nothing is impossible for a good electrician), but before you call an electrician, you need to try to do it yourself.
Holes in drywall can be made with a regular wood bit, 68mm , using a screwdriver or drill.
After drilling the hole, you need to find the necessary wires, which should be right behind the wall. It happens that they are hidden in a junction box, or hang on a cable, with the help of which the wires can be pulled to the hole. Each master has his own way of pulling wires into hidden cavities, but that's a different story.
You need to insert the wires into the socket box BEFORE installing the socket box itself, otherwise it simply cannot be done.
Now comes the fun part. The most painful procedure is the correct installation of the socket box in the drywall. This is due to the fact that different manufacturers of socket boxes for plasterboard (or wood) have lugs for securely fixing the socket box to the ceiling wall (plasterboard, plywood, or whatever you have). In some cases, because of these ears, the rosette does not fit into the prepared hole, but this problem does not occur on all rosettes!
It is best to take care of this in advance when buying socket boxes. Make sure that the ears, when open, do not go beyond the circumference of the socket itself, for example, like here
If, nevertheless, you manage to buy the “wrong” socket box, then you can use one little trick: eyelets are made in plywood or drywall at a slight angle (it is enough to make them only on one side), after which the socket box can be installed normally. The socket box should fit into the hole normally at an angle. The main thing is not to overdo it and not to make a hole with a larger diameter than the outer edges of the socket box.
After all the procedures, we fix the socket box by tightening the screws
Installation of a socket box for plasterboard, wood, PVC, MDF panels.
Mounting boxes for sockets and switches of a special design with spacer legs are installed in plasterboard, wood, MDF and PVC panels, with the help of which it is pressed against the wall.
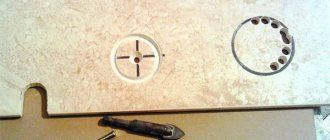
They install quickly and easily. But the most important thing is to make the correct markings for the block; to do this, use a tape measure to mark the required height of the center of the socket or switch, then draw a straight line using a building level. We mark the centers of the boxes on it; there should be 72 millimeters between them. After the markings are made, we proceed to cutting out the holes using a crown with a diameter of 68 millimeters. Sets of special crowns with teeth for wood are used for these purposes (examples in the picture below).
The box must fit very tightly
Sometimes you need to carefully knock it down with a hammer.
Attention, try to place the holes for attaching the socket itself when installing the socket so that they are approximately in one line, otherwise you will not be able to install the switch or socket evenly! All that remains is to tighten the screws that secure the box to the wall. Let's move on to installation and connection.
We recommend reading our articles:
- how to install and connect a light switch;
- installation with connection to an electrical outlet.
← Previous page Next page →
What to do if the socket box pops out of the wall
In cases where you are faced with a dropped or poorly secured socket, there are several ways you can correct the situation. The simplest and most reliable is to screw a self-tapping screw into the base of the socket box (if it is concrete, a self-tapping screw with a dowel). The second method is to use a glue gun. Before gluing, it is necessary to remove all dust from the hole. More complex situations, when, for example, the base is gypsum and it crumbles. A plaster solution will help here ; the base must first be primed, for example with PVA glue.
The mortar method can also be suitable for plasterboard structures. In general, the solution is, in principle, a panacea for fallen socket boxes. In some severe cases, you can screw the socket or switch itself to the base of the wall.
Functions of mounting boxes
Despite the obvious advantages and safety, not all craftsmen use concrete sockets, being confident that any socket can be installed this way. But here it is worth noting that the absence of a socket box is always a risk of damage to the wiring and the absence of any guarantees of fire and electrical safety.
Main functions of mounting boxes:
- Strong fixation in the wall of a correctly and safely fixed socket (regardless of the material of the monolith)
- Protecting the socket from moisture, dust, small debris
- Ensuring electrical safety - any type of socket boxes have dielectric properties that are important in operation and do not allow current to flow from the contacts of the sockets to various metal wall structures
- Guarantee of localization of a possible fire inside the socket box housing, preventing the spread of fire beyond the element
- Simpler and more accurate installation of the socket - thanks to the sockets, the cover of the element is in contact with a flat surface, there are no gaps or cracks
Thus, installing a socket box in concrete is completely justified and allows for a higher level of safety and a long service life of the entire structure.
Installation of socket boxes in tiles or wall panels
It is better to lay the cable and install the socket boxes in advance, before laying the tiles. But if the tiles are already there and you need to make an outlet or switch, then crowns for ceramic tiles will help. The drill bits will help you carefully drill holes in the tiles.
The hardest thing is if there is concrete under the tiles that needs to be tapped. In this case, it is best to use a diamond crown, otherwise there is a chance of damaging the tile (when chiselling with a regular crown).
There is a cheaper and dirtier way, this is drilling a hole with a grinder, the main thing is to drill everything out as carefully as possible so that the hole is covered by the frame from the socket.
Required tools and materials
When large-scale electrical wiring work is being carried out, all the necessary tools will most likely already be at hand, but if the only thing on the agenda is the installation of socket boxes, then you will need the following:
- Pencil and level - for marking the wall and leveling the socket block (if one needs to be installed).
- Drill with bits for drilling socket boxes. If there are no crowns, then just a drill for concrete (or wood, in that rare case when hidden wiring is installed in a wooden wall). A hammer drill or its mode on a drill can also be useful.
- A spray bottle (you can make it homemade) for watering the crown while drilling. Prevents the appearance of dust and prevents cracking of tiles if the socket box is mounted on a kitchen apron.
- Alabaster, gypsum or cement mortar - to secure the socket box in the wall.
- A trowel or spatula with which the alabaster will be applied. Its size should allow the mixture to be placed inside the hole for the socket box.
- Socket boxes of the required design - selected depending on the wall material.
- Dowels are needed in rare cases, if the wall material is soft and installing socket boxes without additional fasteners is problematic.
A detailed overview of the tools required for installation of socket boxes in this video:
The rest does not apply to the work itself, but a broom, cleaning rags and, possibly, a vacuum cleaner will also come in handy.