The best price for aerated concrete partitions!
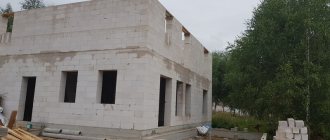
Blocks made of aerated and foam concrete are characterized by fairly high strength with low weight. They are a good heat insulator, non-flammable, and not susceptible to fungus and putrefactive bacteria. In addition, foam concrete blocks are easy to cut to size. All these properties predetermined the popularity of blocks for installing partitions in individual private housing construction.
A block measuring 600 x 200 x 250 mm weighs only 18 kilograms (for comparison: a similar volume of brick will weigh 80 kg). Foam blocks can be mounted not only on ordinary cement mortar, but also with the help of special glue, which avoids “wet and dirty” work, reduces the time required for the construction of partitions and further reduces the load on the load-bearing structures of the house. The solid thickness of the partition makes it possible to install hidden electrical wiring or other communications in it.
Working with foam and aerated concrete blocks has its own specifics and certain subtleties known only to professionals. Therefore, it is better to order a strong and durable partition from specialists. For many years he has been engaged in the construction, repair and redevelopment of houses and cottages in Moscow and the Moscow region. Our craftsmen will quickly, efficiently and at reasonable prices erect foam concrete partitions. Visiting the site and drawing up an estimate is free of charge; the pre-agreed contract amount remains unchanged throughout the entire cooperation.
Partitions made of foam blocks (gas silicate). Price per m2
| Name of work / Total area of partitions | up to 500 m2 | 501-2000 m2 | 2001-5000 m2 | more than 5001 m2 |
| Installation of partitions made of foam blocks/gas silicate (thickness 80-100mm) | 570 RUR/m2 | 510 RUR/m2 | 450 RUR/m2 | 390 RUR/m2 |
| Installation of partitions made of foam blocks/gas silicate (thickness 200mm) | 740 RUR/m2 | 660 RUR/m2 | 590 RUR/m2 | 510 RUR/m2 |
| Manual plastering of partitions | 360 RUR/m2 | 310 RUR/m2 | 270 RUR/m2 | 260 RUR/m2 |
| Mechanized plastering of partitions | 380 RUR/m2 | 330 RUR/m2 | 290 RUR/m2 | 280 RUR/m2 |
| Surveyor's visit, consultations, estimate preparation - free of charge Call a surveyor | ||||
Carrying out masonry work
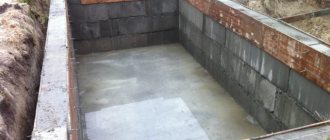
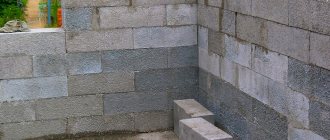
First we prepare the base.
Now let's look at how to properly lay aerated concrete walls. A waterproofing layer is installed on which the first row of aerated concrete blocks is installed. Many people are interested in what solution this row is placed on. It is made of sand and cement so that the blocks do not become saturated with moisture. Cement-based mortar is less demanding on the surface; the thickness of the joint in the masonry helps compensate for uneven areas. We found out whether it is possible to lay aerated concrete on cement mortar. If excess mixture comes out of the seams during work, it is allowed time to harden and removed with a spatula.
Conducting the masonry begins with the corners along which ropes are pulled, serving as guides for maintaining the evenness of the masonry.
During the work, there will be a need for additional elements that can be easily cut from whole blocks with a hand saw.
Having laid the first row, check it with a level and, if necessary, trim it. The process is the most difficult, but if everything is done correctly, then further work will be easier. Having laid out the first row, you need to wait several hours so that the solution has time to “set”. By the way, it is allowed to lay aerated concrete blocks without a base, directly on the foundation.
To increase the load-bearing capacity of aerated concrete walls, it is necessary to perform reinforcement. Its step is every meter (three to four rows, depending on the height of the material).
To lay the reinforcement bars, grooves are made, the depth and width of which is 2.5 cm, the distance from the edge of the stone is five to six centimeters.
The cross-section of the reinforcing rod should be equal to 0.02% of the area of the masonry row. As a rule, the diameter of the metal is six to eight millimeters.
Before laying the reinforcement, the grooves are cleared of construction debris and dust and moistened to increase the adhesion of the adhesive composition. After this, the mixture is poured into the groove and the metal is laid.
Today, galvanized perforated tape is increasingly used for reinforcement. Its advantage is that there is no need to groove block material, which allows increasing the speed of work and reducing the amount of construction waste.
Subsequent rows are performed with dressing - shifting the stones of the next row relative to the previous one. Ideally, such a dressing should be half the length of the block. Work is carried out from the corners, a level check is carried out, and any remaining adhesive is removed.
To construct partitions, a material is used whose thickness ranges from 10 to 20 centimeters. By the way, the height of the future wall depends on this size.
Features of using blocks for internal partitions
Foam blocks vary in density, strength class and size. Strength classes of foam blocks are B1.5, B2.0, B2.5, B3.0, B3.5, B4.0. Block densities vary from D600 to D900. It is worth considering that strength increases with increasing density, and a foam block can withstand a greater load, but the weight of a denser material also becomes greater. Typical block sizes are 10x30x60, 12x30x60, 15x30x60, 20x30x60, 25x30x60 cm.
For the construction of interior partitions, foam blocks 10 cm thick are most often used. Taking into account the layer of finishing materials on both sides (10-15 mm), the final thickness of the partition can be about 120-130 mm.
Aerated concrete blocks are not inferior to foam concrete blocks in terms of thermal insulation properties, but are inferior in sound insulation efficiency. To protect the room from external noise, it is necessary to use additional materials - cork or mineral wool slabs or mats. For internal partitions, the industry produces blocks of reduced thickness: 100-150 mm. The width of such blocks can be 600 and 625 mm, and the height is 200 mm, 250 mm and 300 mm. Partitions up to three meters high are made from blocks 100 mm thick; for walls with a thickness of 3 to 5 meters, it is recommended to choose blocks made of foam concrete with a thickness of 2000 mm or more.
| Description: laying partitions from foam blocks (gas silicate blocks). Price: partitions (100mm) - from 390 rub./m2 partitions (200mm) - from 510 rub./m2 |
| Description: laying partitions from foam blocks (gas silicate blocks). Price: partitions (thickness 100mm) - from 390 rub./m2 partitions (thickness 200mm) - from 510 rub./m2 |
| Description: laying partitions from foam blocks (gas silicate blocks). Price: partitions (thickness 100mm) - from 390 rub./m2 partitions (thickness 200mm) - from 510 rub./m2 |
| Description: laying partitions from foam blocks (gas silicate blocks). Price: partitions (thickness 100mm) - from 390 rub./m2 partitions (thickness 200mm) - from 510 rub./m2 |
| Description: laying partitions from foam blocks (gas silicate blocks). Price: partitions (thickness 100mm) - from 390 rub./m2 partitions (thickness 200mm) - from 510 rub./m2 |
| Description: plastering works. Price: from 260 rub./m2 |
How to correctly calculate the cost of a house made of aerated concrete
It is possible to calculate the cost of building a house from aerated concrete only after the exact amount of necessary materials has been determined. Online calculators will help you cope with this task, many of which can be found on specialized websites. Having an idea of the actual scope of work, you can look for price lists for relevant services in your region if you prefer to hire contractors.
Some organizations that provide turnkey house construction services offer calculators in which you can calculate everything at once - both the amount of materials and the cost of services. We found one of these and decided to use it.
Let's take for example a one-story house measuring 8 by 9 with brick cladding, and see what the results will be. By entering our data into the appropriate fields of the table, we get separate calculations for each section of work with the final figure below. Prices are for April 2020.
Foundation
Let's clarify the parameters of our foundation that were entered into the calculator:
- The exact dimensions of the building are 9.2 * 8.2 m, plus there is another intermediate load-bearing wall 9.2 m long.
- Along the contour of the house, the width of the tape will be 400 mm (for masonry 300 mm thick), for an internal wall with a thickness of 200 mm, the width of the tape will be 300 mm.
- The total length of the outer tape will be: 34.8 m ((9.2+8.2)*2). The length of the internal wall is 9.2 m.
- The height of the foundation monolith is 80 cm.
Here are the calculation results:
| Name of materials and works | Unit | Quantity | Price, rub. |
| ASG with delivery (to the underlying layer) | m³ | 5,568 | 3550 |
| Board 40 pine (for formwork) | m³ | 2,14 | 14338 |
| Fittings d12500С | T | 0,3569 | 15348 |
| Reinforcement d14 500С | T | 0,2653 | 11408 |
| Knitting wire | T | 0,0023 | 101 |
| Nails L50 | kg | 11,77 | 565 |
| Ruberoid | roll | 3 | 783 |
| Concrete M 250 (B22.5) | m³ | 11,693 | 45018 |
| Excavation | m³ | 17,4 | 4872 |
| Filling the base | m³ | 5,568 | 2088 |
| Pouring the foundation (with formwork and frame installation) | m³ | 11,693 | 43264 |
| Cost of work | 50224 | ||
| Cost of materials | 90405 | ||
| TOTAL foundation cost: | 140629 rub. |
Boxes: walls (with aerated concrete reinforcement) and floors
According to the box, in addition to the length of the walls, their height was 2.7 m. The ceilings were made of wood, made of 100*180 mm timber and 50 cm in pitch. Insulation of the walls was not provided; insulation of the floors (floor and ceiling) was carried out with basalt wool 250 mm thick.
Here's what we have in mind:
| Name of materials and works | Unit | Quantity | Price, rub. |
| Aerated concrete | m³ | 32,874 | 157795 |
| Concrete on armored belt | m³ | 5,808 | 22361 |
| Board 40 pine 1 grade | m³ | 0,77 | 5159 |
| Board 25 pine 2nd grade | m³ | 2,77 | 26,315 |
| Reinforcement d12 500С | T | 0,1773 | 7623 |
| Reinforcement d14 500С | T | 0,1318 | 5667 |
| Knitting wire | T | 0,012 | 50 |
| Nails L50 | kg | 4,24 | 204 |
| Lags | m³ | 5,52 | 52992/19872 |
| Skull bars | m³ | 0,981 | 23544/11152 |
| Fasteners | kits | — | 15088 |
| Construction of aerated block masonry | m³ | 32,874 | 92047 |
| Installation of wooden floors and subfloors | m² | 150,88 | 69404 |
| Construction of an armored belt with formwork and frame | m³ | 5,808 | 60403 |
| Total volume of insulation | m³ | 50,84 | 79912 |
| Cost of insulation work | m³ | 50,84 | 37720 |
| Cost of work | 290599 | ||
| Cost of materials | 396709 | ||
| TOTAL cost of the box: | 687308 |
Roofs
Regarding the design of the roof, the following data was additionally entered into the online calculator: it is gable, with overhangs of 500 mm and a slope of 45 degrees. The height at the ridge is 8.5 m, covered with metal tiles. The drainage system is galvanized, with two drains. The result of the calculation was as follows:
| Name of materials and works | Unit | Quantity | Price, rub. |
| Board 50 pine 1 grade | m³ | 2,66 | 25233 |
| Board 25 pine 1 grade | m³ | 1,86 | 17663 |
| Metal tiles with components | m² | 146,08 | 61355 |
| Steam membrane | m² | 146,08 | 4124 |
| Gutters | M. p. | 25,4 | 13440 |
| Fasteners | Kits | 26546 | |
| Installation of a rafter system with a Mauerlat and sheathing | m² | 132,8 | 99603 |
| Roofing | m² | 132,8 | 53122 |
| Installation of gutters | m | 25,4 | 13440 |
| Cost of work | 166165 | ||
| Cost of materials | 148361 | ||
| TOTAL cost of roofing: | 314526 |
Facade cladding
According to the conditions of our task, aerated concrete is lined with brick on the outside. Here's how much it will cost:
| Name of materials and works | Unit | Quantity | Price, rub. |
| Facade area | m² | 104,17 | |
| Cost of work | 250008 | ||
| Cost of materials | 126983 | ||
| TOTAL cost of roofing: | 376991 |
Thus, the cost of all materials and work on the main structures amounted to 1,518,755 rubles.
Estimate for the construction of a house made of aerated concrete 10x10
A 10x10 meter house can be one-story, with an attic (f.1) or built on two floors (f.2). Such a building can easily accommodate a family of 4-6 people on its territory. Let's try not to miss any important points when creating an estimate for the construction of a house made of 10x10 aerated concrete. The construction of such a building must be divided into stages in which it is necessary to adhere to manufacturability and the period for the “duration” of the foundation.
1. Site preparation and foundation laying
To perform this type of work, you need to select the type of foundation. Due to the lightness of foam blocks, any type of base will do. The most acceptable is considered to be a strip or monolithic type of foundation with waterproofing of the base (forms 3,4). The budget for foundation construction consists of:
- conducting survey studies of terrain and soil;
- territory planning with axis breakdown;
- carrying out excavation work (mechanized or manual digging of a ditch, installation of a sand base with a tamper, a layer of crushed stone);
- installation of formwork;
- construction of a belt of intertwined reinforcement;
- pouring concrete.
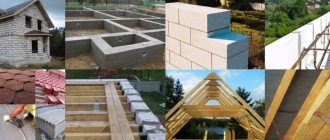
Photo 1 - Strip type foundation
Photo 2 - Monolithic slab foundation
Photo 3 - One-story house with an attic
Photo 4 - Two-story house made of aerated concrete
This takes into account the cost of renting formwork and the price of building materials:
- class A500 reinforcement with a diameter of 12-16 mm and d8mm reinforcement for tying or binding wire d6-8 mm;
- concrete;
- waterproofing;
- sand, crushed stone.
When determining the cost of materials, you need to take into account the cost of their delivery and, in some cases, unloading.
2. Construction of the frame
When drawing up an estimate for the construction of a house made of 10x10 aerated concrete, the cost of materials and work on their installation, delivery, and unloading are taken into account. To build a frame, calculate the cost:
- aerated concrete blocks;
- glue;
- work on laying cellular aerated concrete;
- materials for constructing a reinforced belt or installing columns;
- metal for window lintels.
Recently, a popular construction technology is the construction of a monolithic foundation connected together with corner columns or pylons. For a 10x10m house, the construction of 4 load-bearing columns will be sufficient. They are erected using special sets of column formwork. A 10x10 house with a wall height of 3 meters will occupy 10x4x3 = 120 sq.m of load-bearing wall area, excluding openings for windows and doors. Suitable for construction are gas blocks with a density of D500 and a thickness of 375 mm. For partition walls, use blocks with a smaller thickness. Knowing the size of the blocks offered by the best manufacturer, you can calculate the amount of material needed. The amount of glue is determined based on the manufacturer's recommendations.
Photo 5 - Facing options
Photo 6 - An example of a general estimate for the construction of a 10x10 aerated concrete house
Photo 7 - Sample estimate. Section 1. Foundation
Photo 8 - Sample estimate. Section 3. Walls and partitions
3. Installation of floors
To make the house strong and reliable, it is connected together by a frame. At the bottom, the structure is strengthened by a foundation, on the sides - by columns, and at the top - by a monolithic ceiling. This technology has proven itself and is today used in private, low-rise construction and in the construction of high-rise buildings and industrial facilities. When planning an estimate for the construction of a house made of 10x10 aerated concrete, you should determine the cost of the floor, which includes:
- formwork for floors;
- fittings and binding wire;
- concrete;
- insulation laid around the perimeter of the building.
An experienced team of builders will complete the monolithic vault quickly and efficiently.
4. Roof installation
The most important and costly step is installing the roof. In connection with the chosen option of hip, hip, multi-gable, dome roof, the cost of materials and components is taken into account. The main components in the estimate are the cost:
- covering material (metal tiles, slate, tiles);
- rafter system;
- components for drainage and other elements;
- structures for chimneys, ventilation;
- nails, screws.
Photo 9 - Sample estimate. Section 3. Walls and partitions
Photo 10 - Sample cost calculation. Section 4. Overlap
Photo 11 - Example of cost calculation. Section 5. Roof
Photo 12 - Example of cost calculation. Section 6. Windows and blind areas
5. Facing
Gas silicate blocks quickly absorb dampness, so experts recommend not tightening the outer cladding of the building (f.5). It can be done with insulation and facing tiles. You can simply cover the house with plaster and paint it. Therefore, the estimate for cladding includes the cost of:
- external facing material;
- interior plaster with wall and ceiling finishing;
- floor devices;
- windows, doors;
- stairs.
READ ON TOPIC: How to build a house from aerated concrete
Prices for the construction of walls in the estimate for a house made of aerated concrete
A sample estimate for the construction of a house made of aerated concrete in Excel is shown in Figure 1. It should be noted that in this estimate form, all norms and volumes were applied spontaneously due to the lack of a real project for the site.
Figure 1. Example of an estimate for the construction of a house made of aerated concrete
As you can see, the first item in the estimate for a house made of aerated concrete is the price under the code GESN08-03-004-01. It should be noted that as part of the construction part of GESN or FER, the standards for the construction of structures made of bricks and blocks of various types are combined into collection 08.
Therefore, an example of an estimate for the construction of a house made of aerated concrete will contain the bulk of the norms from the 8th construction collection. Figure 1 shows the estimate for the construction of aerated concrete walls without any associated work.
It is also important to clarify that if the estimates for the construction of a house made of aerated concrete are in Excel, then it is not necessarily the price GESN08-03-004-01 that will be taken into account. The fact is that in the table GESN08-03-004 there are 4 standards for laying walls made of aerated concrete.
The GESN08-03-004-01 standard was applied, as noted above, in the finished estimate for the construction of a house made of aerated concrete in Figure 1. This price is calculated for laying walls 400 mm thick with a height of one floor of 4 m.
However, if you download the estimate for the construction of a house made of aerated concrete, which includes the standard code GESN08-03-004-02, this will mean that the thickness of the walls being built is 400 mm, but at a height of more than 4 m. The GESN08-03-004-03 standard is designed for laying walls 500mm thick and up to 4 meters in height, and the fourth standard in the GESN08-03-004 table takes into account the construction of aerated concrete walls 500mm thick and over 4m high.
It should be noted that if any of the norms of table GESN08-03-004 are included in the detailed estimate for the construction of a house made of aerated concrete, the complex and labor-intensive work included in the specified table will also be included in the estimate form. The scope of work GESN08-03-004 includes unloading aerated concrete blocks and all related materials, as well as their lifting to the work site.
Also, the work standards from table GESN08-03-004, included in the estimate for the construction of a house made of aerated concrete, include moving blocks and materials over a distance of up to 30 m, constructing and dismantling scaffolding, preparing the base and priming the surface. Installing the order, pulling the mooring and sawing the blocks are also included in the work of any of the standards in the specified table.
In addition, the estimate for the construction of a house made of aerated concrete, which includes the standards from the table GESN08-03-004, will include work on preparing an adhesive solution, as well as work on laying blocks with the expectation of installing niches for heating and other utilities for the building under construction Houses. Installation of anchors in blocks is part of the work scope of the standards from GESN08-03-004, among others.
It is noteworthy that even if you download a free estimate for the construction of a house made of aerated concrete, the scope of work in these standards will still contain all of the above manipulations. In addition, it should be noted that the volume of work is calculated according to the standards of the table GESN08-03-004 in cubic meters.
It is also necessary to take into account that facing aerated concrete walls with any material is not included in the scope of work according to the standards of table GESN08-03-004. In this regard, if the project provides for cladding, then prices for this type of work should be included in the estimate for the construction of a house made of aerated concrete as a separate item.
In addition, the standards from GESN08-03-004 include all the necessary resources, from the labor costs of workers and drivers to the necessary materials. However, the cost of materials such as aerated concrete blocks and adhesive mortar are not included in the prices. The standards take into account only the consumption of these resources. Therefore, the estimate for a house made of aerated concrete should separately take into account the cost of these materials, as is done in the example in Figure 1.
Walling
The order of operation does not depend on the design of the blocks. First you need to clean the surface of the foundation from dust and dirt, then cover it with roofing felt.
For laying the first row, a solution of sand and cement should be used. It dries much longer than conventional glue, which allows you to correct the evenness of the layer. The minimum thickness is 1 cm, but there are no maximum restrictions.
Next, you need to determine the highest angle and use a fishing line to mark the wall of the house. Aerated blocks are laid at all corners, then a rope is pulled between the building elements.
After laying each block, be sure to check the evenness. Door openings are skipped. Polishing should be used to polish the surface. A similar procedure must be followed for each layer laid.
The rows are tied, moving half of the gas block. The process is no different from bricklaying. The minimum shift level is 8 cm. To apply the glue, you can use ladles with teeth. The blocks should be pushed end to end; you can check the evenness of the masonry using a level. A rubber hammer is suitable for removing uneven surfaces.
When laying an opening, it is not always possible to fit into the length of the gas block. The excess part can be sawed off using a hacksaw.
Window arrangement
If the window sills are four rows of blocks high, the window openings should be reinforced after laying the third row. For this you will need a wall chaser. With its help we cut two parallel lines. They should extend beyond the opening by 30 cm on each side. Then reinforcing bars are installed in the grooves and filled with a solution of sand and cement.
Installation of jumpers
Lintels are necessary to strengthen the wall above openings - window and door. Otherwise the structure will collapse. The jumper above the window can be made as follows:
- a board is installed;
- then a non-removable structure made of blocks: outside (15 cm), in the center (15 cm), inside (10 cm);
- squares are cut from the reinforcing mesh, after which reinforcement bars are tied to them;
- A frame is inserted into the opening between the gas blocks and then filled with concrete.
You can simplify the task by using ready-made U-shaped blocks. They need to be glued to a sufficient length and installed. Then the reinforcement is laid and filled with cement mortar.
The optimal width of aerated blocks for making formwork is 10 cm. But porous material of standard parameters is also suitable; it can be cut into three identical parts. Glue should be used for fastening.
The lintel over the interior doors is installed as follows:
- the blocks are glued to the required length;
- three ditches are made using a wall chaser;
- reinforcement bars are laid;
- cement solution is poured.
It will take an average of 24 hours for it to dry. When installing jumpers, the fittings should be located at the bottom. The gaps should be filled using gas blocks cut to the required sizes.
Preparing the base for the partition
It is very important to provide the partition with a flat, stable base and provide it with reliable waterproofing. During the construction of a house, it is enough to clean the floor, the role of which is the floor slab, from dust and debris, and then lay a layer of waterproofing material on it - waterproofing material, roofing felt, film. Alternatively, the floor can be thoroughly coated with bitumen mastic. To increase the effectiveness of sound insulation, a vibration-absorbing strip made of a material whose structure contains many air bubbles can be laid on top of the mastic:
- Expanded polystyrene (high density, thin thickness);
- Mineral wool cardboard or high density mineral wool;
- Soft fiberboard.
A layer of glue 2-5 mm thick is placed on top of this strip, and the first row of foam concrete blocks is laid on it.
When installing a partition on the ground in the basement or basement, the ground is filled with fine crushed stone or coarse sand and compacted. Next, removable formwork is installed and a foundation is poured with a width of 300 mm and a height of 100-150 mm. The foundation is connected to the main walls using a mesh of reinforcing bars. The reinforcement is selected with a diameter of at least 8 mm, the class of concrete for pouring the foundation is not lower than B20. Next, hydro- and sound insulation and masonry are installed.
If a partition is installed in a residential building, then the craftsmen are faced with the task of preserving the floor covering. To avoid its complete dismantling, cuts are made at a distance of 10 mm from the marking lines using a hand-held electric saw. The cut fragment of the coating is removed, the slab, to which full access is now provided, is cleaned of dust and fragments of the coating. Finishing material is also removed from the walls. In this case, they are guided by the previously drawn marking lines.
Where to start building a house from timber
When ordering a project, you need to know exactly what result you expect from building a house. In this case, each owner can choose several options:
- Take a standard project and change it to suit your desires and tastes.
- Opt for a ready-made project provided by the selected company.
- Decide on the company to which you will entrust the implementation of an individual project.
Each project can be divided into 3 parts:
- Documents for production.
- Sketch documents.
- Documents for assembly.
The cost of the project may vary depending on the company that compiles it.
What to include in the estimate for a log house
To build a log house, you need to take into account the cost of the material and its processing. More specifically:
- Characteristics of the timber itself (size of the log or timber).
- Treatment of material ends with protective agents.
- Treatment of the surface of the material with fire retardants.
Most often, two types of timber are used in the construction of a house: natural moisture and chamber drying.
Cost of laying a cube of aerated concrete in Russia
Let us now consider the second option - individual builders, the so-called shabashniks. The cost of their work on laying aerated concrete can vary from 800 to 1500 rubles per cubic meter. It all depends on the city, the complexity of the masonry and other nuances, which we will discuss further in the text. When inviting these specialists to work, it is very important to draw up an agreement on the work done so that each party is legally protected.
The third option is the services of specialized companies. The price of a professional team with technical supervision is quite high, but the quality of the masonry, speed of work and level of trust are significantly higher. But this does not mean that construction companies cannot cheat their customers. You always need to draw up a competent contract. The approximate cost of laying aerated concrete per cubic meter from the company is from 1200 to 2000 rubles per cubic meter.
How to make a calculation?
Professionals recommend dividing the work into several stages - this will help take into account all the data, despite the many numbers
It is important to move progressively from stage to stage. This way you will maintain order, and if you make a mistake in the calculations, it will only affect a separate part of them, but not the total
Due to this, the estimate will be drawn up as accurately as possible.
Base
A reliable foundation will help you save on repairs or correcting errors.
Without a doubt, the reliability of the structure depends on the strength of the foundation under the house. Therefore, errors can cause shrinkage and cracking, which will result in the need for difficult and expensive repair and restoration work. Drawing up an estimate for the foundation of a building involves taking into account the following factors:
- First of all, you need to determine the weight of the building with aerated concrete. That is why the calculation of parameters and the exact consumption of building materials for a concrete foundation is carried out only when you know the other parameters. You should add up the mass of each element so you can calculate the weight load on the foundation before construction.
- In addition, experienced builders take into account the characteristics of the soil at the construction site: its type, composition, occurrence of groundwater. You can ask the special service about this. You can ask the builders of neighboring houses about the occurrence of sand and soil moisture.
- When installing a slab to lay the foundation, you will have to remove a layer of soil to create a recess. The side walls of the foundation, its parts laid under and above the ground, will be located on the slab. If the monolithic slab is located above the freezing depth of the soil, then under the base and 150 centimeters around the perimeter the entire space should be additionally hydro- and thermally insulated to prevent deformation due to changes in the soil.
- In addition, you need to remember about reinforcement. If the cost of metal mesh is too high, you can use fiberglass rods to strengthen the aerated concrete. Despite the low cost, the quality of such reinforcement in aerated concrete will not be inferior to the characteristics of metal.
Box made of aerated blocks
Carrying out these calculations is considered the main stage of work, however, each stage of drawing up an estimate is extremely important. The calculation features look like this:
- In construction, it is generally accepted that 40 centimeters is enough to build an average strip of wall thickness. However, when carrying out work, it is necessary to take care of thermal insulation from mineral wool on the outside of the building. Otherwise, the heat loss of a building made of aerated blocks will affect its heating bills.
- Determining the volume needed for construction is quite simple: you will need to add up the length of each wall, then multiply the result by their height and thickness. The resulting value is an indicator of the total consumption in cubic meters.
- It is advisable to use special glue, as this will help reduce the consumption of the composition during construction. In addition, the seams will have a minimum thickness, which will have a positive effect on the thermal insulation of the room. This adhesive solution is easy to use and easy to prepare.
- Every three to four rows, the seams must be additionally reinforced with metal mesh. Its thickness should be 3 millimeters. Sometimes they are reinforced with reinforcement. To do this, cuts are made in the gas blocks, where the rods are placed, and then they are filled with mortar. The use of fiberglass reinforcement helps save heat.
- Window and door lintels are made from M200 concrete mortar. It is necessary to install the formwork, and after installation, pour the mixture inside. You will also need to make a belt of reinforcement in the upper part, the height of which should be no more than 30 cm. Due to this, it will be possible to correctly distribute the load of the roof.
Estimate for building a house and purchasing a plot
The estimate for building a house begins with taking into account the costs of acquiring the site. Currently, there are only two legal ways to acquire ownership of a plot of land: buy from the previous owner or buy from state or municipal property.
Buying a plot of land from a private owner is much easier. It doesn't require a lot of time. However, its price may be significantly higher than that of an equivalent plot in the event of redemption from state property.
There is a theoretical possibility of obtaining a piece of state-owned land for free. However, the number of people who have the legal right to do so is negligible.
To buy a plot of land from the owner, it is necessary to conclude a written sales agreement with him in accordance with the requirements set out in § 7 of Chapter 30 of the Civil Code of the Russian Federation (Articles 549-552, 554-557).
The contract must provide for the following conditions:
- subject of the contract (clearly indicate the data allowing to establish the conformity of the land plot to be sold: category of land, including intended purpose, area of the territory);
- the price of the purchase and sale agreement agreed upon by both parties.
After agreeing on all the details of the purchase and sale agreement and signing it, it is necessary to formalize state registration of the transfer of ownership of the land.
To do this, you need to contact the relevant judicial authority at the location of the acquired plot, submitting the following documents:
- registration application;
- registration payment receipt;
- contract of sale;
- identification documents of the buyer;
- cadastral plan.
The justice institution reviews the accepted documents and issues a decision on state registration within a month.
The justice authority puts marks on all title documents and then issues a certificate of state registration of ownership of the land plot. This completes the land acquisition procedure.
The situation with the purchase of land from state property is much more complicated. According to the law, a land plot intended for construction can become private property only as a result of a tender (auction).
Land acquisition is carried out in the following order:
- an application is submitted to local authorities with a request to provide a plot of land for the construction of a residential building;
- a topographic plan of this site is ordered from a special licensed organization;
- after receiving a copy of the topographic plan, an application is submitted to determine the absence of encumbrances relating to this site;
- when all the above documents are collected, an application is submitted stating that there are no (or presence) prohibitions on construction on this site;
- the entire package of documents is submitted to local executive authorities or self-government bodies to make a final decision.
Based on the submitted documents, local authorities make a decision on an auction, the subject of which is the ownership of the land plot.
The auction is held within a month after the decision to hold it is made. If no one except the initiator of the auction has expressed a desire to participate within a month, the applicant has the right to buy the land plot by paying its nominal value.
The protocol of the auction results serves as the basis for drawing up a contract for the sale and purchase of a land plot. In practice, a lease agreement is concluded between the auction winner and the local government for a period of three years. During this time, the developer is obliged to erect buildings in accordance with the intended purpose of the site. Only after this the plot is finally transferred to the owner as private property.
Approximate costs for purchasing a plot. The amount of state duties for various actions in relation to land is small. But most activities for registering land ownership are carried out by licensed firms. They charge for services according to their own price lists.
DIY aerated concrete house
It is quite possible to build a house from aerated concrete yourself. First of all, set aside a place to store materials and tools. Start construction work when the air temperature is from +5 to +25 degrees.
Before you begin the process of building a house from aerated blocks, you should consult with experts and take into account all their recommendations.
Helpful advice! It is very easy to distinguish home-made aerated concrete: the geometry of the blocks is broken, the structure of the material is uneven, and the products emit an unpleasant chemical odor, most often lime.
4.1. Foundation for a house
As is known, aerated concrete is poorly resistant to bending deformation loads. A monolithic foundation can minimize deformation overloads. It is the monolithic foundation that can withstand different climatic conditions and ground vibrations without causing distortions in the structure. This will help avoid cracks in aerated concrete walls.
A house made of homemade blocks will be cheap, but this can have a bad effect on many characteristics of the building
4.2. Laying blocks
Before installation, you need to prepare the foundation. Cut-off or as it is also called horizontal waterproofing is done. Roofing felt will act as a waterproofing material. For leveling, a cement-sand mixture is applied to the waterproofing layer, which is made 1:3.
The laying of the first row is very important. How smoothly it is done, the quality of the subsequent masonry and the final result will be. To ensure that the masonry is level, use a cord and a level.
For installation, special glue is used, which is leveled using a trowel. The glue will prevent the appearance of cracks and “cold bridges” between the blocks, which will further increase the thermal insulation of the house. When the masonry is completed, the surface should be leveled with an aerated concrete plane. The next row of masonry begins from the first corner.
Laying blocks Tip! In order for the rows to be even, ordering slats should be installed, and if the walls are of a significant length, intermediate lighthouse aerated concrete blocks should be installed. The rows are laid with the next rows offset. The amount of displacement is approximately eight centimeters. The glue that has come out is removed using a trowel.
4.3 Reinforcement and flooring in the house
A house made of aerated concrete may still be subject to deforming loads. Hairline cracks may occur due to soil sedimentation, wind action or temperature changes. Cracks will not affect the load-bearing capacity of the masonry, but can worsen the appearance of the walls. To avoid this problem, reinforcement is used that prevents cracking of aerated concrete blocks.
Everyone knows that in order to avoid cracks, a house should be designed and built correctly. But reinforcing the finishing layers will be additional protection against cracks.
The reinforcement is placed in armored belts. When installing aerated concrete structures, inter-row reinforcement is not used. Correctly reinforce the first row of blocks that lie on the foundation, then every fourth row of masonry. In addition, it is necessary to reinforce the support areas of the lintels, structural parts that have a large load, as well as a number of blocks under the window openings.
Advice! When laying the reinforcement, the reinforcement should be extended 900 mm into the area of the lintels and under the window openings.
Reinforced support is placed under the rafter system at the level of each floor. To lay the reinforcement, use a wall chaser to cut the grooves. Then, the holes are filled with glue.
Advice! Support the slab on a reinforced distribution belt
Like any hollow material, aerated concrete cannot withstand direct support of floor slabs. It is not advisable to build houses made of gas silicate blocks higher than 1-3 floors. Important! It is not recommended to build houses made of aerated concrete above three floors.
Laying partitions
Laying partitions from foam and aerated concrete blocks can be done with glue or cement mortar. The geometry of the wall is checked using a plumb line, a level and a laser line builder. For guidance, a thick fishing line or nylon cord is pulled strictly horizontally between the adjacent walls. Before starting masonry work, embedded parts are driven (embedded) into the adjacent walls - reinforcing bars, metal plates, factory-made connecting elements. The partition is tied to the wall every 2-3 rows. The blocks are laid in a checkerboard pattern, avoiding vertical joints “one under the other.” You can cut the block using a regular hacksaw. The top row is cut to size with a small gap and attached to the ceiling using metal plates.
It is recommended to reinforce the masonry with fiberglass mesh. The first three rows and the three rows on top are necessarily reinforced. Upon completion of the masonry work, the partition is plastered on both sides and left until completely dry. When the partition is dry, you can proceed to finishing work.
Do you need reliable interior partitions? Contact Cottage Expert. Visiting the site and drawing up an estimate is free of charge; the pre-agreed contract amount remains unchanged throughout the entire cooperation.
Foundation
Let’s immediately begin to debunk myths and misconceptions:
- Aerated concrete blocks are lightweight, which means you can save money on the base.
- A building made of such material can only be installed on a concrete basement floor, which increases the construction price.
One thing should be said: a good foundation is one that is capable of providing a constant shape to the structure, regardless of the material of the latter. We can agree that the blocks will not put much pressure on the ground, so this will not be decisive when choosing a foundation.
You should also not consider a foundation made of aerated concrete; it should be built from “solid” material. The best option for cellular concrete at the moment is considered to be a reinforced concrete slab, which can ensure uniformity and a minimum level of shrinkage deformation.
Also, the foundation for such houses can be a strip monolithic foundation installed on a sand cushion or a columnar one, tied with a monolithic reinforced concrete belt.
Manufacturing of strip base
Conclusion
In this material, we tried to show the phased construction, indicating the necessary key points to which special attention should be paid. You should have understood that experts consider the best foundation to be a reinforced concrete slab, and the laying solution is glue (see also the article “Service life of concrete: extending the service life of a concrete structure”)
They also talked about reinforcement and the properties of the material to absorb moisture, which must be taken into account when finishing buildings. The video in this article will help you find additional information on this topic.