Beton-House.com
Website about concrete: construction, characteristics, design. We combine the experience of professionals and private craftsmen in one place
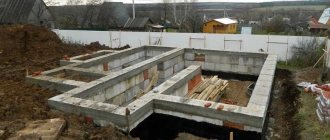
Concrete caisson
When constructing drinking water wells, it is necessary to resolve the issue of access to the well head and well equipment for their maintenance and repair. And also provide them with protection from freezing and flooding by groundwater.
To do this, caissons are installed above the head - special sealed cavities with access from the outside. They can be made of different materials, including modern ones. But for now, one of the most popular options remains a caisson made of concrete rings for a well.
This article will tell you about its advantages and pain points, as well as the features of constructing caissons from reinforced concrete rings.
- Design elements
Device
This is a sealed container made from different materials. At the bottom there is a pipe coming out of the well with water and a casing. The terminal should be located below the freezing level of the soil in your area. The height can be from 1 m to 2 m. The diameter of the structure must allow for normal installation and maintenance of the installed equipment.
Advice: in case of flooding of the caisson, it is recommended to make drainage.
Description
A concrete caisson is a sealed container that protects well equipment from mechanical damage. In addition, this structure provides:
- protection against penetration of animals and plants into pumps;
- concentration of water supply equipment in one place;
- protection of equipment from flooding;
- avoid freezing of pump parts.
The installation of caissons for wells, due to the tightness of the space, increases the service life of all structural elements.
In addition, equipping such a well with rings allows you to place the pumping equipment as close to the surface as possible without fear of freezing.
Arrangement of the CDS
Equipped with the following equipment:
- Pump: submersible or surface pump.
- Filtration system.
- Hydraulic accumulator.
- Automation block.
- Shut-off valves.
- Pipeline.
- Check valve.
- Measuring instruments (pressure gauge, etc.).
Installation must be carried out in accordance with certain requirements:
- Depth not less than 2000 mm.
- The casing pipe should be in the center of the pit.
- When constructing a container made of concrete, a base of crushed stone and sand is built.
- The walls of a concrete or brick KDS must be waterproofed.
- The pit should have dimensions 300 mm larger on all sides around the perimeter.
- When purchasing a PVC structure, waterproofing work is not required.
- From the inside, the structure must be insulated with heat-insulating material.
- Subject to the presence of groundwater, the chamber is mounted ready-made. All actions to prevent moisture penetration occur on the surface.
Concrete structure
Installing a concrete caisson is easy to design, but requires the use of additional equipment, since such elements are difficult to lift by one person. Unlike its analogues, this material has a number of advantages:
- high strength;
- heavy (will not float);
- lasts a long time;
- cheap.
At the same time, caissons made of reinforced concrete rings have a number of disadvantages:
- require digging of a volumetric pit;
- during installation they require the presence of lifting equipment;
- not sealed.
A concrete well protection structure is ideal for:
- Low groundwater level.
- Areas where lifting equipment passes.
Installation of a structure made of concrete links has an attractive turnkey cost!
Types and their sizes
The main requirement for choosing a material is tightness. There are several options to ensure this:
- Steel. Can be square, rectangular and cylindrical. The structure must be insulated and protected from corrosion.
- Homemade concrete. There are two options: installing rings or pouring a reinforced concrete structure over formwork. Concrete also needs insulation and waterproofing.
- Made of brick. The low thermal conductivity of the material requires mandatory insulation, especially if the masonry is made of one brick. Waterproofing measures are also required.
- Plastic. These are ready-made containers produced in a factory. They are light in weight. At the same time, they are distinguished by high rigidity. They are completely sealed. If good insulation is done, plastic containers do not need to be buried in the ground.
Pit
From the point of view of the complexity of installation work, the simplest do-it-yourself well for a well is a pit, which has the following features:
- This is a depression dug around the head to accommodate the shutoff valves.
- Its depth is usually at least one and a half meters, and the walls need to be lined with brick or filled with concrete. In addition, if in the area where the property is located the soil freezes to a great depth, it is advisable to insulate the well body.
- The upper part of the pit can be covered, but this solution will not provide the required tightness.
Its main advantage is that it is possible to build a well for a well with your own hands, using improvised materials. But inside it there is a significant level of humidity, as a result of which it is impossible to install automatic control equipment there, as well as hydraulic accumulators and other devices.
pros
This will help determine which caisson is best to build.
| Advantages | ||
| Varieties | pros | |
| Plastic |
| |
| Reinforced concrete |
| |
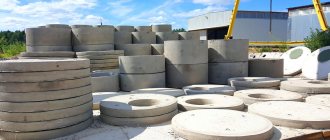
| Concrete rings |
| |
| Brick |
| |
| Metal |
| |
Adapter
This type of well for a well, compared to a pit, refers to structures that are mounted directly on the casing of the source:
- It is usually made of plastic or steel. The second option is preferable, since it can provide better tightness.
- The housing is mounted so that the water supply pipe is located lower than the ground level.
The main advantage of installing an adapter is its affordable cost. But this option is only permissible if one casing is used for water intake. It is built under the condition that a well pump is installed on a pipe, since suspended systems are created differently. It is important to choose the right pump for the well so that you do not have to change the equipment later.
Tools
The set of construction tools largely depends on the type of container, or rather, what material it is made of. However, in any case, a shovel and buckets are needed.
Advice! You can speed up the digging process by renting special equipment. But sometimes this is impossible due to its size and the difficulty of accessing the source.
The following tool is needed:
- Concrete mixer.
- Shovels.
- Master OK.
- Tamping.
- Hammer.
- Trowel.
- Level.
- Buckets and the like.
The work may require:
- Sand.
- Cement.
- Crushed stone.
- Pure water.
- Fittings.
- Additives (giving concrete improved properties) and so on.
Creating well walls for a well
The instructions describing the construction of the walls of a caisson well with a well provide for the step-by-step execution of the work:
- All surfaces are covered with dense polyethylene. Thanks to this, a waterproofing contour is created that provides protection from moisture to the equipment located in the caisson.
- Having stepped back 5 centimeters from the grid, they begin to install the reinforcement strapping, which is a lattice whose cell dimensions are about 20 - 25 centimeters.
- For reinforcement, use a rod with a thickness of at least 5 millimeters.
- Then the formwork is installed using beams and boards. Since the walls should be quite thick, it is necessary to provide space for spacers that will protect the structure being created from being squeezed out by the concrete mass.
- To prevent the solution from leaking, the inside of the formwork is lined with polyethylene, attaching it to the beams and boards using a construction stapler.
- The concrete mixture is poured and processed using a vibration compactor, allowed to dry completely, which takes almost 4 weeks. On the 10th day it is allowed to dismantle the board panels.
- When the walls are completely dry, holes are made in them with a hammer drill in the places where pipes are planned to be installed. To prevent damage, they are placed in special metal sleeves when laying. The gap between the edge of the hole in the walls and the sleeve is sealed with self-expanding foam.
An alternative to concrete walls is brickwork or reinforced concrete rings. But in the second case, increased attention must be paid to sealing the seams.
How to do it yourself?
It is necessary to take into account a large number of nuances and carry out a number of preparatory work.
- Choosing a location. The well for the well is made in the same place where it was drilled. Therefore, there is not much choice here. It is important to take into account the pipe outlet. It doesn't have to be in the center. If the KDS is rectangular, then the exit may be on the side.
- Depth. The caisson made for the well must be placed taking into account negative temperatures. Otherwise, its effectiveness will be reduced to zero. This level differs in different regions of Russia.
- Trench for electrical cable and water supply. A ditch must be dug along which engineering systems are laid. The cable can be laid in the same trench as the water supply. But it should be placed in a protective casing. The depth of this trench should also be sufficient in cold weather.
- A pit is dug in the hole itself. It will be located around the casing.
- An important step is the process of insulating the walls. Waterproofing the structure from the outside is considered the most effective. Liquid bitumen is preferably used since a seamless coating can be achieved.
- As for insulation, it can be done from the inside if circumstances permit. It can also be done outside. In the latter case, the insulation must be protected from soil pressure. For example, when using rock wool, the soil will put pressure on the rock wool, reducing its effectiveness.
Technological process
Is it possible to drill a well in a well? Let's consider how to do this. But before that, you need to decide in which tank it is permissible to carry out work. There are no regulations or documented recommendations, so each case is designed separately.
The following points should be included here:
- Condition of well walls. The new design should not cause destruction of the rings or frame. To prevent this, inspection and elimination of defects and filling of cracks are carried out. The wooden channel is reinforced with additional strapping.
- Ring alignment. If there are deviations, they indicate instability of the sand cushion. Here, a well for a well will not be the best solution, since after breaking through a new water flow can wash away the ring. This will result in the destruction of the walls and the pipe that is attached to them.
An example with a possible misalignment of well rings Source yandex.net
Installation work involves strengthening the casing and the installed conductor. To do this, anchor bolts are embedded in the strong walls of the well along 4 axes. Steel profile racks are attached to them, which are aligned vertically. The support strips, in turn, are connected by rods for the purpose of edging at two or three levels (a square section is obtained). The same is done with the upper ends.
The following actions are performed with the conductor:
- a point for the well is planned;
- vertical corners are hammered around it;
- the strips are welded together along the perimeter;
- the structure is rigidly fixed with the binding of rings.
In the well, a pipe is then driven under the well, which acts as a conductor. Its end should be at the level of the outer edges of the well frame. After drilling is completed, the mine is usually backfilled. This way the canal will be protected from the effects of groundwater and wastewater, and the abrasive effects of solid particles in the soil.
Backfilling a well bottom with a borehole Source odstroy.ru
Step-by-step production
Each case has its own points that are important to pay attention to.
Reinforced concrete KDS
Pouring concrete walls:
- First, a pit is dug.
- A concrete base is poured as the bottom.
- An embankment is made of sand and crushed stone, which is carefully compacted and then filled with concrete screed.
- When the base has dried, the wall formwork is assembled.
- A reinforcing mesh must be made, which will give the structure the necessary rigidity.
- When all this work has been completed, concrete is poured.
- During the pouring process, the concrete should be penetrated to completely eliminate the formation of voids. Filling must be done in one visit.
- When everything has frozen, all that remains is to make the lid. You should put together a frame from wooden panels, also lay a metal mesh, and then fill it with concrete in one go.
- It is also necessary to dismantle the formwork and carry out hydro- and thermal insulation work.
- The lid must have an entrance to the basement and ventilation holes.
- The structure is complemented by a stationary or removable staircase.
Made from concrete rings
It installs faster. The work has the following order:
- A pit is dug with a diameter larger than the rings by 300 mm.
- The bottom must be dug strictly to the level.
- A cushion of sand and crushed stone is poured into the bottom and everything is compacted.
- If there is a bottom element, then it should be placed on the bottom using a crane. If not, then the bottom is filled with concrete. Don't forget about the hole in the bottom plate for the well pipe to exit.
- When the bottom is ready, the rings are installed. They are connected to each other with cement mortar.
- After installing the required number of rings on the outside, they are treated with waterproofing mastic. Be especially careful with joints.
- To lay communications, holes are made in the rings. After laying the pipeline and electrical cable, the holes should be treated with sealing material.
- A cover and hatch are installed on top of the structure.
- The ring caisson is ready for use.
Brick KDS
A brick building requires the longest time to build. The work proceeds in the following sequence:
- A pit is being dug, larger in size than according to the project.
- A cement-sand cushion is poured into the bottom and everything is filled with concrete.
- When the screed has dried, you can begin laying bricks.
- Be sure to use a level to check the horizontal and vertical.
- Decide in advance whether the masonry will consist of one brick or two.
- A height of 2 m can be laid out of brick at a time. The speed of laying directly depends on qualifications; if they are low, the process may take several days.
- After laying out the walls, you need to wait until the solution dries completely.
- After this, formwork is made to pour concrete into the roof of the structure. A frame made of reinforcement must be placed in it.
- Finally, the walls of the structure are waterproofed, insulated and buried from the outside.
- Hatch and ladder installed.
Advantages
The durability of concrete is the main advantage of this design over other types. By choosing this option, you will forget about the issues of equipment replacement and repair for the next 30 years. Even a brick caisson cannot compare in strength to cement. Plastic shelters will definitely not withstand such a load for a long time. Corrosion is not terrible for concrete, which cannot be said about metal caissons.
In addition, there are three more advantages:
- Short installation times. You can mount and install the rings on top of each other in just a few hours. With the help of a crane, it is quite possible to cope with this task in half a day. The duration of the overall process is limited only by the rate of concrete hardening.
- Easy to repair. In an emergency, you don’t have to dismantle the entire structure. Undamaged elements can be easily removed and reinstalled. Other types of caissons usually require complete disassembly.
- Saving money. Based on the estimate of materials, the shelter will be cheaper than similar types. Easy installation does not require significant investment in equipment and workers.
Maintenance and repair
Installing a caisson is one thing, maintaining it in good condition to increase its service life is another matter entirely. There are several tips and recommendations:
- From time to time check the structure for leaks. Especially if the camera is made of metal. The seams and the material itself may be subject to corrosion. If this is the case, then the problem areas are eliminated.
- Check the quality of the top concrete cover. Due to the influence of high temperatures, it is susceptible to destruction.
- Check the outlets of the pipeline and power supply for leaks.
- Check the outlet of the casing pipe.
Disadvantages of concrete caissons
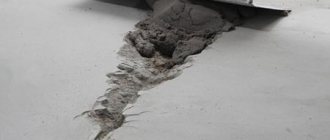
The main and almost irremovable disadvantage of concrete caissons is the impossibility of its high-quality waterproofing. Even if all the work is done very well, water penetrates into it over time.
The photo shows that there is water at the bottom of the caisson
It enters the well through the pipe outlet points and the exit of the casing pipe from the bottom of the caisson. It is simply impossible to waterproof the joint between concrete and metal, plastic or other material in such a way as to guarantee its tightness for many years.
If in the case of metal structures this is achieved by welding, and with plastic ones by means of special rubber cuffs, then any cement mortar or waterproofing materials collapse over time and lag behind the surface. And any microcrack is an open gate for moisture.
Water enters the caisson through pipe entry points
The most vulnerable place is the insertion of the casing pipe. Firstly, it is located below all the others and closest to groundwater. And secondly, due to the impossibility of external waterproofing of the bottom.
Even if the groundwater is low, the caisson can receive high water, flood and melt water that seeps into the ground in certain seasons. And this is fraught with great danger, since it carries with it pathogenic bacteria captured along the way from septic tanks, cesspools, barnyards and other “dirty” places.
If the water level in the caisson reaches the neck of the well, it enters it and becomes a fly in the ointment.
The entry of water into the well makes the water unfit for drinking.
Therefore, the installation of concrete caissons can be justified only in areas where the groundwater level never rises high, and the soil itself is stable and does not have a destructive effect on the joints of the rings and other structural units.
There is also no particular need to rely on thermal insulation in conditions of severe and prolonged frosts. This further limits the scope of application of such caissons to regions with warm or temperate climates.
Sequencing
The main thing is to determine the depth of the well. You will have to start from the depth parameter when arranging. A well up to 50 m is equipped independently using the following sequence:
- Find out the well depth and diameter. The indicators are easy to find out. For measurements you need to use a rope and a meter. Measurements are also carried out using special equipment, if available.
- Behind the installed pipe and in front of the earthen walls of the well and the structure, gravel is poured in the amount of 10 buckets.
- The remaining space behind the pipe and in front of the earthen walls is filled with dry clay or similar material. The structure of the material used must correspond to the characteristics of clay. The process involves the compaction process using long reinforcement.
- Prepare a mixture of liquid concrete and pour the liquid mixture onto the surface with dry clay. The filling process is carried out gradually to the very top. Slowness is a must to ensure smooth filling of voids. If the condition is not met and only gravel is used, melt water, waste liquids and sewage will flow through all the holes. When flooding occurs, the risk of pollution increases by an order of magnitude. Concrete protects against the penetration of wastewater into the structure.
- Protect the structure from freezing. Otherwise, the system cannot be used in winter. To do this, dig a hole 2 m deep and wide and leave a pipe 60 cm high. The dimensions of the hole are a mandatory requirement for the work. Ensuring closed access is carried out by ordering a steel head. The diameter is ordered wider than the structure itself. The floors in the pit are filled with concrete. After the composition has cooled, concrete rings are installed on the walls. You will need from 1 to 3 rings, depending on the level of freezing.
- There is no need to lubricate the seams and joints of the structure. Required to ensure water circulation in the system. The tightness does not allow any remaining liquid to be removed if it accidentally gets into the “house”.
- Make a lock for the lid of this “house” and provide insulation. It is necessary to insulate the structure to avoid condensation and ensure operation of the structure in winter at subzero temperatures. If necessary, the walls of the structure are additionally insulated. The hatch must correspond axially to the structure.
- Continue inside the sea otter (made of plastic). It contains water supply pipes and an electricity cable that powers the pump.
If the work is carried out correctly, melt water and sewage will not be able to get inside the structure and spoil the quality of the water supply. When properly protected, the structure can be used and maintained effortlessly. All well construction work is completed quickly. They can be completed in 2-3 days, taking into account the time for the concrete to cool.
Floor installation
When constructing a well above a well, a particularly important point is the correct installation of the ceiling, for which:
- A monolithic reinforced belt is made on the walls in the upper part, into which a reinforcing mesh is laid, and concrete mortar is poured into the formwork approximately 15 centimeters high.
- Boards with a thickness of 30 millimeters or more are placed on the contour, maintaining a minimum gap, while leaving space for the hatch.
- To ensure waterproofing, the boards are covered with polyethylene, secured with metal brackets.
- Formwork is built along the edge of the hatch and along the perimeter of the well and concrete is poured there, the mixture is leveled and left to dry. To ensure that the surface slowly loses moisture and the cement becomes as strong as possible, the well cover is covered with polyethylene. From time to time it is raised to moisten the concrete floor.
After the filling has dried, a hatch is installed in the hole. A steel corner is attached along its perimeter, and the lid is hung on hinges. To insulate it from the inside, polystyrene foam or polystyrene foam is used.
Why equip?
After drilling, the well must be equipped to avoid pollution, atmospheric phenomena and adverse factors. They negatively affect further operation. Between drilling a well and supplying the water supply to the house, selection of equipment, arrangement of the source and installation of the selected equipment are carried out. This kind of arrangement solves a number of problems:
- protection of equipment and the source itself from freezing during the cold season;
- ensuring cleanliness inside the source, which is guaranteed by its hermetically sealed closure along with the used equipment;
- formation of conditions for servicing and connecting equipment.