An armored belt for floor slabs is created with the aim of strengthening the structure of the structure, increasing the strength characteristics of load-bearing walls, distributing the total pressure of the roof on the walls and foundation, eliminating the negative consequences of soil subsidence, the influence of external deforming loads (wind, soil shifts, daily and seasonal temperature fluctuations, precipitation and etc.).
The strength level of the entire building and the actual resistance are influenced by: the thickness and height of the reinforced belt, the grade of concrete and the properties of metal elements, the design features of the frame, the correctness of the work and compliance with all norms and standards.
Armored belt design
A monolithic belt under the floor slabs is created to smooth out the loads from the weight of the roof, interfloor panels on the main walls (their end plane). In this way, it is possible to distribute the load from the floor slabs in the most optimal way, achieving the strength of the entire structure.
Design planning includes:
- Definition of construction type
- Selection of the optimal reinforcement diameter, mesh pitch, number of layers - the power should be greater, the less durable materials are used in the masonry of walls (for example, for lightweight floor slabs, you can use a not very powerful belt)
- Calculation of dimensions in accordance with area, design features
- The thickness of the armored belt is determined - usually equal to the thickness of the walls
Depending on the place of use, the armored belt can be:
1. Grillage – is a support for the foundation, is made in a special trench at a depth selected in accordance with the weight, number of floors, dimensions and other characteristics of the building.
2. Basement - created under all load-bearing walls to distribute the load on the foundation, the height is 20-40 centimeters, the width is equal to the thickness of the walls, it is made with 12 millimeter reinforcement, and is laid with waterproofing.
3. Interfloor reinforced belt for floor slabs - installed after each floor, strengthening the walls and increasing rigidity, preventing movement and deformation, distributing the load evenly.
4. Unloading - under the roof, simplifies the creation of a rafter system, secures the mauerlat to the wall, levels them horizontally, distributes the weight of the roof over the entire perimeter, preventing point loads.
Comparison of wood and concrete floors
The main difference between wooden floors and concrete floors is the speed of installation. But there are a number of other features of using wood.
In general, the use of wooden floors has the following features:
- have several times less weight than a concrete floor, this is important, because the load is transferred to the walls;
- installation takes at most a couple of days, after which it is ready for use, but in the case of concrete, you will have to wait until the mixture hardens and only then remove the formwork. Because of this, an unwanted interruption in work occurs;
No lifting equipment required for installation
- Low weight saves on crane costs. It is quite possible to lift the beams yourself, the maximum that is needed is a couple of assistants;
- the price of such a structure will be lower than when using concrete or reinforced concrete slabs. Savings are obtained not only due to the cost of the material, but also due to the fact that there is no need to rent a crane.
Of course, it was not without its drawbacks:
- wood, despite all the tricks, impregnation with an antiseptic, antipyretic, remains extremely vulnerable to insects, and even in the event of a fire, the antipyretic will not provide 100% protection from open fire;
Insects can destroy any wood
- wood is susceptible to changes in humidity levels in the room;
- Compared to concrete, wooden floors are more deformable. The deflections, of course, are small, but they are still many times greater than the deformation of a concrete slab;
- Due to the deformability of the beam or ribbed floor, problems may arise with the finishing of the floor. For example, a plastered ceiling may become cracked after a couple of years of use;
- problems may arise when it is necessary to cover a large span. There may simply not be beams of the required length in the warehouse, you will have to increase them, and this is a thankless task, and the joint remains a weak point;
Wooden beams can be extended using overlays
- Due to the design features, wooden floor beams unevenly transfer the load to the walls of the room. But this drawback cannot be considered critical; it is enough to simply arrange a reinforced belt, and on top of it lay a wooden beam around the perimeter of the room and then rest the floor beams on it.
You can simply lay a wooden beam on top of the wall to cover it
Despite the listed disadvantages, wooden floors do not lose popularity. They were widely used in the past (you can still find Stalin buildings with wooden floors) and continue to be used today.
What is the armored belt made of?
When considering this issue, it is necessary to take into account the preparatory work and the design itself. At the preparation stage you will need formwork. To construct collapsible formwork, planed wood in the form of special panels is used, while the stationary structure is usually created from polystyrene. In this case, it is important to ensure the tightness and rigidity of the formwork structure, so materials must be selected carefully.
Reinforcement with reinforcement is carried out using the following materials:
1) Concrete mortar mixed with cement grade M400 and higher. The solution is poured into the formwork frame, which contains the reinforcing mesh. When concrete hardens, it creates a power circuit along the perimeter of the main walls that can withstand various types of loads.
The solution is prepared according to a standard recipe from sand, crushed stone, and cement. Concreting is carried out in one go, with obligatory compaction with a vibrator to eliminate air cavities inside the slab.
2) Steel rods with a diameter of 8-10 millimeters with a corrugated surface. The rods are cut to the required sizes and tied with a special knitting wire into a rigid frame. Typically, the structure is made up of four rods arranged longitudinally and connected by transverse pieces of wire of the required size with a diameter of 6 millimeters. The mesh is made with square cells, the size of which depends on the diameter of the reinforcement used and calculations.
Basic rules for constructing a wooden floor
Despite the differences in design, there are several general rules for constructing wooden floors, for example, the issue of installing reinforced belts on the walls, methods of connecting beams to the wall, etc.
Floor design
One of its features is that there is a lot of free space inside the ceiling. This provides an excellent opportunity to increase its sound and heat insulation characteristics; it is enough to simply lay thermal insulation material in the space between the finished and subfloor.
We can suggest the following floor design:
- if a wooden floor will be installed for the floor of the first floor, then it is recommended to raise the beams using small brick pillars;
Note! In old houses you can find logs simply lying on the ground; this is a gross violation of flooring technology. No impregnation will save the tree from rotting if it just lies on the ground.
Floor covering device for the first floor
- then small wooden blocks are attached to the lower parts of the beams on both sides, that is, the cross section of the beam takes the shape of an I-beam;
- then the subfloor boards are attached to the resulting shelves;
- Thermal insulation material is placed in the resulting cells;
- In order to prevent the insulation from becoming damp, the ceiling must “breathe”, and moisture must pass only in one direction. For this, a special vapor barrier membrane is used. If the ceiling is installed on the ground floor, then the film is placed under the insulation so that moisture from below does not moisten the mineral wool, while the vapor barrier layer remains permeable from top to bottom;
- a finished floor is laid on top of wooden beams; its design may vary greatly. It is allowed to use OSB boards, and lay boards or any other material on top of them, even a thin cement screed can be arranged if desired.
One of the interfloor ceiling options
If you need to arrange an interfloor ceiling, then the waterproofing is placed above the insulation, otherwise the design remains similar. Unless the subfloor can be attached directly to the bottom of the beams/ribs. It is also worth thinking about the stairs in advance; the opening for the stairs in the wooden floor is provided at the stage of sawing the timber and boards.
Do I need a reinforced belt?
Many points have been broken in disputes on this issue, some say that an armored belt is simply necessary, others rightly note that a wooden floor weighs several times less than a concrete one, and you can do without it.
Both are right; the armored belt is being created for several purposes:
- it reliably combines the walls of the building into one whole, increasing spatial rigidity;
- thanks to it, the load on the walls themselves is distributed evenly;
- The armored belt reliably protects window and door openings from excessive deformations.
The concrete is poured, we just have to wait for it to harden
In the case of wooden floors, much depends on what kind of material was used to construct the walls. The fact is that beams can simply push through relatively low-strength blocks of gas or foam concrete. But to prevent this, it is enough to simply arrange support platforms or lay a wooden beam around the perimeter of the walls and attach the beams to it.
So it can be argued that an armored belt will not be superfluous, but not because of the large load from the ceiling, but solely for reasons of durability of the building. Moreover, this is not a very difficult task; all the work can be done with your own hands. It is enough to build a formwork 20-40 cm high, place a standing knitted frame (A-III reinforcement) in it and fill it with concrete.
Frame installed
Note! Of course, in wooden houses there can be no question of any reinforced belts.
Connecting the floor to the wall
Much depends on the material of the wall, as well as on where the ceiling itself is located (between floors) or at the floor level of the first floor.
The following options are possible:
- In the case of wooden walls, the interface is easiest to arrange. For this purpose, metal brackets are used, which are attached to the wall with powerful screws. The end of the beam is simply placed on a fixed bracket and is also fixed with self-tapping screws (there are holes for this in the bracket itself);
The beams can simply rest on the walls - if the walls are made of bricks or concrete blocks, then at the construction stage technological holes can be provided into which the ends of the beams are simply inserted. Otherwise, the instructions require punching a hole in the wall 2/3 of its thickness. In order to avoid problems when installing the beam, its end is cut at an angle of 60ᵒ;
One of the options for pairing a beam with a wall
Note! The end of the beam is carefully waterproofed. To do this, you can use bitumen coating waterproofing. Additionally, the end of the beam is wrapped with roofing felt at a distance of 10 cm from the wall.
- During frame construction, punching a hole in the wall or using staples will not work. Therefore, the ends of the floor beams/ribs simply rest on the top frame. To prevent them from moving under load, they are additionally fixed with steel angles on both sides.
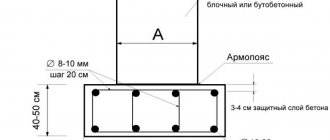
Height and thickness of armored belt
When creating a reinforced belt with a square section, its height is usually equal to its thickness. Rectangular designs assume that the height exceeds the width by 1.6 times.
The grillage should be 30-50 centimeters high, for soft unstable soil it is increased to 80 centimeters, sometimes up to 100. The height of the reinforced belt for basement-type floor slabs should be 20-40 centimeters, for interfloor ones - about 40 centimeters.
The thickness of the reinforcing contour must be equal to the width of the load-bearing walls of the structure. Although, in some cases, technology makes it possible to reduce the thickness of the belt, taking 0.7-0.8 of the thickness of the walls (if thick, lightweight blocks are used in the construction of buildings).
When it is necessary to strengthen building structures with a reinforced belt
An armored belt may be needed to implement the following tasks: increasing the strength of load-bearing walls, creating a level base for installing interfloor panels, uniformly distributing different types of loads, preventing wall deformation, reducing the negative impact of external factors on the building, ensuring maximum structural stability, increasing the safety margin.
When it is necessary to create an armored belt:
- In multi-storey construction, where this is prescribed by building codes
- When constructing walls made of porous materials (aerated concrete, cinder block), which can wrinkle and collapse
- If construction is carried out on soft soils and there is a possibility of settlement, the monolithic belt will act as a screed and will not allow cracks to appear
- When the foundation is shallow or made of prefabricated blocks
- The house is being built in a seismically active zone
The need to install a reinforced concrete belt can be avoided in cases where the main walls are built from brick or block with good strength characteristics, and the foundation is poured below the freezing point of the soil. In other cases, the question of whether an armored belt is needed for a monolithic ceiling is not raised at all: the reinforcement contour becomes a mandatory element of the structure.
Blitz tips
- When pouring the cement composition, you should ensure that the elements of the reinforced mesh do not touch the walls of the formwork.
- To increase the functionality of the armored belt, a frame made of reinforcement is installed on the surface using a level.
- The strength of concrete after it is poured is facilitated by periodic moistening, especially in hot weather. It is recommended to moisten the structure every day for five days. The best effect is achieved by covering the moistened surface with plastic film.
- The formwork can be removed after a week, but it will function as intended only after two weeks, when the cement mixture has completely hardened.
- If you plan to insulate the unloading belt, then you should not make it flush with the wall. Experts recommend shifting the formwork inward with the further purpose of filling the resulting niche with insulating, heat-insulating material.
- There is no need to spend money on a reinforced belt if there is strong soil not saturated with water under the foundation, brick walls, and also when building a one-story house with wooden beams rather than reinforced concrete panels.
Reinforced belt under prefabricated and monolithic reinforced concrete floors
In this case, the contour significantly increases the load-bearing capacity of walls built from blocks with a cellular structure, eliminating problems caused by the porosity of concrete and its instability to deformation. The reinforced belt allows you to evenly distribute the loads from the roof and interfloor ceilings, eliminating local forces, which often cause cracks.
In addition, this type of structural strengthening protects the building frame from cracking, smoothes out the effects of sudden temperature changes, and significantly increases the service life of the masonry. Reinforcement from reinforcement and concrete connects the entire frame of the structure and the floor slab into a single power circuit, which is very important.
Getting ready to make a reinforced belt for floor slabs: building materials and tools
To pour a monolithic reinforcing belt, it is necessary to calculate the consumption and purchase the following materials: plywood and planed boards (or polystyrene in sheets) for formwork, all components for concrete mortar (gravel or crushed stone, cement, sand), steel reinforcement for the structure itself and binding wire for its assemblies, polyethylene film (seals the formwork), fasteners (nails, screws, self-tapping screws) for assembling the formwork structure.
Tools that may be needed for work:
- Concrete mixer for preparing concrete mixture
- Hand hook for tying reinforcement
- Grinder + metal circle for cutting steel rods
- Plumb + building level for measurements
- A device for bending reinforcement - if rods of increased diameter are used
Technology for constructing a reinforced belt (main stages)
- Preparing the base, cutting blanks for the formwork structure
- Assembling formwork from the selected material
- Cutting rods in accordance with specified sizes and in the required quantity
- Assembling the frame - knitting rods with wire
- Preparation of concrete solution
- Filling the formwork with mortar - preferably in one go, tamping with a vibrator or manually to remove air cavities
- Spraying concrete with water to avoid microcracks
- Dismantling the formwork after the concrete has hardened
For houses built of brick, it is possible to create a belt from this material. The contour is constructed during the process of laying the walls, the design corresponds to the features of the building. For a brick belt, there is no need to form formwork, since the reinforcement is placed directly on the brick. When using mesh, you need to choose sheets with a rod thickness of at least 5 millimeters.
Belt composition
As the name implies, the base is a monolithic beam made of concrete. The cement mixture itself acts as the basis of the belt, forming a reliable support. If we are talking about construction on a home construction site, then you should also prepare means for creating formwork. A niche is formed from the timber for subsequent pouring of concrete. The formwork can be made from boards 2.5 cm thick. The better the quality of the wood, the more perfect the geometry of the structure will be - accordingly, the monolithic belt will fit more neatly into the frame of the house
Special attention is paid to the reinforcement of the structure. Reinforcement with metal rods is the key to the strength of the beam itself, so you should also prepare for the introduction of reinforcing bars using, possibly, a welding machine or a specialized tool for knitting iron rods
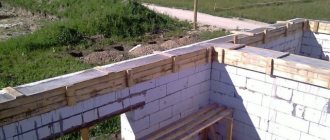
What formwork materials can be used
The first stage, which involves reinforcing the reinforced belt under the floor slabs, is the creation of formwork. The width is equal to the size of the wall, the thickness is about 30 centimeters. Most often, planed wood 2 centimeters thick is used, fastening the boards with screws 5 centimeters to the top of the wall, additionally strengthening every 100 centimeters or more often.
The side edging is fixed with strips or threaded rods. The boards must be fixed horizontally, level, airtight, and securely.
They also use moisture-resistant plywood, impregnated with pre-used oil, which will facilitate installation. Extruded polystyrene slabs are most often chosen for arranging thermally insulated formwork.
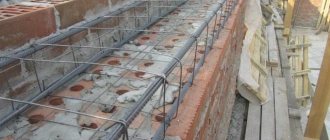
Installation of fittings
Reinforced concrete tape is performed with a certain sequence of work: first, the rods are cut, then they are laid on clamps or pads along the formwork, tied with wire (this is the bottom layer), transverse rods are installed on them and the top layer is attached. Afterwards, the elements are fastened with wire or threaded rods.
Usually, ribbed rods with a diameter of 12 millimeters are used, and they are used to assemble a parallelepiped or ladder. But it is better to take 12 millimeters for the first layer, 6 millimeters for the second, and 10 for transverse fastening. The transverse frame can be welded in the center and along the edges, and the entire volume of rods can be tied together.
The frame must be recessed in the concrete solution by several centimeters, the distance from the edges is 5 centimeters. The knitting wire can be of a minimum diameter, since its thickness does not affect the strength of load-bearing external or internal structures, but significantly increases the time and money required to complete the work.
When both layers of mesh are ready, they are laid, welded together at the edges and in the center, creating a frame with a square or rectangular cross-section. It is better to carry out this stage of work in formwork, so that later you do not have to transport the part, the large weight of which is noticeable.
In the process of assembling parts into a single mesh, welding is not used - it is enough to overlap 20-30 centimeters between the parts. The entire structure must be evenly located inside the formwork; a building level is used for measurements.
If the reinforcement is laid in polystyrene concrete or other blocks, then grooves are first made with a wall chaser, they are cleaned of dust, moistened, and filled with softly mixed concrete mortar or glue. Then they lay corrugated metal rods with a diameter of 8 millimeters in the grooves, remove excess adhesive, and continue the construction process.
Classification of wooden floors
Depending on the design, the following types of wooden floors can be distinguished:
- beam - powerful wooden beams with a cross section of approximately 20x10 cm, or even more, are used as load-bearing elements. A rough and then a finishing floor is laid on the beams; the distance between the beams can reach 1.5 m;
The photo shows an example of a beam floor
Note! The span of the beam should be selected based on the thickness of the flooring boards and the expected load. The smaller the span, the less deformation of the deck under load.
- ribbed - differs from beam in that instead of thick wooden beams, ribs are used (wide but relatively thin boards, for example, 15x4 cm). They also differ from beams in that the step between individual ribs is small, which makes it possible to use thinner boards for flooring;
Ribbed floors differ from beam floors with a smaller pitch between the ribs
- beam-ribbed - beams and ribs are combined. The ribs can be located either on top of the beams (in this case, the work is easier to do, but the thickness of the ceiling will be quite large), or at the same level with them (the installation process is a little more complicated).
Combination of beams and ribs
From the point of view of rigidity, the leader can be considered a beam-ribbed floor. With the same load, it is in this design that the deformations are minimal, and the load is distributed more evenly.
How to pour concrete
To fill a monolithic frame, use a concrete solution, following the recipe: 5 parts gravel, 3 parts sand, 1 part cement, completely mix the dry components, gradually add water until a thick solution is obtained.
The stage is performed in one go, having prepared the required volume of the mixture in advance. In the process of filling the formwork, it is necessary to remove voids with a vibrator or bayonet, check the horizontal level, eliminating differences. Then you need to carefully plan the surface and cover it with plastic film.
During the hardening process, be sure to periodically moisten by spraying. The concrete hardens within 3-5 days, and it will be possible to lay slabs on it, extending 12 centimeters onto the walls for reliability. When the layer has completely hardened, you can dismantle the formwork (but not break it) with a nail puller or crowbar.
How to make an armored belt with your own hands
Before construction begins, if there is no design, drawings or sketches are made.
The loads are first collected, the required geometric dimensions of the beam, and the diameter of the working and strapping reinforcement are calculated. It is important to decide how and where to make the frames, not forgetting about the insulation, supports, as well as the type of formwork, fastening, method of preparing concrete, and pouring it.
Reinforcement and pouring concrete
When constructing yourself, you should follow the technology and adhere to the following tips and recommendations:
- Use prefabricated concrete grade B25 and fine gravel.
- The mobility and workability of the mixture are increased by plasticizers. Adding water degrades the performance of concrete.
- There is no need to use vibrators when compacting the mixture; the concrete is poured carefully. Try not to damage the formwork or shift the reinforcement cage.
- The studs for fastening the Mauerlat are installed evenly, at the same level. The top of the thread is wrapped with tape to protect it from concrete splashes.
- It is allowed to install ceilings and fasten the mauerlat after the concrete has completely hardened.
- Under all types of floors it is necessary to lay waterproofing with a thickness of 3-4 mm.
- Filling is carried out in one step, without forming a joint.
- Before laying concrete, the formwork walls are wetted with water.
Work related to the installation and filling of the armored belt can be easily done independently, with 3-4 assistants. The main thing is to follow the technology of the installation processes. A properly constructed armored belt is the key to long-term operation of a house made of aerated concrete.
Technology for attaching Mauerlat to aerated concrete
Which floors are best to choose for a house made of aerated concrete?
Monolithic floor technology - how to do it yourself
Do-it-yourself technology for building a house from aerated concrete blocks
Insulation of armored belt
The reinforcement circuit acts as a conductor of heat, so without proper insulation, cold bridges will appear, significantly worsening the thermal insulation characteristics. Before finishing work begins, insulation is placed in the recesses remaining after dismantling the formwork.
Typically, insulation is created to the height of the belt along the entire facade. In two-story buildings, if there is a belt between the first and second floors, including after the second floor under the Mauerlat, two insulating belts are created along the facade.
Most often, polystyrene foam 8 centimeters thick, grade PSB-S 25, is used; the height of the insulating contour is calculated as follows: 15 centimeters + height of the reinforcing belt + 15 centimeters, attaching the insulation below and above the contour lines at the specified distance.
To make the thermal insulation layer durable, a drip with a drip is installed in the upper part, which will drain melt and rain water from the reinforcing circuit. The ebb is placed with a slope from the wall, made of galvanized sheet steel and coated with polyester. They are fastened by cutting above the insulation belt, the top edge is brought in, then sealed and secured in increments of 30 centimeters.