Before finishing or cladding begins, the wall must be cleaned of dust, dirt, construction debris, and then leveled. Before plastering or covering the surface, you need to get rid of uneven surfaces. These include nails and screws.
The hardest thing to get is the dowels. Fasteners for different types of surfaces have increased rigidity. Removing them if you lack experience can be difficult. It will not be possible to carry out the procedure without additional tools. You will have to use construction equipment. Depending on the type of fastener that needs to be removed, you will have to use different methods.
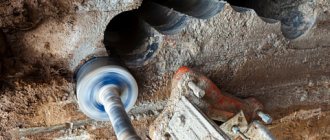
Stuck anchor
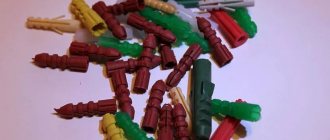
Plastic dowels
To get a plastic dowel, you may need certain tools and skills. But often the removal of such fastenings is easy and quick. Plastic dowels can be made of nylon, plastic, or other elastic materials. They are produced with different profiles, any depth of studs, and can be made with mustaches that fix the sleeve in the monolith.
The easiest way to remove such dowels is to screw a strong corkscrew into the element: first remove the screw/screw from the plastic shell, then screw the corkscrew clockwise, pull it towards you and swing it, carefully remove the sleeve.
- Removing the dowel using pliers or wire cutters - to do this, you need to secure the tool to the plastic element, and then carefully pull with force and at the same time loosen it.
- Melting with a soldering iron - there is also a method for removing the dowel. Suitable for cases where the plastic element is broken. It is melted with a soldering iron, then removed or hammered into the wall monolith.
- Using a metal tube - find a pipe of suitable size, stuff it onto a plastic rod and simply remove it.
- Screwing in a suitable self-tapping screw 2/3 of the length of the dowel, then sharply pulling it out.
- Using a drill and a drill, the length is equal to the dowel - several holes are made around the element with a drill, then the loose rod is picked up with wire cutters/pliers and all that remains is to easily remove it.
When the dowel is in such a state that it is impossible to grab and remove it, you can use another, but slightly more time-consuming method. It consists of melting the plastic surface of this element. To do this, you will need a torch or a regular soldering iron, which almost everyone has in their home tool kit.
With a heated soldering iron, you need to touch the plastic shell and hold it until it heats up and begins to melt from the temperature. A dowel that is reduced in diameter will be easier to unscrew from the wall. But if this method does not help, then you can always return to the option with a screwdriver and a hammer and hammer the dowel inside the wall, covering it with putty.
Removing old and rusted fasteners
How to remove a dowel from a wall if it has been in the damp environment of the bathroom for a long time and is covered with rust and hard layers of dirt? In this case, you will need WD-40 penetrating liquid or a solution of food grade acetic acid. First you need to pour a vinegar solution over the rusty fasteners to be dismantled. This will help dissolve the oxides and free the threads on the screw. If this does not help, then after rinsing the dowel with plenty of water and letting it dry, treat the fastening area with WD-40. Judging by the reviews, it easily penetrates cement building materials and softens them, and also facilitates the removal and rotation of the screw in the sleeve.
How to remove a dowel from a wall? Treatment with soap is also effective. It will help dissolve fatty deposits and penetrate into the pores of the wall. Also, being a good anti-friction agent, the composition will allow you to unscrew the fasteners.
The best means
There are many ways to secure the mount. I advise craftsmen to wrap the dowel with a moistened plaster bandage or polyethylene, use wooden choppers, and fill a hole that is too wide with hot glue or liquid nails. Putty, epoxy resin, and repair cloth will securely hold the fasteners.
putty
Suitable if the funnel is large and the wall around it has cracks. It's better to take adhesive putty. After hardening, a dense plug is obtained. Moreover, it is easy to apply.
What should be done:
- Screw the screw into the dowel.
- Moisten the wall surface and holes with a spray bottle.
- Apply the prepared putty with a spatula if the hole is shallow.
- Remove excess.
- While the cork is still wet, place a screw in it.
To quickly fill deep holes, use a disposable syringe. The fastener can only be loaded after it has fully set.
Epoxy resin
Putty can be replaced with epoxy resin or glue. To make the mass plastic, add filler. What will suit:
- chopped fiberglass;
- fine sand;
- sawdust;
- ground cotton fiber;
- silverfish
The mixture should be viscous and elastic. Make small balls. Push them into the hole with the blunt end of a pencil or other suitable object.
Epoxy glue is best for metal dowels. It is degreased and inserted into the hole filled with mass. After this, the screw is screwed in. You can use the mount after 12 hours, when the glue has completely hardened.
Repair cloth
Designed specifically for cases where the funnel in the wall is too large for the dowel. Suitable for fastening in concrete, brick, aerated concrete. The round napkin is coated with a special compound. To make it work, wet it. Wrap the plastic mount and insert the entire structure into the funnel. After three minutes, screw in the screw.
Pulling algorithm
A protruding nail disrupts the aesthetic appearance, so it must be removed or hidden. When removing old fasteners from the wall, your wits and ability to use power tools will come in handy.
- The element that rises above the surface can be removed by rocking and unscrewing it. Loosen it with a hammer, hitting it on the protruding part from different sides. Then you should grab it with pliers or wire cutters and pull it out. It will not be possible to get it out if you pull it out of the hole using only translational force. If the fasteners are of significant size, it is advisable to use a nail puller, which will help remove them with less effort.
- Much more patience is required when it is necessary to remove a broken dowel if it is difficult or impossible to grasp or hook. The plastic case must be heated and melted with a hot soldering iron. This allows you to remove it from the wall using pliers or other similar tools.
- A metal tube, the diameter and length of which should be slightly larger than the fastener, often helps to get it out. It is driven in so that the bushing is inside. Then, at the same time, the nail should be pulled out.
- In the most hopeless situations, the dowel is removed with a hammer and drill. Using a drill of the required size, make several holes (recesses) directly around the socket. As a result, the strength of the nearby part of the wall decreases. The element can be easily removed with a suitable tool (pliers, wire cutters, etc.), then the surface is leveled with putty or plaster.
It is often necessary to remove the remaining plastic casing in the wall without a metal rod. Experts advise doing this:
select the appropriate self-tapping screw of the required size for the sleeve (about the types of screws for concrete), screw in three-quarters of the length, then loosen and remove; use a hand corkscrew to remove the dowel, carefully unscrewing it; if you can’t pull it out using the methods listed above, you should try cutting off the protruding parts with a knife, and hammer the rest into the wall; drill out the plastic bushing, selecting a tool of equal or larger diameter.
Before carrying out work, builders recommend assessing their feasibility. It is really necessary to think about pulling it out if you need to make a new hole nearby. For example, if you need to hang a new cornice in the same place, but the old fasteners do not fit.
The resulting depression, after you manage to remove the nail, will become large and will have to be sealed. To do this, you need to fill it with putty or plaster, apply a paint mesh, clean it, and level the surface with sandpaper after drying.
What to do if a dowel falls out of the wall?
The condition of the concrete does not always correspond to the required level, since low-quality mortar was used during construction. Interior partitions and window openings are made of material that, after decades, has become loose and free-flowing. In houses like this, nails fall out.
There are several ways to solve this problem:
- Drill a hole in the concrete, remove particles, fill it with liquid nails or epoxy glue. After thickening, install the dowel. Items can be hung after ensuring final curing.
- Screw a layer of electrical tape in the direction of the thread (ordinary cellophane will do), the resulting thickness should ensure a tight fit into the hole. Then drive the element into the plastic case, due to this it will expand, which will increase reliability.
- Wrap the dowel with a damp bandage (just wet it enough) until the required diameter is obtained and install it in the walls; you can immediately drive a nail. Use the fasteners for their intended purpose after the liquid has completely evaporated.
The main thing is to adhere to the rules that ensure reliability and durability during operation: make additional reinforcement, select an element with dimensions larger than usual.
| Articles |
Quite often, when performing various types of repair work, you can stumble upon certain difficulties. It happens that a seemingly simple and understandable procedure causes a lot of problems. So, for example, not everyone can answer the question of how to pull a dowel out of a wall without preparation. The thing is that the design of this fastening element is precisely aimed at holding it firmly in the wall and preventing easy removal. However, there is a way out of the situation, and even more than one, which will be discussed further.
Sequencing
To remove a stuck dowel, you need to have certain tools with you and use them correctly. The following will be useful for work:
- screw of the required size or corkscrew;
- hammer or punch;
- pliers, wire cutters or nail puller;
- a fairly sharp knife and chisel;
- soldering iron;
- Bulgarian.
To remove a wooden dowel you need:
- Using a self-tapping screw, try to screw it into a wooden product, which will help remove the entire structure;
- another option is to split the product into smaller pieces, which may require a hammer, knife or chisel;
- remove those fragments that have broken off and do not sit tightly in the surface;
- due to the absence of some elements, it will be easier to loosen the remaining wooden dowels and remove them completely.
After the wall is cleared of wood chips, you can putty it and completely level it.
To remove a plastic dowel from the wall, you need:
- select a self-tapping screw that matches the dimensions of the dowel and screw it in so as to capture part of this part;
- if you don’t have a self-tapping screw at hand, you can try to take a corkscrew and screw it into a plastic part using the same principle;
- once the object is captured, you can gently pull it towards you;
- if the product does not fit and sits tightly, you can widen the hole near the dowel so that it can be loosened and moved from place.
If it was not possible to remove the plastic part, or the self-tapping screw broke during removal, you can try to drive everything into the wall to putty the surface, leveling it.
To work with metal dowels, you should use other measures:
- if the edge protrudes from the wall, you can hit it from different sides with a hammer to loosen the entire structure, which will help make it easier to get out;
- if the surface is too strong , and it was not possible to move the metal part, you can drill several holes near it and repeat the first procedure;
- If both options do not work , then you need to cut off the edge of the dowel using a grinder and putty this area.
If, during the process of driving in the dowel, part of it breaks off and the base remains inside, there is no point in removing it; it is much easier to drive this part deeper and use another element.
When leaving metal parts in the wall, it is important to remember that over time they can rust on the surface, so you should take care to bury the unnecessary item as deeply as possible.
Dismantling methods
The use of dowels is necessary for better fixation of fasteners in any surface. Dowels can come in different shapes, sizes and materials, so it is important to know how to work with them. If the installation process of this element did not go according to plan, you need to know how to remove the dowel from the wall. There are several reasons for such actions.
- The need to remove the dowel from the wall if it is not needed. The outer part of the product may protrude on the flat surface of the walls, which looks unsightly if new wallpaper is hung.
- Preparing the walls for puttying and painting, for which the most important factor will be the evenness of the surface, therefore all excess must be removed.
- Using one item instead of the previous one . If a painting was placed on the wall, a small dowel might be required to install it. When a picture is replaced with a modern TV, more powerful mounts are used for mounting, so the old ones are removed.
- Changing the design of the bathroom, when hanging shelves are removed, instead of which more spacious cabinets are installed, and it becomes necessary to remove all excess from the tiles.
- When replacing a wooden window with a metal-plastic one, you need to remove not only parts of the product, but also the dowels that hold the frame and window sill.
The reasons why there is a need to remove dowels from different surfaces may be different, but most often they are associated with curvature or breakage of the product.
In some cases, a nail or self-tapping screw may break off in the dowel, and if the broken object cannot be removed, this becomes the basis for removing the entire structure.
Since the procedure for removing dowels is quite common, it is important to know exactly how it should be done. There are several popular techniques:
- hammering in fasteners protruding from the wall;
- using pliers or wire cutters that will be able to grab the edge of the dowel;
- melting the edge of the plastic part, which will allow you to remove it or deepen it into the wall;
- using a metal tube equal to the diameter of the dowel, stuffing the tube will allow you to remove the part from the wall;
- drilling the surface near the stuck object in order to loosen it and grab it with pliers.
Depending on the material of the dowel and the surface from which it is removed, the sequence of actions may vary.
How to remove a dowel
Sometimes, during repairs, it is much easier to break something rather than carefully pull it out. But there are times when it’s almost impossible to even break it. We are talking about old dowels, which sometimes get stuck in the wall so tightly that they cannot be pulled out right away. It happens that it is not even possible to imagine how to remove this very strong fastener. It all depends on what kind of dowel you have in front of you and how much patience you have. So how to remove the dowel? Now you will find out everything.
Metal dowel
A metal dowel is much more difficult to pull out than any other. To do this, you need to take a heavier hammer and loosen the fasteners. If nothing works out, then you need to do it, or rather drill another hole closer to the dowel. This will make it much easier to loosen. Next you just need to pull out the loose dowel. This will definitely not cause any problems.
Plastic dowel
Sometimes, during renovation, when you remove old wallpaper, you may notice an old, long-forgotten dowel. It's unlikely that you need it that much. It is much easier to pull it out than the metal one. You will even be surprised how much. You don't need to pull it out at all. Why isn't it necessary? You yourself understand that after its removal there will be a huge hole in the wall, a hole that will increase. It’s unlikely that you really want to spend extra time and effort on sealing the wall. However, if you need a hole for a new dowel, you will still have to get rid of the old one before drilling it. To remove it, just use a regular corkscrew. You just need to screw it into the nylon and move it towards you so that the old dowel sticks out of the wall. Next, cover the hole with plaster. After the plaster has hardened, you can safely drill a new hole nearby.
Tools
The list of tools required to pull out the dowel depends on the material from which it is made. During your work you may need:
- self-tapping screw or corkscrew,
- chisel, hammer,
- pliers,
- nail puller,
- knife or awl,
- soldering iron,
- "Bulgarian",
- punch or electric drill.
Such a small dowel and so many tools are needed to remove it from the wall! In fact, the above list applies to all types of dowels. Therefore, in the process of work, you will use exactly the tool that is necessary to pull out exactly those dowels that are firmly embedded in your walls or ceilings. Perhaps, let's move on to the process of removing the dowel itself.
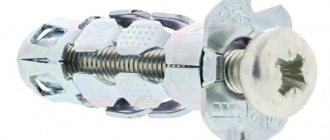
Metal
A metal dowel is also called an anchor or an anchor dowel. The difference is not so great: both fasteners have a sleeve/sleeve made of metal and having at least 3 “petals” that open and act as an anchor in the wall. The expanding element is either a regular screw or a special one, with a cast or removable cone - these are the most common options.
The main difference is that the dowel clings along its entire length, has spikes, whiskers, etc. along the entire length of the sleeve, while an anchor is usually called a smooth sleeve with an opening end.
How to remove the simplest expansion dowel:
- Knock out or unscrew a bolt or screw.
- Hook the edge with pliers, pliers or the like.
- Place the tool against the wall, or if the surface is fragile, such as tiles, against a stand (usually craftsmen take a hammer).
- Rocking, pull out.
Molly
Metal Molly dowels are compressed with a screw or special pliers so that the middle is flattened and unfolded in the form of petals. This allows you to distribute the load as much as possible and increase the strength of fasteners on hollow walls (for example, on hollow bricks, on false walls made of plasterboard), but it also makes dismantling impossible. When the screw is released and pushed, the “petals” do not straighten completely and tear in half.
Remove the dowel for the construction gun
If you look at fastenings from Soviet times, they almost certainly used dowels, reminiscent of a nail with a washer welded to them. They are still installed today, using a construction gun, but only in those places where they are not supposed to be dismantled. Neither doors, nor windows, nor radiators or plumbing fixtures should be equipped with these: today all these furnishings are considered replaceable.
Nevertheless. How to remove such a dowel? Three approaches are used:
- Hit the head 2-4 times with medium force (this will move the dowel out of place and it will lose its tenacity), then grab the head and, swinging, pull it out.
- Heat the fastener with a torch and let it cool (it will expand and push the concrete apart, then return to its previous dimensions) and pull it out.
- Use drill 6 as close to the dowel as possible, then squeeze a narrow tool (“crowbar” or the like) under the head and knock out the pin into the adjacent slot.
Let's work with wood
Today, most people use plastic dowels, but some prefer wooden dowels. The difference in their extraction is not particularly large. The cap can also be pulled out using a self-tapping screw, which is screwed into a wooden product, then the removal process is carried out using pliers. If you don't have them at hand, a nail puller or other construction tool will do.
Another method that is especially popular is pulling it out in parts. To do this, you will need a chisel and a hammer, with the help of which the dowel is divided along the fiber. Then the resulting fragments are removed with a knife or screwdriver. You can also use a drill. This option is provided for dowels made of soft wood. The drill can be replaced with a hammer drill
It is necessary to carry out the procedure carefully to avoid large-diameter holes in the wall
In most cases, wooden dowels are used for installing wooden windows. To do this, take 3-4 fasteners with which to fix the window sill, and several pieces for installing the window frame.
Metal dowels are not as widespread as plastic ones, because their use implies the presence of special equipment. There are two options for removing such fasteners.
One way is twisting. The second is loosening with a hammer. If you can’t carefully unscrew the dowel, you can try to loosen it with a hammer. When the fastener is flush with the wall, it can be removed; to do this, you will need to make several small holes located around it. Then the actual extraction occurs.
Removing a dowel from a concrete surface is not an easy task, but using the right method, you can quickly remove the fastener with minimal loss to the surface. To complete the procedure in the shortest possible time, you only need to prepare the necessary tools and choose the right extraction method.
How to quickly remove a dowel from a concrete wall? updated: November 11, 2016 by: Artyom
Few people know how to properly remove an old dowel from a wall. The main thing is to try to choose a simple, reliable and economical method. Skills in installing and dismantling fasteners will help you achieve results; experience in using electric and hand tools will come in handy.
Several types are available specifically for concrete; they always use a nail as a rod. Reliable operation can be guaranteed if you are able to choose the right version based on the dimensions of the plane and the massiveness of the suspended structures, and perform high-quality installation.
Before starting work, you need to evaluate the quality and thickness of the surface. The presence of hidden electrical wiring and metal fittings is the basis for changing the location. Sometimes it is not easy to hammer in a dowel carefully without damaging the adjacent part of the wall.
The most commonly used options are:
- Expandable, suitable for solid walls. It will establish itself inside it due to the expansion of the plastic casing. The plastic bushing is made with a cone-shaped metal core or with a threaded thread.
- Universal. The built-in nail fits tightly to the walls of the hole. Suitable for loose, hollow partitions.
You can insert the dowel using a drill with a hammer or hammer function, a concrete drill, or a hammer. Correctly perform the work in the following sequence:
- using a hammer drill, punch a hole with a diameter similar to the bushing and a depth exceeding the length of the fastening element by 0.5 cm;
- clean the resulting recess from dirt and dust;
- fix the dowel body with a hammer until its edge aligns with the wall surface;
- hammer the nail into the body until it stops.
If you follow all the installation rules, it will be difficult to get it.
Trying traditional methods
Ask your father or grandfather how to secure a dowel in a loose foundation. You'll probably get a lot of good advice. We have collected some of the most popular ones that people have been using since Soviet times. After all, back then there was not such a wide selection of fasteners, and any means were good for home repairs.
Wooden cork
Helps strengthen the dowel in a large hole. Take a cork or a small piece of wood and cut several thin strips the length of the fastener. Place two to three strips into the hole and then drive in the dowel. Wooden seals will hold it in the material. By the way, sometimes a match is used for this purpose. Only it is inserted inside the plastic element, and not into the hole itself - it acts for wedging.
Pulling algorithm
A protruding nail disrupts the aesthetic appearance, so it must be removed or hidden. When removing old fasteners from the wall, your wits and ability to use power tools will come in handy.
- The element that rises above the surface can be removed by rocking and unscrewing it. Loosen it with a hammer, hitting it on the protruding part from different sides. Then you should grab it with pliers or wire cutters and pull it out. It will not be possible to get it out if you pull it out of the hole using only translational force. If the fasteners are of significant size, it is advisable to use a nail puller, which will help remove them with less effort.
- Much more patience is required when it is necessary to remove a broken dowel if it is difficult or impossible to grasp or hook. The plastic case must be heated and melted with a hot soldering iron. This allows you to remove it from the wall using pliers or other similar tools.
- A metal tube, the diameter and length of which should be slightly larger than the fastener, often helps to get it out. It is driven in so that the bushing is inside. Then, at the same time, the nail should be pulled out.
- In the most hopeless situations, the dowel is removed with a hammer and drill. Using a drill of the required size, make several holes (recesses) directly around the socket. As a result, the strength of the nearby part of the wall decreases. The element can be easily removed with a suitable tool (pliers, wire cutters, etc.), then the surface is leveled with putty or plaster.
It is often necessary to remove the remaining plastic casing in the wall without a metal rod. Experts advise doing this:
select the appropriate self-tapping screw of the required size for the sleeve (about the types of screws for concrete), screw in three-quarters of the length, then loosen and remove; use a hand corkscrew to remove the dowel, carefully unscrewing it; if you can’t pull it out using the methods listed above, you should try cutting off the protruding parts with a knife, and hammer the rest into the wall; drill out the plastic bushing, selecting a tool of equal or larger diameter.
Before carrying out work, builders recommend assessing their feasibility. It is really necessary to think about pulling it out if you need to make a new hole nearby. For example, if you need to hang a new cornice in the same place, but the old fasteners do not fit.
The resulting depression, after you manage to remove the nail, will become large and will have to be sealed. To do this, you need to fill it with putty or plaster, apply a paint mesh, clean it, and level the surface with sandpaper after drying.
What to do if a dowel falls out of the wall?
The condition of the concrete does not always correspond to the required level, since low-quality mortar was used during construction. Interior partitions and window openings are made of material that, after decades, has become loose and free-flowing. In houses like this, nails fall out.
There are several ways to solve this problem:
- Drill a hole in the concrete, remove particles, fill it with liquid nails or epoxy glue. After thickening, install the dowel. Items can be hung after ensuring final curing.
- Screw a layer of electrical tape in the direction of the thread (ordinary cellophane will do), the resulting thickness should ensure a tight fit into the hole. Then drive the element into the plastic case, due to this it will expand, which will increase reliability.
- Wrap the dowel with a damp bandage (just wet it enough) until the required diameter is obtained and install it in the walls; you can immediately drive a nail. Use the fasteners for their intended purpose after the liquid has completely evaporated.
The main thing is to adhere to the rules that ensure reliability and durability during operation: make additional reinforcement, select an element with dimensions larger than usual.
| Articles |
Before finishing the walls, the surface must be carefully leveled, all protruding elements, nails, screws and dowels must be removed.
Getting the last element is very difficult, it is important to know the basic rules of how to do this. It will not be possible to pull out the dowel by hand; in any case, you will have to resort to using tools
What to do if there is a fragment of a nail or screw left in the dowel?
A nail or screw in a dowel sometimes breaks due to too much pressure. In this case, you will not be able to pull it out with pliers. But there is another effective way. You can take a soldering iron or a gas torch and heat the plastic dowel until it becomes soft and pliable.
After this, you need to quickly pull out the dowel along with the fragment from the wall until the plastic hardens again. If you can’t pull it out the first time, the dowel can be heated again until the operation is successful.
What to do to get a chopik
Wooden fasteners are rarely used. However, before the mass appearance of plastic dowels on the market, chopiki were used everywhere. Therefore, when renovating an old apartment, you can find several such elements in the walls.
There are no significant differences in dismantling plastic and wooden dowels. You can try to screw in the self-tapping screw, then remove it with pliers, pliers, or another tool.
You can crumble it into several fragments and remove them from the hole in the wall. This is easy to do with a chisel and hammer. Divide it into several parts along the grain of the wood. After this, you can remove them from the crack in the wall with a knife or screwdriver.
You can drill it out. However, this depends on the strength of the chopik. For example, a chopper made of oak is difficult to drill. There will be no problems with a powerful hammer drill. However, it is not advisable to exert too much effort when working. You can significantly damage the walls; you will have to do plastering, priming and putty. The whole process will significantly prolong the repair.
What building materials are suitable for repairing damage?
Today in any supermarket you can see materials for sealing cracks; they are designed to work with various types of surfaces. Both universal mixtures and special ones for external or internal use are sold.
Several of the most used types of putties from different manufacturers:
- Neomid Professional - for eliminating both street and internal damage. This putty is distinguished by its versatility, it is suitable for various materials. The content of reinforcing fibers allows you to work with deep and wide cracks.
- Semin Fibrelastic is a universal putty with increased elasticity, can be used both indoors and outdoors. Withstands significant loads when “breathing” cracks expand and contract, and does not lose its qualities due to changes in temperature and humidity.
- Profix - easy to apply and has plasticity and high adhesion to most materials from which walls are built. The mounting-putty mixture works great outdoors and is suitable for self-repair of small cracks; it can be applied textured.
- Unis Glare-thick-layer is a gypsum putty; manufacturers provide a 15-year guarantee on Unis seams. Used to correct internal defects.
You can prepare a mixture for sealing cracks yourself.
Cement-sand mortar is made at the rate of 3 parts sand to 1 part cement; for large or through gaps in the walls, crushed stone can be added, and for plasticity, add liquid soap in the amount of 30 g per 15 liters of concrete or silicate glue (1 liter per 15 liters of solution) , or PVA (100 g per 15 liters of mixture). The properties of the finished putty can be improved by adding fiber reinforcing fibers and ready-made plasticizers.
It is used for external cracks in brickwork, concrete, and aerated concrete. The advantage of this material can be considered its strength, and the disadvantage is its low elasticity, even in the presence of plasticizing additives; moreover, the finished solution cannot be stored for a long time.
There is no need to make silicone sealant yourself; it is sold ready-made in special tubes and is applied using a glue gun with a thin tip, which is convenient for filling cracks. The advantages of silicone are fast drying and high elasticity of the seam, moisture resistance. Disadvantages include the fragility and softness of the material. Silicone is used inside the home to repair small cracks.
Polyurethane foam is used to fill internal voids in cracked structures made of aerated concrete or aerated concrete; its advantage is lightness and excellent thermal insulation. The downside of polyurethane foam is its softness and lack of strength; an additional coating of plaster is required on top.
Pull with pliers
This option is suitable for firmly set nails. Pliers are a universal tool that has wide, flat “jaws” that can grab any small object well.
Also, many modern models of pliers have cutters similar to wire cutters. If the nail does not sit too deep, then first try to grab it with these cutters and press enough to fix it, but not to bite the nail itself.
Even the most unpleasant nail will succumb to this method, especially if you use the lever method. Where the cutters are useless or it is sunk too deeply, try to grab the cap with the jaws of the pliers and pull it towards you. More effort will be required, and the main thing here is to maintain balance and not fly too far with the pulled pin.
Carpenter's pry bar
A steel rod of hexagonal or I-section, approximately 45 cm long, one end wide and flat with a wedge-shaped slot and a teardrop-shaped hole for pulling out nails. There is an angular variety, in which the second end is bent at a right angle and also has a wedge-shaped slot.
Read also: Who is a professional waiter?
In general, a more powerful mount model is used for dismantling parts with small gaps between them.
It is adapted for striking it with a large hammer, so it can be used as a chopping tool similar to a flat mount. Particularly useful when removing floor boards. There are many modifications of carpenter's pry bars, choose the one you need specifically.