by Alexey | Decor Tips Workshop Furniture Interior | Tuesday, June 01, 2021
| Follow Make-Self.net on Facebook and be the first to read our articles. |
There is something completely sophisticated about a concrete sink. Concrete is a fairly inexpensive material that has become increasingly popular in home decor over the past few years. Because concrete is so malleable, it can be used to create any size and shape of sink that will fit perfectly into your bathroom or kitchen.
Design options
Concrete sink designs can be classified according to a fairly large number of characteristics.
Depending on the design it may be:
- Concrete countertop with recess for sink
- Freestanding sink.
Each option has its own advantages and disadvantages. The choice depends on the room where the sink is supposed to be installed. For the kitchen, installing a combined sink would be an excellent option. So, without extra costs, you can install additional work surfaces, which are always the weak point of the interior, since a large number of surfaces is unsightly, and a small number is inconvenient.
For the same option to be appropriate in the bathroom, you need to have a room of sufficiently large dimensions. Rarely does a modern apartment have a bathtub of this size. But in a private house in a spacious bathroom this would be a good option. Such a sink will emphasize the spaciousness of the room. If this is not particularly necessary, then in the bathroom it is better to get by with a free-standing product.
Depending on the shape, the sink can be:
- Geometric shapes
- Traditional or round shapes
- Original
Here everything depends solely on the preferences of the owner. The only thing worth mentioning is the depth of the sink. If you are installing a purchased product, be prepared for a shallow sink depth. This was done for a reason. The fact is that only with such parameters concrete fully reveals its aesthetic properties. A deep concrete sink is not beautiful. Therefore, if, due to technical requirements, you require a deep sink, then it is better to choose a different material.
We use improvised means
Even if you only have plans to create a moydodyr at your dacha, you will still have to wash your hands and face. In this case, the simplest, portable option will come to our aid - a plastic bottle with a volume of 1.5 liters or more. Cut off the bottom, turn it over and attach it to a wire to a tree branch, fence, etc. Water is poured in from above and warms up quite well. You can make a full-fledged washbasin by attaching holders for soap, toothpaste and brushes.
Scheme of a washbasin made from a plastic bottle
So that the water from such a bottle does not flow constantly, but when it is needed, you can use several devices.
- The easiest way is to nail the cork. Make a hole in the center of the bottle cap and insert a nail into it so that the cap remains inside. Screw the plug tightly. The disadvantages are that water leaks, and this causes the nail to rust, and besides, it is not very convenient to wash your hands with such an inconsistent water supply.
- The second method is easier to use. A hole is made on the side of the lid. When the lid is unscrewed, water begins to flow as much as you need. Screw the lid and the water will stop. The disadvantage of this method is that it is not very easy to control the sufficient level of unscrewing so that the lid is not completely torn off.
- The third method is also simple: you can attach a faucet, for example, from a washing machine, to the neck of a bottle with electrical tape. The water will flow as you need, and you can be sure that the faucet will not fall off if it is fixed well.
- The same faucet (or a purchased one from a hardware store) can be attached to a plastic container with a volume of 5 liters or more. To do this, just drill a hole of the required diameter and fix the faucet in it. A tin or enamel bucket as a container is also perfect.
Such homemade washstands can be decorated with various designs using improvised materials. Children will be very happy to have the opportunity to contribute their imagination and effort to a common cause.
Benefits of concrete
So, let's look at the main advantages of this material and what sinks can be made from it.
The first is its low cost. This building material is available to almost everyone.
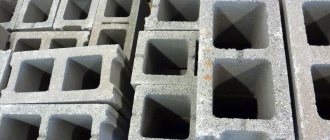
Secondly, high strength and reliability. Concrete consists of components such as cement, sand, crushed stone, and special additives (for example, marble or quartz chips). All these components give the material stability and durability.
The third quality can be called versatility. Concrete sinks fit equally well into any design style. This is especially true for loft, hi-tech, minimalism, and grunge styles.
Design
Regardless of the final outcome of the manufacturing process, you first need to create a design. The completed drawing will facilitate the presentation of the entire production process, will help to anticipate and eliminate possible errors and difficulties. Generally speaking, the drawing will greatly facilitate the execution of all work.
Initially, it is worth finding out what components your kitchen set consists of. To do this, you need to study the available list of similar products and choose the required option. After this, you need to find out the exact dimensions of the upcoming concrete countertop. To find out, you need to measure the length and width of the empty area, taking into account the pieces of furniture that are nearby. In the event that the product will come into contact with a corner, you also need to measure the angle, since in reality it may not be straight.
For normal and full functioning, the thickness of the concrete countertop should not be less than 5 centimeters. But you shouldn’t make it much thicker, because in this case the weight of the product increases significantly.
The location of the sink in the kitchen, its size and shape are of great importance. It would be much better to purchase the sink before starting to manufacture the product.
In this case, it will be easier to make the hole, and the result will be more accurate. An equally important detail is the location of the tap, because it will also need a hole.
In the case of a built-in sink, you need to check whether it overlaps the countertop. If everything is in order, then you can start making a template for the hole. To do this, turn the sink over and outline it with a construction pencil.
In the case of an overlay sink, it is necessary to measure the inside part where it will come into contact with the overlay part. If the internal part does not have a rectangular shape, then it is worth making a rectangular template according to the largest measurements of the internal part. The main thing is to make such a hole that the sink will fit. It is even allowed for the hole to be slightly larger than required.
Now you can make a drawing of real size using the data obtained. To do this, you will need a sheet of plastic or chipboard. We carry out the design on it
We apply all the required dimensions and holes very carefully and carefully, everything should be as close as possible to the intended product
We draw a drawing and select materials; preparations are in full swing
One of the most important steps on the path to producing a concrete surface is creating a drawing. This is necessary in order to know exactly the dimensions of the tabletop, as well as its appearance. To ensure that the product is firmly attached and does not wobble during operation, it must be installed as tightly as possible to the walls. You should also not forget about the sink - its dimensions and location are indicated in the drawing. The same applies to the corner, because kitchens are very often corners, and that’s where it usually happens. Ideally, the angle is straight and 90 degrees - this will greatly facilitate the work process. If the angle is slightly different, you will need to take this into account during construction work, and also note it when preparing the drawing.
In some cases, it is recommended to make a surface from several individual components. This method is due to the fact that for large kitchens the surfaces are very bulky and heavy. If the product is divided into several smaller structures, then it will be much easier to work and install them. In addition, it will be possible to avoid cracks and chips that may appear in the event of unsuccessful processing or moving heavy objects. Having drawn a sketch, you can begin collecting the necessary materials and tools. Choose high-quality and reliable equipment. For work you will need the following items:
- plastic sheets 18 mm thick;
- plywood sheets;
- hardwood boards;
- sand and cement for mixing the solution;
- polymer concrete made from acrylic resins;
- reinforcing mesh to strengthen the structure;
- decorative elements - shells, small pebbles, broken glass to decorate the surface;
- spray adhesive;
- silicone sealants;
- colors – special coloring pigments to give the surface the required color shade.
Naturally, we cannot do anything without tools. For successful work you will need the following tools:
- 1. building level;
- 2. wood hacksaw;
- 3. screwdriver – required for installation of formwork and its subsequent disassembly;
- 4. spatulas, levelers, trowels for working with uncured concrete;
- 5. polishing wheels;
- 6. sandpaper;
- 7. grinding machine.
Roughing the resulting concrete sink
At the last stage, it is necessary to remove the plastic plugs from the concrete that form the required holes. During this work, minor damage to the concrete is possible, but this is not a big deal. Further processing will hide all the imperfections.
After the plastic elements are removed, the entire surface of the sink should be treated first with coarse and then fine sandpaper.
PHOTO: YouTube.com The rough sink is ready, it’s time to start applying the decorative layer
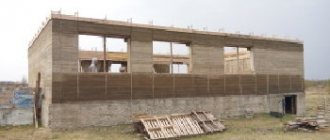
Preparation of formwork
When making your own countertop, it is important to complete this area of work with the utmost precision and accuracy. After all, the strength of the product and its appearance in general will depend on the quality of the workpiece.
After a decision has been made regarding the height of the structure, parts of the required length need to be cut from the beams - these are the vertical parts of the future formwork. They will need to be secured to the floor. To do this, you will need profiles. If the contact with the walls is direct, then the racks must be drilled through. They are secured using anchor dowels. After fixation, the vertical parts are connected to the horizontal ones. Thus, the formwork frame is ready.
To make the lower part you will need a wooden MDF sheet. The formwork must be made in such a way that the concrete can be pulled out later without damaging it.
If the countertop has a sink, then you need to place a metal ring inside in the required place. Also, when using the hob in the future, this place must also be marked.
Bathrooms are a special place in the home, an island of bliss created for relaxation and relaxation. Being alone with yourself and soaking in a fragrant bath after a hard day at work is a great pleasure.
Despite the often compact size of this room, it is important to create a cozy and comfortable interior in which an atmosphere of peace and harmony will reign. Bathroom arrangement should be taken seriously, carefully considering every detail
Incorrectly selected furniture and accessories can immediately ruin the entire look and impression of the interior. And, conversely, a small touch, and the interior will be transformed and sparkle with new colors
Bathroom arrangement should be taken seriously, carefully considering every detail. Incorrectly selected furniture and accessories can immediately ruin the entire look and impression of the interior. And, conversely, a small touch, and the interior will be transformed and sparkle with new colors.
Dismantling the formwork, preliminary assessment of the result
When the concrete has dried, you can dismantle the formwork. After unscrewing the screws, you need to remove the side walls. This will be extremely easy to do; concrete will not stick to the laminated chipboard surface.
The bottom part of the fiberboard formwork may stick to the mortar, but this will not be a big problem. Subsequently, the product will still need to be processed.
PHOTO: YouTube.com The formwork has been removed, you can proceed to dismantling the internal part of the matrix
Polystyrene foam crumbles easily, which means that if you pick up a simple chisel, you can remove it from inside the sink within five minutes. Therefore, you should not stop at this stage for a long time.
PHOTO: YouTube.comFoam from the sink can be removed using a regular chisel
Stages of work
Regardless of the product being manufactured, you first need to find out its size and shape. If you are replacing an old countertop, you can use its measurements.
If a completely new product is being manufactured, then it is worth taking measurements of the base, and also taking into account the existing requirements for the selected room
In order to have a template before your eyes, you can try to make a drawing of the tabletop on paper; you are even allowed not to make marks for different types of holes. Next you will need a full-fledged life-size template. To do this, you need to take a sheet of thick cardboard, of such a size that you end up with a full-fledged template. If the cardboard is small, then for the actual volume of the product you will have to glue the parts together. If you have large cardboard, then simply cut out the required layout. When the template is ready, you need to check that it fully matches the dimensions. To check, you should place it on the desired area and make sure that everything is accurate and there are no distortions. After such checks, the concrete countertop will be completed quickly and easily. Now you need to divide the template into separate parts. Once you have ready-made detailed templates on hand, you can begin production of the product itself.
Can I make my own concrete sink?
Without a doubt. While books and online instructions on DIY concrete countertops abound, there isn't much on making concrete sinks. But it is worth understanding that creating a form can be a complex process; you need to make sure that the bottom of the sink slopes towards the drain so that the water flows out. There's also plumbing. If you are still trying to do the washing yourself, then you should prepare carefully.
Follow us on Pinterest for more interesting articles.
Useful short videos from Make-Self.net
Style and design
The style of sinks varies depending on the shape of the bowl and its surround. In the kitchen, as a rule, the bowl is installed on a surface made of rough, varnished wood. This combination of incompatible things gives a special effect, which in design is called eclecticism.
The bowl shape is usually a flat stone with a small notch in the middle. Bowls in the form of a hemisphere stand separately
They look nice and are chunky enough to attract attention, but they're more of a decorative item than a handy device. Therefore, it is better to refrain from such a purchase
Bowls recessed into the countertop are particularly convenient and functional. It’s easy to move dirty dishes from the countertop into this sink without spilling anything on the floor. Otherwise, everything depends only on the customer.
Is it possible to use a concrete sink in the kitchen?
I would not recommend installing a concrete sink in the kitchen. The coating simply will not last over time due to constant exposure to dishes, food chemicals and aggressive detergents.
However, many people do install concrete sinks in their kitchens. For those who are less tolerant of imperfections, a concrete sink is a better choice for a bathroom.
The process of creating a concrete sink
So, we’ve prepared the tools, learned about the pros and cons, been inspired by the forms, it’s time to get to work!
Markings are applied to the prepared (cleaned of paint or plaster) wall surface near which the sink will be located. To avoid distortions, a building level is used. Since you will be creating your masterpiece from scratch, there are no restrictions, you are guided only by your taste.
Now it's time to start formwork. First, make a layout from cardboard: firstly, this way you will clearly see the result that you need, and secondly, if the expectation does not coincide with reality, it is faster and easier to remake a cardboard layout than finished formwork.
After this, you can begin to bring it to life. The base and sides are made separately, then they are fastened together with self-tapping screws and steel corners. The joints are treated with sealant.
Now we create something with which the sink will be firmly attached to the wall - the fittings. We use a hammer drill and a drill to punch holes in the wall for the rods. We put a metal washer on each of them, weld it and hammer it in so that the reinforcement fits tightly into the wall. The intersections of the rods are also welded or tied with wire.
We install formwork on the resulting structure. Additionally, we attach it to the wall with corners, dowels and self-tapping screws. But that’s not all: since the next stage is already connected with concrete, we immediately place brick supports below, which will take on its entire mass.
Time to get to the solution! Mix cement, sand and granite crushed stone in a ratio of 1:3:3. Then add the same amount of water as this mixture is obtained (that is, if half the bucket is filled, then you need to add enough water to fill the bucket completely).
Mix our “porridge-malasha” with a construction mixer. After this, we pour it into the formwork in layers. If you want to create a decorative colored surface, then a separate solution is prepared for concrete with dye.
Now we just have to wait. After a week, you can remove the formwork and plastic pipes. Dismantling is done from top to bottom. It is best not to remove the supports at this stage, even if the sink looks solid.
You can start decorating. It's up to your taste: you can lay tiles, or simply sand the surface and apply a moisture-resistant coating to it.
In a month, the concrete will finally harden and all you have to do is remove the supports and connect the plumbing equipment. All is ready! Happy washing your hands and dishes!
Care
An important point in care is cleaning. For cleaning, it is recommended to use liquid or cream products.
It is not recommended to use powder that contains abrasives. After applying a special product to the wall and bottom, it must be washed off with water after a while. The cleaning procedure is as follows:
- First, the sink needs to be treated with dishwashing detergent. This is necessary to remove excess fat.
- If there are stains on the bottom, it is recommended to remove them before starting the cleaning procedure.
- Next, apply a small amount of cleaning cream to the walls.
- After a quarter of an hour, rinse off the detergent with water and wipe the treated part dry.
The product must be cleaned to maintain its smoothness and shine. During long-term use, salt may accumulate on the surface, resulting in plaque.
It is recommended to wash the mini-sink regularly. Daily care should be carried out using dishwashing detergent. After applying the product, the sink should be wiped with a piece of soft cloth. Twice a week you need to use a special cleaning product.
What you need to make a concrete sink with your own hands
For this purpose, sand concrete M300, M400 or M500 is best suited - these are the types that can provide the most smooth surface. It will be even better if you add a plasticizer to the solution. Not everyone likes the gray color of concrete, so if you are one of them, you can additionally purchase a special dye at a hardware store.
You will also need clean fine sand (from 1.2 to 2 mm). Just wash and dry it before use.
Don't forget about the formwork. It will require particle boards, boards or sheets of plastic. If you want to experiment with shape, thin sheets of zinc-coated steel are ideal, as they are strong and bend well. In addition, you will need sheets of cardboard to create the layout.
To reinforce concrete, you will need steel rods with a diameter of 10–15 mm, and to strengthen the joints, you will need corners and tapes of the same material, fasteners and sealant. To support the weight of the sink while it dries, you need reliable supports - I recommend bricks as the simplest, most durable and inexpensive solution. While drying, the sink should be wrapped in plastic film, so make sure you purchase that too.
If you want to make an external finish, for example, with tiles, then you will additionally need tile adhesive and grout.
And finally, a list of necessary tools:
- jigsaw;
- hammer drill with concrete drills;
- screwdriver or screwdriver;
- hammer;
- metal scissors;
- welding machine;
- a large bucket to mix the concrete solution in;
- construction mixer;
- ruler or tape measure, pencil;
- building level.
What texture and color can the sink be?
Surface texture can vary from smooth and polished to matte or rough. As for the color, it is no longer a universal gray. Today's concrete can be painted in a variety of colors, although a neutral shade is usually chosen.
I'm a big believer in good, timeless design. Some people will use white cement to create light pastel colors, but I prefer nature-like colors that aren't too bright—and will stand the test of time.
Execution options
There are no restrictions on the shape - rectangular, square, round, with curves... Order a washbasin with or without a countertop, with one sink or with another required quantity. The base for the tabletop is made from any material that you can independently find elsewhere or purchase from us.
Advantages of the countertop sink from the Bershovo workshop:
- Stylish design that will harmoniously complement the interior of the room.
- The monolithic design guarantees protection against leaks.
- There is additional space for placing the necessary items.
- if you want to visually expand the space, choose narrow and long models,
- To fill spacious rooms, massive options are used (thick and wide countertop with 2-3 sinks).
You can buy a bathroom table with a countertop by calling the number listed in the “contacts” section. The company's consultants will answer your questions.
Loft is now more fashionable than ever. And that’s why everyone wants to replace even the usual earthenware sink with something more “lofty.” There are eccentric solutions, for example, a copper basin with a hole in the middle or a galvanized bucket, but such ideas are difficult to combine with a modern interior, and are not very convenient to use in everyday life. If you don’t want to complicate your life, then a sink made of real concrete will become the highlight of your loft and cannot be compared with any other option, in all respects.
Concrete is still not earthenware, but that’s why we’ve gathered here, to find out all the pros and cons.
It's at least original.
This is exclusive - each of our sinks is made by hand and can be considered a work of modern art
It is durable - a high-quality concrete sink will last for centuries, and maybe even thousands of years))
It is reliable - breaking off a corner is as difficult as with a faience sink
This is unique - the picturesque texture of concrete cannot be imitated by any other material
Now about the cons:
Vulnerability. A concrete washbasin can be either varnished or protected with impregnation. In the first case, it is well protected from dirt, but the coating is easier to scratch than earthenware enamel. In the second case, it is difficult to scratch, but it is necessary to constantly (once every 2-3 months) renew the impregnation, and if this is not done, then sooner or later stains may appear, which only sanding will help get rid of.
Price. Setting up a sink production process on an assembly line is very difficult. Therefore, if we are not talking about a piece of foundation weighing 200 kg, but about a sink made of high-strength and beautiful concrete, weighing an acceptable 20-40 kg, then this is painstaking manual labor with a large number of stages, complex technology and expensive materials.
Since all over the world, concrete sinks are much more often protected with varnish, we will tell you about it in more detail. Varnish for concrete in the interior meets several requirements:
1) it must be non-toxic;
2) lay down in a beautiful matte thin layer so that it is difficult to identify as something foreign;
3) do not allow water to pass through, because if the varnish allows water to pass through, it will also allow contaminants to pass through
4) be as scratch resistant as possible
Only one type of varnish meets all these requirements to the maximum - polyurethane, and even then not just any one. We conducted many experiments to choose the best varnish, but, unfortunately, we never found the perfect one in all respects. So when purchasing a concrete sink, prepare to be treated with care.
Don't expect miraculous performance and practicality from concrete or you will be disappointed. Although if you take care of such a product properly, then there will be no problems with it. Do not use aggressive acidic or strongly alkaline cleaning agents or abrasive sponges.
PS: And for lovers of everything real, I recommend bare concrete without coating. In this design, the sink will be as natural as possible. And over time, becoming covered with patina during use, it will only get better.
How do you care for your concrete sink?
Because concrete is porous, the surface must be sealed to protect it from staining and discoloration. There are two types of sealants: something like epoxy resin that keeps moisture out and prevents stains, but it looks like plastic and can't be repaired without completely removing it.
It is better to use an easy-penetration sealant that maintains a more natural appearance. It is not bulletproof, but it does create a recoverable surface.
Staining or discoloration is still possible - if, say, an irresponsible guest spills acidic food such as red wine, vinegar or lemon juice and allows it to seep in. Then you usually need a professional to buff out the stain. using a very fine diamond blade and then re-coat.
Advantages and disadvantages
Concrete as a material for a sink has a fairly large number of advantages:
- Low corrosion activity and resistance to moisture. Concrete coated with a special composition will retain its appearance and shape for decades.
- Low material cost. Concrete is not a natural stone, so the cost of making or purchasing a concrete sink yourself is quite comparable to buying a regular ceramic sink
- High aesthetic qualities. Using various types of coloring additives, you can change the color of the sink within a fairly wide range. In this case, the shape of the future sink is determined by the casting mold, which can be absolutely anything. And special inclusions, which are created by replacing crushed stone with another filler, can create a full-fledged imitation of marble.
There are also disadvantages to a concrete sink, like any construction solution:
- Bulky. No matter what shape the future sink has, it will look bulky in any case. This technique is not suitable for elevated interiors. The design of a bathroom or kitchen in the style of a medieval castle or a rustic style will go perfectly with this choice. In addition, you need to take into account that bulkiness visually reduces the height of the room. Therefore, for low rooms it is better to choose a different design.
- Weight. No matter how much you call concrete an imitation of stone, they weigh, if not the same, then very similar. Therefore, it requires mounting on reinforcement that passes through the entire wall. For mounting, it is better to choose a load-bearing wall. An option for those who don’t want to drill into a load-bearing wall is to install a separate shelf under the sink. Such a shelf will easily support the weight of the product and will not require any special installation skills.
Finishing
After removing the formwork, the wall will have a finished product. But the sink still needs to be processed and brought to its final form. This is done either by sanding or tiling.
If it is just grinding, then before starting the work you need to cover up the unevenness and cracks with concrete paste. After the paste has dried, start sanding. Here everything is done individually. You can bring the surface to perfect smoothness using a grinding machine, and also leave a slight roughness.
Tiling does not require the removal of minor imperfections. The tiles are laid like tiles. But don’t skimp on glue and grout.
The shell bosom can be filled with epoxy resin. For beauty, it is recommended to pour granite chips there. When the resin hardens, you will get a smooth surface.
Required materials and tools
The whole difficulty of pouring a sink with your own hands is that for it, like for any concrete product or structure, you need to make formwork. The formwork must be reliable and waterproof. Therefore, the materials used are boards, OSB boards, moisture-resistant chipboard panels, the thickness of which should not be less than 20 millimeters.
To create the shape of the sink, or rather its bowl, you will need a metal sheet no more than 1 millimeter thick. Typically galvanized sheet metal is used for this. To create a reinforcing frame, you will need metal reinforcement bars with a diameter of 10 millimeters. Be sure to purchase furniture corners, with the help of which the parts of the formwork are connected.
Tools you will need:
- hammer drill with drills with a diameter of 10 millimeters;
- metal scissors, which will be used to cut out the shape for the sink bowl;
- screwdriver for fastening formwork;
- hammer;
- saw or jigsaw;
- mixer for mixing concrete mortar;
- container for mixing concrete mortar;
- building level;
- roulette;
- pencil;
- notched spatula;
- plastic pipes for forming a sewer drain (40 millimeters in diameter) and a mixer landing site (32 millimeters in diameter).
For the manufacture of plumbing fixtures, it is recommended to use concrete grade M400 or M500. The classic recipe for M400 concrete is one volume of cement, two volumes of sand and crushed stone (1:2:2). Since a concrete solution using artificial stone technology is used for the sink, instead of crushed stone, granite or marble chips should be added to the mixture, or better yet, screenings, which are three to four times cheaper.
What are the disadvantages of a concrete sink?
But the main disadvantage is that no matter what you add to concrete, it will never be as hard as granite or cultured stone. Concrete is more similar in hardness to limestone. This means it is porous and must be treated to prevent staining and discoloration. This also means that the surface is quite easy to scratch.
Unique products from the Bershovo workshop
Take, for example, bath countertops made of decorative concrete; they look very stylish and elegant. They can become the highlight of any bathroom. In addition, this material is excellent for use in damp areas. A bathroom sink and countertop made of decorative concrete will serve you for many years without complaints.
You will find a large assortment of countertops for bathtubs made of decorative concrete here in the Bershovo workshop.
Such products are created from decorative concrete, which has high performance characteristics: it is resistant to temperature changes, humidity and the formation of mold and mildew.
The strength, resistance of this material to chemical and mechanical influences and reasonable price have made decorative concrete a material in demand today.
It is an excellent alternative to natural stone, while it is more pleasant and “warm” to the touch. And due to its antibacterial properties, it is also hygienic.
And this is a very important requirement for products intended for furnishing a bathroom.
Decorative concrete sinks create a special look in your bathroom. Decorative concrete sinks provide the opportunity to choose the color, thickness, style and shape of the product. Whether the sinks will be used in your bathroom or powder room, in a commercial office or restaurant application, requiring double or triple fabrication options, we can help you achieve a solution to your design challenges. Decorative concrete sinks will be made especially for you to suit any of your design requirements. We can offer you ready-made solutions in our Store or choose from the design options presented on this page.
Customer Reviews
Konstantin, Moscow : “My wife wanted a bathroom in an ecological style. The floor and walls were finished with boards, and a shower system a la a tropical shower was installed. But there was still no highlight. And then I decided to order a wooden sink. This is such a miracle! It is executed perfectly, smooth, smooth shapes. Washing your face in the morning is a pleasure!”
Irina, Moscow : “I had a dream - a wooden bathtub. So that, as in advertising, you can bask there in the foam and rose petals. But such baths cost exorbitant prices! So I decided to buy myself a wooden sink. And now every morning starts with a smile. I really like the way this sink looks. I love touching its glossy surface. Following the sink, I wanted to buy more wooden items for the rest of the apartment.”
Sink creation technology step by step instructions
The first step is to make all the necessary calculations and make a cardboard model of the future workpiece. The cut out planes are fastened together with a glue gun into three-dimensional shapes. Knowing all the dimensions, you can accurately calculate the volume of the sink and purchase the appropriate amount of materials.
Immediately regarding the composition of the mixture. To prepare a good sink, a concrete mixture using M-500 cement is quite suitable. The amount of water should be determined by the consistency of the solution, but the optimal water-cement ratio will be 0.3-0.35, that is, an average of 0.33 liters of water is poured per 1 kg of cement. Additionally, it is necessary to add plasticizer S-3 or SP-1 to the concrete in the amount of 0.5% to 1% of the weight of the cement.
The ratio of dry components is as follows: for one part of cement, take 2 parts of sand and 3 parts of small crushed stone. Since the structure will be small, you should be very careful in the selection of each ingredient for concrete. Buy cement from trusted manufacturers, with a strength grade of at least M-500, crushed stone should have a maximum fraction of 5-10 mm, and either buy sand specifically in construction stores, or sift it through a sieve with a 2x2 mm mesh.
In this case, a mixture was used, the consistency of which was selected experimentally and will depend on the quality and percentage of water in your sand. Focus on the consistency, which is clearly visible in the photos below.
After creating a cardboard model, you need to draw on it on laminated chipboard sheets every detail of the future shape into which the mixture will be poured.
The mold parts are attached to each other using a screwdriver and self-tapping screws, and the cracks are sealed with silicone sealant. Make sure that all internal surfaces are as smooth as possible, so that you do not later find unnecessary depressions or humps on the surface of the finished sink. Make all corners and junctions without sharp joints: create a smooth transition between surfaces using seams made of silicone sealant.
The next step is optional. In this project, it was planned to create a backlight, so glass balls purchased in advance were broken and fixed in shape with glue. Also, to enhance strength, reinforcement should be made in the form of a mesh of metal wire.
For future holes for plumbing and drain installation, plastic pipes of the required diameter are placed on the form. In the last photo you can see how a layer of sealant has been applied at the location of the future drain. This elevation on the form will then provide the necessary slope for water to drain when using the sink. A metal cover is installed on the hill, onto which the pipe is then attached.
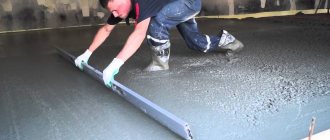
Next, you should fill the horizontal surface of the mold with the solution - the future tabletop. During the laying process, the mixture is constantly processed with a concrete vibrator so that it fills the entire volume of the form as best as possible.
After this, the outer shell formwork box is placed on this surface. As you can see in the photo, it is an enlarged inner box mounted on horizontal slats. These strips are placed on the edges of the countertop formwork, causing the outer shape of the sink to hang above the horizontal surface, creating voids around the inner formwork. The solution is placed into these voids with a spatula.
The inclined plane, after filling with the mixture, is also covered with a sheet of chipboard.
When the entire solution is poured into the mold, it is covered with plastic film so that the liquid does not evaporate from the surface of the solution for at least another 7-10 days. This is necessary so that the concrete undergoes the process of gaining strength. If this part is not followed, the concrete will crack over time.
After the required period of time, the film and formwork are removed.
Next, the concrete surface must be sanded and coated with a protective compound. Here you will need a special grinder with a number of revolutions per minute from 4 to 5 thousand and a water supply. It can be rented at specialized rental shops.
And this is what the finished sink with countertop looks like.
Initially, a special lamp was placed in the mold, which can be seen in the photographs depicting the process of laying the concrete mixture.
It is made of a large number of light-transmitting fibers, distributed throughout the entire volume of the tabletop when pouring the solution. If you connect it, then at night the surface glows beautifully in those places where pieces of broken glass are located.
What else can you make a washbasin for your summer cottage from?
A concrete sink is a solid, sustainable option that is more suitable for private homes and cottages. However, very often there is a need for lighter and simpler structures, for example, for a country house.
A country washbasin can be easily and simply made from scrap materials. The best option is a design made from a plastic bottle. The production of such an outdoor washbasin will take a few minutes. It will serve well until a more reliable option becomes available.
However, a garden washbasin made from a plastic bottle does not meet the needs of the whole family, even with very economical use. You can install a similar, larger version of a washbasin made from a plastic or metal canister. Even a bucket is suitable for these purposes.
It is enough just to make a hole for the tap in the selected container.
A more reliable and convenient option for a summer house can be a washbasin with a cabinet. This design can be installed both in the yard and inside the house. One of the most common models of country washbasins is “Moidodyr”. It is a frame structure, which is sheathed with sheet or panel material.
To create it we use:
- plywood;
- drywall;
- chipboard;
- steel;
- plastic.
As a sink, you can use an old, used sink, a basin or even a bucket. It is better to purchase a water tank in a store, although you can also use an old canister or other container. Such a washstand is usually equipped with a countertop and a dryer, for the design of which ceramic tiles are used. You can also paint the surface with acrylic paint.
Formwork and reinforcing mesh influence of elements on product quality
The next stage is to form a wooden frame or formwork, into which we will pour concrete mortar to give it the required shape. It is necessary to make a strong frame that can withstand the pressure of concrete for several days. Formwork largely influences the quality and aesthetic appearance of the finished product. To create it, we use plywood sheets laid on a flat surface. Next, we transfer all the lines and strokes from the drawing to the plywood, exactly repeating the shape of the future tabletop. It is necessary to install wooden blocks 50 mm high along the perimeter.
To give the frame the necessary strength properties, pay special attention to fastening the walls. To do this, we will use long screws (at least 6 cm) or metal corners, which will provide connections of sufficiently high quality
Depending on the size and type of sink and faucet, we will determine the space for the sink. Today, overhead and built-in sinks are popular. There is not much difference between them, this also applies to cost. If you choose an overhead sink, then the only significant difference is the horizontal side, about 3 cm wide. When drawing up sketches and forming wooden frames for concrete, you need to remember this.
Experienced craftsmen note that countertop sinks are optimally suited for installation in self-made countertops. The reason lies precisely in the above-mentioned side, the presence of which makes it possible to allow small errors when forming the hole for the sink. In addition, built-in sinks have special seating chamfers, which cause great difficulties in the manufacture of a concrete surface. To make a hole for the faucet, you can use various tools. A plastic pipe with a cross-section of 35 mm is best suited. This diameter is the standard for faucet pipes.
After this, all we have to do is install the reinforcing mesh to strengthen the concrete structure. An ordinary steel mesh with a cell size of 25x25 mm is suitable. It is necessary to select the mesh so that it does not touch the walls of the wooden frame. Thus, the distance between the reinforcement and the formwork should be about 2 cm. There is one trick that allows you to avoid any appearance of the mesh on the surface of the concrete - you just need to cover the base of the formwork with a regular polyethylene film. In this case, the concrete will be even and smooth, but the mesh will remain inside and will not stand out in relief.
How to make your own sink
A concrete washbasin is quite easy to make. To do this, you just need to strictly adhere to the construction processes. After the preparatory work, it is necessary to install a reinforcing mesh. It is this that will ensure an increase in the strength level of the concrete mixture. For these purposes, you will need to drill a number of holes in the sides of the formwork for the reinforcement bars. The procedure is carried out using a hammer drill equipped with concrete drills. Metal rods will ensure the isolation of the reinforcing mesh from the bottom of the frame.
The independent method of making a sink from concrete also involves attaching the formwork to the wall. This ensures the necessary strength of the frame. The work is carried out using screws and metal corners. The recommended length of fasteners is 6 cm. This value can ensure reliable fastening of the structure. A good support for formwork is usually made of bricks. With its help, the concrete sink is securely fixed while drying.
Next, according to the instructions, you should proceed to mixing the solution. Perfect mixing of all components is ensured by a powerful construction mixer. The finished mixture includes:
- cement (grade not lower than M400);
- plasticizer;
- fiberglass (prevents cracking of concrete structures);
- marble chips or granite screenings;
- river sand;
- water (preferably warm and free of chemical impurities).
To obtain a homogeneous concrete mixture, cement and only the 8th part of the liquid with fiber and plasticizer are initially added to the mixing container. All this is thoroughly mixed until smooth. Next, sand and screenings are added to the solution. At the final stage of preparation, the elements of the concrete mixture are mixed with the addition of water. The prepared solution is poured into the created washbasin mold.
It is strictly not recommended to bring concrete to ideal plasticity. This indicator is the main reason for the loss of strength. The most suitable ready-mix should be as hard as possible. Only such a solution can ensure durability and reliability of the sink.
The finished concrete sink often has a very original shape. Its creation should begin with filling the most inaccessible places. For these purposes, concrete must first be agitated until cement laitance forms. After completing the pouring, it is recommended to cover the structure with film. Removal of formwork should begin at least 2 days after completion of the pouring process.
Additional plumbing (faucet and siphon) are installed on the concrete structure after 1 month. The last step of creating a concrete sink requires sandpaper or a sander. Using these tools, the sink is thoroughly polished. Thus, unevenness, streaks and pores are eliminated.
The prepared surface is carefully treated with a mixture of cement and acrylic filler. The result is a perfectly smooth and beautiful concrete sink. After the mixture has dried, it can be used for its intended purpose.
Types of fastenings for washbasins made of concrete and ordinary sinks
The concrete sink is a durable, heavy monolithic structure. In order for such a product to be securely fixed in the wall, it is necessary to use special fasteners. Conventional studs and brackets made of steel or cast iron are not at all suitable for these purposes. Such mounts simply will not withstand a massive sink. In such cases, only one type of fastener is ideal - steel reinforcement with a diameter of at least 10 mm. A concrete sink will be securely attached to the wall using this type of fastening.
To install lighter washbasins made of porcelain, earthenware or steel, standard fasteners should be used:
- T-shaped brackets (have a reinforced base, made of cast iron);
- L-shaped brackets (made of steel or profiled pipe);
- framework;
- girths (made of metal profiled frame).
The most reliable type of fasteners is considered to be girth. This element is a metal frame.
When choosing a bracket for mounting a sink, you should pay attention to the weight of the plumbing fixtures, the thickness of the wall, as well as the characteristics of the fasteners.