Approximately 80% of Russian cities are located in a temperate continental and extreme continental climate, which is characterized by pronounced winters with severe frosts and precipitation in the form of snow. But even in this unfavorable time of year for construction, the construction of monolithic concrete structures does not stop. To create the necessary temperature conditions, there are different technologies:
- special greenhouses;
- heat mats;
- formwork with heating elements and electrodes;
- cable electric heating.
The first method is the most energy-intensive and therefore economically unprofitable. In the second case, thermal stations are installed that heat only the upper layers, and in some cases this is not enough. The third option involves installing electrodes in the solution and connecting them to the network through a welding machine or a step-down transformer. This method is energy-consuming, since water in concrete is a conductor, and its resistance increases significantly during hardening.
Heating concrete with cable is considered one of the most effective and economical methods. This will be discussed further. But first, let’s explain why all this is necessary.
Warm-up technology
The locations of communications and the location of holes in the concrete surface must be thought out before starting to pour the composition. After installing the system and covering it with a cement mixture, any work on the surface may damage the wires. For example, before diamond drilling into a material, you need to make sure that the hole will not pass through the concrete heating cable.
Rules for laying the system
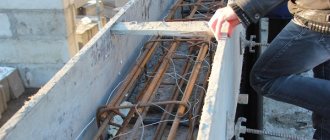
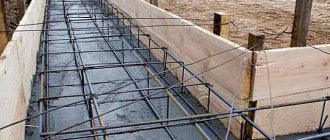
Before placing the heating system, reinforcement and formwork are installed. Then the PNSV layout is carried out; there should be an interval of 8-20 cm between the turns of wires. The size of the gap depends on the wind, outside temperature and humidity.
The cable is attached with clamps to the fittings, without tension. The optimal radius of bends is more than 25 cm. The current-carrying conductors should not intersect, the distance between them is 1.5 cm, this arrangement avoids short circuits.
The following points must be checked before pouring the solution:
- the temperature of the prepared mixture is above +5 °C;
- there is no ice in the formwork;
- the circuit is connected correctly;
- cold ends have an optimal length.
The PNSV cable comes with instructions, which are important to follow when installing the heating system. There are two options for connecting via busbars - star and delta.
In the first method, three cables of the same type are combined into a node, then the free three contacts are connected to a transformer. The power supply is located at a distance of up to 25 m from the connection point. The area of material that will be heated is protected by a fence.
The system is connected only after the solution has been poured. The use of a heating cable for concrete PNSV includes the following steps:
- Warming up is underway; the temperature should increase by 10 °C per hour. High speed will disrupt the uniform heating of the material.
- Heating is carried out at a constant temperature value. Concrete needs to gain half of its technological strength. The optimal temperature is 60 °C, the maximum possible is 80 °C.
- The material cools slowly. Its cooling rate should not exceed 5 °C per hour, otherwise cracking of the structure will occur.
If all work was carried out correctly, the concrete will reach the appropriate strength grade. After heating, the cable remains in the material and plays the role of an auxiliary reinforcing structure.
VET and KDBS cables can be connected through a socket or panel board to a 220 V network; they are also divided into sections, which prevents overloads. But their cost is significantly higher than PNSV wires.
Concrete can also be heated using a tubular electric heater (TEH) and electrodes. The fittings are inserted into the solution and connected to a power source - a welding machine or other step-down transformer. This option does not require a heating cable, but will require significant energy expenditure. Water acts as a conductor in concrete, and as the material hardens, the resistance will increase.
Calculation of the length of the PNSV
Several factors influence the determination of the length of the PNSV cable. The amount of heat that will be applied to the material for hardening is of great importance. This indicator is affected by thermal insulation, air temperature, shape and size of the structure, and humidity.
The length of the loop should be on average 28−36 m. If the temperature is above -5 °C, then laying is done in increments of 20 cm. When cooling, every 5 degrees the gap between the cores is reduced by 4 cm. At around -15 °C it will be equals 12 cm.
The power consumption of the PNSV cable is also important; it depends on the diameter:
- 1.2 mm - 0.015 Ohm/m;
- 2 mm - 0.044 Ohm/m;
- 3 mm - 0.02 Ohm/m.
To do this, the squared current is multiplied by the resistivity. The total power is found from the product of the obtained value and the total length of the wire. The transformer voltage is calculated in a similar way. The current is multiplied by the resistance to get the operating voltage.
PNSV wire is the cheapest option for heating concrete mix. But its use requires special equipment and relevant knowledge. Thermal insulation also reduces the cost of heating the material and improves the quality of concrete due to uniform cooling.
https://youtube.com/watch?v=Mi9bK_pcfcI
Types and features of KDBS and VET cables
Warm-up wire PNSV
Despite their widespread use, the described types of heat cables have a significant drawback - the need to use special expensive equipment that regulates the heat generation power by changing the voltage.
The solution to the problem is the use of two-core sectional self-regulating thermal cables. The domestic modification was called KDBS, and the European modification was called VET (manufacturer: Finland). For their full and uninterrupted operation, no additional equipment is required; they are connected directly to a 220 V network.
There are practically no differences in the design of the domestic and European models. The table shows a comparative analysis.
| Technical features | KDBS | VET |
| Degree of protection | IP67 | IP67 |
| Section size, m | From 10 to 150 | From 3.3 to 85 |
| Nominal diameter, mm | 7 | 6 |
| Recommended bend radius | 35 | 25 |
| Resistance of insulating material, Mohm/m | 103 | 103 |
| Linear power, W/m | 40 | Depending on the model and length it ranges from 35-45 |
| Operating voltage, Volt | 220-240 | 220-230 |
Domestic models have their own marking features. They are coded in the following form: ХХКДБС YY, where ХХ are linear power indicators, and YY is the section length.
PNSV wire
A universal and affordable way to warm up concrete in winter using a high-resistance cable and a step-down transformer. When linking the frame from the reinforcement, a heating cable is laid; the size and shape of the structure does not matter.
This heating method is applicable both at the construction site and for home builders. Let's tell you in a little more detail how to heat a concrete mixture with a PNSV wire at home.
After reinforcing the frame of the structure or laying the beacons under the self-leveling floor, the wire is laid in a snake no closer than 20 centimeters from each other (the optimal laying step). The length of one loop ranges from 28-36 meters. A welding machine can be used as a voltage source. The connection diagram in this case will look like this:
The nuance of warming up is that the PNSV cannot be connected without being covered with a solution, because Without heat absorption due to the high temperature outdoors, it will burn out. To avoid burnout, switch to an aluminum cable, leaving the output ends of the PNSV heating wire 10 cm out of solution. The manufacturer recommends a current in the cable of 11-17 amperes, which can be controlled with current clamps. We talked about how to use current clamps in a separate article.
For home construction, a PNSV with a diameter of 1.2 mm is sufficient. Its characteristics:
- resistance 0.15 Ohm/m;
- operating current immersed in solution 14-16 amperes;
- laying temperature from -25 to 50 °C.
Wire consumption per cube of concrete is 60 linear meters. The temperature to which concrete is heated is 80 °C, it is controlled by any thermometer. The rate of temperature rise of the solution should not exceed 10 degrees per hour. To avoid pointless expenses on electricity bills, the heated area is covered with any material that prevents the heating of the atmosphere, for example, covered with sawdust. To obtain an excellent result, the concrete mixture is also heated before pouring; the temperature of the mixture should not be lower than +5 °C. Following these instructions, you can warm up concrete in winter with your own hands. The technology is labor-intensive, but even an inexperienced person can do it. How to lay a heating cable in the foundation is described in the video tutorial:
Heating the foundation with wire
By the way, instead of the PNSV wire, you can also use the BET cable to heat the concrete. The video below briefly describes the instructions for installing the heating conductor:
How heating with BET cable works
The article does not indicate all methods of heating concrete in winter. There are induction, infrared and other methods, but we do not consider them due to their low prevalence and complexity. We gave a general idea of the technology for constructing concrete structures, and the possibility of home craftsmen using methods for heating screeds and walls. By the way, the use of PNSV wire is possible not only during the heating of the structure under construction, but also after that. It can be used as a ready-made warm floor or anti-ice on stairs or sidewalks. Short sections are connected through a step-down transformer from 400 to 1500 watts. To connect directly to a 220 volt network, the length of the wire will be more than 120 meters.
That's all I wanted to tell you about why concrete is needed to be heated in winter and how to do it using heat guns, electrodes or PNSV wire. We hope our instructions were clear to you. You can get more information by watching the video tutorials in the article.
We also recommend reading:
- Heating of tracks with a heating cable
- How to save energy at home
- How to choose a heat gun by power
- Temporary power supply for construction site
Post-processing of concrete
Soon after warming up concrete monolithic structures, you cannot begin to process them. The building material must first harden and achieve optimal grade strength.
Shock loads are also contraindicated. Cutting is allowed. For this purpose, equipment equipped with diamond nozzles is used, after which cracks do not form. In general, heating concrete with heating wires resembles the operation and installation of heated floors.
The use of nichrome cables to heat the concrete mixture is prohibited by safety regulations. In addition, this approach will cost the customer large financial costs.
Technical data
Structure
PNSV cable element diagram
The heating wire for concrete has a simple structure:
- A steel core consisting of a single wire, capable of conducting electric current and having a round shape. Its diameter can be from 1.2 mm to 3 mm.
- An insulation layer usually made of polyvinyl chloride or polyethylene.
Performance characteristics
Has high resistance to temperature changes. It does not lose its qualities and is able to work properly in the range from -60 degrees Celsius to +50, which in the case of our climate means always.
Low temperature makes the core shell less elastic and prone to fracture
- Polyethylene or PVC coating provides high water-repellent properties and can withstand exposure to a twenty percent salt solution and thirty percent alkali.
- When laying the cable, you will probably have to roll and bend it. If you overdo this, the metal wire may break off inside the insulating sheath. To prevent this from happening, the bending radius should not be less than twenty-five millimeters.
An example of the correct installation of a heating wire with your own hands
The instructions also require maintaining a minimum distance between wire elements of at least fifteen millimeters. Overheating can lead to damage to the insulating coating, followed by a short circuit. Sufficient indentation will save you from worrying about this.
Maintain the required gap between the heating elements even with such a chaotic arrangement
- During operation, the cable must operate in intermittent or long-term mode.
- The connection to the power supply must be made with “cold” ends and the soldering points must be taken outside the heating area.
Electrical indicators
- The resistance of the product in question depends on the thickness of its section, decreasing as it increases:
- 1.2 mm – 0.15 Ohm;
- 1.4 mm – 0.1 Ohm;
- 2 mm – 0.025 Ohm;
- 3 mm – 0.005 Ohm.
- The supplied AC voltage is allowed up to 380 V.
- The power supply in this case is considered most suitable around 65 V.
- The amount of heat generated depends on the presence of reinforcement in the structure:
- Reinforced concrete mass - 30-35 watts per linear meter.
- Ordinary concrete without metal inserts - 35-40 watts per linear meter.
- The required heating cycle is usually three days.
Length calculation
Calculation of concrete heating using PNSV wire is based on two variables:
- The object's need for heat. It, in turn, depends on temperature, wind strength, degree of thermal insulation, brand of cement and shape of the monolith.
The concrete is placed in thermally insulated formwork.
- Maximum power density of the wire. For reinforced concrete it is taken equal to 30 - 35 W/m, for unreinforced concrete - 35 - 40.
What follows is simple arithmetic. So, to obtain 4 kW of heat in an unreinforced structure, we need 4000 / 40 = 100 meters of wire.
It is somewhat more difficult to calculate the maximum length of an individual section with your own hands. Here you need to know the resistivity of the steel conductor for different sections.
| Section | Resistance, Ohm/km |
| 0,6 | 550 |
| 1,1 | 145 |
| 1,2 | 140 |
| 1,4 | 100 |
| 1,8 | 70 |
| 2 | 48 |
| 3 | 21 |
| 4 | 12 |
Our goal is to get a current of 14-16 amperes. Let us recall the relationship between voltage, current and resistance: U=IR, where U is voltage, I is current, R is the total resistance of the circuit.
The relationship between voltage, resistance and current is described by Ohm's law.
So, with U = 75 volts and a target current I = 15 amperes, we need the circuit resistance to be equal to 75 / 15 = 5 Ohms. With a conductor cross-section of 1.4 mm, it will be provided by a wire with a length of 5 Ohms / 100 Ohms/km = 0.05 km, or 50 meters.
Attention: we have presented an extremely simplified calculation method. The actual resistance of the conductor changes as its temperature increases, which corrects the result.
Warming up concrete with PNSV wire
Professional construction is a process that does not stop in any weather: neither in rain, nor in snow, nor in severe frost. One of the main components of any construction process is concrete, for accelerated hardening of which various technologies, methods and devices are used. The most common technical means for accelerating the process in this way are: heating the concrete solution and structures made from it using special thermoelectric construction mats (TEMS) and wires for heating the concrete.
Characteristics and features of the wire
To heat concrete, in most cases, a wire marked PNSV is used, which stands for: “heating wire, steel core, vinyl sheath.” In some cases, PTPG 2x1.2 is used. The PNSV cable for electrical heating of concrete consists of a steel core, in some cases additionally galvanized, with a diameter that can vary from 1.2 to 3 mm. On top it is covered with an insulating shell made of polyvinyl chloride or its subtypes. This type of insulation allows you to avoid fractures and kinks of the internal veins, and also protects against fires. A cable for heating concrete, depending on the core diameter and electrical resistance, can withstand a load of 80-160 watts per meter. PNSV type wire is optimally used for heating monolithic concrete, for example, when pouring foundations or walls.
Another distinctive feature of the heating cable is the presence of so-called cold ends. These are special branches that extend beyond the concrete surface. For them, APV wires are used, connecting the heating cable PNSV and the supply line from the heating transformer.
Heating wires are fixed to the reinforcement frame and supplied with current through step-down transformers, consisting of several stages, which allows you to change the level of surface heating depending on the ambient temperature. The most common heating substations are SPB-80 or KTPTO-80/86, each of which can heat about 20-30 m3 of concrete solution. The stations are connected to a three-phase network with an operating voltage of 380V, with mandatory grounding of the housing and the neutral (zero-phase) wire.
New warm-up method
More recently, it has become possible to heat concrete using a cable without a transformer. This became possible using BET thermal cable technology, capable of withstanding up to 40 W per linear meter and operating from a network with a voltage of 220V. A nichrome shielded thread is used as a heating element, ensuring a constant temperature of +80 °C and uniform heating of the solution. This cable is suitable for any type of foundation, be it a strip grillage or a monolithic one.
Wire prices
To expand the temperature range of cable use from -60 to +50 °C, as well as to increase the strength characteristics of the insulating layer, primary raw materials (primary) are used. The prices at which you can buy PNSV wire today for heating concrete made from such raw materials are presented in the table below:
| Cable diameter | Footage | Price in rubles |
| PNSV 1.2 | 1,000 m | 0.85 |
| PNSV 2 | 1.25 | |
| PNSV 3 | 4 |
How to heat concrete?
To warm up concrete, a certain sequence must be followed:
1. During the first two hours, the heating rate of the concrete composition should not exceed 10 °C per hour;
2. In the future, it is necessary to ensure that the temperature does not exceed +80 °C.
3. The last stage is cooling, and the temperature should not drop by more than 5 degrees per hour.
In the event that a separate heating station is used, a “star” connection diagram is suitable, designed for heating small areas. Installation must be carried out according to the technological map of the facility.
Operating principle and types of heating wires
The most common heating wire is the PNSV type. This is due to the ease of installation and reasonable price compared to analogues.
An analogue of PNSP is also often used. Its main design difference lies in the insulating material. The composition is polypropylene, which makes it possible to increase the maximum power of the heat generator.
The table shows the main technical and physical characteristics of wires of the PNSP and PNSV types.
| Wire brand | Estimated weight of 1,000 meters of wire, kg | Optimal length of the heating section at a voltage of 220 V, m | Nominal outer diameter, mm | Nominal value of electrical resistance of 1 meter of heating core, Ohm |
| PNSV | 19 | 110 | 2,8 | 0,12 |
| PNSV | 18,5 | 95 | 2,7 | 0,18 |
| PNSV | 18 | 80 | 2,6 | 0,22 |
| PNSP | 16,4 | 130 | 2,8 | 0,11 |
| PNSP | 12,7 | 100 | 2,6 | 0,12 |
| PNSP | 14,5 | 110 | 2,7 | 0,14 |
| PNSP | 11,1 | 85 | 2,5 | 0,18 |
| PNSP | 9,6 | 75 | 2,4 | 0,22 |
Heating wires of the PNSP and PNSV types are also used to organize heated floors in residential premises.
The main difficulty that builders face when using heating wires is the need to calculate the required length. Minor errors are corrected by regulating the voltage supplied to the warm-up transformer.
Laying scheme
The main requirement is uniform heating; there should be no cold zones. The minimum distance between adjacent wires for heating concrete is 15 mm, the maximum is selected taking into account the characteristics and external conditions. The optimal horizontal gap is considered to be 20-40 cm, vertically - 8-10, it is not recommended to exceed it. The entire volume of the mixture and the main dimensions of the structures are taken into account.
The simplest design is a “snake” with a bending radius of at least 5 working diameters for PNSV and 10 for PTPG. It is placed along the reinforcement without tension (ideally with fixation with plastic clamps), overlaps and exits to the surface (the recommended distance to the edges is from 20 mm), the integrity of the insulation is monitored. Direct contacts of bare areas with mesh or metal rods cause a short circuit; in particularly dangerous places, laying with pieces of bitumen-impregnated paper or roofing felt is provided.
An unregulated wire is connected to a step-down transformer, special attention is paid to the cold ends, the current supply conductors must have a lower resistivity value than the heating ones, aluminum meets this requirement. When choosing a "triangle" circuit, the wires are divided into three equal groups, connected in parallel and combined into three output points
When distributing the load with a “star”, three segments of equal length at one end will be connected into one node, the rest - to the power station. All contacts are reliably insulated; for these purposes, double-sided electrical tape or heat-shrinkable tubes are used. The power of the transformer for heating is determined by the calculation; on average, 1 kW is required for 0.4-1 m3 of concrete.
Laying KDBS follows the same principle, but in slightly larger increments (consumption is 4 lm per 1 m2 along a screed or horizontal plane) and with direct connection to an outlet. It is completely immersed in concrete, only the supply terminal remains outside. Despite the higher cost of the cable and the increase in power consumption to 1.5 kW per 1 m3, this type provides the most uniform heating and stable performance characteristics. Once dry, it is simply cut off and left in the concrete. KDBS is selected for critical areas, when carrying out urgent repairs, with a large number of individual monolithic elements, or the need to use a vibrator. It is easier to install it for people without experience; the factory parameters exclude overheating or burnout.
Basic rules of heating technology:
- The minimum temperature of the poured composition is +5 °C.
- Power is supplied exclusively to wires buried in concrete, ideally through a voltage stabilizer.
- Due to cracking of the insulation, installation is not recommended at temperatures below -15 °C.
- The process is carried out with power control: smooth heating for the first 2 hours, maintaining within 50-60 °C for at least 3-4 days, gradual cooling.
Heating cable price review
Single- and double-core cables are sold in coils:
| Marking | Insulation material | Diameter of conductor, mm | Electrical resistance, Ohm/m | Coil length, m | Price per 1 linear meter, rubles |
| PTPZH 2 | High pressure polyethylene | 0,6 | 0,55 | 500 | 4,5 |
| 1,2 | 0,14 | 4,9 | |||
| 1,4 | 0,1 | 5 | |||
| PNSV 1 | Polyethylene or PVC | 1,2 | 0,15 | 1000 | 1,3 |
| 2,0 | 0,044 | 3,5 | |||
| 3,0 | 0,02 | 3,7 |
Prices for self-regulating cable in sections, respectively, are:
| Marking | Nominal diameter of heating cable, mm | Length of working part, m | Starting/nominal power, CT | Section resistance, Ohm | Price, rubles |
| 40 KDBS with cross-linked polyethylene insulation and PVC sheath | 5-7 | 10 | 440/400 | 104,5-121 | 1570 |
| 20 | 910/800 | 50,5-58,5 | 2020 | ||
| 53 | 2250/2120 | 19,9-23,1 | 4190 | ||
| 82 | 4080/3280 | 11,3-13,1 | 5460 | ||
| 100 | 5120/4000 | 9-10,4 | 6960 | ||
| 150 | 7680/6000 | 6-6,9 | 13000 |
The wire
What is a PNSV wire?
Appearance of the PNSV.
Characteristics
| Parameter | Meaning |
| Structure | Single-core |
| Conductor material | Steel, galvanized steel |
| Insulation material | Polyvinyl chloride, polyethylene |
| Nutrition | 380 volts via transformer. Power supply from a 220V network is also possible, but with power restrictions (7 kW from the electrical panel, 3.5 kW from the outlet) |
| Operating temperatures | -60 — +80С |
| Section | 0.6 - 4 mm |
Features of use
The technological map for heating concrete with PNSV wire should take into account a number of its features.
Steel has a relatively high resistivity, which leads to much stronger heating of the conductor at moderate currents than copper or aluminum. The norm for a wire laid in concrete is 14-16 amperes; however, in air such an amperage will melt the insulation.
- Overlapping and laying adjacent wires at a distance of less than 15 millimeters is unacceptable due to the likelihood of overheating with melting of the insulation and short circuit.
- Since steel is not highly flexible, the wire is laid with smooth bends with a radius of at least 25 mm.
- Laying is permissible at an ambient temperature of at least -15 degrees. The instruction is due to the fact that plastic insulation at lower temperatures loses its elasticity and can be broken when bent.
- For more uniform heating of the concrete mixture, it is recommended to cover the laid wire with metal foil 0.2 - 0.5 mm thick.
- The heating section can be assembled from several sections; in this case, connection is allowed not only through blocks, but also with twists. Warming up is a one-time event, and the contacting surfaces simply do not have time to oxidize to any significant extent.
But it is recommended to connect the so-called “cold” end (the wire leading to the transformer) to the PNSV by soldering or through a terminal box.
The simplest installation scheme for heating concrete with PNSV wire is a snake.
The method of heating concrete with PNSV wire is determined by its mechanical properties; in particular, the coefficient of thermal expansion. When heated, the temperature of the monolith rises at a rate of no more than 10C/hour and drops at a rate of no more than 5C/hour.
Exceeding the speed can lead to an increase in internal stresses and cracking. The adjustment is performed by gradually increasing and decreasing the voltage on the transformer.
When using power from 380V through a step-down transformer, the main current-limiting factor is the danger of overheating of the PNSV itself. The problem is solved simply and elegantly: the laying scheme for heating concrete with PSNV wire, if it is necessary to increase power, includes several parallel-connected sections.
Concrete heating technology
System installation
The work is performed in the following order:
- First of all, you need to clean the surface of debris and various sharp parts that can damage the wire.
- Then the reinforcement or reinforcing mesh is laid, and the reinforcement is welded.
- Then the wire is installed. The easiest way is to lay it with a snake. Its value will depend on the area of the fill and the length of the cable. At the same time, do not forget that laying wires on top of each other is strictly prohibited; in addition, you must ensure that the cable does not come into contact with the formwork and does not protrude beyond the surface of the concrete.
Wire installation
The optimal distance between cables is considered to be no more than 15 centimeters, especially if there is a long wire and the filling area is small.
Next, you need to check the system for functionality - connect it to electricity and make sure that the cable heats up. It is imperative to control the current power.
Do not exceed the indicators indicated by the manufacturer on the wire. If the system will be operated without a transformer that allows you to reduce the current, then PTPZh brand wire should be used, since it is more powerful.
- After this, you need to disconnect the cable and let it cool.
- The final stage is pouring the area with concrete.
Cable installation diagram
As we can see, installing a concrete heating system with wire is in many ways similar to installing a heated floor. Moreover, this cable can be used for these purposes as well. The only thing is that in this case it is more expedient to make a heating element from wire threads and wrap it with insulating material.
If a separate power station is used, then it is better to use a “star” connection diagram. It is more efficient than the “snake” and is well suited for heating small areas.
Star scheme
Procedure for heating concrete
Instructions for heating concrete with a cable are as follows:
- After the area is completely filled with concrete, the heating system starts. In this case, the rate of temperature increase should be no more than ten degrees Celsius in two hours.
- Next, the main warm-up period begins. At this stage, you need to ensure that the temperature does not reach 80 degrees Celsius.
- The final stage is cooling. The rate of temperature decrease should be no more than five degrees per hour.
This completes the concrete heating process. If the instructions are strictly followed, the material will be able to achieve the required level of strength even in conditions of very low temperatures.
Advantages of heating the soil with a heating cable
Such a system is ideal for Belarusian climatic conditions; it will not only protect the soil from severe frosts, but also preserve its fertility and quality. Depleted soil is unable to produce the desired harvest; if you take care of it, then it will take care of us. Frost does not allow the soil to be saturated with moisture, heat, or useful minerals, and the heating system will provide the soil with the opportunity to feed and produce fruit at any time of the year.
Thus, we can highlight the following advantages of purchasing a cable heating system for plant soil:
- Early sowing. Thanks to the warm soil, you can plant seedlings in a greenhouse about 1-1.5 months earlier than usual and harvest until late autumn. This way you can get 2 harvests in 1 year;
- Comfortable and safe growing conditions. Seedlings and seedlings will not freeze in case of frost and will grow and bear fruit more intensively;
- Relatively inexpensive components. The price of the entire system, depending on the size of the greenhouse, will cost $100-300;
- Economical consumption of electricity. We are not required to heat the entire greenhouse. The cable warms the soil and plant roots. To do this, for 1 sq. meter of beds the power is about 80 Watt/m2. The use of thermostats reduces energy consumption by another 30-70%;
- Quick installation. Unlike boiler water heating, the system can be installed in 1-2 days. If you use water boiler heating, then its installation will take more time and money.
Electric soil heating systems equipped with thermostats monitor the temperature in the greenhouse and will become indispensable assistants for every landowner. Previously, much more effort and time was spent on providing plants with a comfortable existence even in cold seasons. Thanks to soil heating systems, you can easily manage your site and vegetation. Heat, moisture and mineral decomposition are the main elements that provide the earth with vital force; this issue is resolved much faster today thanks to these systems.
Generally speaking, this whole system is something like heating for the soil and plants during the cold season. Why not allow nature to exist even in frost, taking into account the needs of each plant and the ability to provide complete comfortable conditions? If modern technologies can provide warmth to the soil and plants in the cold winter, then all that remains is to choose the most optimal option!
Wire Requirements
The PNSV heating cable must comply with the parameters that have a direct impact on the functional qualities:
- Bandwidth. For houses and apartments, a current of 16 A is sufficient; if installation on an industrial scale is necessary, the figure must be increased.
- Section diameter. Its resistance to heat depends on the thickness of the cable; a wire that is too thin for heating concrete will burn out when the temperature increases to a certain limit. The recommended value for private use is 1.2 mm.
- Cold ends. This is the name given to the taps from the main core, which are located outside and connected to the power source. They are usually made of aluminum, the cross-sectional diameter of which is larger than the heating cable for pouring concrete in winter. The ideal option is the APV-4 wire.
Don't forget about the required wire length. Taking into account the thickness of the section, the heating cable for heating concrete should be calculated based on the average value of 55 m of heater per 1 m3 of solution.
Review of techniques
To ensure proper hardening of concrete, it is necessary that all the cement included in the solution react with water. This process is called hydration, and it is disrupted if all or part of the moisture turns into ice.
To avoid this, various methods are used:
- Firstly, with a small amount of work, you can add components to the solution that prevent freezing. The disadvantage of this technique is the inability of such additives to withstand severe frosts, as well as the increased cost of work.
- Secondly, during a short-term cold snap, you can simply ensure high-quality thermal insulation of a poured foundation or other supporting structure. In this case, formwork made of materials with low thermal conductivity is used, and the concrete is covered on top with multilayer polyethylene or roofing felt.
Note! A variation of this method is the so-called “hot thermos” - before pouring into the formwork, concrete is heated to 60-700C, after which it is carefully insulated.
- For active heating, the electrode method is often used. In this case, the conductors are either immersed in the thickness of the solution or located on its surface. The electric field formed between the conductive plates or rods transfers some of the energy to the concrete, maintaining its temperature at a high level.
- However, the most effective and practical method is the use of special heating cables. They are laid deep in the concrete, after which they are connected to a special transformer and heat the material. The price of conductors is relatively low, so this method can be recommended for large volumes.
Concrete can only be poured in winter if it is warmed up.
As practice shows, the most effective is to combine methods of passive heat conservation and active heating of concrete. Below we will look at the details of this process in as much detail as possible.
Using PNSV wire after hardening
Heating cable sections laid in a concrete structure remain in it forever and do not lose their resistive properties. Therefore, it makes sense to use them to improve the comfort of your stay. Often, the PNSV wire is specially laid in a concrete floor screed. However, this is not the best solution, although it is the most budget-friendly.
When placing the heating element under the floor covering, possible obstacles to the dissipation of the generated heat should be taken into account. In living rooms, these are places where cabinet furniture is installed, the base of which fits tightly to the floor. Local overheating zones appear in them.
With prolonged use, the wire gradually becomes thinner and eventually breaks. Replacing it is extremely difficult, as it requires removing the floor covering and destroying the concrete screed.
The solution to the problem is to use a self-regulating heating wire. Its design consists of two copper cores, between which there is a so-called thermal matrix - a semiconductor element whose conductivity changes as it heats up. The higher the temperature, the higher the resistance. This causes the current flowing through this area to decrease, causing it to cool down.
Such a heating element works at any size - from a piece a few centimeters long to a multi-meter section. It can be crossed with others similar to it (this is strictly forbidden to do with a PNSV wire due to the danger of melting the insulation and causing a short circuit). The main disadvantage of self-regulating heating wire is the cost. It is several times higher than a single-core resistive one.
https://youtube.com/watch?v=ITujT-WErts
Warming up the poured concrete mass using the PNSV heating cable allows you to reduce the time to achieve 80% of the structural strength from seven days to two to three days and not stop work with the onset of cold weather. However, the technology of this process is quite complex; usually its scheme is developed for each specific case. Therefore, do not be seduced by its apparent simplicity. Contact professionals, and in their absence, thoroughly study the issue yourself.
Types of heating wires and cables
In most cases, electrical heating of concrete in winter is carried out using a PNSV wire (interpretation: heating wire, core material - steel, insulation - PVC), since among all types it has the lowest price and the simplest installation.
In second place in terms of frequency of use is the PNSP cable for heating concrete. Its main difference with the wire presented above is the polypropylene insulation (as opposed to PNSV with PVC insulation). This material allows you to slightly increase the thermal conductivity of the cable. However, its cost is higher, so it is used only in cases where the length of the cable used is of decisive importance. More often, such a wire is installed as a warm floor.
Wires of this type are difficult to install, since an accurate calculation of their length is necessary. If minor errors were made at the design stage, this can be corrected by adjusting the supply voltage.
Heating concrete with a 220 volt cable: features
To ensure that the solution poured into the formwork sets properly, a KDBS is used - a 220-volt heating cable for concrete. This is a two-core resistive heating cable, complemented by a connecting wire and a connector for connecting to the mains.
It is effective in the temperature range from +5*C to -30*C and can be used not only for monolithic work, but also for temporary heating of the entire construction site.
Heating concrete using a heating cable has many advantages:
- The concreting process at low temperatures accelerates, and the concrete does not freeze.
- It is possible to maintain a high pace of construction work, reducing time and labor costs.
- This is an economical solution that does not require significant financial investments.
- Installation of a heating cable for concrete does not require the use of special equipment, is carried out without a technological map and can be carried out directly by specialists from a construction company.
- To connect the line, a step-down transformer is not needed, since the concrete is heated with a 220-volt wire.
- The maximum cable heating temperature is 60*C, which provides optimal conditions for concrete hardening. It does not overheat and does not boil, which means that so-called “sinks” and voids are not formed in it, reducing its strength.
- Heating of concrete at 220 V is carried out using heating sections, which guarantee uniform heating over the entire area of the poured structure.
- The use of KDBS is absolutely safe, since the high-strength insulating coating reliably protects the steel core from mechanical damage.
Basics of laying and installation technology
After purchasing the necessary heating material, the production of the heating system begins:
- The purchased coil or reel is cut into heating sections, the lengths of which are determined by the specifications, in the required quantity. It is possible to manufacture sections from segments, ensuring reliable connection contact;
- The ends are stripped to 4 cm, and “cold ends” are connected to them - pieces of insulated aluminum conductor of sufficient length to connect to the transformer. A reliable insulated connection must be located inside the heated volume;
- Heating sections are placed in the formwork. Measures are being taken to ensure the correct location, absence of sagging, and care for the boundaries of the future monolith. If reinforcement is used, you can tie it to it; It is not allowed to cross or touch wire sections within the formwork. The distance between the wires is at least 15 cm.
- To improve the uniformity of heat distribution, it is recommended to wrap the wire with thin metal foil 0.2÷0.5 mm thick;
- All marked “Cold ends” after installation should be located at one edge;
When heating concrete on construction sites, ensuring electrical safety requirements, it is necessary to take measures to fence off the dangerous area and limit the presence of unauthorized persons in it.
Once completely dry, using floor or wall heating is not dangerous.
Carrying out treatment of concrete after heating
Many builders wonder whether it is possible to manipulate cutting or drilling concrete after it has gained strength. This question is due to the fact that at the time the heating stops, the structure has not yet acquired brand strength. The answer to this question can be positive, but with some reservations. Although cutting is possible, it is unacceptable to produce impact loads. The most suitable solution for this is the use of diamond tools. So, if you use diamond drilling at this stage, the holes in the concrete will have smooth edges and cracks will not appear. Moreover, if you drill through the concrete body using a diamond bit, then you will not have to change the tool at the moment of breaking through the reinforcement, which is true for reinforced concrete.
Conclusion
Information on how to heat concrete with PNSV wire will be indispensable for anyone who plans to build a house in winter. Of course, this system is quite expensive, but when there is not much choice, it is better to use the most effective and affordable concrete heating technology.
In any case, the above tips, as well as the video in this article, contain very valuable information for the master, so it’s worth taking the time to study it closely!
Types of heating wires
The modern market provides a wide range of such products with different performance characteristics.
The cable heating the concrete must have good insulation, otherwise a short circuit or fire may occur. A good insulating layer helps prevent kinks and fractures. As a rule, such products have one current-carrying core, but they are also found with two conductors.
Types of wire for heating concrete and their features:
- PNSV is the most accessible and well-known type. It has an attractive price, starting from 1 ruble per meter. Reusable use is possible, but can only be used with a transformer.
- The PTPZh wire is similar in technical characteristics to the PNSV, but it has two cores.
- KDBS - two-wire in sections. Expensive. Can be used without a transformer. Very easy to install and install. Applies once.
- VET - with two steel wires. Economical. You can work with it without a transformer.
https://youtube.com/watch?v=ITujT-WErts
In addition to products that heat concrete structures, there are series of heating wires used for other purposes. They can be resistive or self-regulating. Resistive conductors include the simplest ones, which are used in the construction of heated floors, as well as for heating pipes with a diameter of up to 40 mm. Large pipes and roof heating are carried out using a self-regulating cable, which independently regulates heating without sensors, reacting to temperature changes.
Goals
Why heat concrete?
All possible ways to increase the temperature of the mixture laid out in the formwork pursue one of two goals:
- Ensuring strength gain in winter . When the temperature of the monolith drops below zero degrees, the water in it crystallizes, which completely stops the process of cement hydration.
In addition: crystallization of unbound water destroys concrete, expanding its pores.
- Acceleration of setting and strength gain in other seasons . An increase in the temperature of the mixture sharply accelerates all processes occurring in it.
Since cement releases a fair amount of heat during the setting process, the mixture does not always need additional heating in winter.
PNSV wire for heating concrete in the cold season is used when:
- The outside air temperature is well below zero.
- There is no way to ensure high-quality thermal insulation of the formwork.
- The surface modulus of the monolith (the ratio of its area to volume) exceeds 10 m^-1.
Method of heating reinforced concrete
The main advantage of this technology over other heating methods is the absolute absence of heat loss, since thermal energy remains in the surrounding concrete mass. The costs of heating the cable and transferring heat into the body of the concrete structure are minimal compared to other heating technologies.
The next, undoubtedly, big advantage is the ease of implementation of this method. After calculations, it is enough to select the right heating element, connection and installation diagram, select the appropriate voltage, and the final result can be achieved without resorting to the services of builders and electricians.
The technology itself consists of several stages, the first of which is the construction of formwork or a form of the corresponding structure, into which the reinforced frame, heating wire will be laid and concrete will be poured, which must be compacted with an in-depth vibrator before applying voltage to the circuit.
Pouring the solution into the prepared form
https://youtube.com/watch?v=Mi9bK_pcfcI
Some features that PNSV or KDBS have, which are used to warm up the concrete mass, allow the circuit to more efficiently convert voltage electricity into heat, the main thing is to calculate everything correctly. This heat warms the concrete, speeding up its setting and hardening.
Professional builders know and understand the difference between heating wire and cable, and individual developers will find it useful to have an idea about this, which will help them use the technology correctly and more efficiently. The heating method using a cable is more expensive for the following reasons:
- Heating of reinforced concrete is carried out by connecting the circuit to a reduced voltage through a special step-down transformer in order to prevent the leakage of dangerous voltage into the structure through wet metal reinforcement in the event of accidental damage to the insulation.
- The heating KDBS can be connected to a network of at least 220V. Optimally - 220V or 380V without reducing the mains voltage.
Connecting PNSV or KDBS is easier in terms of organizing the workflow - connections are made through special couplings, and the cable does not need to be shortened or extended. But a heating cable is more expensive than a wire, so in individual construction it is used at the discretion of the owner. Another disadvantage of cables is that they cannot be reused.
KDBS for heating concrete
Wire differences:
- Externally, a wire can be distinguished from a cable by the following characteristics: a wire usually has one core, a cable has two or more.
- The wire has nominal temperature limits when heating concrete – ± 55°C.
- Maximum current – 16 A.
- The cross-section is 0.6-3 mm, which allows you to bend the wire in any direction and use complex laying patterns. You can use a special calculator to calculate the wire cross-section.
- Wire consumption for heating 1 m3 of concrete solution is 50-55 m.
Methods for heating concrete structures
Concrete is heated when working in the cold using various methods. Builders often use the following technologies.
Transformer
To warm up concrete in winter, many builders use a transformer. The heat generated by this technology produces an electrical current. Electrodes or wires are used with the transformer. The former are inserted into a pre-concrete structure or placed on its surface, and the latter are attached to reinforcement or immersed in the formwork, then the solution is poured. Electrodes and cables are connected to an electrical network with a voltage of 220 V or 380 V through a step-down transformer. Typically three-phase equipment is used. All phases must be loaded simultaneously.
Heating elements cannot be connected directly to the network. This will cause local overheating and can be life-threatening.
Electric heating of concrete with wire is a universal method. It can be used for walls, foundations, columns or floors. The following types of cables are allowed to be used for electrical heating of concrete using this technology:
- PNSV (heating with a steel core and vinyl insulation);
- VET (designed to operate directly from the electrical network);
- PTPZh (conductive with parallel galvanized conductors).
The wire cores can have a diameter of 1.2-3 mm.
If concrete is heated by a transformer using electrodes, the following types are suitable:
- strip;
- strings;
- rod;
- lamellar.
Infrared radiation
Another effective method of heating concrete in winter involves the use of infrared radiation, which is converted into thermal energy.
Industrial infrared heaters are placed next to the formwork filled with cement mortar and directed towards the formwork. The function of the radiation source is performed by heating elements with a power of up to several hundred kilowatts.
The infrared device has the following components:
- emitter;
- reflector;
- suspension or holder.
The required equipment power indicator must be selected in such a way that the surface temperature is no higher than 93 °C. The technique is not suitable if the concrete thickness is more than 70 cm.
The electric infrared method of heating the building mixture has high efficiency and low energy costs.
Warming up concrete on your own
Some simple techniques can be used in private construction, and heating equipment can be easily made with your own hands.
Magnetic induction method
Only reinforced structures can be heated using magnetic induction. Metal elements in this case turn out to be irreplaceable, since they act as a core. The insulated cable is placed in loops around the concrete-filled structure. It will act as an inductor. Which wire to use and how much of it is required is determined through calculations. Then alternating current is passed through the cable. The magnetic field formed as a result of the described manipulations heats the reinforcement of the reinforced concrete structure, from which the heat spreads throughout the concrete composition. And winter is no longer an obstacle to continuing construction work.
Heating is done from outside. The advantages of induction heating using the induction method are low cost and uniform heating. The disadvantage is that it can only be used on a small list of structures - beams, columns, etc.
Heating formwork
In some cases, heating formwork is used for concreting in cold weather. It can also be used in the summer to reduce the rate of hardening of the solution. The standard components of such formwork are supplemented with heating elements. The scheme of such a modification is quite simple. Both wooden and metal formwork can be used for heating.
It is allowed to use not only wires and cables as heating elements, but also tubular, tape electric heaters, and conductive films. The size of the heating elements is calculated individually. The use of heating formwork ensures uniform heating, and installation of the structure takes a minimum of time.
Teplyakom
One of the oldest proven methods of heating concrete mortar involves the use of greenhouses (or tents). The technology consists of creating a thermally insulated space around the structure being filled with the composition. The latter is then heated to the required temperature using heat guns or heaters. The greenhouse can be made from tarpaulin, wood or polymer materials with suitable characteristics. Only a separate part of the entire structure, which is poured, is subject to covering. The tent is then moved.
Recommendations for use
Sections 40 KDBS are economically and technologically feasible to use in the following typical areas:
- pouring a large number of small-sized monolithic structures and elements;
- critical fillings that require uniform heating of the reinforcement grids without boiling or burning out;
- production of columns, walls, etc. without the involvement of specialized teams for the monolith;
- using a vibrator;
- supplying concrete mixture from a mixer;
- urgent large-scale work in which it is impossible to regulate the heating power;
- the need for a large number of heating stations at the same time.
Read with this
- Cable current cross-section
- Warming up concrete in winter: goals, common methods and pouring without heating
- Using PVC wire according to the characteristics and description
- Pugnp and punp wires: characteristics, differences, prohibition of use
- Wire cross-section for home wiring: how to calculate correctly
- Technical parameters and scope of application of heat-resistant wire RKGM
- Which cable to choose for installation outdoors (over the air and in the ground)
- Wire pv-1: description and characteristics
- Which wire is better: single-core or stranded
- Wiring diagram and installation of electrical wiring in the kitchen
Installation of sectional heating cable
A cable for heating concrete of this type is supplied to the site not in a coil, but in the form of a finished section. This fact somewhat simplifies the installation process, since there is no need to cut the wire. Assembling the system after the following preparatory work:
- Calculation of the required power of one segment depending on the volume of concrete mixture.
- Selecting the wire length.
The installation process of the system is quite simple, but requires certain knowledge and skills.
Below are general recommendations, following which you can quickly and correctly install a sectional wire for heating concrete:
- To heat one cubic meter of concrete mixture, depending on the composition, 500-1500 W are required (depending on the ambient temperature). Electrical energy consumption can be reduced by adding special additives to lower the pour point of the mixture or by insulating the formwork.
- If a floor or any beam is poured with concrete mixture, the electrical wiring calculation is carried out taking into account the following initial data: 4 meters of wire per 1 square meter of element surface.
- The wire is reliably protected, so it can be attached to the fittings.
- The wires must always be in contact with the formwork.
- During the installation process, it is important to monitor the distance between the cables, otherwise the electrical heating of the concrete with the heating wire will be uneven.
- It is necessary to maintain a minimum of 4 centimeters between adjacent contours.
During the installation process, it is necessary to ensure that the wires do not intersect.
Pros and cons of PNSV
Heating concrete in this way is quite beneficial. This is explained by both the low cost of the wire and the relatively low electricity consumption. Separately, it is necessary to note the resistance of the wire to alkaline and acidic influences, which allows the use of this method when adding various additives to the mixture.
Main disadvantages:
- complexity of calculations when calculating the length of the wire;
- the need to use PT.
Step-down stations are quite expensive, and given the length of the process, it is not profitable to rent them (such services cost 10% of the cost of the product). The use of welding machines makes it possible to heat small structures, but since it is not designed for this mode of operation, its failure and subsequent expensive repairs are quite likely.
Types and characteristics of cables
There are several types of heating cable for heating concrete, the most popular is PNSV. It is based on a steel core with a cross-section of 0.6-4 square meters. mm and 1.2−3 mm in diameter. Some models are galvanized, which protects the wire components from aggressive components of building mixtures.
The heat resistance of the cable is provided by polyester or PVC insulation. It is also not afraid of aggressive components, abrasion and kinks, has increased resistivity and a durable structure. Technical parameters of the PNSV cable:
- about 60 m of wire is enough for 1 cubic meter of solution;
- resistivity 0.15 Ohm/m;
- use of the element up to -25 °C;
- Possibility of installation down to -15 °C;
- stable performance at temperatures from -60 °C to +50 °C.
The cable is connected to the cold ends using an aluminum recloser wire.
A three-phase 380 V network is suitable for power supply; connection to a transformer is possible. If the cable length is more than 120 m and the calculations are carried out correctly, then a household network of 220 V can also be used. The operating current passing through the thickness of the concrete should be 14-16 A.
An alternative element for heating building mixtures can be a PNSP cable. Its insulation consists of polypropylene, which slightly increases the heat dissipation rate compared to PNSV products. These types of cables can also be used for underfloor heating equipment.
For proper operation of the heating element, you need to accurately calculate the length of the cable. Minor defects can be corrected by the incoming voltage from the transformer, adjusting its level.
PNSP and PNSV wires can only work together with equipment for adjusting the heat transfer power. This can make things more difficult. The way out of the situation is sectional two-core thermal cables with self-regulation VET and KDBS. They can be connected to a 220 V network directly. Linear power is 40 W/m for the KDBS wire and 35-45 W/m for VET. The permissible bending radius is 35 mm for the first model and 25 mm for the second, respectively.