Trays for drainage are used in places that are known for heavy rainfall all year round, as well as in areas with clay soil. Since streams of water after heavy rains and melting snow wash away the layer suitable for growing various crops, it has to be topped up from time to time and black soil purchased for this purpose. These gutters help eliminate this problem by creating a system that allows wastewater to be disposed of in the gutters rather than running around the area. In this article we will tell you how to make concrete drainage trays with your own hands.
Materials and tools
To form concrete products you need to prepare the following tools:
| Name | Characteristic |
| Portland cement grade M 400, sand without clay particles, crushed stone, metal rods with a diameter of 0.6 cm | Used for the manufacture of reinforced concrete |
| Shovels, buckets, trowel, wheelbarrow | Entrenching tool necessary for working with the solution |
| Concrete mixer, drill or hammer drill with attachment | Power tools for preparing concrete |
| Board, timber, plywood sheets, nails, screws, corners for strengthening the structure | Used for making formwork |
To prepare the mixture, it is recommended to maintain the following proportions of cement, sand and crushed stone - 1: 2: 4.
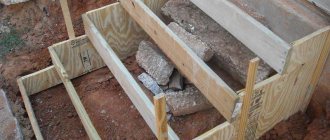
Creating formwork
The material for making the form can be anything, but not too thin, otherwise it may deform under the weight of the concrete. An open structure in the shape of the letter “P” is made from boards or sheets of plywood with a thickness of at least 10-15 mm, and immediately reinforced with iron corners.
Next, cut the pipe to length. The pipe must be smooth from the inside - it will make the shape of the gutter for the drain perfectly smooth.
Advice! To make the pouring process go faster, it is better to prepare several of these products at once, otherwise the work will last several days.
Stages of work
Mold making
A tray for concrete with a “P” configuration is assembled from wooden material (leveled board, laminated plywood 1.0–1.5 cm thick). The formwork material is selected carefully - it must withstand the pressure of the poured solution. Individual elements of the form are reinforced with metal corners. This creates additional rigidity of the structure.
After making the main part of the tray for filling, we begin to prepare the molding part of the structure. For these purposes, a metal or plastic pipe of the required size is sawed lengthwise. An important element of the form is its smooth, non-porous surface, which ensures the formation of a semicircular gutter along which waste water will move by gravity. To ensure continuity of the concrete pouring process, it is advisable to produce 10 products, otherwise the construction of a drainage structure on the site will take a long time.
Reinforcement
A reinforcement cage embedded in concrete increases the strength properties of the cast product. Also, when removing the tray from the formwork, the “skeleton” of the structure will not allow it to collapse. The strengthening property of metal rods or mesh makes it possible to produce elongated trays. When placing reinforcing elements in molds, they are placed at a distance of 50-100 mm, in a vertical and horizontal plane - this creates a mesh frame configuration, which is fixed with wire or connected by welding. To prevent corrosion of metal elements of concrete, the edges of the rods should not be located at a distance of less than 50 mm from the plane of the wooden tray and the molding part.
Pouring into molds
After laying the reinforcement cage, they begin pouring the prepared concrete into the molding trays. During this stage of work, it is advisable to use a special vibrator. The unit will compact the poured solution and remove air and excess water from it. If it is not possible to use such a device, take a sharp metal object and, with its up-and-down movement, bayonet the mixture into the molds.
To prevent the solution from leaking out of the wooden formwork, it is tightly covered with plastic film.
When the solution is in the molds, using a blank and a cut pipe, begin to form a semicircular shape of the drainage gutter. To do this, press the part into the solution, scrolling in different directions several times, without pressing hard on it. This will give the tray a smoother surface. To improve the properties of concrete and “harden” its surfaces, sprinkle the top of the formwork with cement. Such manipulations will give the monolith greater strength.
Types of gutters
There are several types of gutters for pouring concrete:
Hanging device
It is used when transporting concrete mortar over a short distance with a shift to the site of the future foundation. To build this mechanism, you need to take a rope and attach a tray to it using cables threaded through a couple of blocks. One end of the rope is tied to a column or pole. A weight is attached to the other and left on the ground. The load should also be hung on the edges of the cables so that it is convenient to adjust the degree of inclination of this mechanism.
If a massive foundation is being laid for a large project, a fixed angle of inclination of the concrete conveyor should be installed. This can be achieved by increasing the height of the tower or installing additional columns. Actually, the mixture from the central tower will be transferred to these additional pillars.
Gutter structures with jibs
Such a device is a mechanism in which the lower edge of the tray is attached to a jib - a lattice structure made of metal, one edge of which rests on the lower slide, the other is connected to the upper ones by means of a lifting cable. To maintain stability of the angle of inclination of the gutter, the lower edge of the structure is attached to the ground using cables. This device is used when delivering concrete composition to the formwork at a distance not exceeding 60 meters.
Truss-type concrete mix tray
The simplest mechanism for delivering concrete to the foundation site of all those listed. It is a design in which the lower edge of the concrete conveyor is attached to a support.
Cement drainage trays yourself
Trays for draining water are used in places that are known for heavy rainfall all year round, as well as in areas with clay soil. Because the flow of water at the end of heavy rains and melting snow washes away the layer suitable for growing various crops, it is sometimes necessary to top it up and purchase black soil for this purpose. These gutters help eliminate this problem by creating a system whereby the wastewater will be disposed of in the gutters rather than running around the area. In this article we will tell you how to make cement drainage trays with your own hands.
Looking for energy efficient solutions?
Pay attention to FORUMHOUSE geothermal heat pumps
Ground source heat pump EU (start/stop)
Geothermal heat pump IQ (pseudo-inverter)
IQ ground source heat pump (inverter)
Experienced builders and country residents know well that “excess” water on the site is bad. Excess water leads to flooding of the foundation and basement floor, washout of the foundation, flooding of beds, swamping of the area, etc. As a result, in spring, autumn and even summer you cannot walk around your summer cottage without rubber boots.
In this article we will look at:
- How to arrange water drainage on the site.
- How to make a budget storm drain with your own hands.
- Drainage device. How to make inexpensive drainage and drain a wetland.
Drainage system design
Such systems, installed on the site, can be implemented using various schemes. But it is fundamentally important to consistently follow a number of serious rules:
In those cases when extremely complex drainage has to be done in the garden line, where long trees or wide shrubs grow, then the best option in this situation is a system with branches. How does she look? Water flows out of the site in two places, therefore there will be more than two outlets.
In addition, it is quite often possible that the surface of the entire plot is quite uneven, so it is not very easy to make a normal slope there. In this case, the drainage system is made differently - all the slopes that will be seen when laying cement drainage systems must correspond to the height that is there at each site mark.
For areas with more or less flat surfaces, a standard drainage pattern known as linear is used. They dig a pair of channels located parallel to each other, after which they are connected at a point that has the minimum slope.
What kind of water interferes with the life of a developer and a country homeowner?
A whole book could be written about the types of surface and ground water, as well as drainage and storm sewer systems. Therefore, we will leave beyond the scope of this article a detailed listing of the types and causes of groundwater occurrence, and will concentrate on practice. But without minimal theoretical knowledge, starting to independently arrange drainage and storm sewer systems is throwing money away.
The fact is that even an incorrectly designed drainage system functions for the first few years . Then, due to clogging (siltation) of the drainage pipe, wrapped in geotextile, which was placed in clayey, loamy, etc. soil, drainage stops working. But money has already been spent on drainage construction and, most importantly, drainage construction involves a large amount of excavation work involving equipment.
Therefore, simply digging up and relaying a drainage pipe 3-5 years after it was laid is difficult and costly. The site has already been inhabited, landscaping has been done, a blind area has been arranged, a gazebo, a bathhouse, etc. have been installed.
You will have to rack your brains on how to redo the drainage so as not to ruin the entire area.
Hence, the construction of drainage should always be based on data from a geological study of the soil (which will help to find a waterproof layer in the form of clay at a depth of 1.5-2 m), hydrogeological surveys and clear knowledge of what kind of water leads to flooding of a house or waterlogging of an area.
Surface waters are seasonal in nature, associated with the period of snowmelt and abundance of rain. Groundwater is divided into three main groups:
- Capillary water.
- Ground water.
- Verkhovodka.
Moreover, if surface water is not drained in time, it turns into underground water when infiltrated (absorbed) into the ground.
Conclusion: surface runoff should be drained away by storm (rain) sewerage, and not try to create surface drainage!
Storm drainage is a system consisting of trays, pipes or ditches dug in the ground, discharging water from drains outside the site + competent organization of the relief on the personal territory. This will allow you to avoid stagnant zones on the site (lenses, pools), where water will accumulate, which simply has nowhere to go, and further waterlogging.
The main mistakes that are made when installing drainage yourself:
- Failure to maintain the correct slope of laid drainage pipes. If we take an average, then the slope is maintained in the range from 0.005 to 0.007, i.e. 5-7 mm per 1 running meter of drainage pipe.
- Using a drainage pipe in a geotextile wrap on “wrong” soil. To avoid siltation, pipes in geotextiles are used on soils consisting of clean medium- and coarse-grained sands.
Setting up the mold for pouring
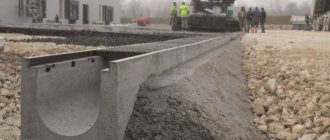
To figure out how to make cement water drainage trays, you need to understand the principle of their operation. In autumn and winter, a large amount of precipitation falls on the area near the house or cottage. Then they spread over the surrounding area, flooding low-lying areas, creating dampness in the basements and spoiling the finishing of the walls. If there are properly made cement trays near a private house, then the water will flow through them and then be drained away without creating trouble on the site.
Technical characteristics of concrete products for drainage
Concrete drainage trays are among the reliable and durable structures, and most importantly, durable.
Taking into account the characteristics of the material used, the equipment has the following technical characteristics:
Concrete drainage trays - reliable and durable structures
- high level of density;
- strength;
- frost resistance;
- minimal moisture absorption;
- reliability;
- precise hermetic characteristics (this allows you to design a system without gaps and cracks).
Buying drainage trays is not a problem now, but in order to navigate their diversity, you need to know what indicators to pay attention to first of all.
This applies to tempering strength in winter and summer, the level of abrasion, strength class, length, height and width of the gutter itself, weight, throughput and permissible load class.
Pouring trays into molds
Now the formwork is completely ready and it is possible to start concretely pouring cement trays, from which water drainage will then be installed. The following materials are useful for concrete:
The ratio of cement, sand and crushed stone can be used either as 1:2:4 or 1:3:5. The latter ratio allows you to take more concrete with the same amount of cement, but its strength will be slightly lower than in the first case. The resulting solution should be sufficiently viscous, but not flow and not be too thick.
The finished concrete is poured into the molds made, after which a pipe cut lengthwise is immediately pressed into it. After the days have passed, you can disassemble the mold, being careful not to break it, and remove the pipe (you also need to keep it intact).
What is fittings needed for? It allows you to significantly increase the strength of the future structure, and will not allow the tray to break during its removal from the formwork. Thanks to the reinforcement or mesh, it is possible to make fairly long trays.
Trays are made in four approaches:
When choosing screws or nails, it is fundamentally important to choose their length correctly. It must be large in order to securely fasten the structure. If in some place the screws or nails go inside the formwork, then their length should be a couple less - then they will not allow you to pull the tray out of the formwork and can also damage it by breaking off a piece of concrete.
Strengthening
Concrete must be reinforced with iron rods. This will significantly increase its strength and reliability, and the structure will not collapse when the formwork is removed. Instead of rods, you can use a thick metal mesh.
Individual reinforcing elements are placed 5-10 cm apart from each other vertically and horizontally, forming something like a mesh. The rods are fastened with wire or by welding.
Necessary tools and accessories
In order to prepare concrete for pouring and the trays themselves, certain tools will be useful. These can be devices operating from a 220 V power supply, and hand tools:
The following power tools are needed:
Shovels are needed to throw the solution into the concrete mixer, and when finished, pick up concrete from a wheelbarrow and pour it into the formwork. In most cases, a trowel is used to smooth the top layer of the tray being poured.
Do-it-yourself drainage of the area around the house
If the distance is less than 1.5 m, then the bearing capacity of the soil decreases - it becomes waterlogged and saturated with water. This affects the settlement of the foundation and makes the construction of a basement or ground floor problematic.
To drain the area around the perimeter of the planned house, or better yet along the edges of the entire yard, they dig channels with a slight slope and organize drainage. The optimal width of such channels is 50-70 cm.
The depth is calculated in each case individually, since it depends on how much the groundwater level needs to be lowered. Drainage is laid as follows.
At a distance of 2-3 m from the house, dig a ditch with a depth equal to the base of the foundation. A 15-20 cm layer of clay is placed on its bottom, giving it the shape of a tray. Medium-sized stones are carefully laid on top, forming sides. Large stones are placed on top, forming a vault. Gravel or crushed stone 25-30 cm high is placed on it. Everything is covered with soil removed during excavation. Water will seep through the soil into the tray and flow in the desired direction.
Reinforcement and filling of the tray
When making a mesh of reinforcement rods, you need to place them at a distance of 5–10 cm from each other, both vertically and horizontally. The mesh can be tied together with knitting wire or welded using electric welding. To prevent the reinforcement in the tray from rusting or rotting, the edges of the rods should not reach 5 cm from the wall of the formwork and the molding part.
While the reinforcement is laid, it is possible to pour the formwork. How to make concrete correctly was outlined above. During pouring, it is necessary to use a construction vibrator - a device needed to compact concrete and remove air bubbles and excess water from it. If it is not there, it is possible to take a piece of reinforcement or something similar and compact the concrete with an “up and down” motion.
When the concrete is poured, you must immediately use the molding part from the pipe, thanks to which the top of the form will be in the form of a semicircle. For a better result, it is possible to sprinkle the top of the poured form with dry cement, which was used in the manufacture of concrete, in order to “harden” the surface, in other words, to give it greater strength. And you can not only press the pipe into the fresh mixture, but also rotate it a couple of times in different directions, without applying too much pressure - this way the semicircular surface will have great smoothness.
It takes 28 days for concrete to completely harden. But after just a few days, the formwork can be disassembled - the concrete has reached the stage of preliminary hardening, in other words, it has not gained full strength, but it will not fall apart in your hands. The resulting tray should be rectangular in shape, and its internal cavity should be semicircular, smooth, without pits, cracks or other imperfections.
Classification
Concrete trays are differentiated according to load-bearing characteristics, which are reflected in the form of load class:
- C250 – elements that are used in the construction of highways with medium and low traffic intensity, as well as in the arrangement of infrastructure for passenger car parking lots;
- D400 – products in demand for high-capacity roads and highways with high traffic intensity, as well as for industrial zones, garage complexes and gas stations;
- F900 - elements with this designation have the highest strength indicators and are used as separate modules in drainage systems of ports, airports, large logistics and cargo delivery centers;
- E600 is a class corresponding to products repurposed for forming drainage from highways, railways, and also for use in large industrial enterprises.
For domestic purposes, polymer concrete trays or products of class C250, which have the lowest cost, are used. In addition, modules are classified according to parameters such as: shape, depth, overall dimensions. Nowadays, the production of trays of the same length is being implemented - 100 cm, while the value of the internal cross-section can vary widely.
In addition, the design distinguishes between telescopic and edge tray elements.
Installation of trays
Before laying the trays, it is necessary to dig rectangular trenches for them in accordance with one of the selected installation schemes. The bottom of the dug trench is covered with a small amount of sand (the so-called sand cushion) to make it easier to adjust the slope of the tray.
The slope of the trays itself is measured by two methods - a level or a level with a block (slat) attached to one of its edges. The second method is more imperfect, but will help those who do not have a level. When the slope is adjusted along the entire length of the trenches, it is possible to lay trays. In the end, it is possible to check their performance by first pouring only water in that direction, and then water mixed with sand (simulating runoff after heavy rains). If there is nothing left in the trays, then everything was done correctly.
If the trays run near pedestrian paths or through concrete, they can be covered with gratings, which will prevent garbage from accumulating there and will protect the movement of people.
Advantages of surface drainage compared to storm water inlets
The surface drainage system involves the use of separate trays that are joined together.
The trays cover the entire perimeter of the surface from which water must be drained. The channels are closed from above with gratings designed to protect the passages from blockages by debris washed into them. Such systems allow safe movement of pedestrians and vehicles through the territories. In addition to surface drainage systems, hard surfaces can also be equipped with point drainage systems (rain inlets). Water intake points are located evenly throughout the drained area. They are connected to each other by underground pipes that drain water into the sewer system.
Surface linear drainage from plastic trays has the following advantages compared to storm water inlets:
- installing such a system is more profitable from a financial point of view, since the installation of trays is easier and faster. It also requires fewer materials to create drainage on the surface;
- the ability to lay trays almost anywhere on a hard surface. Point drainage has restrictions on location due to the presence of underground communications;
- surface drainage is easier to install;
- there is no need to create external slopes towards storm water inlets. The surface remains level and suitable for the movement of people and vehicles.
- Maintenance of surface trays is several times simpler than maintenance of a point drainage system.
Read about the types of drainage systems in another article: Drainage around the house.
An example of surface drainage using trays