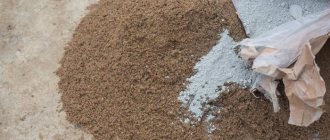
During the interior decoration of a building, plaster based on a cement binder solution is often used. To get a high-quality solution, you need to know how much cement and sand is needed for plaster. It is best to purchase cement in bags to make it easier to make proportions. Depending on the need and service conditions, components are added to the cement mortar that will impart certain properties to the resulting mortar:
- plastic;
- frost resistance;
- heat resistance;
- resistance to aggressive environments;
- slow or fast setting.
Division of cement depending on the amount of binder
If the question is how much cement is needed to plaster walls, then it all depends on what kind of solution is needed. As a rule, from 1 to 6 parts of sand are taken for 1 part of cement. The solution is divided according to the amount of sand taken into the part of cement: fatty, thin and normal.
A greasy solution is obtained if the amount of cement is very large. This solution has strong shrinkage and cracks easily (1-3 parts of sand). Skinny ones, on the contrary, have an increased amount of sand per part of concrete, they do not shrink and do not crack (6 = < parts of sand). Normal solutions have an optimal ratio of filler and binder (4-5 parts sand).
What proportions are they usually diluted in?
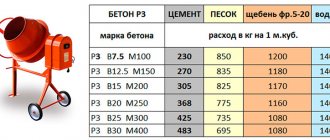
When using grade 400 cement, a solution is most often made with a ratio of 1 part cement to 4 parts sand. If you are interested in how much sand is needed in cement 500, then you need to add 5 parts of sand to 1 part of cement. It’s very easy to remember the values: for 400, 4 parts sand, for 500, 5 parts to 1 part concrete. At the same time, to obtain a high-quality solution, one must not forget to take into account that one year of storage: - 100 to the brand of cement. Many people forget about this property of cement.
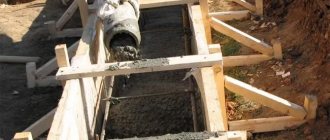
Screed
If the question is asked - how much sand and cement is needed for a screed, then they mainly use grade 400 cement. The ratio of cement and sand is 1:4. The cement consumption for flooring is determined as follows: for a screed of 1 meter square and 10 cm high, one 50-kilogram M400 bag and 200 kilograms of sand are used. Calculation of the required amount of screed is done using the formula:
(Screed area, say 20 m2) * (screed height, and it is translated in meters, and 10 cm = 0.1 m) = volume of the required solution.
To calculate the required amount of sand and cement, it is necessary to divide the volume of the required solution by the number of parts (in this case there are 5) and multiply them by the average weight of a cube of material. For cement, this value is 1300 kg; if the exact weight of sand is not known, then the value is 1625 kg. Shrinkage also occurs in the amount of ¼ of the solution, and the resulting values will need to be multiplied by 1¼.
Due to the fact that plaster performs two functions - decorative and leveling, the calculation of the number of components, including cement, must be done separately in each specific case. Experts recommend a “wall-by-wall” calculation based on the so-called “average thickness of the plaster layer.”
Relevance and benefits
The façade is one of the main impressions made even at a cursory glance. This statement is true for both cozy private houses and commercial skyscrapers. Property owners and architects strive to give it, if not uniqueness, then at least aesthetic appeal. Textured plastering successfully copes with this task by imparting structure, which is complemented by absolute freedom of choice of color shades.
The bark beetle looks organic not only in the exterior, but also in the interior space, which is why it is loved by designers for creative interior ideas for corridors, halls, balconies and even bedrooms.
But still, the impetus for widespread distribution was not so much the beauty of the resulting relief, but rather its pronounced practicality, due to the following:
- Easy to use, thanks to which not only professional builders, but also home craftsmen can cope with plastering;
- Lightness, reducing the load on load-bearing structural elements, especially significant for multi-story buildings;
- Environmental safety achieved by the complete exclusion from technology of toxic substances that can cause poisoning when heated;
- Biological resistance that prevents the development of molds and mosses in the porous structure;
- Heat resistance, maintained for 70 or more freezing cycles and in the temperature range from – 55⁰С to + 60⁰С;
- Immunity to ultraviolet radiation, guaranteeing equal safety on the sunny and shady side in any climate zone, even to the subtropics;
- Long operational period, subject to technical conditions - more than 15 years in indoor spaces and more than 8-9 years in the open air;
- Acid and alkali resistance, allowing wet cleaning, including with non-concentrated detergents;
- Resistant to accidental damage, removing dirt with a brush or vacuum cleaner;
Photo from repaireasily.ru
The listed points, combined with maintaining the technological nuances of the process, guarantee durability, as well as resistance to atmospheric and other damaging agents. And the variability of relief formation methods and extraordinary colors create countless combinations for the most demanding customers.
Technology for determining the “average thickness of the plaster layer”
So-called “key points” or “beacons” are attached over the entire area of the wall to be plastered, which are set according to the level. These can be nails, self-tapping screws, screws or special strips. The rule here is “the more beacons, the more accurate the calculation.” In general, there should be at least three “key points” located over the entire wall area.
Linear measurements of the depths of the recesses are made, which in one place of the wall can be 5 cm, in another 2 cm, and in a third 6 cm. The measurements of irregularities are summed up, after which their average value is calculated.
For cement grade M500
- 0.0446:5=0.00892 m3;
- 0.00892:0.000769=11.6 kg (the number of kilograms of M500 cement required for plastering 1 m2 of wall).
When performing repair work yourself, you need to be able to correctly calculate the consumption of building materials. This will help you save money when purchasing them. Cement consumption per 1 m2 of plaster depends on the quality of the surface on which we will apply the solution, the technical characteristics of the mixture and the texture of the resulting coating.
Let's consider how to independently determine the mixture consumption depending on the thickness of the layer and the type of plaster used.
Varieties
There are 3 types of cement-based plasters:
Used for rough exterior/interior finishing. The coating is quite durable and resistant to aggressive moisture. A solution of this type is ideal for ceilings/walls even in unheated rooms, as well as those characterized by high humidity (bathrooms, kitchens, toilets).
Involves finishing both inside and outside the building. It has excellent adhesion to various types of surfaces: from wood to stone. Since lime has an inherent bactericidal property, this plaster solution allows you to protect the coating from fungal and mold damage.
Usually used for treating walls in rooms where the humidity level is not too high, moderate. It is practically not used for facade finishing, unless in a dry climate.
Let's compare the costs per 1 m2 of different types of plasters when applying them in the same layer.
Types of cement mortars for plaster
Plaster mixtures used for wall finishing differ in the presence of certain components and their ratio. Divided into types:
| Cement-sand | They are used for rough interior and exterior finishing, resulting in a durable, moisture-resistant coating. Suitable for finishing walls, ceilings in unheated, damp rooms and for cladding facades. The constituent components are cement and various fillers: sand, plasticizers, etc. | The standard solution is prepared in a ratio of sand and cement 1:3. Cement grade M 400 can be diluted 1 part to 8 parts sand. M 100 is mixed in a ratio of 1:2. The composition is selected depending on the type of surface, layer thickness, and operating conditions. To increase plasticity, add PVA glue to the finished mixture in a ratio of 50-100 ml per 10 liters of the finished solution. |
| Cement-lime | They have good adhesion to all types of surfaces. Used for finishing plinths, cornices made of stone and wood. Lime has bactericidal properties and protects the surface from mold and fungal infections. | 1 part cement and lime to 5 parts sand. For a 25 kg bag of cement we take 21 kg of lime, 280 kg of sand, 50 liters of water. |
The cement composition is most often used for rough finishing of walls. A thin layer cracks during operation, so it is recommended to apply cement-sand mortars with a thickness of 3 to 6 cm, depending on the material from which the walls are made and the plaster application technology used.
Products using tyrsa
Hyper-pressed brick is a durable building material and is produced from a cement-lime starting mass using a special technology in which there is no firing stage. Hardening of the piece material takes place in special steaming chambers. The binding component is cement; various materials are used as filler, among which tyrsa, which contains a small percentage of clay particles, is widely used. Hard pressed facing brick is used as a facing brick, and the paving option is in demand in the field of landscape design.
Tyrsa is an inexpensive substitute for other bulk materials used in modern road and low-rise construction and the production of finishing materials.
Exterior finishing
What affects material consumption
The amount of solution depends on the level of the walls. The more defects, the more mixture required
You can easily calculate the cement consumption for plastering walls yourself. Consumption is determined based on the following components:
- type of solution and its components;
- how smooth the walls are, and what material they are made of.
In multi-storey buildings, the level deviation of the plane is 2-2.5 cm. The greater the unevenness of the surface, the thicker the layer will have to be applied.
To reduce the consumption of the plaster mixture, the surface is treated with a primer in several layers. It helps remove dust from the surface, reduce absorbency and better adhesion of materials.
At the junction of two surfaces made of different materials, we install a construction mesh. Because of this, a thicker layer of plaster is required. The consumption of decorative plaster is calculated using a special method.
In old houses you can find perfectly straight walls, but more often they have crooked walls.
Calculate the layer thickness
We determine the difference in the surface relative to the vertical plane using a plumb line or installing beacons.
Methods for determining the curvature of walls:
- We lower the plumb line from the ceiling, find the most protruding point of the wall, then measure the depth of the depressions.
- We use long, even slats as beacons; we apply them to the wall and see how crooked it is; We measure the depressions on the wall.
For clarity, we give an example of calculating the thickness of a layer of cement plaster for a wall with an area of 12 square meters. m.
Let’s say we installed 4 beacons and measured deviations along the plane of 2, 3, 4, 5 cm.
We add up the depths of the depressions on the walls and divide the resulting result by the number of beacons: (2+3+4+5): 4= 3.5 cm. The thickness of the plaster layer will be equal to 3.5 cm.
Characteristics
The choice of cement plaster composition for walls is determined by the following features:
- characteristics of the base;
- method of application;
- quality of the applied mixture.
According to the purpose of application, the compositions are divided into categories:
- simple, eliminating irregularities and defects in the base;
- special, containing additives to impart the necessary properties;
- decorative, or finishing, used for finishing.
Cement plaster is widely used and can withstand climatic conditions outside and inside the house.
Surface structure before finishing
Standard consumption rates
One bag 25 kg
The average consumption of cement for plaster is indicated on the packaging, taking into account a layer of 10 mm, and is individual for each manufacturer. If we apply a solution with a thickness of 2 cm, then we multiply the quantity by 2, etc. For plaster, the average consumption is 8.5 kg per sq.m.
If we take a 25 kg bag, then 8.5:25 = 0.34% of the amount of the bag will spread the plaster per 1 m2.
Let us consider in the table the calculation of cement consumption for plastering walls depending on the thickness of the applied layer at a standard consumption rate of 8.5 kg per square meter. m:
| 2 cm | 8.5*2 cm =17 kg. | 17kg : 25kg = 0.68 = 68% bag |
| 3 cm | 8.5*3cm = 25.5 kg. | 25.5 kg: 25 kg = 1.02 = 102%. One bag may not be enough for such a layer. |
| 4 cm | 8.5*4 cm =34 kg. | 34:25= 1.36 =136%. You need to purchase 2 bags. One will go completely, 1/3 of the second will be used. |
If you need to calculate the consumption of materials for a thicker layer, multiply the resulting amount by the layer thickness.
Marble chips give the “Bark Beetle” mixture a relief
The composition for finishing bark beetle plaster contains marble chips, which results in a relief surface with an interesting structure. Standard consumption ranges from 2.5 to 4 kg. Each manufacturer indicates these indicators on the label.
Venetian plaster is applied in a layer of several millimeters, resulting in a small mixture consumption of 70 to 200 grams per square meter. m. Working with such material requires experience; in order to apply it to the surface efficiently, it is better to invite a professional.
Gypsum compositions are consumed in a ratio of 9 kg per square meter. m. The plaster quantity calculator on our website will help you quickly calculate how much of this material will be needed for finishing work.
When purchasing a plaster mixture, you need to add 10% to the calculated amount of material so that you don’t have to run to the store during the work.
Information on the purpose of the calculator
The online brick calculator is designed to calculate the amount of building and facing bricks for a house and basement, as well as related parameters and materials, such as the amount of masonry mortar, masonry mesh and flexible connections. Also, the calculations can take into account the dimensions of gables, window and door openings of the required number and size.
When filling out the data, pay attention to the additional information with the Additional information sign
Since ancient times, brick has been the most popular, widespread and familiar building material for the construction of long-term and reliable structures. This situation persists for a number of reasons, despite the emergence of new, modern and cheaper building materials. There are several most common types of bricks for any construction needs:
- Adobe - made of clay and various fillers
- Ceramic - (most common) made from baked clay
- Silicate - made of sand and lime
- Hyper-pressed - from lime and cement
- Clinker - made from special baked clay
- Fireproof - (fireclay) made from fireclay
Ceramic brick
(clay) are divided according to purpose into façade, ordinary and clinker. Ordinary brick (backfill) may not have an ideal geometry and in most cases is used for laying rough walls of houses, plinths, garages, which are subsequently plastered, painted and protected with facing materials and coatings. Its color has various shades of red.
Facing
(facade) are used for the construction of walls without any additional finishing in the future. There are also various special types of facade bricks that can withstand high mechanical loads and adverse atmospheric influences, and are usually used for paving paths, building all kinds of retaining fences, stairs, and walls.
Clinker
It has an ideal smooth surface, various shades of red and black colors and is highly dense.
Silicate
is a light-colored lime-silicon artificial stone. Sand-lime brick differs from ceramic brick in that it is not fired during the manufacturing process. It is quite hygroscopic, and accordingly is not used for the construction of objects that will be operated in humid environments, such as the basement and basements.
Also, sand-lime brick is not used in the construction of furnaces, pipes, chimneys and foundations, since it can withstand external destructive loads quite poorly.
Refractory
is divided into several types and is used for the construction of structures exposed to high temperatures, such as stoves, fireplaces, chimneys and smelters. The most common is fireclay brick, it has a yellowish tint, made from special fireclay (chamotte) and, unlike ordinary clay brick, can easily withstand high temperatures (up to 1400 degrees), as well as numerous heating and cooling cycles without loss of strength.
Bricks are solid (volume of voids no more than 25%), hollow and porous-hollow. It is believed that depressions and voids in the material not only reduce weight, but also significantly increase the overall strength of the masonry by increasing the contact area between the brick and the mortar.
The most common standard brick size: 250 - 120 - 65 mm (length - width - height), the so-called first “normal form” (1NF).
When calculating the amount of brick required for work, they usually use a rule called “format”, in which the dimensions of the brick itself are increased by 10 mm (this is the standard joint thickness), that is, it turns out: 260x130x75 mm.
The following is a complete list of calculations performed with a brief description of each item. If you haven't found the answer to your question, you can contact us via feedback.
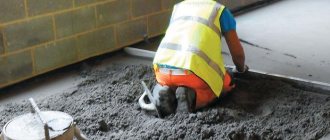
We plaster with our own hands
Apply three layers of plaster
After we have calculated the required amount of material and purchased dry components, we begin to carry out the work.
Step-by-step instruction:
- We prepare the surface. We clean the wall from dust and flaking building materials. We remove rust and oil stains.
- We prime the surface in 2-3 layers, applying each subsequent layer after the previous one has dried.
- Apply the plaster in three layers. First of all, spray a medium-consistency solution onto the wall; this can be done with your hands, with a spatula, or with a ladle. Then we rub the composition over the surface with a rule or a grater: apply 4-5 mm thick to a concrete surface, up to 7 mm to a brick surface, and up to 10 mm to wood.
- The second layer is the main one. Mix the solution a little thicker than for spraying. Using a spatula or trowel, apply the composition to the wall and rub it over the surface, leveling it.
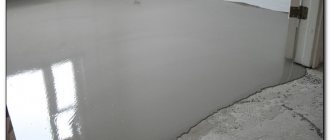
- Apply the last layer with a thickness of no more than 4 mm, and prepare a more liquid solution for it. Apply the coating to the moistened base layer. After setting, but before the surface dries, we grout. For more information about plastering work without beacons, see this video:
A type of wall plaster is beacon finishing, which allows you to create a perfectly flat surface.
The guides are installed strictly according to the level at a distance slightly less from each other than the width of the rule. Beacons can remain in the wall or be removable.
Rule from the bottom up
Stages of applying plaster to lighthouses:
- We fill the area between the beacons with a solution and level it using the rule. We fill all the voids and carefully level them.
- We cover and rub the surface well.
We need to prepare such a volume of solution that we can apply it before it hardens.
Be sure to study the calculations of plaster consumption before starting work.
Repair is not complete without leveling the walls and performing plastering work. The surface treated with a cement composition serves as a reliable basis for finishing.
In order not to make mistakes when purchasing materials for independent repairs or to control the builders, you need to know how much material is consumed. After studying this article, you can easily calculate these indicators.
Finishing work always begins with correcting problems with the walls using plaster “add-ons”. In each specific case, to effectively use the capabilities of plaster, it is important to maintain the correct proportions of cement and sand mortar. You can save money and try to prepare a mortar for plaster from the remains of the masonry composition, or you can make a mixture according to science, maintain the required proportions of cement and sand, then the mortar will last a long time and be strong.
Sand-cement mixture from the remains of masonry mortar
For masonry, a mixture of sand and binder cement is used in standard proportions with the addition of a small proportion of lime or clay. Bricks in masonry are knitted using a standard proportion: 400 grade cement take a bucket with 4 buckets of sand, for 500 grade sand put more in a bucket. Depending on the proportion of lime or clay, the composition becomes rigid and more plastic. This is extremely important for keeping the brickwork upright.
Let’s make a reservation right away: the remains of the masonry mixture in its original form are not very suitable for plastering walls for a number of reasons:
- The proportions of the plaster mortar have a higher cement content, with a minimized amount of lime or clay;
- By the time plastering work begins, the remaining masonry mortar will have partially lost its plasticity and will give poor adhesion to the surface of the brickwork, and such a mixture will not stick to the concrete surface at all without special adhesive additives.
Advice! Use the remains of the masonry mortar to adjust the filling of the joints and do not try to adjust its proportions to the values of the plaster mortar by adding cement or sand.
Basics and proportions for preparing solutions
A plaster composition based on a mixture of sand and cement must be prepared and used as quickly as possible, before the process of partial binding of free water with cement grain begins. On sale you can purchase a ready-made plaster mixture for a wide variety of plaster options, in which the optimal proportions of sand and cement have already been selected.
The most successful option is considered to be the situation if you manage to buy several bags from a large proven batch of mixtures at a serious construction site, not very old and proven in practice. The same goes for buying cement. The most problematic from a quality point of view is considered to be the use of old packaged or hung building materials. In this case, the recommended proportions of cement-sand 1:3 need to be adjusted and a couple of practical test batches done. Most often, grade 400 ShPTs or PTs is used in plaster.
To carry out work to correct defects in the geometry and curvature of walls, use PC I cement mortar with a sand/cement ratio of 3:1 as a masonry primer. For mortar for the main leveling mass of plaster, grade 400 - PC II with a proportion increased to a ratio of 5:1.
Choosing sand for the solution
The requirements for sand for the plaster composition are higher than for the masonry option:
- The sand must be sifted and washed; it is extremely important to obtain large and medium sand fractions and eliminate dust and clay inclusions.
- The larger the sand fraction, the better the adhesion to the wall, and the harder the plaster becomes. If there is nothing but coarse sand, you can add a small amount (up to 5%) of fatty clay, ground to a fine powder. With a higher clay content or the presence of clay lumps in the mixture, a network of small cracks may form on the surface of the plaster.
- An excessively fine sand fraction can make the plaster solution too plastic and slippery, does not hold the applied layer well, and floats. The recommended maximum layer on such sand is, as a rule, no more than 3 mm; it is excellent for finishing surface finishing work.
Important! When preparing plaster, only dry sand is used; even a slightly moistened mixture with cement mixes very poorly with dry cement, the material will be heterogeneous, and, as a result, the surface of the plaster will crumble and crumble in places.
The most used cement grades in plastering
Depending on the goals and objectives, Portland cements or Portland slag cements of a grade not lower than 400 are used for plaster mortar, and less often, in special cases, grade 500. Most craftsmen are well aware of the preparation technique and the required proportions of the solution, the requirements for sand and cement, but they cannot always successfully select the required brand for specific types of plaster or working conditions.
For large areas of plastering work, with a small amount of corrections or leveling of walls, Portland M400 type 1 is used; on the packaging marking after the letters PTs you can see the designation I or II. The first is the cement with the maximum rate of increase in hardness and rigidity. The listed cements have proven themselves well for plastering external walls in conditions of high humidity and low temperature.
The second type of cement corresponds to Portland with special additives that reduce the internal stresses of concrete and cement castings, improve the ductility and frost resistance of the plaster composition. This cement is well suited for leveling walls.
In addition, there are many specialized grades of cement with improved characteristics, but they are used in industrial structures and are most often not used for ordinary plastering work.
Use of special modifying additives
It is not always possible to achieve high-quality “adhesion” of the plaster mixture to the brick or, especially, concrete base of the walls. Often the cause of abnormal adhesion is the incorrect consistency of the prepared plaster mass or poor preparation of the wall surface itself. It is quite easy to check the consistency of the plaster composition - from the smooth metal surface of a trowel or rule, the solution slides off in about 7-8 seconds in one compact piece, and does not flow down or stick tightly to the tool.
In the finished plaster mixture, the “stickiness” of the plaster solution is artificially increased by adding small proportions of powdered water-soluble carbocellulose or polyacetate adhesive compositions. They displace air from the surface of the plaster mass and reduce the surface tension coefficient of bound water.
Thanks to this, the frozen layer acquires a very even and smooth surface. As an alternative to preparing walls and plaster mixtures, you can use ready-made liquid KMS compositions intended for priming walls and preparing plaster solutions.
But most often, to improve the plasticity of plaster cement-sand mortars based on M400 I, craftsmen and amateurs use cheap washing powder or liquid synthetic detergent, in a proportion of 50-70 g per 50 liter tank of the mixture. The effectiveness of this method is difficult to assess due to conflicting reviews, but to be sure, it is better to test the recipe with a surfactant using small portions of the plaster composition.
A small amount of fatty clay, 50-100 grams per 15 liters of water, has a roughly similar, but less expressive effect. The clay mass is rubbed by hand in water until a homogeneous cloudy suspension is obtained, which is filled with a dry mixture of cement and sand. The plaster mass becomes more plastic and less susceptible to high air temperatures, and takes longer to dry than usual. If you overdose the required proportion of clay or dry it in a strong draft, a network of microcracks may form on the plastered surface.
In the previous recipe, clay can be replaced with lime paste or a liquid lime substitute in the proportion of 150 grams of additive per 50 kg of plaster mixture. This version of plaster can be prepared for external walls and even semi-basements.
For walls whose surface is exposed to regular and fairly strong temperature changes, it is better to use the addition of a small proportion of chopped fiber material based on polymers, fiberglass or fiber structures to the mixture.
Conclusion, special components for plaster
To reduce the density of the plaster and increase thermal insulation, special types of sand and ground natural raw materials can be added to the plaster composition in the required proportions. Flour and grains from crushed dolomite and calcined vermiculite increase the number of pores and microcavities in the volume of the cement mortar of the plaster up to 30-33%, and in special proportions, air entrainment in the plaster mass can reach 47-50%.
The average content in proportion of such fillers can range from 13 to 27%. Heat loss is significantly reduced, sound insulation qualities are improved by 20-25%, vapor permeability increases while maintaining water-repellent qualities.
The number of pores can also be increased by using special reagents such as Ceresit CR166, specially designed to reduce the amount of water vapor in the atmosphere of enclosed spaces.
Making your own plaster mortar does not require extraordinary knowledge; it is enough to accurately maintain the proportions of cement and sand and use special additives in the mortar. Buying a ready-made plaster mixture will cost 2-2.5 times more expensive at an average level of plaster quality.
- Arbolite blocks: reviews from home owners
- Preparation of mortar for plastering walls
- Sand-lime brick one and a half
- Preparation of mortar for bricklaying
We install beacons
Just as an ordinary lighthouse is a guide for ships, a construction lighthouse serves as an excellent guide for a plasterer. Construction beacons can be made in the form of hard points on the surface to be finished or in the form of nails, slats or tubercles of plaster mortar.
Note! Each of the mentioned types of beacons must be installed at a level.
The process of installing these landmarks on the surface can be done with your own hands in two main ways:
- A small portion of cement composition, tile adhesive or putty is thrown onto the wall in a vertical direction. A perforated lighthouse strip is installed on this solution. A level is applied to the beacon along the length of the product, which sets the direction of installation of the product;
Advice. Since the lighthouse profile is a rather fragile product and bends easily, a long level should be used. If you don’t have one at hand, then you can use a short level with a rule. The rule is located on the lighthouse, and we lay a level on top of it.
- On a pre-prepared vertical line on the wall, holes are drilled into which wooden pawns are driven in the shape of a cone. A strong thread is stretched between the outermost pawns, along which all the others are installed. The protruding parts of the pawns can be sawed off or hammered in with a hammer.
The lighthouse profile is attached to the pawns with self-tapping screws. And a solution is applied along the line between the pawns, which prevents the profile from bending.
Note! The second method is preferred in cases where there are large differences on the surface.