Printed concrete (stamped concrete) is a relatively new construction technology for Russia that allows you to turn a “dull gray” concrete surface into a real work of art.
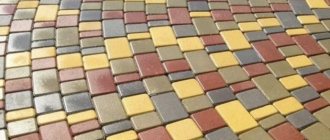
That is why stamped concrete is often called “architectural concrete”. Using this technology, you can visually accurately imitate the surface of areas made of “noble” components: granite paving stones, slate, marble, brick, weathered stone, shell rock and other materials. .
Printed concrete manufacturing technology
The technology of stamped concrete is not prohibitively complex, and can be implemented on your own using relatively inexpensive universal construction tools
The essence of the process of making architectural concrete is to give the surface of the prepared concrete site texture and color: granite paving stones, boardwalk, brickwork, animal skins, whatever. For this purpose, special rubber stamps, special coloring and strengthening materials, as well as special tools and equipment are used.
To implement the technology of printed concrete on your own, you will need to have, purchase or rent special tools and equipment. In particular, you will need the following tools for stamped concrete:
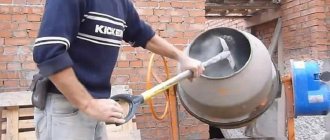
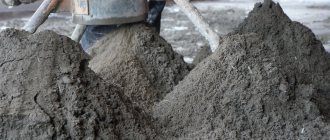
- Concrete mixer, galvanized buckets, shovels and bayonet shovels for making the base - heavy concrete. Note If ready-made concrete material is purchased from the nearest bacon factory, there is no need for this equipment.
- Special rubber stamps in the amount of 6-7 pieces and a tamper for “compressing” the concrete surface with stamps.
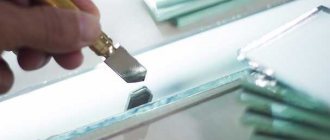
- Angle grinder with a cutting tool “for concrete”, for opening expansion joints and correcting stamping defects.
- Scraper for leveling the surface of concrete.
- Magnesium floating strip for rubbing in color strengthening agent.
- Magnesium polisher for leveling concrete.
- Manual edge bender for forming corners.
- Steel trowel.
- Vibrating screed.
- Rustication to eliminate defects in joints.
- Texture roller for processing stamp joints.
- Paint brushes, paint roller, plastic buckets.
In addition, you will need 100x20 (25) mm edged boards for formwork, M350 concrete and a number of special finishing materials which will be discussed below. As you can see, the technology of blasted concrete will require certain costs for the purchase of special tools.
However, considering that the price for 1 m2 of printed concrete starts from 1,500 rubles and above, it makes sense to spend money. Moreover, some of the above tools will definitely be needed later for other construction work on a private or country estate.
What is architectural concrete
Source strmaterials.com
Perhaps it’s best to start with the history of the French entrepreneur Antoine Bonnet producing architectural concrete with his own hands in 1928 (as you can see, not even a full century has passed). He had the idea of creating a park similar to Noah’s Ark, where all the animals living on our planet would be located, but the original plan had to be abandoned, since each living creature has different natural conditions of existence. However, a solution was found - Vincent Gall (a builder) suggested that he make four-legged animals from concrete in the form of life-size sculptures. Having started work, everyone was convinced that this project had good prospects.
The very first sculptures created in Antoine Bonnet Park were a family of turtles. They were made using the same method that is still used today - first, a wire frame was knitted, and then the sculptor gave the desired shape to the figures using cement mortar. All Parisian newspapers wrote about this event, and something incredible happened in the park - a pilgrimage of Parisians and guests of the capital practically began. Turtles began to be made to order, and this brought good profits. Over time, other animals appeared in the park: bears, deer, hares, wolves, tigers, rhinoceroses, hippos and so on. Unfortunately, it has begun. The Second World War and in 1940 the park was bombed, and the surviving figures were taken to Germany, where their trace was completely lost.
Source autogear.ru
Of course, this was a serious loss for art, but, fortunately, several French publications and even some European newspapers managed to describe the technology for producing such sculptures. They described the creation of an imitation of wood and stone structures, and talked about how the wool and feathers of animals and birds can be reproduced from cement stone. In addition, a documentary was made in which the workers who created the sculptures showed how to repeat the relief of a turtle shell and the features of sculpting various parts of the body of other animals.
However, as a separate building material, architectural concrete received a patent in the United States only in the early 60s of the last century. In any case, the binding component for such a mixture remains cement, to which various fillers, plasticizers and coloring pigments are added. But architectural concrete, unlike conventional building mixtures, has a fine-grained structure with low hygroscopicity. Hardened cement stone of this type can be ground and does not react to natural temperature changes. The main visual difference of such a mixture can be called a wide range of colors.
Types of architectural concrete
Source kladembeton.ru
As a rule, do-it-yourself architectural concrete is made for landscape design, and today at least three types of solutions are used for these purposes:
- Conventional concrete mixtures of a certain brand and strength class, necessary to create simple geometric shapes - most often, this is a base or stand for a sculpture. This solution is poured into the formwork and compacted by vibration. The mixture is called geometric concrete.
- Decorative mixtures are needed to create various decoration elements - they are elastic and are also poured into molds, only in this case, they are more complex matrices. After hardening, the products are sometimes subjected to painting. The mixture is called decorative or artistic concrete.
- Sculptural mixtures are the most elastic and resemble clay in viscosity, and the setting process lasts for several hours (the duration depends on the plasticizer). Decorative cement of the desired color is often used for the solution, and kaolin (white clay) is sometimes added along with sand. The mixture is called sculptured concrete.
Use of architectural concrete
Source znaybeton.ru
For the vast majority of people, the concept of concrete is associated with something gray, cold and at the same time durable, monumental, but this is not always true. Today, thanks to the emergence of structural expressionism and such trends as hi-tech, loft, modern and minimalism, fine-grained concrete mixtures have received a kind of second life - they have begun to be used in landscape design, exterior and interior architecture.
Source mycona.ru
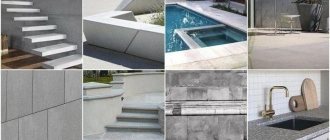
Areas of application of architectural concrete:
- In the interior, such mixtures are used to create panels with a three-dimensional pattern, columns, cornices and decorative grilles.
- In the exterior, architectural concrete is used to imitate natural stone, create bas-reliefs, atlases, caryatids and various figures of people and animals.
- In landscape design, artistic concrete is used to make various sculptures of animals and fairy-tale characters, borders, fences, pillars, lamps, as well as volumetric flowerpots or entire artistic compositions.
Source pinterest.com
As a rule, those home craftsmen who are looking for ways to make architectural concrete with their own hands are primarily interested in landscape design and, less often, in finishing facades. But, no matter what categories of people are looking for an answer, such a “caste of inquisitive people” exists, and I am going to give more detailed recommendations on this topic. So everyone who knows Russian is welcome.
Stages of work
As already mentioned, you can make printed concrete yourself. However, it is best to take on this work with some experience in handling concrete. Problems that inexperienced stamped concrete layers may encounter:
- The material hardens quickly, making it impossible to get a clear print.
- Difficulties in correcting typing errors.
- The need to be able to handle an angle grinder, trowel, magnesium lathe and other construction tools.
In general, the technology for producing architectural concrete consists of the following main stages:
- Surface preparation. The base for pouring concrete for stamping is a standard planned area of the required dimensions. The boundaries of the site are marked with pegs and a cord. Next, along the line of the cord, the soil is removed to a depth of 20 cm. The resulting surface is compacted, a crushed stone cushion 10-12 cm thick is poured, formwork is installed from boards, and a reinforcing mesh is laid, placing pebbles 3-4 high under the mesh cm.
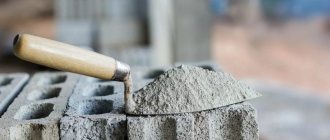
- Preparation (purchase) and pouring of heavy concrete grade M 350 or higher.
- Leveling the surface as a rule.
- Compacting concrete with a vibrating screed.
- Smoothing the surface with a trowel until the surface is smooth, uniform and horizontal.
- Application of the “MONOPRESS” hardener. This is a colored hardener, which is a fine powder of various colors. Work on its application begins after the initial hardening of the surface. The powder is spread manually in a format “from the center to the edges of the concrete.”
- Allow the initial layer of hardener to penetrate into the concrete for 10 minutes. Smooth the surface with a magnesium trowel and apply a second layer of color hardener.
- The edges of the corners are formed using a manual edge bender.
- The next stage is the application of a special separating component from Increte Systems to the concrete surface, which ensures that the loaf does not stick to the molds. The separating component is applied using a paintbrush. The brush is immersed in the container with the component, and the release powder is sprayed horizontally using double hands over the surface of the base for stamping.
- Stamping. One of the most critical stages. Before stamping, it is necessary to check that the surface has the required degree of ductility. To do this, you need to press your finger in different parts of the site. If, after pressing, an imprint with a depth of 5-6 mm remains, you can begin stamping. The available rubber stamps are laid out on the surface according to the accepted pattern, and pressed into the concrete with a tamper. After this, the prints are left to harden for 1 day.
- Elimination of stamping defects using rustication.
- Cutting temperature-shrinkable joints using a grinder and a disc for concrete.
- Washing concrete from the separating component with running water.
- Washing concrete with hydrochloric acid solution.
- Spraying Clear Seal with a paint roller and paint brush. The sealant serves as protection for stamped concrete from abrasion, and also gives its surface rich color and a pleasant shine.
- Drying. After the sealant has dried, stamped concrete is ready for use.
Types of decorative building materials
The technologies for working with the material differ. As a result, the final product and its purpose are different. Here are the three main types:
- Colored or printed concrete decor. You can find more than 20 options for pigmenting additives on sale. They can be mixed with the solution or only with the surface layer of the mass that has not yet hardened.
- Fake diamond. Products are cast in molds that create the appearance of tiles, blocks or lamellas similar to rocks. Imitation of paving stones, bricks, and wood texture is also performed. The products are relevant both outside and for the interior of the apartment. Coloring of the working mixture is carried out at the stage of its preparation.
- Textured or artistic concrete. Here the coating is unique due to mineral inclusions that differ in color from the main composition. After casting, the surface layer of the binder is removed to expose the “dye.” We will use the material for decorating floor structures, walls with facades, and fences.
The last type of decorative monolith does not have to be textured in order to highlight the colored inclusions. It is possible to create a relatively smooth surface by sanding. The effect from the outside will be almost identical.
Relief stamp
To make it, you need to purchase liquid polyurethane - this is the most convenient material. Initially, polyurethane has the consistency of thick kefir, thanks to which it flows into all the small parts of the matrix for casting the stamp. After hardening, this is a full-fledged rubber product, elastic: after squeezing, it takes on its original appearance.
Purpose : applying a convex ornament to a concrete surface or plaster walls.
Preparation . The most important thing is to make a mold for pouring, because it will represent the result of the imprint on the concrete. You need to decide on the variety:
Production technology . The desired fragments for imprinting are laid out on a sheet of thick plywood: this could be your favorite paving slabs, stucco molding, or cut-out ornaments. Another option is textured wood (you can strengthen the convexity with your own hands by burning and using an iron brush, the main thing is to sand it after processing).
Scope of application
This is a universal material that can be successfully used indoors and outdoors. It does not require a special base, so the coating is widely used to create floors:
However, in order for decorative stamped concrete to last for an unlimited number of years, strict adherence to the technological process is required.
Opportunities for renovation and construction
Concrete with a decorative coating is a conventional concrete mass, onto the surface of which a decorative imprint is applied. Among the large and varied selection, the following imitations are presented:
Kawabanga! Concrete repair using injection method
Thanks to such opportunities and the offered assortment, everyone will be able to make their choice. Construction companies often use such masonry to decorate the area near the entrance to an office building.
DIY decorative block
You can create a seal yourself using silicone sealant and a wooden box . The height of the sides of the box must be at least 12 cm, and the sealant base must contain acetic acid. After this, the box is generously filled with sealant and carefully straightened with a brush dipped in water. Lay the tiles face down on a layer of sealant and wait until the material hardens.
In order for the tile to move away from the sealant layer without problems after hardening, it is recommended to lubricate it with grease. Instead of ready-made tiles, you can use directly natural stones of a suitable size. The stones are pressed into the silicone according to the planned pattern. When the seal or stamp for future decorative concrete slabs is ready, you can begin paving garden paths and cladding the walls of buildings.
In order to obtain a decorative concrete block, you can proceed as follows:
- prepare one tile with imitation of natural stone;
- 3 parts quartz sand;
- 1 part white cement;
- 2 parts granite chips;
- take a plasticizer (no more than 5% of the total mass).
The consistency of the finished concrete should be such that it slowly slides off the trowel. To speed up the work process, it is recommended to make several molds for stamped concrete.
Stencils for concrete: roll, relief stamp and roller
Concrete is one of the most ancient building materials. Due to its versatility, it is used both for load-bearing structures and for finishing. If it is better to entrust the construction of walls to professionals, then creating a beautiful facade or sidewalk can be done by any craftsman. The most accessible way is to add texture using a stencil.
There are several types of stencils:
Everything can be purchased in the store, but to create an exclusive work, it is better to make them yourself.
What types of stamps are there for concrete?
Construction stores offer a large selection of any molds. However, their choice must be taken responsibly, paying special attention to the degree of rigidity of the form. The higher this indicator, the easier it will be to create an imitation of concrete paving stones. Soft shapes will require considerable effort when printing the design.
High-quality prints can be obtained using the following types of stamps:
A separate category includes stencils for pouring the mixture. These are easy-to-use forms that are laid out on the ground and filled with solution. After hardening, the stencil is removed and rearranged further. With their help, you can make a floor on a terrace or in a gazebo, decorate a porch, or lay out a garden path.
Advantages and disadvantages
This type of flooring has no equal in finishing sidewalks, parking areas, and paths. This is a monolithic coating that has no failures, with a variety of colors and textures, frost resistance, strength, and long service life. The positive aspects of the decorative surface include:
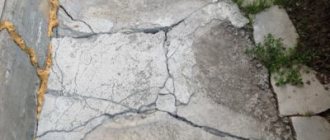
The wear-resistant concrete surface is not afraid of atmospheric influences, but it is easily scratched by metal objects. Studded car wheels can leave characteristic marks. The surface will quickly become covered with scratches in areas where the front wheels turn daily. Of course, the appearance of such defects is also possible on paving stones or natural stone paving, but this will have to be taken into account.
Riding on spikes or twisting the steering wheel on stamped concrete flooring is unacceptable. Strips poured under the wheels will help resolve this situation. They can be dismantled if necessary and refilled. The width of the stripes should be about 0.7-0.8 meters.
Technology for creating a decorative surface on concrete using a stencil. Part 1
In this article
I wrote about the technology of printed concrete. The surface turns out to be quite attractive, but the technology itself has disadvantages. The main disadvantage: it is only available to the brigade. It takes 20-30 minutes to stamp a monolithic surface of a large area. I came across another, easier technology of printed concrete - obtaining a pattern through a stencil:
Briefly, the process can be described as follows: as soon as the poured concrete surface has been smoothed, you lay a special stencil (there will be information below on where to get it). Next, use a rubber roller to roll the material into full contact (adhesion) with the concrete. Sprinkle colored pigment on top (or different colors for contrast). Roll the surface again with a roller.
Next, you can stamp the surface under the stone with a rubber mold. But if it’s not there, don’t worry. Without waiting for the concrete to set, we remove the stencil and correct any visible irregularities.
The process is shown in this video (in English - turn on subtitles with translation).
What to do if there is no rubber stamping mold? As I said, it is not needed. The decorative surface can be obtained with a textured roller or a lint roller. But you need to work while the concrete has not yet begun to gain strength. Under this condition, you can get the following decorative surface:
In winter it will not be slippery. But it is possible that over time it will wear out a little (if it is not covered with polyurethane varnish). To do this, you need to paint the concrete at least 1 cm deep with pigment. Sharp protrusions after the roller can be passed and smoothed with a spatula - the effect of decorative plaster will be obtained.
Better yet, go over it with a textured roller like this (in one pass with one pressure). The surface will acquire the texture of stone.
If such a surface is coated with polyurethane varnish, this is guaranteed to protect the surface, give the effect of a wet stone and make it wear-resistant.
Where can I get stencils? If you need to make a small area, a stencil can be ordered from organizations that deal with outdoor advertising and offer plotter cutting services. Make a stencil from banner fabric (you can even use it) or thick thick paper. There are companies that sell stencils designed to create decorative surfaces:
The stencils are made of thick paper. Sold in rolls like these.
If you organize a business based on this technology, then it is better to cut a stencil out of thin plastic and make it reusable:
After work, I washed it and rolled it up. The plastic should not be fragile, but of high quality.
To be continued in the second part...
Photos are taken from open sources, from the Yandex.Images service
Subscribe
to the channel, bookmark it in your browser (Ctrl+D). There is a lot of interesting information ahead.
Source
Customer reviews
Our review would be incomplete without examples of finished work and customer reviews. Below are reviews from our readers who have assessed the advantages and disadvantages of printed concrete in practice.
Nikolay, Orel
Dmitry, Moscow region.
Andrey, Kursk
Tatyana Markovna, Chelyabinsk
Oleg, Tula