When you first have to arrange DIY self-leveling self-leveling floor, many questions arise. For example, which materials to give preference to, which technology is considered the best and how not to make mistakes, due to which the finishing coating will soon have to be redone.
To order a self-leveling floor or screed device at the best prices in Moscow, visit this website: STROI-F.RU
What is a self-leveling self-leveling floor?
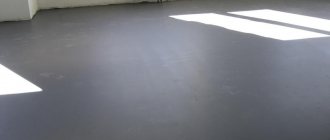
When spread, the liquid self-leveling floor creates a flat and smooth surface. Such models are an ideal option for the further installation of many types of floor coverings. A popular type of self-leveling floors are self-leveling structures, which are the final finishing.
Self-leveling floor is a type of coating obtained by filling the floor surface with a certain self-leveling mixture. It is characterized by high strength and perfect evenness. Outwardly it resembles linoleum, has no seams or gaps.
An important technical characteristic is the minimum thickness of the self-leveling floor. In the technology of self-leveling coatings, every millimeter is of great importance.
In an apartment, a layer of 1 mm is considered sufficient to forget about repairing the floor for a long time.
A self-leveling floor is not just a uniform, smooth surface on which there is nowhere for dirt to hide. Modern achievements make it possible to make the result of the work a real work of art with a colorful image in 3D.
Various filling methods
Generally, the pouring method depends on what substrate the mortar is being applied to and what type of finish the pour will be used for.
Conventionally, it is customary to distinguish three methods of pouring the solution:
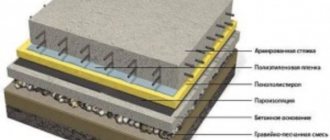
- Self-leveling floor on concrete. A situation where the fill is a finishing coating. The thickness of such a layer is no more than 1.5 cm. For better adhesion, the concrete base is sanded and primed before pouring. This method makes it possible to do without further finishing work, but requires perfect evenness. After drying, it is usually varnished or painted.
- Two-layer cake: the solution is poured onto a base with fundamentally different physical qualities - for example, wood. To ensure that the properties of both materials do not harm each other, a separating layer (polyethylene) is laid between them. The thickness of this fill is no more than 2 cm.
- Floating screed. In this case, the base may be similar to the fill - but a leveling layer is placed under a finishing material of a different property, for example: laminate or parquet. In this situation, a separating material (film) is also laid over the walls and glued along the entire perimeter with damper tape. The thickness of the layer is no more than 2.5 cm. After laying the decorative material, the remaining film and tape are cut off, and the gap is closed with a plinth.
Wooden floor prepared for pouring floating screed
Regardless of the method used to construct self-leveling concrete floors, the technology for pouring them is the same:
- Work is carried out from the opposite corner towards the exit.
- You can't rely on lighthouses.
- The rule is to drive in a zigzag pattern.
- Do not leave a large volume of unleveled mortar on the floor.
- When mixing, it is necessary to strictly observe the proportions.
- Having finished pouring, it should be covered with polyethylene and access to the room should be closed.
Self-leveling floor on concrete screed
Features and advantages of self-leveling floors
In apartments and private houses, linoleum, laminate or ceramic tiles are used as flooring. In comparison with them, a self-leveling self-leveling floor has a number of advantages:
- linoleum lasts no more than 20 years, and self-leveling flooring lasts 2 times longer. In addition, when replacing the coating, the old linoleum is always removed, which is not required when updating the self-leveling floor;
- Laminate reacts negatively to moisture, so installing such flooring in a kitchen or bathroom is not recommended. In addition, the service life of the laminate is only 12 years;
- Ceramic tiles are not inferior to self-leveling floors in strength and resistance to moisture penetration. However, the presence of seams between tile elements contributes to the accumulation of bacteria and dirt;
- self-leveling floors are made from materials that are not subject to fire. They do not require complex maintenance, can withstand heavy loads, and are resistant to abrasion and moisture penetration;
- The high sound insulation characteristics of self-leveling floors have allowed them to be widely used in residential premises, whose owners prefer a quiet lifestyle.
Self-leveling floor, video:
Option #2 - special glue
A good glue for linoleum is quite elastic, which does not allow it to peel off under load. According to the method of gluing linoleum, compositions are divided into two types: for fixation and continuous gluing.
There are five types of adhesives for continuous bonding: one-component, two-component, water-dispersed, polyurethane and solvent-based adhesive. Water-dispersed compositions are environmentally friendly and popular. At the same time, they are quite elastic and fix linoleum with high quality.
As a more economical option, use adhesive for fixation - a special composition that has moderate adhesive ability and constant stickiness. This glue is easy to apply and the consumption is not high. It is best to buy glue together with linoleum, which will allow the seller to give full advice and offer the best option.
Having chosen the adhesive composition, you can proceed directly to the procedure for laying linoleum.
The adhesive composition is evenly applied to the floor surface with a notched trowel, sequentially spreading the linoleum and pressing it to the floor surface with a roller or brush.
Drying times vary; to find out exactly, you need to read the label and instructions on it.
Main types of self-leveling floors and their thickness
The following compositions are used for the finishing layer when installing self-leveling floors.
Epoxy
They are used in laboratories and medical institutions where sterility is of great importance. The presence of a large number of coating methods has made epoxy self-leveling flooring popular in residential premises, and its high durability and wear resistance in factory workshops. Provides excellent protection for metal and wood surfaces.
Polyurethane
Coverings of this type are often installed in shops, warehouses, swimming pools and bathrooms. Polyurethane floors are resistant to conditions of high humidity and temperature changes, however, when the floor dries, moisture should not enter it due to the likelihood of bubbles forming.
Able to withstand mechanical loads and maintain strength under impact.
Polyurethane coatings are recommended for residential premises, as they are considered the most hygienic and safe for health.
Methyl methacrylate
The technology of laying the floor requires accelerated completion of the work, because the viability of the solution is short. The floors are not afraid of temperature changes and chemical influences.
Laying self-leveling floors made from methyl methacrylate mixtures is advisable in industrial facilities and even in open areas.
Polymer-cement
This is a separate category of coatings for industrial use. They are installed at facilities with difficult operating conditions: significant fluctuations in temperature and humidity, excessive loads.
These floors differ in their composition, but all belong to the group of polymer coatings.
The thickness of the self-leveling floor when using polymer materials is within a few millimeters. Polyurethane compositions make it possible to make a layer with a cross-section of up to 2.5 mm; this indicator is considered optimal.
If there is an intention to apply different colors to the coating surface, apply a thin layer of the composition, no more than 0.3 mm. The maximum recommended thickness of the polyurethane coating is 5 mm. A further increase in thickness does not make sense, especially since polymer floors are not cheap.
It is also preferable to apply epoxy-based compounds in a layer of 2.5 mm.
This thickness is enough for the floor to gain the necessary strength characteristics and not be fragile.
Rapid-hardening or methyl methacrylate mixtures can be used at moderate thickness. However, given that such floors are installed in rooms with heavy loads, you should not save. A coating that meets quality requirements must have a layer of 8–10 mm.
Additional Tips
The presence of such a seam softens the deformation that is transmitted by the floor from the rough screed due to temperature changes. As a result, it is possible to create self-leveling floors that maintain the integrity of the structure for many years. No cracks form on their surface. If it is important to ensure 100% tightness, then the tape is cut out after the floor has dried, and the resulting voids are filled with a layer of sealant.
How to make a self-leveling floor with your own hands step by step?
First of all, you need to prepare the tools: a plastic or galvanized bucket for mixing the mortar, a construction mixer, usually a laser level, a roller with needles to remove air bubbles.
In the process of work, you will need a lot of all sorts of secondary tools and devices, but there is no need to list them, because this equipment is necessarily present in every home.
Preparing the base
It is a mistake to believe that if the base is hidden under the finishing layer, its preparation can be taken lightly. The base is the foundation of the future floor, and the final result of the work depends on how it is prepared.
By laying the solution on a dusty base without priming it, you can soon see the appearance of cracks, which can lead to peeling of the material. Therefore, the floor on which the finishing layer will be applied should be cleaned of debris, dust and any contaminants.
Weak areas should be removed and cracks and voids filled with epoxy putty.
When the base is heavily contaminated with fatty substances and its strength is questionable, experts advise using a separating layer. The damper tape for self-leveling floor will ensure a strong floor screed and the tightness of the structure.
The last stage of working with the base is its primer. The primer composition is applied to the surface with a brush or roller in several layers.
The primer for self-leveling floors requires mandatory drying of at least 12 hours between layers.
It is not necessary to buy the material in a store; you can prepare it yourself from a dry composition for self-leveling floors. The main thing is that the primer composition has deep penetration or strengthening properties.
Mixing the solution
Instructions for use are always included on the packaging of the purchased material. One of its main points is the consumption rate of components.
A precisely measured volume of water with a temperature in the range of 15–20 °C is collected in the bucket. The liquid must be clean and free of impurities. Gradually, the dry mixture is added to the bucket and mixed with a mixer to form a homogeneous solution.
During work, it is necessary to use personal protective equipment: goggles, gloves, respirator. They will be needed when installing self-leveling floors using cement-based materials.
Such materials, when in contact with water, form an alkali, which is dangerous if it comes into contact with skin or eyes.
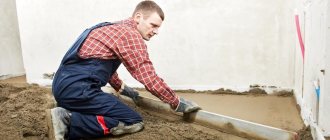
Pouring the mixture
Despite all the responsibility, this stage is not considered difficult. Using a laser level, the height difference of the base is determined, which allows you to calculate the thickness of the finishing layer.
If a floor heating system is installed, it should be turned off two days before the start of work, and turned on again 5-7 days after the floor is installed.
Pouring of material begins from the corner of the room farthest from the entrance. The mixture itself will immediately begin to spread over the base, taking its final position, but it still cannot be done without manual finishing.
To maintain the required floor thickness, you will need to use mathematical knowledge: it is necessary to link the area of the room with the flow rate of the mixture.
Floor hardening time
Before starting work, it is important to know how long it takes for the self-leveling floor of the selected type to dry. The main thing is that the need to use the floor does not occur before the drying process is completed.
Typically, a self-leveling or polymer floor dries from 2 to 6 days; the drying time is affected by the structural composition of the mixture, the quality of the fill and the thickness of the layer being installed.
The drying time of a polyurethane floor is about two days, and you can walk on it after 6–10 hours. The time for complete drying of an epoxy floor increases to 5 days.
To ensure that the self-leveling floor dries correctly, you should use a few tips:
- when the distributed mixture dries a little, it must be covered with a film that will protect the surface from dust, debris and foreign objects;
- After the first stage of drying, allowing you to move on the floor, it can be coated with a protective varnish containing a polyurethane base. Varnish will add durability and beautiful shades to the coating;
- It is recommended to protect the floor from direct sunlight and ensure a constant temperature in the room. This will reduce the drying time of the coating.
How to fill a self-leveling floor? Video:
Technology for laying linoleum on concrete
In the room where linoleum will be laid on a concrete floor, a constant temperature of at least +18 degrees Celsius must be maintained. Humidity should not exceed 68%. Before laying, linoleum is spread in the room and allowed to level out and “rest.”
Next, the linoleum is cut, taking into account the location of the canvases in the room.
Be sure to carefully combine the pattern and leave a margin of about 10 cm on each side. In rooms that have complex floor contours, it is worth taking a particularly responsible approach to cutting the panels. Sometimes it’s better to do an approximate cut with allowances, and then do the final cut after gluing.
Seams, if any, should be placed in the direction of light from the windows, so they are less noticeable.
For styling you may need a knife, ruler, rollers or brush. For gluing, you need to prepare special glue, mastic or double-sided tape, depending on the chosen laying method. To seal joints tightly, you can prepare special glue.
There are several ways to lay linoleum. Let's look at the most popular options:
No gluing. The fastest way.
It is used for small rooms where there is no significant load on the floor. However, there is still a risk of wrinkles and waves forming. Gluing with tape. When using this method, linoleum does not wear out so quickly. Gluing with mastics or glue.
The last installation method is the most labor-intensive, but effective. For large premises it is mandatory.
What is the best way to proceed: whether to glue the linoleum completely or use the free-spreading method will depend on the size of the room and the loads. In living rooms, hallways, corridors, of course, it is better to glue it.
How to properly fill a self-leveling self-leveling floor with your own hands?
The decision to fill the floor yourself is made when there is a desire to test your abilities or save money that you will need to pay a specialist for the completed order.
Anyone who has at least basic knowledge can cope with the job. The main thing is less improvisation and more compliance with the requirements of the instructions.
Basic recommendations on how to make a self-leveling floor yourself have already been discussed. At the final stage of work, several useful tips will come in handy:
1. If the layer thickness is less than 1 cm, the prepared mixture must be poured onto the base and carefully distributed with a rule or squeegee.
If the thickness is more than 1 cm, it is recommended to install beacons for the self-leveling floor. These reference devices are installed on the work surface at regular intervals.
2. After finishing pouring the floor, it’s time for aesthetic measures, for which you will need a needle roller for self-leveling floors. By rolling it over a coating that has not yet hardened, you can prevent the formation of bubbles and further compact the mixture.
If expansion joints were installed in the base of the floor, they will need to be restored in the finishing layer. In order not to leave footprints on the drying surface, it is recommended to wear paint shoes - special soles with spikes.
3. During work, drafts in the room are not allowed. All windows and doors in the room must be closed so that drafts do not disturb the evenness and strength of the coating. After applying a thick layer, it is advisable to cover the surface with plastic film - this will ensure uniform drying.
4. You should not work on floors if you have not had any practice before. Theoretical knowledge does not guarantee a successful result. For the first time, you can be an assistant to a neighbor or friend.
Surface grinding
If you couldn’t avoid mistakes when pouring the floor, you shouldn’t be upset: no one is immune from them. Sanding the self-leveling floor will help correct many visible defects.
You need to start it after marking the boundaries of the holes and bulges. If the self-leveling floor does not serve as the front surface, then the holes can be covered with the main mixture. After it has dried, you can begin to remove the bumps with a grinding machine.
How to choose an air conditioner for an apartment or house? - there is more useful information here.
It is not recommended to sand polymer floors to a depth of more than 2 mm: the applied layer may lose its strength.
In addition, the presence of reinforcement and other metal products in the processed plane is excluded. Otherwise, it will be impossible to complete the grinding process.
When sanding, a large amount of dust always arises. Because of this, you should not wet the floor with water: the sander will begin to slip, and wet chips will begin to accumulate on the working surfaces.
You will be interested in this article - Monolithic house: construction technology, pros and cons.
How much material will be needed, calculation of consumption
As a rule, if a ready-made mixture is purchased in a retail chain, the manufacturer’s annotation provides information about the rules for choosing the amount of building material, at a level of 1 mm and a prepared base.
The master can independently make such a calculation for 1 m2 of floor using the formula:
P = S * H * P
Where:
S—floor area;
H—layer thickness;
P is the density of the bulk mixture.
The first 2 indicators are measured with a tape measure, and the density is taken according to the passport data for a specific composition.
Additional Information! To level a floor of 15 m2 with a layer of 1 mm you will need: 24 kg or 1 bag of 25 kg. To fill 15 m2 and 5 mm thick, 120 kg is required, 5 bags of 25 kg each.
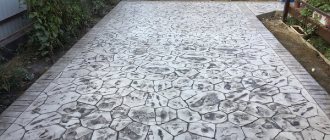
Decorative self-leveling floors
Construction stores offer a large selection of self-leveling floors with decorative patterns and three-dimensional perception. After preparing the concrete base using the traditional method, the further technology for pouring a self-leveling floor with a 3D effect is as follows:
- a synthetic banner canvas is selected, onto which the image you like is applied using high-precision laser printing;
- the fabric is ideally smoothed over the primed surface and glued to it using polymer glue; excess pieces of material near the walls are carefully cut off;
- After 1–2 days, necessary for drying the adhesive layer, you can begin to create a highly filled coating. Quartz sand, marble chips, and various decorative elements are used as fillers, which are scattered over the canvas and carefully leveled;
- if necessary, a hardener is added to the polymer mixture, after which the compound is poured onto the floor and leveled, with the obligatory removal of bubbles;
- The floor should be poured in several stages until the fillers are completely covered with the mixture. In addition, layer-by-layer pouring allows you to reduce the polymerization time;
- the formation of the coating ends no earlier than after 10 days.
Despite the fact that the effect of a three-dimensional image is perceived only from one point in the room, the resulting result will meet expectations.
Creating an absolutely flat surface is a mandatory requirement when installing modern floor coverings.
Having studied all the recommendations on how to make a self-leveling floor, you can do the work in your own house or apartment yourself, if necessary, involving not an expensive specialist, but a good friend. Already as an assistant.
Stage V. Fill the base layer
Now carefully form the underlying layer. Align everything well and remove air bubbles with a needle roller. After all this, apply the front layer. We use a raclette to distribute the composition as evenly as possible in the front layer.
Tip: Use quartz sand as a base layer. This way you will save filling costs twice.
The thickness of the polymer floors itself is no more than 5 mm, and therefore, when the floor height should be greater, a leveling screed is poured with a rough version, and only then 2-3 mm of self-leveling floor of any color.
Example of work on video:
On the issue of dismantling. Yes, the self-leveling polymer coating really adheres very firmly to the concrete screed, literally eating into it. That’s why, when changing the coating, there’s no talk of dismantling it – why? This floor is a wonderful foundation for any other!