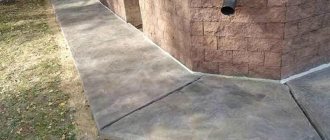
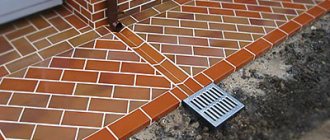
A concrete blind area is installed around the base of the house.
Its main purpose is to drain surface rain and melt water from the walls and foundation. Thanks to the presence of such an element, moisture does not get inside the house, and the blind area additionally serves as decoration and a kind of sidewalk around the building.
Over time, this structure may be subject to damage: often this is due to violations of construction technology or operating conditions.
In order to repair a concrete blind area, it is necessary to prepare materials and choose a repair method for each specific case.
What problems can arise on a concrete structure?
The main problem when constructing a concrete blind area is that after a few years it begins to crack . For most owners of country cottages, the concrete blind area begins to crack after 2 years.
This occurs due to thermal deformation of a closed loop made of inelastic material. Such a structure cannot remain intact for a long time and becomes unusable, losing its declared functions.
Often the concrete on the blind area begins to crumble - then repairs will also be required. This happens for many reasons:
a low quality solution was used;- concrete absorbs water, in winter it freezes, and when it thaws it thaws and crumbles the structure;
- too much water was used for the solution;
- the thickness of the structure is too large;
- a large amount of air in the solution;
- After pouring the blind area, they did not take care of it: they did not water it with water in the first 3 days, they did not compact it into formwork.
What happens if the defects are not eliminated?
The problems listed above require immediate repairs, since in the absence of repairs moisture will begin to penetrate into the house.
What other consequences await the building:
- The foundation will not be protected from moisture.
- Snow that falls and melts over time will penetrate inside the house.
- The thermal insulation of the underground part of the house will be compromised.
- With temperature changes, wet soil can move, which also allows moisture to get inside.
The blind area must be continuous, so during its construction there should be no open areas. When the first cracks appear, it is recommended to begin repairs as quickly as possible, especially if a rainy and snowy season is expected.
Pouring concrete solution
The solution must be prepared from cement and sand in a ratio of 1:3. The consistency of the solution should be quite thick and plastic, so calculate the volume of water correctly. Typically, 1 kg of cement requires about 2-2.5 liters of water.
A solution that is too thick will be difficult to distribute throughout the trench. But if it is too liquid, it will take a long time to dry and may become cracked.
It is worth adding fiber fiber and moisture-repellent impurities to the solution, this will increase strength. You can also add crushed stone to the solution to strengthen the structure. The prepared solution must be poured along the entire perimeter of the path.
- How to choose the right greenhouse?
- About the use of gardening products
- A small decorative pond: the “highlight” of any site
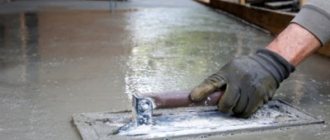
To achieve uniform distribution of the solution, special vibrators are used. If you do not have such a tool, you should at least use a spatula, which you need to mix and pierce the solution to remove air. Leveling the concrete layer is carried out using the usual construction rules, resting it on the formwork.
After the concrete has hardened, it is necessary to dismantle the separators and pour the same solution into the joints to create a smooth surface. This way, the expansion joint will remain, since it was not poured at the same time as the track, but it will not worsen the appearance.
During the first week after pouring, the path should be moistened with water daily. Dismantling of the formwork is usually carried out after 5 days.
Materials for restoration
To repair a concrete blind area, use new mortar and other materials . Some builders recommend using bitumen mastic. This raw material consists of bitumen, mineral wool and a thickener.
It fills all existing cracks 100%, leaving no open pores in the concrete. The mastic is resistant to changes in ambient temperature and protects against aggressive factors.
Along with bitumen mastic, you can use sealant. It is durable, but expensive. It is reasonable to use it if there are small cracks in the blind area.
If there is a major overhaul, you will have to pay a lot of money to use this material, so in this case it is not practical.
Additionally, the following materials are prepared for repairs:
- sand;
- crushed stone;
- cement;
- water;
- primer;
- clay;
- PVA.
The latter material is purchased optionally: it is necessary for sealing small cracks instead of using sealant. PVA is poured into a liquid concrete solution and used for its intended purpose.
A solution is prepared from sand, cement, crushed stone and water , which is then used to repair the concrete blind area. To prevent crumbling, cement is often removed from the composition by adding gravel.
A primer is necessary for pre-treatment of the blind area before repair. When restoring large faults, clay is used, laying it on the bottom of the blind area.
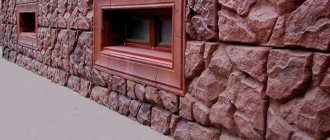
Decor of concrete paths
Concrete sheets in the country are decorated to give aesthetics to the garden area. Decorating the paths can be done either before pouring, or at the latest - a day later.
There are methods such as dyeing, stamping, using various shapes, etc.
You can decorate the paths before pouring or a day later.
Painting
Painting of paths can be done either at the stage of mixing the solution, or after the finished road surface has hardened.
In the first case
In the second case
To restore color (when you need to refresh old paint), you can use the following instructions:
- Remove the mud layer from the path; for segment paths, remove weeds in the tile joints.
- Remove the old paint layer with a wire brush and remove dust.
- Seal chips and cracks on the surface using a concrete sealer (sealant, putty or grout mixture).
- Degrease the path with a stain remover.
- Coat the concrete surface with 2 layers of primer. The first layer must dry completely, and only then can the second be applied.
- Paint the dried surface with paint. You can tint in several layers for color saturation, but it is worth considering that the interval between applying layers should be at least 12 hours. This is the time required for the paint to fully set on the surface and dry.
To ensure color durability lasts as long as possible, it is recommended to paint the path with penetrating mixtures with pigment additives.
It is recommended to paint concrete with polyacrylic paints intended for exterior use: they are water-repellent and vapor permeable, concrete can “breathe” and will be protected from destruction by moisture. In addition, polyacrylic mixtures are UV resistant and scratch resistant.
You can also use polyvinyl chloride, polyurethane and latex mixtures to strengthen paths - they will protect against destruction. But it is undesirable to use oil-based paints: the enzymes included in the composition penetrate into the pores and destroy the structure from the inside, forming cracks.
When working with paint, you can use a brush, roller or sprayer, but keep in mind that the first two tools waste a lot of material, besides leaving air bubbles and streaks, and the sprayer can form streaks if overexposed.
Using forms and stencils
Stencils and forms can be used when pouring the mortar, and in this case a formwork structure is not required.
The template is installed in the trench, filled with concrete mixture and leveled. After 2-3 hours, the mold can be removed and wait for it to completely harden and gain brand strength without a limiter. Such tracks are segmental and consist of individual elements.
Despite the speed of installation, the elements also need to be periodically moistened with water until the concrete hardens completely.
Stamping
This method is a variation of using stencils with the difference that separate pouring into each limiter is not required. The concrete mixture is also poured into the prepared trench, and stamps are placed on the solution that has not yet completely hardened.
When choosing stamps in a store, you should be guided by the rigidity of the template - the denser the material, the easier and faster the stamping will be.
This method can simulate the laying of rubble stone, paving stones, boards and various building materials.
other methods
No less interesting and easy decoration options are the following:
- Imitation flagstone. For this purpose, slots are made on the surface of the concrete, which has not yet completely hardened. They can be filled with either grout or a concrete solution of a different color. The pattern on such a path will be similar to the laying of flagstone.
- Laying mosaics. Any broken material is suitable here: fragments of tiles of various colors, broken bricks, multi-colored pebbles and pebbles, and even old buttons. The main condition: do not press small parts too deeply, and embed the elements on a surface that is not completely frozen.
- Creating patterns. Relief designs can be created using various imprints when concreting paths. These can be leaves, small and large shells, traces of hands and feet.
Tools for work
To restore the concrete foundation around the house you will need:
- deep bucket;
- shovel;
- wheelbarrow for transporting bulk materials;
- perforator;
- drill with attachment;
- wide brush;
- spatula or trowel;
- hammer;
- chisel.
To mix the cement-sand mortar, you will need several buckets with a capacity of at least 15 liters. In one bucket there will be water that needs to be added, in the other the solution will be mixed. For kneading, use a drill with a “mixer” attachment - it helps to achieve the desired consistency in a few minutes.
Using a shovel, you can quickly throw materials into a wheelbarrow and deliver them to the mortar mixing point. A hammer drill is necessary to remove unnecessary blind area elements that cannot be restored. For this process you will also need a hammer and chisel.
Using a wide brush it is easy to remove fine dust from the blind area, but it is best to do this with a construction vacuum cleaner. You will need a brush to prime the base before repairing it. Spatulas and trowels are convenient for taking and applying the solution to the surface.
Monolithic path
Below are instructions on how to make the surface in question at your dacha yourself. The solution includes a base of sand and gravel mixture and, reinforced with reinforcement, a cement-sand layer with crushed stone.
How to pour concrete on the street
Tools and materials
To carry out the work you will need the following materials:
- Construction cement with markings from M400 and more;
Cement
- Construction sand;
Sand
- Mesh and wire;
Low Carbon Reinforcement Wire
Mesh for reinforcement
- Waterproofing additives;
Waterproofing mixture
- Boards for formwork;
Boards for formwork
- Pegs, spacers, bars.
Use of pegs, spacers and bars
Tools you will need:
- Shovels – bayonet and shovel;
Shovels
- Capacity;
Capacity
- ironer;
ironer
- Small spatulas;
Putty knife
- Device for compacting sand;
Tamping device
- Hammer for formwork.
Hammer
Main stages
The construction of a monolithic structure includes several stages:
- First you need to decide on the design and location by making sketches;
Sketch drawing of the site indicating the location
- Then, markings are made on the territory of the land plot in the place where the path will be located. Taking into account the size and configuration, its location is fixed using pegs and a cord.
Nylon cord secured to pegs
Where the coating will be rounded, additional pegs are driven in;
Making a turn
- Perform soil preparation;
At this stage, the height of the bedding and its location relative to ground level are determined. At the same stage, the top layer of soil with plants and their roots is removed so that they do not cause the destruction of the concrete structure in the future.
Destruction of concrete by plants
The soil is removed to a depth capable of containing four layers - 10 cm of sand and crushed stone, another layer of sand of 5 cm and a solution of 7 cm.
Excavation
- The formwork is mounted, securing the boards to the pegs;
Formwork
Dividing the formwork into fragments
Coverage scheme
The outer side of the formwork should rest against the inner side edge of the trench, or vice versa, the boards can be attached to the pegs using self-tapping screws. To create expansion joints, transverse boards are installed every 50–60 cm, which should not be higher than the longitudinal boards of the formwork.
- The installation of a sand cushion is necessary for timely natural drainage. As a result of this, the solution will not be destroyed from the inside when moisture expands;
How to pour concrete paths at the dacha
When pouring sand, it is necessary to compact it - to form an even, dense layer without voids.
To create a high-quality foundation, first lay crushed stone, or crushed stone with sand, geotextile material, and then a small leveling layer of sand - about 5 cm.
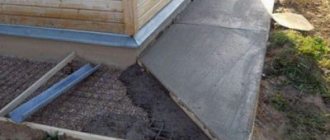
- The fittings are laid.
Reinforcing mesh
First, polyethylene is laid on the sand bed to ensure high-quality hardening of the concrete, due to which the cement laitance will not be able to go into the ground.
Film
Reinforcement process
- The solution is mixed in a ratio of one to three, where for 1 portion of cement there are 3 portions of sand;
Mixing the solution
Using a shovel, the solution is laid and distributed throughout the trench.
Laying the mortar
Then, using a trowel or level, the mixture is leveled.
Alignment
Using a grater or a wide spatula, the surface can be made perfectly smooth.
Smoothing
How to repair?
When the materials and tools are prepared, you can begin repairing the concrete blind area. Depending on the type of problem, the repair method will vary.
What to do if it's cracked?
To repair cracks in a structure, you will need to prepare a solution in the following proportions of the constituent components:
- 2.6 parts sand;
- 4.5 parts crushed stone;
- 1 part cement - here it acts more as a binding component.
Water must be taken at the rate of 125 liters of liquid per 1 cubic meter. From cements it is better to choose those that are stronger. Cement grades M400 and M500 are perfect. The prepared solution can be used within the next 2 hours; if done later, it will lose its properties.
The repair technology looks like this:
- Dismantling the destroyed part. If the blind area is severely damaged, then all the old pieces are dismantled. If the cracks are small, it is enough to level their surface. The cracks need to be widened and damaged areas removed.
- Surface cleaning and priming. The surface and all internal parts of the cracks are covered with a primer. This provides increased adhesion to the solution. You must first clean it with a brush or vacuum cleaner.
- Repair. Small cracks are repaired with sealant. It is laid in the formed empty space, sometimes a liquid solution of concrete mixed with PVA in a 1:1 ratio is poured.
Large faults are repaired differently. The blind area, which is cracked, is dismantled down to the lining layer. Clay and sand are laid on the bottom in a layer of 10 cm. If necessary, a reinforcing layer is laid and formwork is installed.
If it crumbles
If the concrete hardens unevenly during the construction of the blind area, then it begins to flake and crumble. To repair such a defect, the following technology is used:
- Preparation. At the initial stage, the boundaries of the damage are determined. After this, the damaged part is cut down, the destroyed elements are removed and the edges of the entire parts are primed.
- Creation of formwork. If the blind area begins to crumble, then you cannot do without formwork. It is made around the entire perimeter from wooden boards as required.
- Preparation of the solution. It is done before starting repairs at the construction site. Pour water into the container, turn on the mixer and, while stirring, add the dry mixture. The solution is prepared for 2 minutes so that there are no lumps. The solution is allowed to stand for 5 minutes and mixed again with a drill and nozzle.
- Repair. The solution is poured into the formwork. If the damage is significant, its layer should be at least 4 cm.
- Surface care. For maintenance, regular irrigation is used 3 hours after pouring the material. After 3 days, when the solution is already solid, treatment occurs 2 times a day.
The higher the air temperature outside, the more often you need to water the blind area. At a temperature of +30 degrees, this is done 6 times a day.
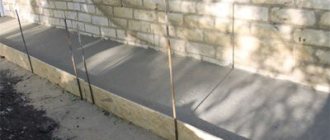
Features for sloped paths
If the integrity of the blind area under the slope is damaged, then at the first stage it must be restored. For concrete blind areas, the slope angle is from 3 to 5 degrees .
If there is a slope, the damaged area is completely cut down. Then it is cleaned and primed for better adhesion. The bottom and walls of the structure are covered with liquid bitumen, then concrete is poured, compacting it with a hand roller.
Rolling is done from the edges to the middle, then a flat surface is obtained . If necessary, a new one can be laid on top of the old coating.
Inexpensive replacement
If the old canvas is worn out, cracked and interferes with safe movement around the territory, sometimes it is more advisable to replace it altogether.
An inexpensive replacement can be standard concrete slabs, which can be purchased at construction sites or poured out of the solution yourself. Concrete slabs for country paths last quite a long time if properly placed on the site, and they look very good if, for example, you decorate them with plants on the sides, lay a lawn along the path, and so on.
You can lay concrete slabs on the ground, or you can make a proper cushion of crushed stone, screenings and sand, creating a certain drainage layer. Filling occurs according to a self-created form. If you have ready-made slabs, then all that remains is to lay them according to the markings and seal the seams, perhaps plant lawn grass in the seams.
Possible mistakes and how to avoid them
When repairing a concrete blind area, many people make mistakes, which then lead to undesirable consequences. The most common of them:
Level the slope .
If there is already a slope, then it must be left as is. Many people do not know that there should be an angle of 3-5 degrees from the house and, due to inexperience, completely level it.Then, after repairs, water accumulates in the blind area and the concrete begins to deteriorate again. The transverse slope must be at least 10% of the width of the blind area itself.
- The solution is mixed incorrectly . Many people mix the components incorrectly - in the wrong order or use the solution after it has been left in the air for a long time. This is a violation of technology and subsequently after repair the concrete will begin to crumble again.
- Use inappropriate components for the solution . If you take cement grade M100 or M125, the concrete blind area will not be strong. Even for repairing cracks, it is better to take the M400 or M500 brand.
To avoid the consequences of erroneous repairs, it is enough to adhere to the correct technology and not retreat, making your own personal adjustments.
Repair Tips
- You should not try to make repairs by simply filling unfinished cracks with cement mortar. Experience shows that such repairs do not last long and soon the cement will crumble out of the cracks.
- You should not try to make repairs by simply pouring cement screed over cracked concrete. In a very short time, such a screed will crack and completely crumble from the surface of the old concrete.
If repairs are made according to the recommendations given, garden paths can be updated, and they will serve as a decoration for your suburban area for a long time. All this can be done with your own hands, without resorting to the services of specialists.
It must be said that the durability of garden paths is directly related to how correctly they were constructed during construction. Concrete will deteriorate much less if water does not linger on the surface of the path. Despite the fact that concrete also needs repair, it is more durable than paving slabs or paving stones.
Prices
The price of repair work depends on several factors:
- type of materials;
- complexity of work;
- type of blind area;
- degree of deterioration of the structure;
- region of the country.
Both expensive sealants and affordable bitumen mastics can be used as materials. Repairs can be cosmetic or major, which directly affects the cost of the work.
For example, in Moscow the price per 1 sq. a meter of blind area repair costs 400 rubles. At the same time, in St. Petersburg, construction companies will take on the work for 450 rubles. In the city of Krasnodar, they will ask for repairs from 430 rubles per square meter.
In the attached estimate you can understand how much money will have to be spent on repairing a blind area 15 cm thick:
A lot of important and useful information about repairing the blind area around the house is presented in this section.
Why did this happen
Most often, repair operations are needed after poorly performed work. Violations during mixing of the initial solution, violations during pouring or when laying elements can lead to various consequences - from cracks that can be easily removed, to chips along the edges or even pieces breaking off from the surface. The main culprit in this case is water.
Through cracks, small chips or other defects it can get inside the finished casting. In winter, the water inevitably freezes, expands, and the result is that the concrete paths at the dacha need to be repaired. Even if the solution is mixed incorrectly, water remains the culprit of the trouble - if the mixture is too liquid, this reduces the strength of the final product and the consequences appear soon.
When studying how concrete paths are repaired on the street, we will consider the most frequently occurring defects:
- Chips along the edge.
- Cracks.
- Cracks on the surface.
In all cases, the preparation will be the same: cleaning, priming, preparing a mixture for repair
The latter will be important: the durability of the repaired path depends on the strength of the composition. You can prepare everything yourself: three, one, one - the proportions of cement, sand and water
However, if you are not sure that you can make the right mixture yourself, in stores you can find mixtures ready for dilution with water for repairing concrete paths.
If there are cracks
It's easy to work with small ones - you just need to fill them with solution and level the surface with a grater. It is better to take a ready-made composition for repairs - buying bags of cement for the sake of a small defect is wasteful. If the defect is larger or there are quite a lot of them, then it is better to try preparing the solution yourself. The mixing proportions are slightly different - you will need two parts of sand. Water is added until the mixture resembles sour cream. The repair process itself is similar to the others:
- We clean and chip away the edges of the damage. It is optimal to widen the crack to two centimeters.
- If the crack is larger, then it is advisable to use reinforcement with wire or special fittings.
- Next, the entire cavity is filled with a trowel and you need to make sure that the solution gets everywhere and the entire volume is filled with it.
- Smooth everything on top with a smoothing iron, and then go over the entire defect again with a brush - roughness will appear.
- PVA glue can be applied on top to create a stronger coating.