Every car owner who has his own shelter for his car should know how to fill a garage floor with concrete with his own hands. Because a concrete floor, in terms of its quality indicators and manufacturing cost, is the optimal covering option for such a difficult-to-use room. Its main advantages are strength and durability. But they appear only if the work of pouring concrete is carried out competently in compliance with technological requirements.
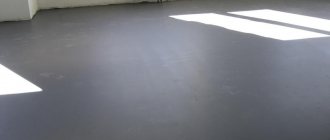
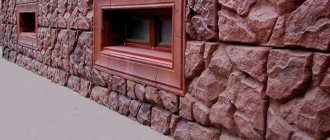
The quality of the coating must be high Source roomester.ru
Pouring a garage floor: basic requirements
Pouring a garage floor, done in compliance with all the rules, ensures that the coating will last a long time and withstand the highest loads. Let's take a closer look at how to fill a garage floor with concrete. Experienced craftsmen put forward the following requirements for the quality of concrete pavement:
- The surface must withstand massive equipment.
- Durability. Repairing the coating is expensive, so it is better if the surface lasts as long as possible.
- Resistance to fire hazardous flammable liquids and substances.
- The surface should be easy to wet clean.
- Leakage of fuel or various oils in a garage is a common occurrence, so the surface is made of materials that do not absorb dangerous chemical compounds.
- The coating must be moisture resistant and not prone to cracking during low humidity.
Important! Concrete coating can also be the basis for finishing the garage floor with any other materials. Experienced craftsmen use ceramic tiles or epoxy resin for this. These materials have no less worthy qualities and look aesthetically pleasing.
Thermal insulation
Floor insulation
The garage is not a heated building, and many will decide that thermal insulation is something they can save on. However, there is one factor in favor of thermal insulation. Car breakdowns happen at any time of the year, and warming a frozen garage in winter will be more expensive than repairing it. Thermal insulation provides up to 20% savings in energy costs for heating. For thermal insulation of the floor, a special material is used - polystyrene foam. The plates, whose thickness is about 20 mm, are tightly laid on the waterproofing layer. The top layer is covered with film.
Thermal insulation is needed to reduce heat loss and energy consumption during forced and rapid heating of the garage during the cold season.
Preparing the base
A properly prepared base will avoid problems during pouring and make the coating more durable and safe. Experienced craftsmen recommend removing the top fertile layer of soil until clean soil is formed. Compliance with these requirements will reduce the content of microorganisms in the soil that can have a destructive effect on the coating.
Zero level mark
Before pouring concrete, workers fill in preparatory layers of sand and gravel. To avoid errors, you need to calculate the zero floor level. Most often, the surface is leveled to the level of the threshold. But if you decide to make the floor below the level of the main entrance to the room, then it is important to consider the placement of a drain to drain water.
The level is drawn along the trajectory of the beam formed using a level or electronic level. If you don’t have a laser device at hand, then use a water device, which is no less accurate, but involves a larger amount of work when taking measurements. Marks are made on the walls several times, and then they are connected to each other. Before drawing, it is important to check whether the marks are applied correctly. A bubble level is best for this.
Calculation of the thickness of ASG layers
The density of the fill and paving levels determines the size of the required depth. Calculation technology:
- sand level 5 cm;
- crushed stone with a layer height of 5 cm;
- the height of the concrete coating is 10 cm, taking into account that the pressure comes from the pressure on the surface by passenger vehicles.
It turns out that without taking into account the additional floor covering, the total thickness of the layers should be at least 25 cm. If the finishing coating only needs to be impregnated or painted, then this thickness will be sufficient. When using other means that involve additional pressure and load, it is recommended to increase the density of the layers.
Important! To avoid alterations that entail additional financial expenses, you need to calculate the height of the layers in advance. The planned depth of the pit depends on this.
The level of each layer is also drawn on the walls of the garage. When the space is large, stakes are placed at equal distances throughout the entire area; the level is indicated by the tension of the rope or twine. The height of the mark is determined with a level or notations are made using a bar.
Materials for backfill
Experienced craftsmen recommend using crushed stone for backfilling. Some people buy gravel for this, but it is more difficult to obtain the required density with it due to the roundness of the edges. A moving bottom layer will lead to cracks in the floor, despite the installed reinforcement.
To obtain a stable coating, crushed stone of small and medium fractions is used. About two-thirds are medium-sized pebbles, the rest are small.
It is recommended to sift the sand before backfilling. Bulk material should not contain debris or clay inclusions.
Cushion for concrete floor
To pour a concrete floor, work is carried out in stages:
- Carefully level the bottom of the pit.
- Using a vibrating platform (it can be rented), the surface is compacted and leveled.
- The total volume of crushed stone is divided into 2-3 parts. Gradually, crushed stone is poured in parts, evenly distributed over the surface.
- The filled crushed stone must be compacted thoroughly. This will increase the density of the coating, which means it will make the floor more durable and prevent subsidence. Each piece of crushed stone is compacted separately.
- The prepared bottom is covered with sand at the level of the marks made. It is also poured sequentially (2-3 portions), and then each one is compacted and leveled. The sand must be damp.
After all the manipulations have been done, you can begin to form the base of the pit, if it is in the project. The walls are brought to the height of the planned threshold or slightly higher. This method of arrangement allows you to wash your car indoors. There is no need to worry, water will not penetrate into the hole.
Preparatory work
Preparation includes excavation or removal of the old floor (earth, wood). The main guidelines at this stage will be the following requirements: work carefully, in accordance with the predetermined thicknesses of the bedding/floor layers, be sure to use a level.
It is extremely undesirable to “hack”: mistakes made at the initial stage will require adjustments at subsequent stages. For example, an error in calculating the coating or careless digging will cause excess consumption of concrete, and the need to level the level of the finished floor by increasing the amount of mixture.
Level marking
Includes placing lines on walls and installing high-altitude beacons to make work easier. The ideal option is to mark using a level, but as a compromise, using a level - laser or water level - is also suitable. The goal is to balance the bubble exactly in the middle, which means that the planned surface (line) is horizontal.
To make your task easier, the marks are made with a bright marker that will be visible against the background of the wall. It is permissible to stretch a thin cord (for example, white) over the driven nails.
Soil preparation
It consists of cleaning from contamination (oil spills, debris), excavating the top layer of soil and deepening it to the required, predetermined level. The roots of plants, trees, grass, and any foreign matter are also removed. They will remain under the coating, may begin to destroy it and will not allow the work to be completed with good quality.
The root system of flowers is capable of breaking through dense structures such as concrete and asphalt, so it is very important to completely get rid of their presence.
Backfilling the sand and gravel cushion
In fact, the layers of gravel and sand are not mixed, like ingredients in cooking, but are laid alternately on the ground. It is recommended to level the “floor” of the mini-pit in order to then carefully and accurately distribute the components of the pillow. Sometimes it is advised to soak and compact the sand to increase the density of the layer and fill all the voids at the bottom of the hole.
Regarding crushed stone: professionals prefer to use not just one fraction, but a mixed one - up to 2/3 medium, the rest - fine. Such proportions will ensure the required rigidity of the layer so that it does not “play”, and the individual particles fit tightly to each other. Crushed stone is also compacted using a manual or mechanized tamper. Waterproofing is installed on top of it.
Waterproofing
Modern technologies make it possible to use cheap and effective methods to ensure waterproofing of the future coating and prevent its contact with the soil and aquifers. For example, ordinary polyethylene film used for greenhouses and greenhouses. There are also more “serious” compositions - polymer and bitumen-based. They need to be applied to the finished preparation, wait until it dries, and then proceed to the next stage - laying the reinforced frame.
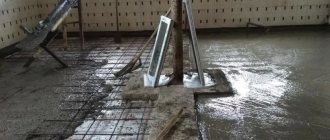
Reinforcement
Opinions differ regarding the need to reinforce concrete with steel rods or mesh: on the one hand, such a step increases the strength of the slab, on the other, it increases the cost of the work. Concrete itself tolerates distributed and point compression loads well, but with a sudden change in pressure it can burst.
The reinforcement in the body of the slab absorbs external influences and allows them to be dispersed throughout the entire plane of the structure. Mesh and frames are used to strengthen the floor, increase its strength and reliability. In this case, the metal is laid with a small gap (not closely) to form a protective layer of concrete (usually 2-3 centimeters).
Damper gap
Repairers call the concrete coating on the ground “floating.” The uniqueness lies in the fact that a small gap is left between the walls and the floor. This method of screeding floors allows you to avoid damage to the coating if the walls begin to move or sag. Or vice versa, the floor will sag and crack, but the walls will not “pull” behind it.
The required gap is obtained using a damper tape, which is laid around the entire perimeter of the garage. It is also possible to use sheets of polystyrene foam 1 cm thick. The material is lightweight, so after work it can be easily cut off in areas of development above the main surface. It is recommended to use material with a width of at least 12-15 cm.
Concrete mix
Preparation of concrete mixture
| Concrete grade | Mass composition, C:P:SH, kg | Volumetric composition per 10 liters of cement P/Shch, l | Amount of concrete from 10 liters of cement, l |
| 100 | 1 : 4,6 : 7,0 | 41/61 | 78 |
| 150 | 1 : 3,5 : 5,7 | 32/50 | 64 |
| 200 | 1 : 2,8 : 4,8 | 25/42 | 54 |
| 250 | 1 : 2,1 : 3,9 | 19/34 | 43 |
| 300 | 1 : 1,9 : 3,7 | 17/32 | 41 |
| 400 | 1 : 1,2 : 2,7 | 11/24 | 31 |
| 450 | 1 : 1,1 : 2,5 | 10/22 | 29 |
| Concrete grade | Mass composition C:P:SH, kg | Volumetric composition per 10 liters of cement P/Shch, l | Amount of concrete from 10 liters of cement, l |
| 100 | 1 : 5,8 : 8,1 | 53/71 | 90 |
| 150 | 1 : 4,5 : 6,6 | 40/58 | 73 |
| 200 | 1 : 3,5 : 5,6 | 32/49 | 62 |
| 250 | 1 : 2,6 : 4,5 | 24/39 | 50 |
| 300 | 1 : 2,4 : 4,3 | 22/37 | 47 |
| 400 | 1 : 1,6 : 3,2 | 14/28 | 36 |
| 450 | 1 : 1,4 : 2,9 | 12/25 | 32 |
Preparing a concrete mixture is not a difficult task, but you need to make the correct calculations. If the concrete mixture is prepared on site, then only three components are involved: sand, water and cement. All ingredients are mixed taking into account certain proportions, depending on the brand of cement. There is no one approach here; each master, like a cook in the kitchen, based on his own experience, makes a solution “to his own taste.” The basis of the concrete mixture is cement. If, for example, cement grade M400 or M500 is used, then the ratio with sand will be 1:3. There are also options for the ratio to sand 1:4 and 1:5, using M300 cement. Due to the wide choice of special dry construction mixtures on the market, their use is now very popular. In this case, there is no need to make any calculations, just follow the instructions for use printed on the packaging, mix with water and that’s it - the solution is ready.
Experts tend to choose a high-quality dry mixture rather than mixing sand and cement. The choice of a dry ready-made mixture is determined by the already proven recipe, as well as the presence of fiber fibers and plasticizers in its composition. These additives increase the strength of the concrete surface and its smoothness.
In order for the concrete mixture to absorb additional polymers, you need to give the solution time to “come up.”
How to make concrete correctly
Temperature of water and concrete mixture
Video - Pouring concrete screed
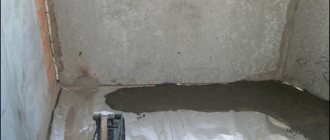
Waterproofing a concrete floor in a garage
The coating is resistant to moisture, but it is necessary to ensure that liquid gets into the room or condensation appears on the walls. Excessive humidity is contraindicated for the car, as well as for many things that are planned to be stored here.
When determining the type of waterproofing, it is necessary to find out the location of groundwater and the intensity of its manifestation in certain seasons. If water flows are located at a high level, exceptional measures may not be taken. To prevent water from concrete from penetrating into the lower levels, it is enough to cover the sand layer with a dense (250 microns) polyethylene coating.
The intensity of groundwater requires careful isolation using waterproofing or other similar materials. The canvases are covered with an overlap (10-15 cm). The joints must be secured with double-sided tape. Waterproofing must be applied to the walls. The upper edge is located above the already laid damper tape.
Waterproofing
Waterproofing the floor before screed
Everyone knows about the ability of water to go down, but water can also go up due to capillary rise. The insulator can be glass roofing material, roofing felt, foil insulation, waterproofing or polyethylene film with a thickness of 250–300 microns. The waterproofing strips are laid overlapping the sand layer, with an overlap of approximately 100–150 mm.
It is better to glue the joints of the canvases together with construction tape.
The material is laid carefully, in an even layer, so that there are no dents or folds. The edge of the canvas needs to be placed on the wall, slightly larger than the height of the future floor. So that when laying and pouring the floor, the edge of the waterproofing material does not interfere and is not accidentally damaged, it is better to fix it on the wall of the garage. It is forbidden to cut waterproofing material.
Waterproofing materials
Garage floor reinforcement
For reinforcement, use a standard mesh with a cage size of 15 cm and a wire diameter of 7-8 mm. Square blanks are laid, grasping the edges, on top of each other, and fixed with special ties and other devices.
Important! The mesh should be located inside the fill. When laying square metal blanks, low (5-6 cm) stands are placed under them. It is important that the reinforcement does not bend.
Recommendations
A garage with a basement is popular as it effectively saves space. Before construction, it is important to study the soil and groundwater level in the construction area. The bottom of the basement is covered with a layer of crushed stone and sand and treated with bitumen mastic. Particular attention is paid to hydro- and thermal insulation of the basement floor and walls. To prevent indoor humidity levels from rising, ensure that your basement is properly ventilated.
The ceiling of the cellar in the garage must be very reliable, because it will withstand the load of the car. The highest quality and most durable flooring is considered to be a concrete slab using a massive reinforcing frame. If the cellar is the size of a viewing hole, you can cover it with wooden boards.
To cover the garage roof, you need to decide on its type (single or gable). A gable roof is practical; it will allow you to arrange an attic and store the necessary tools and materials. The most popular roofing materials are slate, corrugated sheets and metal tiles.
Installation of beacons
Getting a smooth concrete floor is not so easy. The surface is leveled using a special device called a “rule”. It is installed on “beacons” - strips fixed at the required height. You can use wooden blocks and sections of PVC pipes for this.
Installation method:
- Form a slide from a thickly mixed solution.
- A “beacon” is installed in the center of the slide so that it is at the desired level.
- The first “beacon” is installed at the farthest wall at a distance of 30 cm, and then with a certain interval (120-125 cm) they move towards the exit.
- After a day, the “beacons” are removed from the filling.
- The resulting voids and holes are filled with a mixture of concrete.
In this way, you can make an inclined surface, which will allow water to leave the room by gravity.
Problems often encountered
There are a number of issues that novice craftsmen should pay attention to to help them avoid mistakes:
- Subsidence of floor areas. Most likely, there were gaps in the preparation or the preparation itself was not done thoroughly enough.
- Cracks (mesh of small or deep). The technology was violated: the choice of the water-cement ratio was incorrect, the load was applied before the onset of setting of the mixture (28 days), the work was carried out at subzero temperatures.
- The difference in elevation marks in the corners, sides, and a recess (protrusion) in the center of the slab is visually noticeable. The beacons were placed incorrectly or the concreting was done without them; the mixture was not leveled after laying.
- In some places, voids have formed under the hard top layer. The mixture did not vibrate, causing the crushed stone to fill the formwork unevenly.
Compliance with technology requirements and strict adherence to installation rules will allow you to obtain a high-quality, reliable floor that will last a long time.
Pouring the floor in the garage
To form a floor in a garage, experienced craftsmen recommend using the M250 grade of concrete. According to the calculations of repairmen, the average volume of solution in a room of 4 x 6 meters is 2.4 cubic meters. If, according to the project, it is planned to make a slope, then the volume will increase to 3 cubic meters. One person cannot cope here. A team of workers will be required. For special equipment, it is advisable to purchase or rent two concrete mixers.
If it is not possible to hire a team, you will have to work alone, laying out the concrete mixture in parts. The downside is that joints will form, which will later crack. This can be avoided if you constantly remove the cement laitance that forms on top of the coating with a metal brush.
You can buy imported concrete. To do this, you should worry in advance about the method of receiving the mixture. It is recommended to build a receiving tray in the center. From there the mixture is distributed and leveled over the surface.
Which brand of concrete is better to choose?
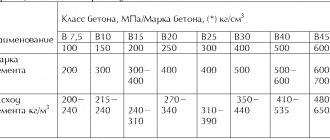
You can prepare concrete yourself using a concrete mixer or purchase ready-made concrete. When doing it yourself, the grade of concrete is selected according to the SNiP table:
| Concrete grade | Type of coverage | Coating thickness, mm | Hardening time |
| M200-M350 | Screed with reinforcement | 50-70 | Day |
| Fiber concrete | 40 | ||
| M400-M500 | Sand concrete reinforced | 40 | 8 days |
| M500-M550 | Concrete reinforced | 40 | 8 days |
For passenger vehicles, experts recommend using a reinforced screed 7 cm thick. The shock-absorbing cushion is not included in the calculation.
Apply a primer on top - 2 layers.
This coverage can be renewed every 6 months.
Finish coating
The final stage of forming a concrete coating will be its finishing. To prevent the floor from becoming dusty, it is covered with paint, epoxy or polyurethane. The main thing is to ensure that the concrete is completely dry before finishing. Failure to follow the recommendations will lead to the appearance of cracks and subsequent destruction of the surface.
Possible problems
After some time of use, cracks may appear in the concrete floor.
During the operation of a concrete floor, surface defects such as cracks and cavities may form. They are eliminated by filling with cement-sand mortar. Pre-embroider, removing all loose particles, remove dust and apply 1-2 layers of primer.
One of the troubles when using concrete surfaces is the formation of specific fine dust. It can be removed by priming, ironing or finishing with facing materials.
The hygroscopicity of concrete is reduced using special means - water repellents. One of them is Penetron. The solution is prepared in accordance with the manufacturer's instructions and applied to the floor surface with a paint brush or roller. For these purposes, you can use other compositions:
- "AQUATRON";
- "HYDROHIT";
- "KALMATRON";
- "HYDROTEX";
- "WASCON"
They all work on the same principle: they fill the smallest pores of concrete, crystallize and form a moisture-proof layer.
Curing
Drying the concrete layer takes more than one day. It is important to follow some recommendations:
- in hot weather, the doors of the room must be closed and the window curtained with a thick cloth that does not let in the sun's rays;
- during dry days, the surface is covered with damp burlap or polyethylene;
- During the week, it is recommended to pour water over the woven material from above in a small stream. If the surface is covered with polyethylene, then before watering the material is removed and then covered again.
When watering, it is necessary to monitor the state of the stream. Experienced professionals recommend using special nozzles with a large number of holes that form light, small drops. It is necessary to ensure an even flow. You can determine the degree of humidity by the changing color of the coating.
How much cement per cube of concrete for screed
Due to the fact that the proportions of the components of the solution are “tied” to the amount of cement, before purchasing materials for preparing concrete yourself, you must first determine the amount of cement, and then calculate the amount of sand and water. The amount of cement per 1 m3 of screed mortar is regulated by current building codes and regulations:
- 420 kg when preparing a solution M150 based on Portland cement CEM I 32.5N PC (M400).
- 370 kg when preparing a solution M150 based on Portland cement CEM I 42.5N PC (M500).
Accordingly, the amount of sand: 420x3.5=1470 kg or 370x4=1480 kg. Amount of water: 420x0.6=252 liters or 370x0.7=260 liters.
Pouring a garage floor: useful tips
Experienced repairmen recommend planning in advance all the desired additions to the arrangement of the garage. Here are some recommendations:
- it is better if the threshold of the garage, as well as the area in front of it, is a continuation of the main covering, but with a slight slope;
- it is necessary to cover the concrete floor with paint or any other type of topping;
- Before applying paint, the surface must be primed;
- Not only the floor is covered with primer and paint, but also the lower part of the walls.
To avoid unnecessary expenses associated with surface repairs, it is recommended to follow the rules for forming the coating, as well as the technical features of caring for the concrete floor during drying.
Many owners decide to do all the work related to the construction of a concrete floor on their own, without taking into account the detailed rules on how to make a concrete floor in a garage, but then they still resort to the help of a team of professionals. The problem is that you have to spend additional money on remodeling and purchasing additional material. Therefore, it is better to immediately realistically assess your physical capabilities and, if necessary, hire a team of workers.
Device requirements
Before you begin building a garage, you need to study the requirements for constructing a concrete floor:
Primary requirements.
- First of all, it must be durable and reliable, able to withstand the weight of not only a passenger car, but also a heavy van. In addition to vehicles, shelving is installed in the garage, tools and spare parts are stored. Therefore, the concrete screed is made durable. Its thickness should not be less than 20 mm.
- In case of mechanical damage, the floor should not collapse, crumble, or deform.
- Solvents, fuel and lubricant mixtures, and paints that are fire hazards are often stored in the garage. If they get on the surface, they damage the material and can ignite, so the concrete screed must be resistant to chemical influences and be fireproof.
- When it’s freezing outside, it’s difficult to maintain the temperature inside the building at the same level even with a heating system. Therefore, the garage foundation must withstand significant temperature changes.
- The floor must be durable.
Then repair work on the floor covering will be needed no earlier than in 10-15 years.
Types of waterproofing materials for garage floors
There are restrictions on materials used for waterproofing: you should not use membrane or film products, since they do not have the required elasticity and are not able to cope with the amount of groundwater in spring and autumn.
Experts consider inexpensive roll coatings with good consumer characteristics to be the best choice of materials for the waterproofing layer in the above-described pie. Professionally performed waterproofing work in a room will protect it from dampness, prevent the appearance of mold and the spread of fungus, and thereby prevent the building from collapsing, and the property located in the garage will not deteriorate.
There are several types of waterproofing floors in a garage building:
- anti-pressure, which protects against the ingress of groundwater;
- non-pressure - prevents the harmful effects of flood runoff and rain;
- anti-capillary – protecting the structure from the negative effects of capillary moisture.
In addition to creating waterproofing in the garage, it is necessary to install an effective ventilation system.