What are lintels over windows, and why are they needed?
If you approach a house under construction and look at the rectangular openings for doors or windows, you will notice that its upper part is made up of special masonry or a beam stretched across it. It is this simple structure that bears the load from the building elements above it. Regardless of the size of the jumpers, they are needed for:
The calculation of the opening area occurs long before the start of construction work. Although it is possible to change its dimensions or shape during the construction of a building, it may require significant changes in the design in order to evenly distribute the weight load of the structure.
Transportation and storage
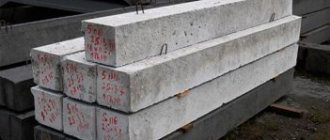
What are lintels in construction? These are auxiliary products that can be easily transported horizontally in specialized vehicles. When loading, they are laid tightly next to each other, using spacers. Before completing the bottom row of jumpers, pads are placed perpendicularly down. Usually made of wood, because they are more capable than other materials of distributing the voltage received by the jumpers. Upon completion of laying the jumpers, they are fixed in the transported vehicle, bursting against the edges, if they were not laid in forms specially made for them. When loading and unloading lintels, lifting mechanisms and lifting equipment are used. The jumpers are unloaded in blocks.
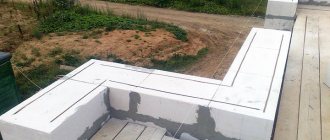
Source
Options for arranging jumpers
Depending on the installation location, the types of jumpers mounted above the windows differ.
As you know, reinforced concrete floor slabs rest on two sides.
The wall on which the slab rests is load-bearing. And a wall on which the floor slab does not rest is self-supporting. Those. carries itself.
So, window openings located in load-bearing walls are covered with reinforced lintels - 3PB. And in self-supporting walls, 2PB jumpers. The length of the lintel is selected equal to the width of the window opening plus support of at least 250 mm on each side.
Prefabricated aerated concrete lintels
Factory autoclaved material has a height of 20 or 25 cm. The depth of support must be at least 250 millimeters. In order not to violate the height of the row, additional elements are produced.
Window openings
The number of bars is selected according to the thickness of the block. For walls 40 cm thick, install two 15 cm bars and one 10 cm. For walls 50 cm, take two 15 cm bars and two 10 cm.
Standard Size Chart:
| Height | Thickness | Length |
| 250 | 100 | 1250 |
| 1500 | ||
| 2000 | ||
| 150 | 1250 | |
| 1500 | ||
| 2000 |
The industry produces materials in accordance with GOST 31359 - 2007 “Autoclave-hardening cellular concrete”. They are light in weight and can be easily installed by hand using an adhesive solution.
The surface after installation is smooth. This makes finishing work easier. Their disadvantage is their high price.
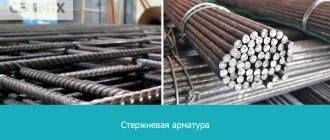
Reinforced products
Note! Aerated concrete quickly breaks down in a humid environment. Remove material from packaging as you use it.
Reinforced concrete as the most popular material for lintels
Reinforced concrete parts are combined with each other to create a reliable lintel.
However, to manufacture it, you should know that there are different sizes of reinforced concrete lintels, differing in name:
Some people prefer to make reinforced concrete themselves by constructing formwork, inserting reinforcement parts and filling it all with concrete mixture. However, to create support above window openings, it is recommended to use factory-made lintels. At some factories it is possible to order individual forms for the window opening.
As for the minimum support for lintels, it is at least 250 mm on a brick wall, and for installation on partitions - at least 200 mm.
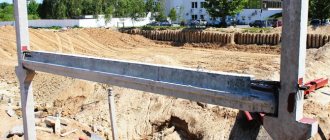
Installation of reinforced concrete lintels
Formwork frame
To organize concrete lintels, formwork panels should be prepared according to the dimensions of the opening. To do this, first purchase wooden boards with a thickness of at least 20 mm, which will be fastened together with screws or nails. Experts advise using self-tapping screws, which can be easily removed later using a screwdriver.
Formwork assembly diagram
The side panels of the formwork must cover the opening in width and height. The lower support panel is assembled with increased strength strictly according to the dimensions of the opening. The installation of formwork begins specifically for the lower shield, which is supported from below by two wooden posts arranged in a V-shape. The support is installed only after the lower panels have been completely installed and checked for level; they must be placed strictly horizontally.
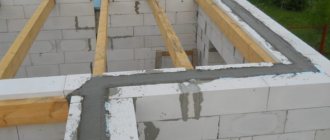
Reinforcing mesh is laid on the lower shield and then the vertical shields are secured with self-tapping screws. For additional thermal insulation of the lintels located in the facade walls, insulation is laid on the outside of the formwork: mineral wool, penoplex or dense foam.
Jumper fittings
At the next stage, the structure is reinforced. The diameter of the steel reinforcement is selected taking into account the load-bearing load of the lintel, its length and width. Metal rods are laid along the lintel, fastening them together with a special knitting wire.
Note!
Experts do not recommend using welding when working with metal, only technological bonding.
To fill the lintel, prepare a concrete solution from high-quality certified cement, small crushed stone and washed sand. The solution can be prepared using an electric concrete mixer or manually in a large container, thoroughly mixing all the ingredients. It should be remembered that crushed stone is added to the finished solution last. Before pouring concrete, small chips of concrete or brick are placed under the reinforcing mesh to a height of 15-20 mm so that the metal is completely recessed in the mortar and the finished structure.
Note!
It will be possible to remove the formwork only after a few days, after waiting for the concrete composition to set. The lower formwork panels and spacers are left for at least 3-4 weeks until the concrete is completely strengthened.
How is the opening size calculated?
The size of the opening and the support of the lintels are calculated individually, depending on the type of materials used for the construction of the building, which can only withstand a certain load. Should be considered:
There are also the following formulas for measuring the main parameters of the future jumper:
It is advisable to take the help of professionals to determine the correct size of openings so that during future construction, unforeseen situations such as collapse of materials do not occur.
Admin
Hello. I wrote and adapted most of the articles and instructions on this site. If you want to chat or ask a question in person, here are my contact details. https://vk.com/id484816322 @Galinarad
Rules for installing lintels above windows: 4 comments
I spent a long time looking for how much to support the jumper. And here everything is clearly explained. Thank you.
for how long? 250mm on each side? did not quite understand.
The maximum length of support is 25 cm)) There is a typo in the article))
Source
Standard size range, weight and marking
The GOST dimensions of reinforced concrete lintels are as follows:
The weight of these structures directly depends on the dimensions and can range from 20 kilograms to 2 tons.
Reinforced concrete lintels are mounted on cement mortar. Cutting of these structures for the purpose of adjustment is not permitted. If the wall thickness is large, the opening is covered with several timber lintels, laying them parallel to one another.
Special markings help you understand the wide range of these products. It consists of three groups of alphanumeric symbols separated by a dash.
The first digit indicates the GOST number of the section. It is followed by two letters indicating the type of jumper and two numbers of its length (in decimeters). The second group of numbers contains information about the design load in kN/m. The third group of marking symbols is service and contains data on the degree of concrete density, the presence of mounting loops, the degree of seismic resistance or the class of reinforcement.
For example, let’s decipher the standard designation of a reinforced concrete jumper: 2PB22-3-p:
To increase the load-bearing capacity of lintels, prestressed reinforcement is used. Such structures can be distinguished by the type of reinforcement indicated at the end of the marking. For example, 5PB21-27-AtV. In this case, AtV is a type of prestressed reinforcement.
In what cases is it impossible to do without a concrete lintel in the span of floors?
A lintel is a horizontal structure that is installed between two vertical supports. It is designed to carry the load above the opening in the wall. It is used as a decorative and architectural element. Often the lintels are called beams or blocks, and sometimes several of them are mounted together to form a concrete slab.
Why is a jumper needed?
Floor blocks are an important structural element, without which no building can be constructed. Over time, the frame of the structure weakens, and reinforced concrete blocks bind the support posts, helping the structure stay in place. Lintels are very important because they maintain the structural integrity of the building. They function as load-bearing elements; their absence can lead to the gradual destruction of the building structure.
Reinforced concrete products are installed on window and door openings of high-rise buildings, where the load is 400 kg/sq. m. They are also used for the construction of private houses, where the foundation is poured into the ground with a high groundwater level. The blocks are mounted on the walls, connected to the brickwork, where they become part of the armored belt. Monolithic blocks are used in places where the distance between columns exceeds 2.5 m, when the iron structure can bend.
Dimensions
In industrial conditions, reinforced concrete lintels are made 100 - 390 cm long, 12 - 25 cm wide, 6.5 - 22 cm high. They are designed to withstand pressure from 100 kg s/m to 3700 kg s/m. It is important to follow the rules for installing a reinforced concrete block on a wall. For a span of 1.5 m, the beam is laid with an overlap of at least 12.5 cm on each side.
For spans of 1.8 m, the overlap increases to 20 cm, and openings over 2 m must have an overlap of 25 cm on the support. How to calculate the parameters:
The indicator is calculated by summing the indicators of three values 200 + 100 + 100 = 400 kg / m2.
Lintels are made of steel, stone, wood, brick and reinforced concrete. The choice of supporting structure depends on the place where it is used. If the pressure is high, reinforced concrete beams are installed that can withstand heavy weight. Reinforced concrete products are widely used in the construction of buildings as they are durable and can withstand heavy loads.
Source
Installation
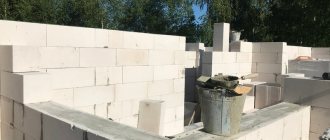
Rules
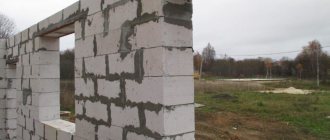
Installation of partitions from aerated concrete blocks is carried out with the obligatory ligation of vertical seams. Simply put, the joint between blocks in the same horizontal row should not be above the same joint in the row below. The minimum horizontal distance between vertical seams is 20 cm;
Pay attention to the dressing of vertical seams
The top of the partition should not reach the ceiling. Between the top row of blocks and the ceiling, there remains a compensation gap of 1.5-2 cm, which is filled with polyurethane foam or any other elastic soundproofing material. In this case, thermal expansion and deflection of the floor under load will not lead to the appearance of cracks in aerated concrete;
The seam between the wall and the ceiling is filled with polyurethane foam
The partition should be attached to adjacent walls in increments of no more than a meter in height. This instruction is intended to provide additional stability with respect to horizontal loads and the absence of cracks in the corners. For fastening, stainless or galvanized anchor plates and perforated tapes are used between the rows of masonry;
Fastening an aerated concrete partition to an adjacent wall
For masonry, use only and exclusively special glue. The use of cement-sand mortar will force you to spend extra time sealing rough joints;
Thin-seam adhesive from one of the largest manufacturers of aerated concrete
Storage of aerated concrete
Under what conditions can aerated concrete blocks for interior partitions be stored before work begins, and how can they be unloaded correctly to avoid damage?
- To unload pallets from transport, use belts or soft slings. Steel cables are guaranteed to damage the side walls of the blocks;
Unloading a pallet with aerated concrete: soft belts are used
- Place individual blocks on a flat surface, placing a rag or other soft material under them;
- If repair or finishing work is being carried out in the room, cover the aerated concrete partition blocks with polyethylene. The film will protect their surface from paint, cement mortar and other contaminants.
First row
The construction of an aerated concrete partition with your own hands begins with laying out the first row. The appearance and durability of the wall as a whole depends on how smooth it turns out. Yes, yes, it’s durability: uneven masonry contributes to the appearance of cracks in places of maximum stress.
Here are a few rules for laying the first row:
- Ensure that the wall is waterproofed from the ceiling or foundation. It will prevent moisture from leaking through the capillaries of the porous material. To do this, spread two layers of roofing material along the future partition;
- On an uneven surface, lay partition blocks made of aerated concrete on a leveling cement-sand pad with horizon control along a long level and a mooring - a cord stretched at the height of the surface of the blocks;
Laying the first row. The photo clearly shows the waterproofing and cement-sand cushion
Control the relative position of blocks using a long level
- After laying the row, check that there are no slight differences between adjacent blocks. If differences remain, remove all irregularities with a grater and sweep away the remaining dust;
- To mark and make the boundaries of the openings strictly vertical, install vertical slats with marks at the level of each new row. Between the marks on the order slats, as the wall grows, the mooring cord will move.
Next rows
The laying of the second and subsequent rows is carried out along the same level and mooring cord. Glue is applied to the vertical surface of the previous block or wall, and to the top of the previous row, with a notched ladle, carriage or notched trowel; then the aerated concrete partition block is adjusted with a rubber hammer. The last one in the row, the additional block is cut in place.
Applying glue using a carriage with a width corresponding to the thickness of the block
GOST and SNiP requirements
Since beams for openings in aerated concrete walls are installed from different materials , there are several regulatory documents that regulate their production quality and installation technology.
The main issues of GOST and SNiP for creating lintels in walls made of aerated blocks:
The requirements of regulatory documentation establish the type of structure, dimensions and markings of beams, as well as production and installation technology.
Thus, reinforced concrete structures are divided into several basic types PP/PB/PG/PF , where the first “P” indicates the type of product - lintel:
Support on aerated concrete structures
This regulatory requirement ensures the reliability of the wall structure and depends on the type of lintel:
Projects of houses made of aerated concrete blocks
Number of projects 371
- 5 rooms
- 3 bathrooms
Sami House Project
To favorites
- 325.6² Total area
- 16 x 17m Construction area
from 9,299,000 rub. Construction period 158 days
- 4 rooms
- 2 bathrooms
Optima House Project
To favorites
- 158² Total area
- 11 x 9m Construction area
from 2,133,000 rub. Construction time individually
- 4 rooms
- 2 bathrooms
Spruce House Project
To favorites
- 125.78² Total area
- 10 x 13m Construction area
from 4,096,000 rub. Construction period 88 days
- 4 rooms
- 2 bathrooms
Eridanus House Project
To favorites
- 137.2² Total area
- 10 x 10m Construction area
from 4,498,000 rub. Construction period 91 days
- 3 rooms
- 1 bathroom
Wisła House Project 153
To favorites
150² Total area
from 1,891,500 rub. Construction time individually
- 4 rooms
- 2 bathrooms
House Project SDM-13
To favorites
- 126² Total area
- 11 x 8m Construction area
from 2,772,000 rub. Construction period 90 days
- 6 rooms
- 2 bathrooms
Classic Plus House Project
To favorites
- 212² Total area
- 12 x 11m Construction area
from 2,925,600 rub. Construction time individually
- 5 rooms
- 2 bathrooms
Danish House Project
To favorites
- 211.75² Total area
- 8 x 15m Construction area
individual calculation Construction period 40 days
- 10 rooms
- 4 bathrooms
House Project Tula Gingerbread-2
To favorites
366.6² Total area
from RUR 9,279,636 Construction period 169 days
- 9 rooms
- 4 bathrooms
Vasily House Project
To favorites
- 352.3² Total area
- 15 x 12m Construction area
from 7,592,000 rub. Construction period: 172 days
- 8 rooms
- 2 bathrooms
Luxury House Project
To favorites
- 264.8² Total area
- 11 x 19m Construction area
individual calculation Construction period 145 days
- 5 rooms
- 2 bathrooms
Project of the Optium House
To favorites
9 x 7m Construction area
from 2,100,000 rub. Construction period 60 days
- 5 rooms
- 3 bathrooms
Jasmine House Project
To favorites
- 283.42² Total area
- 19 x 12m Construction area
from 7,046,000 rub. Construction period 131 days
- 3 rooms
- 2 bathrooms
Mitrofanushka House Project
To favorites
- 133.9² Total area
- 12 x 10m Construction area
from 4,382,000 rub. Construction period 90 days
- 4 rooms
- 2 bathrooms
Daisy House Project
To favorites
- 222.9² Total area
- 13 x 11m Construction area
from 5,216,000 rub. Construction period 120 days
- 3 rooms
- 3 bathrooms
Finnish House Project
To favorites
- 132.9² Total area
- 11 x 9m Construction area
from 4,158,000 rub. Construction period 89 days
- 4 rooms
- 2 bathrooms
House Project My Marusya
To favorites
- 170.6² Total area
- 13 x 11m Construction area
from 5,089,000 rub. Construction period 105 days
- 6 rooms
- 3 bathrooms
Project House Amur 528
To favorites
500² Total area
from 6,558,650 rub. Construction time individually
- 3 rooms
- 2 bathrooms
House Project Danube 123
To favorites
120² Total area
from 1,621,500 rub. Construction time individually
- 4 rooms
- 1 bathroom
Hut House Project
To favorites
- 150² Total area
- 13 x 12m Construction area
from 4,700,000 rub. Construction period 95 days
View all projects
Let's find out what lintels for aerated concrete blocks are, their main types and how they are selected. Correct use and installation of lintels during the construction of a house made of aerated concrete blocks
Read the article to the end, and you will learn about what types of jumpers exist, what options to look for when purchasing, and what rules must be followed when installing products
Lintels are an integral element in the construction of any houses Source www.ytong.ru
What varieties are there?
As a rule, the developer purchases ready-made lintels for walls, but you can make them yourself monolithic using a reinforcement frame. Most often, the following are used as ready-made lintels for openings in walls made of aerated blocks:
U-shaped beams make it possible to disperse the load from the floor slabs. These are modern types of blocks produced on specialized equipment.
Aerated concrete lintels with a rectangular cross-section are used in houses no higher than 2 floors ; they are also produced according to the design sizes of windows and doors and the required strength, depending on the dimensions of the walls.
Wooden beams in aerated concrete wall openings are used much less frequently , but a prerequisite must be a wooden floor and preliminary thorough treatment of the wood: dried and impregnated with an antiseptic.
Such a beam also has serious disadvantages: a tendency to rot and increased dimensional deformation under the influence of natural factors.
Metal profiles (corners) have the highest load-bearing characteristics and accelerated installation. The cross-section of the metal profile can be different. The large span is covered with an I-beam with a support of at least 250 mm.
Additionally . The disadvantages of metal profiles include their increased corrosion activity, the need for mounting grooves and additional insulation of the structure.
We can conclude that a metal corner (profile) is best suited for creating lintels in walls made of aerated concrete blocks, but each developer will have to decide which options to choose independently based on an analysis of the advantages and disadvantages and taking into account the features of the building design.
Corner lintel for aerated concrete
Home craftsmen also construct lintels from a corner in a wall made of aerated concrete or use corrugated reinforcement as a lintel. Professional builders do not approve of this design, but it is often used in private housing construction for openings no larger than 120 cm. To ensure structural strength, use a corner with a thickness of 0.6 cm and a shelf size of 7.5 cm. Blocks are laid on a metal base, covering opening
This design is different:
- cheapness;
- simplicity;
- ease of installation.
Corner lintel for aerated concrete
Disadvantages of lintels based on corners or reinforcement:
- possibility of corrosion of the supporting structure;
- the need to form grooves for the placement of reinforcement or corners.
Due to the accelerated pace of development and simplicity of design, this option is also widely used.
How to install a reinforcing rod and lay an angle under a lintel
Having decided to use corrugated reinforcement or a corner for aerated concrete as a lintel, observe the size of the supporting surface and carry out installation activities according to the following algorithm:
- Thoroughly clean the surface of the corner profile or fittings from any existing rust.
- Prime the surface of metal elements for reliable protection against corrosion.
- Make grooves in the outer blocks of the opening, allowing you to place a corner shelf or fittings in them.
- Cover the opening with a metal profile and cover with cement mortar the grooves in which the angle or rod is placed.
- Ensure structural rigidity by using annealed wire, metal tape or electric welding.
After completing the installation of the supporting metal structure, lay aerated concrete blocks.
Various methods for installing support elements are used:
- with the arrangement of two corners with shelves facing each other from the outer and inner parts of the opening;
- with the placement of two corners welded together in the center of the opening with shelves in opposite directions;
- with laying one reinforcing rod along the axis of the opening and two rods on the extreme sides.
The choice of the optimal installation method is determined individually.
How to calculate?
Calculation of lintels involves determining their dimensions, support area, type of structural material and installation technology.
All this data is obtained during the implementation of a house construction project when calculating walls and technological openings for windows and doors.
In this case, the load from all load-bearing structures must be taken into account , in accordance with the requirements of SNiP. In the process of calculations, the height of the masonry, the weight of the floor and the temporary loads on the floor above the lintel are determined and compared with the design characteristics.
Above the windows
For example, when choosing a lintel for a window opening with a width of 1.0 m in a load-bearing aerated concrete wall of 380 mm, a design of 800 kg/m is chosen.
Initial data:
Above the door
For a doorway, the lintel parameters are calculated based on the applied load, which combines:
When choosing a standard size, take into account the width of the beam , which should be equal to the thickness of the partition, and the height is determined by its load-bearing capacity. For gas blocks, the beam line must be at least 250 mm.
The required length of the lintel over a door opening of 1 m will be equal to: 1+2×0.25=1.5, using the albums of ready-made lintel solutions, select the closest standard size of the product.
Materials used
In addition to the classic option (using reinforcement), other materials can be used to reinforce block masonry:
Galvanized metal mesh
Consists of steel rods welded in a mutually perpendicular position.
Of all the types of mesh used, metal is the most durable. But it has one big disadvantage: a special adhesive composition for joining wall blocks promotes the development of corrosion, which leads to a fairly rapid loss of all the positive properties of such reinforcement. Also, transverse rods act as cold bridges in winter. I do not recommend this type of enhancement.
Basalt mesh
It is made of basalt fiber rods, which are located perpendicular to each other. In butt joints, the rods are fixed using wire, clamps or specialized glue. This fastening ensures the correct and even geometric shape of the cells.
Basalt mesh can withstand strong tensile loads - about 50 kN/m. Its weight is several times less than that of metal mesh, which ensures ease of reinforcement work.
Basalt-based meshes are resistant to the negative effects of corrosion and do not respond to changes in temperature conditions. They have very low thermal conductivity, which ensures the absence of a cold bridge that occurs when reinforced with steel mesh.
HelpBasalt mesh costs quite a bit, so this solution is the most expensive of those proposed.
Metal mounting perforated tape
This is a galvanized strip of steel with holes made along its entire length.
It is enough to purchase a tape with dimensions of 16x1 mm. Reinforcement of the masonry is carried out without cutting the aerated concrete by fixing it with self-tapping screws. Otherwise the principle is the same as when using reinforcement. To increase strength, it is possible to fasten the strips in pairs using steel wire. Has lower bending strength compared to profiled reinforcement.
Attention! Punched paper tape with a thickness of 0.5-0.6 mm is common in online construction stores and markets. It is not suitable for reinforcement
Look for 1mm thick punched paper tape in specialty stores or order online in advance. Unfortunately, it is not so easy to buy it on the regular construction market.
I see the advantages of using this material compared to traditional fittings as follows:
- savings on delivery due to the compactness of the tape;
- no need to make grooves (saving on labor and installation adhesive).
Fiberglass reinforcement
The main material of the reinforcement is fiberglass, on which the thread is wound in a spiral to ensure better adhesion to concrete.
Significantly lighter in weight than its metal counterpart. Low thermal conductivity will avoid cold bridges in aerated concrete masonry. Ease of installation is ensured by a minimum number of joints, since such fittings are sold in packages in coils.
Attention! Fiberglass reinforcement has a significant disadvantage - it cannot withstand high fracture loads, and this is the main task of reinforcing masonry made of aerated concrete blocks with increased bending stress.
It is impossible to build a rigid frame from this material, therefore such reinforcement is not recommended in seismically hazardous construction areas. Our verdict is not to use.
The benefits of reinforcing wall structures are obvious. Therefore, it is worth sacrificing small additional monetary costs and time during installation, so that the building being constructed will serve you faithfully for many years.
Description of the DIY installation process
In practice, the installation of standard lintels for aerated concrete walls does not differ from each other if their dimensions are chosen correctly, taking into account the dimensions of the walls and the technological opening.
The most popular among developers at present are shaped reinforced beams. Technology for installing U-shaped blocks over a window or doorway :
Production
What is a jumper? This is a reinforced concrete product, in the production of which heavy concrete and reinforcement cages are used. The type of cement concrete mixture and the type of reinforcement cage are selected based on the necessary strength requirements for the reinforced concrete product in the future. Also, lintels are made from cellular concrete. They are characterized by low specific gravity and low thermal conductivity, which allows you not to worry about further insulation.
They are available with two types of reinforcement:
It is treated against the influence of external factors that can aggressively affect the reinforcement frame, for example, corrosion. Reinforced concrete products differ in shape, finishing technology used and ability to bear load.
Possible difficulties
The biggest difficulties for the developer arise when he decides to independently produce monolithic beams over technological openings up to 174 cm long in aerated concrete walls. For example, a reinforcing structure will require additional insulation, and the stop line in it should be at least 250 cm.
U-shaped lintels in permanent formwork can be installed with an opening length of up to 300 cm and a stop line of at least 250 cm, which do not require insulation, but have a high price and are difficult to find in the retail chain.
Important ! A steel lintel made of a metal profile can be provided for small technological openings, when this is allowed by the design. Given the high corrosion activity of metal, before installation, the surface of the beam must be carefully treated with anti-corrosion paint.
Application of lightweight jumpers
What is a cellular concrete lintel? This is a product that, despite its low specific weight, can withstand the necessary compression and fracture loads. This is ensured by reinforcement, quality of aggregates and precision of the technology followed. The filler takes compressive loads, and the reinforcement takes tensile loads. Products made from cellular concrete are used in the construction of structures up to five floors high, because they do not have the strength characteristic of reinforced concrete products.
Prices for work in the Russian Federation
| № | Types of jobs | Dimension | Average cost , rub . |
| 1 | Monolithic works | 1 m 3 | 6000 |
| 2 | Installation of ready-made lintels for technological openings | m.p. | 400 |
| 3 | Production of metal jumpers and on-site installation | m.p. | 1000 |
| 4 | Production of aerated concrete lintels on site | m.p. | 1200 |
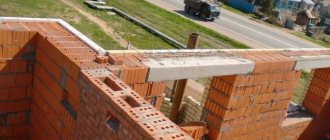
What are lintels on a brick wall, what is their minimum and maximum support?
All buildings have windows and doors.
The construction of openings for them is associated with some features, which involve the use of special structures - lintels. Brick walls containing lintels evenly distribute the load on load-bearing surfaces, support the weight of higher floors (up to 2 tons) and prevent the building from collapsing.
Read more about the need to use jumpers in a brick wall, installation rules, regulations and other nuances in this article.
Organization of the masons' workplace.
How to hang kitchen cabinets on the wall 80 photos mounting on a mounting rail on a plasterboard wall in the kitchen
When performing masonry work, the productivity of masons is greatly influenced by the correct organization of the workplace. The organization of the workplace should eliminate unproductive movements of workers and ensure the highest labor productivity. Therefore, the workplace must be within the range of the crane, have a width of about 2.5 m and be divided into three zones: a working area 0.6...0.7 m wide between the wall and materials, in which masons move; a materials zone about 1 m wide for placing pallets with stone and boxes with mortar and a transportation zone of 0.8...0.9 m for moving materials and the passage of workers not directly involved with the masonry.
Number of pallets with
stone and boxes with mortar and their alternation depends on the thickness of the wall or structure, the number of openings in a given area and the complexity of the architectural design.
Since the greatest height, and which is still rational for laying, is 1.2 m, then all stone buildings and structures are divided by height into tiers of the same size. Therefore, when the masonry reaches such a height, it is necessary to stop work and install (or rearrange) scaffolding. In order to coordinate the process of installing scaffolding and ensure constant employment of masons, the building or structure is divided in plan into sections and plots. Captures are areas of a building or structure under construction in which the labor intensity of the work is approximately the same. The grip is allocated to a team of masons. Each plot is divided into plots, which are sections of masonry allocated to a team of masons. The work is organized as follows: after finishing laying a tier in one section, masons move to another section, and in the first section they install or rearrange scaffolding or mount floors.
The execution of work when laying walls is closely related to a number of related and auxiliary works. Thus, transport workers ensure a continuous supply of materials to workplaces. After finishing the masonry, carpenters install scaffolding to the height of the tier. Upon completion of the floor laying, the installers begin installing the floors, staircases, and partitions.
The work of teams of various specialties must be organized so that there is no downtime. This is achieved using the flow-grabbing method, when the building under construction is divided in plan into parts of equal labor intensity - grips, and in height - into tiers.
So, if the building is divided into two sections, then on one of them brickwork is carried out, and on the other at this time prefabricated reinforced concrete floors and stairs are installed or the scaffolding is rearranged (this can be done in the second shift). Procurement of part of the bricks at workplaces is possible in the third shift or in the second with the installation of scaffolding. The rest of the brick, as well as the mortar, is supplied continuously during the laying process.
When organizing work in a continuous manner, it is necessary that the laying of the walls of one floor on the first section is completed in the same time as required for the installation of floors and scaffolding on the second section. This makes it possible for masons and installers to switch places after completing their work on the grips: the masons move to the second grip for laying the walls of the next floor, and the installers move to the first for installing floors on the finished walls.
If you put the required number of masons on the block, the laying of one tier of walls can be completed in one shift. In this case (if the scaffolding is rearranged in the second shift), the laying of one floor on the landing is completed in 3 days, and the laying of one floor on the entire building is completed in 6 days.
Installation work must be completed within the same amount of time. If this fails, change the number of grips or increase the duration of the masons’ work on the grip tier.
Tips and tricks
It is important to remember that if the length of the opening does not exceed 1.2 meters, and the height is less than two-thirds of the width, then the most convenient option for the device will be a lintel made of standard blocks without the use of additional fasteners. The blocks must be laid using removable temporary formwork and special glue for cellular aerated concrete. In this case, the side elements are recessed into the wall by at least 115 mm.
Additional reinforcement can be the reinforcement of the rows located above the opening. The optimal cross-section of the reinforcement used is approximately 6-8 mm. The end part extends beyond the boundaries of the opening by 0.5 m on both sides of the masonry. The ends need to be given an L-shape and anchored into the masonry of aerated concrete blocks.
Related article: How to find electrical wiring in a wall without a device
Types of window lintels and their characteristics
Window lintels are building structural elements used to cover window openings. Jumpers are classified according to material:
- wooden,
- reinforced concrete,
- metal,
- stone,
- made of brick.
They are also distinguished by installation method:
- finished goods. Usually these are reinforced concrete concrete, wooden beams, metal channels, I-beams, rails,
- lintels made on site - arched brick and stone masonry or cast-in-place reinforced concrete structures.
Let us consider the listed structures and materials in more detail.
Wooden lintel
Wooden lintel
Morally outdated and least suitable material for such a building structure. Even when treated with septic tanks, its durability and reliability leaves much to be desired. Requires additional waterproofing. The only advantages are low cost and ease of installation. Allowed for use only in low-rise construction.
Reinforced concrete lintels for window openings are the most common option in mass housing construction. They can also be divided into several types.
Factory products
Reinforced concrete lintels are available in two versions with prestressed (tensioned at the bottom of the product) and non-stressed reinforcement.
The length of the finished product is 1-6m, width 14-29cm and thickness 12-25cm. All standard sizes are regulated by GOST 948-84 “Reinforced concrete lintels for brick buildings.”
There are various methods of reinforcement, depending on the size of the product:
Self-made products
It is easy to make a jumper of individual sizes yourself. This can be done on the ground and then installed above the window.
Or you can pour it directly on site using removable formwork.
- Wooden formwork is installed above the window opening.
- The sides are attached to the walls, and the bottom is mounted on spacers. The bottom of the formwork should not rest on the wall. The grip must be at least 200 mm in each direction. It is preferable to make the top of the fill flush with the wall for ease of further laying.
- The reinforced frame made of rods 12-14 mm in diameter is welded separately. It should be 10 cm smaller than the formwork opening.
- The reinforcement frame is installed so that it has a distance of 5 cm from the bottom and walls of the formwork. To do this, fragments of bricks are placed under the bottom.
- The pouring mixture consists of cement, sand, crushed stone, slag, and water in a ratio of 1x2x1x3. This mixture corresponds to concrete grade M150.
It is also possible to make window openings from a corner with a shelf width of at least 40 mm. To do this, two corners are placed parallel at a distance equal to the thickness of the wall and welded with cuts of reinforcing rods 10-12 mm in diameter.
The structure is laid on the lower part of the wall, and gas blocks or bricks are laid on top of it.
Brick lintels
In order to lay the simplest window lintel with your own hands from brick, considerable skill is required. But such structures not only have excellent performance characteristics, but also look great, being a decorative architectural element of the facade.
Wedge masonry
Used to construct openings up to 2 m. The brick is placed on its edge, with a slight slope from the edges to the center. The last “castle” brick is lightly trimmed with a wedge.
Arched masonry
The length of the masonry, compared to a straight line, is one and a half times greater. The semicircular shape of the arch makes it possible to accept and optimally distribute significant loads. The radius of the arch should be equal to half the width of the opening.
Segmental (beam) masonry
The radius of the arc is much larger than that of a classic arch. The masonry is laid using a wedge, however, due to better load distribution, this type of lintel is the most reliable and strong.
In addition to the obvious advantages: the absence of cold bridges, better strength and aesthetics, brick lintels also have disadvantages. One of the main ones is the great complexity of execution.
Aesthetics and functionality
Before the invention of modern cheap but durable materials, special craftsmen were engaged in constructing jumpers. Their masterpieces are still admired to this day.
The load in such masonry is distributed tangentially, which contributed to the incredible durability of the structure.
Diolectian window
It was first widely used in the construction of the Diocletian Baths. The arch is supported by two additional supports, dividing the opening into three segments. In large spans, supports are needed to strengthen the structure. In medium and small ones, for aesthetics and highlighting style.
A variation of such a lintel is the Venetian window.
What it is?
Experts call a lintel a structural element involved in covering openings , which carries the bulk of the masonry and distributes the loads of materials (bricks, cement mortar, ceiling).
The lintels are in the form of reinforced concrete structures (RC), belonging to the factory series of type 1.038.1-1 or 1.225-2.
Instead, you can independently make monolithic reinforced lintels that correspond to the dimensions of the opening and the distributed load.
The difference between factory-made and self-made is that a finished product can cost more than a home-made one and has a quality mark. Regardless of the manufacturing method, it is customary to distinguish between the following types of jumpers:
The most common are the first two types of structures (load-bearing and non-load-bearing), carried out using technology, in accordance with established regulatory rules. For example, they are divided into block (PB) and slab (PP). Lintels help keep the laid bricks from moving and the wall from collapsing.