Home |Construction |How to place beacons under a floor screed?
Date: August 28, 2017
Comments: 0
The technology for installing any type of floor covering requires the elimination of defects and unevenness, followed by planning and ensuring the horizontal surface of the floor. In order to level the base, a dry or wet cement-based composition is used, which is distributed evenly over the surface. Beacons for floor screeding are used when performing this operation, serving as a guide, as well as simplifying the process of pouring the base and facilitating the work. Let's dwell on the varieties, figure out how to install beacons for screeds, study the specifics of installation, as well as the technology of implementation.
What are floor screed guides?
Beacons are special elements fixed at one mark, located horizontally and at an equal distance. Varying in design, guides provide a solid base, the top level of which serves as a guide when forming the base.
Beacons are simple devices intended for one-time use.
The location and correct installation of the fixed elements determines the level of the future floor, affects the final appearance of the decorative coating, as well as its characteristics during operation. The method of making the screed is influenced by the design features of the guides and the materials used in manufacturing.
The following types of special elements are in demand:
- rack and pinion
They are used when forming a dry base with expanded clay filler, as well as when arranging a sand-cement or concrete base using the wet method; - rappers.
Used in the manufacture of self-leveling bases. They are a structure with a height-adjustable rod fixed to a base with three support points.
Do I need to clean up after?
Since metal profiles or plaster beacons are made of metal, over time they tend to rust. Even in a dry environment, the material can oxidize and form rusty stains or cracks. Therefore, it is best to remove thin profiled beacons after pouring, when the mixture has not yet had time to dry and become extremely strong. For T-shaped beacons, their upper edge is clearly visible above the screed; you can pull them out with the corner of a spatula. If the floor is already dry enough and the mortar has set, then you will have to remove the beacon using a pick or chisel with a hammer.
After removing the plaster beacons, grooves remain in the flat floor, which can be easily leveled using the same solution that was used for the screed. You can also seal cracks after removing the profiles with gypsum plaster. Pointed beacons-benchmarks in the form of metal tripods are easy to remove from a fresh screed thanks to sharp legs with a smooth surface. Also, immediately after pouring, you need to remove the plastic markers.
It is quite difficult to remove tubular beacons from a poured screed. Typically, such thick guides are left in the finished floor, plus they additionally reinforce the concrete layer.
Varieties of elements and recommendations on how to install screed beacons
When carrying out activities to form floor foundations, the following types of elements are used as guidelines, differing in the material used and design features:
- Wooden slats.
The control level is formed by square wooden blocks with a side of 3 cm. The vertical displacement is adjusted by placing conical wedges of different thicknesses under the bars. It is allowed to use self-tapping screws of increased length. Pre-soaking wooden beams in water reduces moisture absorption when using the wet pouring method. The main disadvantage is the possible warping of the wood, as well as the need to remove the bars from the formed massif. This way the wood can be prevented from decomposing over time.
Beacons for floor screed are divided into groups depending on the type of mortar being poured
- Metal profiles.
The most common type of device today. U-shaped profiles with dimensions of 2.7x2.8 cm and 2.7x6 cm are used. They are fixed with self-tapping screws to the base with the flat side, and the sharp edges of the U-shaped structure are located in the opposite direction. In order to increase the strength characteristics, the installation of nested profiles is used. The design has proven itself positively when performing activities in rooms with limited space. The height of the profiles is adjusted by rotating the threaded rods. - Plaster profiles.
They are used as guide rails when carrying out plastering activities and forming floor foundations. Their use when performing finishing work significantly facilitates the process of leveling the base and shortens the overall production cycle. The slats are attached to the base using cement mortar. A profile with a height of 0.6 cm is used for plastering activities. Surface planning is carried out using beacons with a side size of 1 cm. Increasing the layer thickness to three centimeters can bend the profile, which is deformed under the weight of the heavy solution. - Benchmarks.
The zero mark is determined by the location of the rod, the degree of vertical movement of which is adjustable. It is secured in a support structure supported by three points. When performing work, benchmarks are placed at intervals of up to one meter in a checkerboard pattern. Using several reference points allows you to plan the floor in one room. Benchmarks are widely used by professional builders who have special training and know the features of their installation. After the filling process is completed, the control elements are easily removed from the formed array.
Installing beacons using self-tapping screws is also popular
- Self-tapping beacons.
Self-tapping screws or self-tapping screws screwed into the base are the basis for performing work on forming the surface. Threaded winding facilitates screwing at the required level for subsequent tension of the construction thread between them. Cement mortar is then laid in slides along the cord to install the guides. The installed profiles rest on the formed slide and are immersed in cement mortar to the required level so that the supporting surface touches the cord stretched between the screws. The interval between the screws located in opposite rows should allow the rule to be used with a margin of 5–7 cm in each direction. - Metal pipes.
The use of steel pipes makes it possible to fill floors of increased thickness in rooms with larger dimensions. The design features of the tubular elements are increased strength characteristics and the complete absence of deformation under the influence of the mass of the cement base. The use of round pipes as guide supports, as well as box-shaped structures of square or rectangular cross-section, allows you to form a reliable base that maintains its position when filling the interval between the elements with cement mortar. - Guides from the solution.
A supporting surface made of cement mortar is used when laying out floors using the dry method, with the composition being laid in an increased layer. Cement mortar slides are made starting from the corner areas of the room along its length, with an interval between the supporting surfaces corresponding to the length of the base leveling tool. In accordance with the location of the zero mark, the height of the cement platform is formed. The process of screeding is carried out using a rule that moves along the surface of concrete slides after their final hardening.
There is another unusual way to set horizontal landmarks - cement slides
After reading the recommendations, it’s easy to figure out how to set up beacons for floor screeds, depending on their types.
Peculiarities
In order for the floor finish to look flawless, without wrinkles, cracks and unevenness, it is necessary to first level its surface. Most often, a screed is used for this - a special mixture that is evenly distributed over the entire surface of the room. It is difficult to visually bring even a few square meters under one level, so you have to install special rigid guides - beacons.
Placing beacons is only necessary in some cases; for example, when using a self-leveling floor, they are not needed, since the mixture itself, which has leveling properties, spreads evenly over the entire surface. But for concrete and cement-sand screeds, their presence is simply necessary. The minimum layer thickness for such solutions is 3 cm, and at the lowest points it can be more than 10 cm, so you have to use beacons.
Metal beacons look like hollow pipes, profiles or corners. They can be attached to cement mortar, gypsum plaster or self-tapping screws. Some make them from strong and smooth wooden beams or from the same mortar. The main condition is to maintain an ideal horizontal level on the entire surface of the floor in the room. After the beacons are installed and firmly fixed, they begin to pour the screed.
Definition of zero level
The process of determining the zero mark is one of the most critical operations affecting the quality of foundation formation. In order to determine the zero level, it is advisable to use a hydraulic level or use a modern laser device, which allows you to quickly and efficiently perform the work.
Installation of beacons for floor screed begins with calculating the zero floor level
Follow the following algorithm:
- Mark the starting point, moving one meter vertically up from the level of the floor slab.
- Using a level, draw a basic line along the closed contour of the room in which the work is being carried out.
- Check the distance from the drawn line to the floor surface and mark the farthest and closest point.
- Draw a line along the furthest point and connect the marks with a solid line, forming a base level.
- Move a meter towards the base and draw a solid line around the perimeter of the room, parallel to the existing mark.
- Step back from the resulting zero mark to the required height of 3–4 cm and draw a line.
The indicated line corresponds to the required thickness of the array and serves as a guide when performing work.
Preliminary work
Before installing screed beacons, it is necessary to perform preliminary work. First you need to remove the old floor. A hammer drill with a lance or a jackhammer will help with this. Gradually remove layer by layer until a clean slab is exposed.
Now you need to inspect the stove. Most likely, cracks have already appeared on it. They need to be slightly expanded, cleaned of dust, and grooves for reinforcement must be punched (for example, for bolts with a bitten off head). Afterwards all that remains is to cover them with cement mortar.
It is also advisable to prepare the stove itself. If there are oil stains, remove them with a degreasing compound. Remove strong protrusions with a grinder and an abrasive wheel.
Often in old slabs the reinforcement shows through the slabs. It is better to cover them with paint or enamel.
Sometimes mold colonies can be found under the old topcoat. Before installing beacons for filling the floor, remove them with antiseptic agents.
Now you need a primer. In general, you don’t need to apply it under a dry screed, but it is necessary for contact compounds. You can take “concrete contact” or deep penetration acrylic primer.
Lastly, you need to apply a construction film with a thickness of up to 200 microns.
Selecting the distance between beacons
Guided by the dimensions of the rule used to perform the work, it is easy to determine the interval between the supporting elements. During operation, the rule must slide along the supporting surface.
To do this it is necessary to provide:
- the interval between supports, which should be 10–20 cm less than the length of the tool;
- parallel arrangement of guides and equal distance between them.
You need to start installing the rail from the wall. The distance will be approximately 10-30 cm
The use of easily deformable materials as guides requires reducing the distance between them to 20–25 cm.
Installation of beacons for floating screeds
In this case, the technology for arranging the base for the finishing floor covering involves pouring a concrete mixture over a layer made of foam plastic. In addition to its main purpose, this screed design helps to further improve the heat and sound insulation characteristics of the floor covering.
In this case, self-tapping screws that are screwed into the subfloor work well as guides. Usually 24 hours after the floor has been screeded using beacons with your own hands, the fasteners are dismantled. The holes from the self-tapping screws are filled with the mortar that was used to construct the cement base. The remaining recesses must be carefully rubbed flush with the surface of the wet screed.
How to set beacons for floor screed at zero level
Setting to the zero level is carried out in accordance with the preliminary markings made, taking into account the thickness of the array. The supporting elements are fixed in such a way that the upper plane, which will be in contact with the rule, corresponds to the zero mark.
Sequence of events:
- Fix the first profile at a distance of 30–50 cm from the wall.
- Fasten the next element in parallel, taking into account the length of the rule.
- Check that the location of the guides corresponds to the zero mark.
Depending on the design of the beacons used, use the appropriate fastening method and the necessary elements for fixation.
It is important to ensure:
- fixed distance between supports;
- immobility of guides.
Construction of beacons made of concrete mortar
The process of creating beacons according to this option consists of several stages:
- Screws are attached to the rough base, the distance between them depends on the length of the mounted guide;
- between the fixed landmarks, strong wire is pulled in several rows;
- The prepared cement-lime mortar is carefully laid out along it.
The master is faced with the task of forming a structure from the solution that is similar to the wall. It is necessary to stretch the long strip perpendicular to the wire, simultaneously touching the screws. As a result, a horizontal platform is built on which the functions of beacons are assigned.
In this case, it is necessary to remember the following feature of the process: before pouring the screed, the beacons from the solution must be given time to dry (usually 2-3 days). During this period, the landmarks will gain strength. But the waiting time will be compensated by the fact that after pouring the screed there will be no need to dismantle the guides.
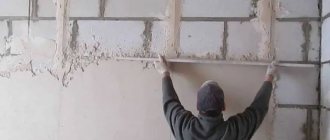
How to make a floor screed using beacons
Using the example of a cement-sand composition, we will consider how to make a high-quality fill.
Carry out the work following the sequence of operations:
- Prepare a cement-sand mortar based on Portland cement grade M400.
- Gradually fill the space between the supports with mortar, starting from the far corner.
- Distribute the composition evenly as a rule, smoothly moving it along the supports.
- Move excess grout towards the area to be poured.
- Remove the floor screed guides and fill the existing recesses.
- Smooth out uneven surfaces using a wide spatula.
- Allow the cement mass to harden to ensure strength.
- Cover the surface of the screed with plastic wrap.
The normal course of the cement hydration process is facilitated by light and periodic moistening of the surface for two weeks.
Which ones are better to choose?
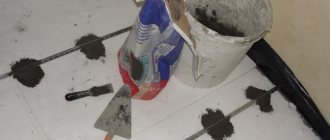
It is quite advisable to pour a floor with minor differences of up to 3 cm under profile perforated plaster beacons, those that are used for walls. Their advantages are that they are cheaper than metal profiles for gypsum boards or profile tubes, they are very lightweight and can be easily cut with metal scissors. Their standard cross-sectional dimensions are 10x26 or 6x21 mm, the most common length is 3 m.
Plaster perforated beacons can be secured to a quick-hardening gypsum mixture, metal or plastic fasteners. The best of them are “ears,” which are thin metal plates with a hole in the middle and small curved ears. Such fasteners are mounted to the floor using ordinary dowel screws. The advantage of fastenings for beacons with “ears” is that there is practically no gap left between the floor and the beacon, this allows you to save on screed mortar.
To perform screeds with high differences, when a layer of more than 3 cm is needed, it is best to use metal profiles for gypsum plasterboard. The required length and width of the guides are selected, then they are cut and mounted under the level using mortar or screws. Their surface is smooth enough to guide along them with a rule.
If the width of the floor being poured is large and requires several layers of thermal insulation, protection from steam and moisture, then the best option is profile pipes installed on cement or gypsum putty mixtures. The design is strong, rigid, and allows you to pour a floor screed on top of penoplex, mineral wool, polyurethane foam, polystyrene foam and other insulating materials.
General practical advice
Despite the existence of a large number of methods for installing beacons under floor screed, professional builders have developed general tips for all cases.
Tip 1
Before starting work, it is recommended to check the condition of the base using an ordinary lath or a long rule. Apply the tool along the diagonals of the room, then at several points around the perimeter. As a rule, install a long bubble level; with its help, try to hold the tool in a horizontal position and measure the gap between it and the plane of the base. The purpose of the preliminary inspection is to detect the area of the floor with the maximum protrusion. If it is small in area, then it is much more effective to cut off the protrusion with a hammer drill than to increase the thickness of the screed by several centimeters. This not only speeds up the work process, but also reduces the estimated cost of floor installation.
Tip 2
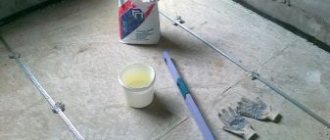
If you don’t have a laser device, you can set the level of the beacons using an old water level. By the way, this is the most accurate instrument in nature. No modern laser can compare with water in these indicators. A water level is an ordinary flexible transparent hose filled with water; it can be painted in different colors to improve visibility. The water level works according to the fundamental law of physics - the law of connected vessels. This means that the liquid level in such vessels will always be the same; it is leveled by gravity.
You need to make marks using this level in the following sequence. You need to work with an assistant; you cannot complete the markings alone.
- Place a mark on the wall at a distance of about a meter from the floor, the specific height does not matter.
- Place one end of the water level to this mark, the other end should be located against the opposite wall. Achieve a position so that the water level on the wall coincides with the zero mark on the hose; in this state, make a mark for the location of the water level at the second end of the hose. Both lines will be strictly horizontal.
- Using the same pattern, make marks around the entire perimeter of the room and connect them with lines using upholstery rope.
- Now you have a horizon throughout the room, use it when placing beacons.
At first glance, it seems that working with a water level is much more difficult than working with a laser level. This is not true, it all depends on the practical skills of the performers. Of course, a laser device has many significant advantages; you need to know them and use them in practice. But the ability to use traditional measuring instruments will always be useful in life.
Tip 3
There is a method for installing beacons on a line made of cement-sand mortar. In essence, it is not much different from those described above, only under the metal profiles, not individual buns are made, but continuous tubercles of the appropriate height. Professionals try to use this method whenever possible. Its disadvantages are fully compensated by its advantages.
There are two disadvantages: an increased amount of solution is required to install beacons and its preparation requires additional time. But when laying the screed, significant time savings are achieved. The fact is that it is necessary to push a mass under the freely sagging beacon profiles; this takes a relatively long time and is very inconvenient. If the beacons have a solid base, then there is no need to push anything anywhere; the screed is made faster and easier.
Tip 4
The accuracy of the beacons depends on the parameters of the finishing coatings. If the screed for joists may have deviations of up to 1–2 centimeters in the corners of the room, then for linoleum the tolerance range is reduced to several millimeters. Keep this in mind and, in accordance with technological requirements, adjust the screed tolerances. There is no point in wasting time on excessive screed precision if the quality of the floor finish does not depend on it.
Beacons made of self-tapping screws
Those home craftsmen who have a desire to install a self-leveling floor can use a homemade design similar to professional flooring. To do this, take self-tapping screws already screwed into the dowels, fasten them with a piece of punched paper tape and align the homemade device relative to a given level. Self-made landmarks, as well as benchmarks, should be dismantled before the self-leveling floor hardens.
Installation of beacons for arranging floor screed is a critical process. It requires a lot of time. Experienced specialists have learned from their own experience that one should not rush to the detriment of the quality of the pouring arrangement. Otherwise, adverse consequences cannot be avoided, since the finishing coating laid on top of a screed with an uneven surface will not only have an unpresentable appearance, but will also last much less than its service life.
In order for the flooring to be installed efficiently, when placing beacons, it is necessary to check with a level that they are correctly placed in all directions.
Advice from professionals
There are several tips that will help speed up the process of installing beacons.
- First, it is recommended to mount the two outer beacons and stretch the ropes between them. Then place all the remaining ones along these ropes. Thanks to this technology, there is no need to check the position of each beacon separately and waste time.
- If the beacons are made solid from cement-sand mortar without the use of metal profiles, then it is better to level the surface with a long bubble level. It allows you to simultaneously control horizontality and extrude a groove along which the rule slides.