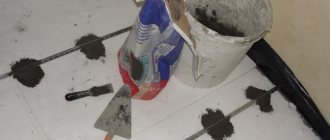
The garage is often called a second home. This room is used as a covered parking lot for a car, there is also a workshop here, and the remaining free space is occupied by those large things that did not have enough space in the apartment. In addition, there is often a basement underneath the garage floor. Therefore, special attention should be paid to the garage floor - it must be strong and durable. These requirements are sufficiently met by a concrete screed. Installing a concrete floor in the garage is a simple and inexpensive solution to the problem.
How to fill a garage floor
The garage owner can do all the work with his own hands; he just needs to strictly fulfill certain technological requirements.
Necessary materials and equipment
- Crushed stone (gravel).
- Sand.
- Cement.
- Water.
- Reinforcing mesh.
- Boards for formwork.
- Metal profiles or wooden bars for lighthouses.
- Concrete mixer.
- Waterproofing materials (polyethylene, roofing felt, roofing felt).
- Insulation.
A few words about the concrete mixer: you can, of course, prepare the mixture by hand, but firstly, it’s just physically difficult, and secondly, you may not get high-quality mixed concrete.
Is it possible to do without lighthouses?
Beacons are definitely necessary when installing any type of screed and even some types of self-leveling floors, which, in principle, have the property of self-leveling, but cannot be made efficiently without the participation of guides. The screed is used everywhere:
- Even the most experienced and talented builders cannot install floors in such a way that they are located, so to speak, completely in the same plane. Level differences are inevitable. They also occur during shrinkage of the house.
- Concrete structures also lack the smoothness required for laying large amounts of finishing surfaces.
- The installation of hydro-, thermal and sound insulation, the installation of a heated floor system also involves the subsequent formation of a screed.
It is completely unrealistic to create a screed of the required thickness, focusing on your own perception. The work can only be done efficiently if the performer sets up beacons. They will play two roles:
- They will help you determine the scope of work and navigate the floor level to be installed.
- They will facilitate the labor-intensive process of backfilling and pouring the floor from a technological point of view.
Strengthening
Plasticizer
Often, many owners of parking lots or private garages complain that the surface of the concrete floor gradually turns into dust, and the thickness of the floor becomes less and less. This is not surprising, because concrete itself is not eternal. It is exposed to environmental influences and gradually deteriorates. So, in order for a concrete floor to last as long as possible, it is necessary to strengthen it with something. Question: what?
Most often, when pouring, special admixtures are used that tend to impart increased strength to concrete structures. Such compositions are various plasticizers. They can not only prevent the destruction of the top layer of the concrete floor, but also help avoid its shrinkage. They also have different properties, for example, with their help you can achieve an effect in which concrete cools quickly, or you can get the opposite result. Also, these plasticizers improve the fluidity of cement paste and compact the concrete mixture, releasing excess water and air bubbles from it.
To harden the floor after it has been poured, various polyurethane or epoxy compounds are used. They do not affect the concrete itself from the inside, but are able to preserve its surface integrity for a long time, which is why the floor becomes not only quite durable, but also aesthetically attractive.
Note! When purchasing a plasticizer, read the instructions, as it tells you what it is intended for. Ask the seller to help you choose, as there are a large number of plasticizers, and some of them may not be suitable for you at all.
Assortment of guides
There are different types of beacons. They differ not only in the types of composite materials, but also in the installation methods. Moreover, some of them are used when pouring self-leveling mixtures, others - when installing screeds.
Lighthouses made of wooden slats
The guides are wooden beams with a cross-section of 3x3 cm. In principle, you can use material of other sizes, the main thing is that the cross-section forms a square. Otherwise, the workpieces have minimal stability during operation. They are used for making cement screeds.
The level of the beacons is adjusted using wedges, screws or shims. This marking method is now outdated, but is still sometimes used.
Important! The materials allow you to form a screed of any thickness, but do not guarantee high accuracy when setting the floor level.
Beacons made of metal profiles
We are talking about a profile for drywall (PN 28x27 or PP 60x27). To increase strength, they are nested inside each other and get a square cross-section. Guides are used for constructing a concrete floor and dry screed or backfill.
You can buy the material at almost any hardware store. It is very convenient to work with, but there is also a minus - the lack of variations in the height of the profiles. The choice is limited: only 3 and 6 cm.
Beacons made of plaster profiles
They are in high demand for several reasons:
- Ideal for forming screeds with a small area.
- They have a simple device.
- They have the function of adjusting the height by screwing in and unscrewing the bolts.
- They differ in their small thickness of about 1 cm, i.e. with their help it is supposed to install only thin ties.
Beacons are used for laying cement screed and leveling self-leveling floors. You need to work with them very carefully - the material is flexible, easily deformable, and sometimes springs.
Metal pipe guides
We are talking about pipes with a round, square or rectangular cross-section. Most often they are used to install concrete floors in rooms with large square footage. The material is very durable and practically does not deform. It is able to withstand a large mass of screed.
Working with such a professional tool as tripod beacons requires experience and skill. Benchmarks are used for installing self-leveling screeds and self-leveling floors. They are adjusted using a rod, which is used to set the level. They are distinguished by high accuracy. The marker beacons are shown in the photo above:
Self-tapping beacons
Dowel-nails or self-tapping screws are screwed to the base, and their heads are used to guide them to the level of the screed. Easy to install, but not very helpful in setting the exact level.
Important! For convenience, electrical tape is sometimes placed on the screws.
Mortar guides
They are created from a mixture of the screed itself or lime-cement mortar. Used when pouring cement screed and concrete floors. Their height has no restrictions and, what is especially nice, the beacons do not need to be removed after work is completed. True, you can’t even start working on them until the material dries, which takes several days.
Reinforcement
The finished concrete floor will be subjected for a long time to both dynamic (car entry and exit into the garage) and static (parking) loads. Therefore, to achieve the required rigidity, concrete is reinforced.
Most often, a road mesh with a rod thickness of 5 mm and a cell size of 100x100 or 150x150 is used for this purpose. This mesh is already welded and only needs to be distributed over the floor area.
Road mesh 100x100 mm
The second option is to make the mesh yourself, on site. Those. it is necessary to purchase a bundle of reinforcement, lay out and tie together many cells. Moreover, it is better to knit with soft wire rather than weld. The knitted mesh, having a certain degree of freedom in the places where it is knitted, does not break in the event of possible deformation of the concrete floor.
The entire mesh should subsequently end up in the middle part of the concrete mixture layer. To do this, lining clamps are prepared in advance from available materials (stones, brick fragments, scraps of metal profiles, etc.).
Attention! The next stage will be the installation of beacons. Remember: beacons cannot be attached directly to the reinforcement mesh. Practice shows that in many places concrete does not flow under the lighthouses; voids remain there, weakening the entire structure.
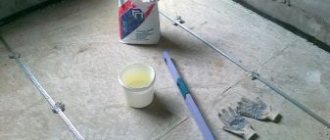
Floor marking
Whatever type of beacon is chosen for work, it must be installed correctly, and this requires accurate markings. First, the planned level of the future screed is noted. Guidelines are made on the walls around the entire perimeter of the room. The more marks, the better.
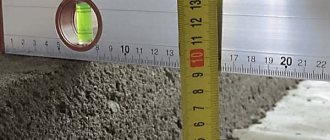
Determination of the highest point
Using a laser or water level, the highest point on the surface is determined. To do this, mark the first point on one of the walls, at a distance of a meter from the concrete floor. A horizontal line is drawn from it along the entire perimeter of the room. The best way to cope with the task is to use a ruler level: draw a line and check the horizontality.
Next, measure the distance from the line to the floor in different places. Where it is the smallest is where the highest point is located.
In addition to this, it is necessary to check the surface over the entire area. Nails are nailed along the line or screws are screwed in. A wire is pulled over them and, measuring the distance between the base and the lines, the highest point in the entire area is determined. Once identified, its projection is transferred to the wall and the height of the planned screed is added. Using a ruler level, draw a horizontal line. It is called the zero level.
Important! The thickness of the final floor must be calculated in advance so that it does not later exceed the height of the threshold.
Defining lines for installation
Marks are made on the floor. They are exhibited according to the following rules:
- The lines should be parallel to each other (ideally and to the walls).
- First of all, mark the locations of the 2 outer beacons. To do this, step 20-30 cm away from the wall and draw a line.
- Marks for the remaining beacons are placed last. The distance between them depends on the length of the tie rule. 10-15 cm are subtracted from it and marks are placed (usually at intervals of 1-1.7 m).
- Self-tapping screws are installed on the lines that indicate the zero level of the floor. They are installed exclusively in places corresponding to the ends of the marks for beacons. They will come in handy in the future when pulling rope guides.
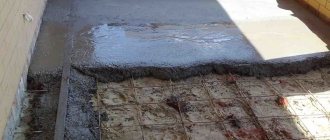
Fill
Pouring a concrete floor
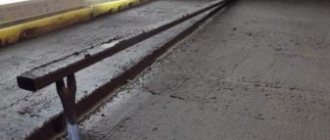
The floor is insulated, the fittings are laid. Now you can fill it in. Have you forgotten about the lighthouses? They will play an important role in the construction of the concrete pavement. Concrete is poured in strips between the already laid beacons. Before pouring, you must make sure that none of them has been moved out of place and that each is firmly secured.
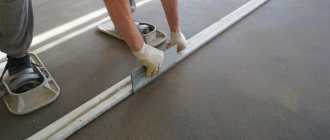
The pouring of concrete always begins from the far corner. It’s more convenient to work this way, because you can get closer to the exit, rather than walking around later, jumping over fresh concrete. The mixture is poured between two beacons - the one next to the wall and the one next to it. Concrete must be poured slightly above the level of the beacons - as a rule, the excess layer will be removed, and there will be no voids in the remaining screed. If, however, such voids remain, you can simply take a little concrete from the edge that has not yet hardened and throw it there. Then you need to go through the strip again with the rule in order to remove the excess layer in this place. When one strip is filled, we move on to the next.
When working as a rule, you need to take into account that the tool must be of sufficient length, that is, at least 2 m, and when moving it should not jump off the beacons. If, for example, its length is 2 m, then the beacons should be located at a distance of 1.7 m from each other to make it more convenient to work with the tool. There is no need to follow the rule every 20–30 cm between the beacons; depending on the length of the garage, you can stretch the strip 2-3 times.
Note! It is best to fill the floor in one go. So its integrity and strength will have better performance.
The finished concrete coating is left to dry for several days. After only 3-4 days it will be possible to walk on it to carry out further work, however, until complete hardening you will need to wait only 28 days - the concrete hardening period. You can use the above-mentioned plasticizers, which will allow this process to last much less time.
The top layer of concrete is impregnated with a primer to reduce dust emissions. Then the floor is covered with special paints that will reliably preserve the surface. In addition, thanks to them, a rough surface is created, and this is precisely what is necessary for better adhesion of the car’s wheels to the floor. Also, special tiles are used as floor covering, which are particularly durable, resistant to moisture and friction. It is glued using adhesive cement. It is also necessary to allocate time for the tiles or paint to harden, from three to five days.
Installation of beacons
The specifics of all subsequent work directly depend on the chosen type of guides. However, in any case, dowels or screws, thread or wire and a two-meter rule-level will be useful.
Installation of beacons from profiles
Holes are made along the marking lines on the concrete floor and screws are screwed in. The fastener pitch is 40 cm. The length of the self-tapping screw should be such that, screwed in halfway, it helps to adjust the level of the beacons, taking into account the thickness of the future screed.
The profiles are placed on the screws with their base up. Then the thread is pulled from wall to wall at the level of the planned screed. Using these guidelines, the beacons must be aligned in one plane using self-tapping screws and the horizontal level must be checked using the rule. Afterwards, the beacons are fixed with a screed solution (in the places of fixation, and then along the entire length).
Important! To ensure the integrity of the waterproofing, pads are used instead of screws.
Installation of beam beacons
The process is almost identical to the previous one. The only difference is that the beams are soaked in water before work begins. Otherwise, there is a possibility of their negative impact on the solution and the quality of the screed itself.
Installation of pipe beacons
The pipes are secured to the floor using a screed mixture. It is laid out in small portions on the base marking line with an interval of 40-50 cm. Afterwards, pipes are laid on the composition and lightly pressed into the solution.
At the level of the marks, a thread is pulled between the opposite walls, indicating the height of the screed, and the beacons are placed in one plane. To do this, you need to press the pipe or add the mixture. The rule is to check the horizontal layout, and then cover the pipes with mortar.
Installation of benchmarks
Beacons on tripods are placed on the floor in a checkerboard pattern at a distance not exceeding 1 m. Their height is adjusted using a central rod. For reference, as in previous cases, the threads are pulled.
Installation of self-tapping beacons
Forming beacons from solution
The thread or wire is pulled in several rows between opposite walls parallel to the markings on the floor (for reference). The finished mixture is spread along the formed lines. It turns out a kind of wall, as in the photo:
An example of guides made from a screed mixture laid using tensioned threads
It is leveled with a strip or rule to the required level, moving the tool perpendicular to the guidelines without touching the wire. Then check the horizontal position and wait for it to dry (usually 2-3 days).
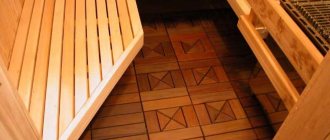
Wooden floor
Wood floors are very rare in garages. Despite the ease of installation, low cost and environmental friendliness of the material, this coating is not popular. Even the densest wood cannot withstand the loads of a car for more than 5 years. In addition, wooden floors are highly flammable, and in a garage where gasoline, oil and solvent are stored, this is doubly dangerous.
Wooden floor
pros
- environmental cleanliness;
- durability (if larch is used, then the service life is several decades in a row);
- simple installation process;
- inexpensive building material available to a wide range of car box owners.
Minuses
- may be a source of fire or support it;
- absorbs moisture, which leads to the formation of organic matter in the wood structure, resulting in rotting.
If you still want to make a wooden floor, the installation technology is simple and straightforward:
- the concrete screed is cleaned and primed;
- the timber for the logs is treated with an antiseptic and dried;
- install logs on concrete in increments of 1.-2 m, securing with dowels at a distance of 50 cm;
- lay intermediate logs every 40 cm;
The photo shows a variant of a wooden floor on joists with expanded clay
- the wooden frame is covered with waterproofing material;
- boards are stuffed perpendicular to the joists.
Wooden floor in the garage - photo
Filling the screed
After installing the guides, you can proceed to pouring a cement screed or self-leveling mixture. The solution is poured between the beacons, starting from the wall, and leveled using the rule. It is moved along the profile.
Filling the space with solution, as well as leveling, is done gradually. The mixture of different batches should be mixed so that the future coating does not delaminate, but becomes monolithic.
As soon as the screed dries to the point where you can walk on it, any beacons, except soluble ones, are removed. Leave them only if the floor is dry.
Important! Self-tapping screws and tripods are removed 30 minutes after pouring. To avoid damaging the surface, you should wear studded special boots.
The guides are removed to avoid unpleasant situations. For example, pin beacons are excellent noise conductors. In addition, the guides can lead to the formation of cracks and will begin to bulge when the screed sag.
The holes that remain from the beacons are sealed with screed mortar using a spatula. It is recommended to prime them first to ensure surface strength.
Laying the screed
After the installation of the beacons on the floor is completed, you can begin pouring the floor of the apartment or house.
The work is performed in the following order:
- The required solution is mixed and laid out between the beacons.
- The surface is leveled. To do this, the rule should be moved with smooth movements along the guides towards you. Excess mortar should be moved further along the screed, resulting in a horizontal surface.
- When the screed has set, you can remove the plates and fill the recesses with mortar. Unevenness should be smoothed out using a spatula.
Advice! After finishing laying the screed, before starting further actions with the surface, you must wait at least 28 days, which are necessary for the concrete to harden. It is advisable to wet the surface of the screed for the first 10-12 days to prevent cracks from appearing.
How to set beacons for floor screed?
Korovin Sergey Dmitrievich
Master of Architecture, graduated from Samara State University of Architecture and Civil Engineering. 11 years of experience in design and construction.
Before you start placing beacons for floor screed, you need to prepare the base. The preparatory stage includes the following work:
- the base is thoroughly cleaned of foreign objects;
- dust and concrete deposits are removed;
- chips and holes are repaired and leveled to the horizon;
- a primer is applied to the cleaned and leveled surface of the base;
- waterproofing is arranged;
- find the zero mark.
Nuances of constructing an inspection pit
If the project provides for the construction of an inspection pit, it is necessary to apply markings along which the pit is dug.
When choosing the size of the recess, focus on the following indicators:
- the size of the base of cars that will be located in the premises. Simply put, this is the distance between the wheels;
- room area - the distance between the edges of the pit and the walls cannot be lower than 100 mm;
- the depth is calculated taking into account the sand and gravel backfill, the thickness of the screed, and the level of groundwater. If the horizon lies higher than 2500 mm from the surface, work on constructing a pit will have to be abandoned;
- the width of the structure should ensure comfortable movement;
- length is taken within 2000-6000 mm.
Technology for constructing an inspection pit
When the area where the structure will be placed is selected, markings are made. The pit must exceed the design size by 250-300 mm. In practice, the width is taken as 800-850 mm; an increase is required for walls, waterproofing, backfilling, and compaction.
If the structure is installed simultaneously with the foundation pit, this is the best option. If the garage has already been built, the soil is excavated manually. In any case, a recess measuring 1800*1100*6000 mm is made under the pit. The soil is selected with shovels, lifted with buckets and removed with wheelbarrows from the premises.
The remaining manipulations are subject to the following principles:
- if ventilation will take place under the foundation of the garage, a channel is dug through which a pipe will be laid over the waterproofing layer;
- the bottom of the excavation is compacted using special equipment or a manual tamper;
- The sand and crushed stone cushion is being backfilled. The technology allows for several backfill options. The first is that sand and crushed stone are mixed in a 2:1 ratio and laid on the ground. The second is layer-by-layer application: crushed stone 100 mm, sand 50 mm, crushed stone 50 mm (or sand 100 mm + crushed stone 100 mm), subject to layer-by-layer compaction;
- the bottom and walls of the excavation are covered with waterproofing material (plastic film, roofing felt, membrane). If the most economical option is chosen, the polyethylene film is straightened, stretched, and pressed along the joints and the top edge. It is necessary to overlap and seal the joints with tape. Roofing felt is also laid with an overlap of about 150 mm, with the joints treated with bitumen mastic;
- After installing the waterproofing, ventilation pipes are laid. The first channel should be lowered into the lower part of the pit, the second should be attached to the upper part of the wall;
- if the walls of the structure are built on concrete, reinforcement is required. It is permissible to use a ready-made mesh or you can assemble it from a rod 5-7 mm in diameter with wire knitting. The system should rise above the bottom of the structure by 70-80 mm, for which it is convenient to use bricks. If bricks or blocks serve as the basis for the walls, the reinforcement is placed only at the bottom;
- the solution is prepared on the basis of cement and sand in a ratio of 1:3. It is possible to use gravel with a 1:2:2 ratio shift. The mixing is carried out using M400 cement. To ensure additional water resistance, it is permissible to add liquid glass to the mixture (250 ml per 5 liters of solution);
- The bottom is filled with ready-made concrete. The thickness of the layer above the reinforcement frame should be 40-60 mm;
- the surface is leveled as a rule, left for initial hardening, periodically moistening with water;
- if the work is carried out in a garage with a finished floor, the edges are processed with a steel angle of 100 * 100 mm. The corner is welded so that it protrudes from the edge of the pit inward to a thickness equal to the thickness of the future wall (provided that the walls of the pit will be based on concrete);
- Formwork is installed at the bottom of the pit. Use timber or plywood. The distance from the walls and formwork should be equal to the design thickness of the wall. To strengthen the system, spacers are placed. In general, the edges of the formwork are oriented to match the edges of the metal frame. The system is removed 14 days after pouring concrete - not earlier;
- Mortar is poured between the walls of the pit and the formwork. It is prepared on the basis of sand and cement in a ratio of 1:3;
- after 2-3 days, when the mortar has set, the formwork is increased and the mortar is poured again. This continues until the walls of the pit are completely formed, right down to the metal corner. The formwork is raised to the height of the future screed. The solution should gain full strength;
- if there is a need for external waterproofing of the pit, a gap is left for this. After the solution has gained strength and the formwork has been removed, this space is filled with clay. Very often additional soil removal is carried out. The clay is poured gradually, 200 mm at a time, compacting each layer;
- if subsequent finishing is planned, this stage is implemented after pouring the screed.
Filling is implemented in several approaches. The pouring height at the first approach is 300-500 mm
Finding the zero mark
Before placing beacons for the screed, you need to find a mark to which you can attach subsequent markings. At this stage, the use of a laser level greatly facilitates the work of finishers.
When searching for the zero mark, perform the following actions:
- The laser level is adjusted in such a way that its beams are reflected on all side surfaces of the room in which it is planned to perform the screed. The level of the mark at the initial stage of marking is unimportant; the height is usually set within 1000 mm. On vertical surfaces, a marker is used to mark the line shown by the laser beam.
- Next, you need to measure the distance from the laser mark to the floor level. Such measurements are made in all adjacent rooms at different points. As a result of these measurements, the maximum point of the base is found.
- If the level beam cannot cover all the rooms, it is moved and adjusted to the marks already obtained.
Determining the point of maximum floor height is required for installing screed beacons. Using CPR for pouring requires a thickness of 3 cm or more; a smaller size will not allow you to gain the recommended strength and cracks will appear when standing up. Accordingly, 20-30 mm is added to the maximum level point, which becomes the starting mark.
So, in order to find the required height of the screed, it is necessary to subtract 30 mm from the value of the highest point (for example, 500 mm). We get 470 mm. This distance must be set aside from the original line from which the measurements were taken. This way we get the marking of the future surface of the screed. There are many options for how to place beacons under a floor screed, but all of them, in one way or another, require finding the original mark.
When taking measurements, it is necessary to remember that a concrete base made of floor slabs does not have bumps or depressions in the middle of the room; usually the points with extreme values are on opposite sides.
To avoid mistakes, it is recommended to draw up a paper plan in which you need to mark all the measurements, and duplicate the measurements on the walls with a construction pencil.
Using traditional levels significantly complicates marking, so it is necessary to take measures to find a laser device (for example, rent), which will speed up the process and avoid mistakes.
Using a hydraulic level to find the zero mark.
Preparing the floor for concreting in the garage
It all starts from the foundation. It is advisable to lay a solid concrete slab. But this is expensive, you will need to pay for the work of the crane and workers.
Base structure
Most car enthusiasts prefer to concrete the floor themselves, saving significant money. Below are step-by-step instructions for carrying out the work:
1. You need to choose a soft layer of earth;
2. On the walls of the box, mark the level of the future floor;
3. Lay a layer of crushed stone with a fraction of 30-50 mm up to 50 cm high, compact it, select fragments with sharp edges. A crushed stone cushion will remove excess moisture and increase the load-bearing capacity of the base;
Crushed stone pillow4. Add and compact a layer of sand 15 cm high. With its help, a flat horizontal surface is achieved, settlement is reduced and a slope level of 2% is set to the drain grate or to the garage door;
To compact the resulting pillow, you need to carefully pour water from a watering can onto it.
5. Place waterproofing on the resulting base. When concreting the floor in the garage, this stage cannot be neglected. Since water can approach the concrete slab by rising through capillaries. Suitable for waterproofing:
- roofing felt;
- polyethylene film (250-300 microns);
- roofing felt;
- waterproofing
Features of laying waterproofing
Laying waterproofing
Regardless of the material, it is laid flat, without folds, overlapping, leaving 10-15 cm of margin. The joints are taped with double-sided tape. The waterproofing material is wrapped on the walls so that its edge sticks out slightly after the floor is poured, and fixed to the wall.
When arranging a flooded floor in a garage, you should remember about the compensation gaps, which will be obtained due to the folded insulation;
6. Thermal insulation. If we are pouring and installing a floor for a heated garage, then it is necessary to make the flooring from heat-insulating material (expanded polystyrene) or expanded clay (10 cm thick). The tiles are laid end to end and taped to secure them in place. A layer of plastic film is laid on top. If the garage will be used only in the summer, then this stage is skipped when pouring the floor in the garage with concrete and proceeds to reinforcement.
7. Reinforcement. A concrete floor is strong and durable, but during the shrinkage process it is subject to deformation. Therefore, when making a concrete floor in a garage with your own hands, you should lay a metal mesh.
Floor reinforcement
Features of reinforcement
It is necessary to use class B-1 wire, knit a mesh from it with cells of 15 by 15 cm, or purchase ready-made reinforcement. To prevent the concrete floor from cracking, it is fixed at half the height from the thermal insulation layer.
If the budget is limited, then the mesh is mounted on concrete supports located every 40-60 cm. Next, the mesh is laid, leveled horizontally using a level and fixed with mortar. After 24 hours, work continues in the garage to pour the concrete floor and its subsequent processing.
8. Gaps and slope. Between the walls of the box and the floor, near pipes and pillars, a compensation space of about 5 mm is left. The same polystyrene foam, expansion tape, and plastic profile are suitable for this. When installing concrete floors, you should remember a slope of 2% towards the gate (2 cm per 1 m of length).
There is a classic version of the composition of the mixture and its proportions. One part M 400 cement, two parts water, two parts river sand, four parts crushed stone (5-10 cm fractions). The result will be M 300 concrete. For a self-poured garage floor to be durable, this brand is more than enough. First, cement and sand are mixed, then water and crushed stone. It is optimal to use an electric concrete mixer or order a ready-made solution. But, to save money, the components are mixed manually. Using different proportions, you can get the desired grade of concrete for pouring the floor in a garage of any size and purpose.
Installation of beacons for dry screed installation
The best option for organizing backfilling of dry screed is the use of a metal U-profile. Considering that the leveling bar remains inside after the work is completed, you need to choose only reliable products that can withstand the load of the coating.
It is impossible to install the guide on self-tapping screws; this method leads to damage to the waterproofing.
The use of a U-profile with a wall height of more than 27 mm will allow you to make a high-quality and convenient beacon. It is installed on the base, shelf down, using a solution to adjust the height and secure the beacon. The run-up between profiles is selected based on the length of the rule.
The dry screed is leveled, usually relying on the guides, and after installing the finishing coating, due to the contact of only the profile edges with the base of the finished floor, normal sound insulation is maintained.
Concrete screed device
Laying a reinforcing frame to strengthen the screed
Reinforcing mesh is laid on carefully prepared floors. You can use a ready-made factory-made mesh, or you can make a reinforcing layer yourself using a standard reinforcing bar. If the letter “C” is present in the designation of the reinforcement, then such material can be welded using conventional electric arc welding, otherwise knitting with a special knitting wire is used. After laying the reinforcement, it is raised to the required height with special supports so that the reinforcing belt is located in the thickness of the poured concrete, the layer of which must be at least 50 mm. The minimum thickness of the bar for reinforcing the floor in the garage to ensure the required strength is 8 mm, and the mesh pitch is 10 cm.
At the next stage, control beacons should be made, along which the surface of the poured concrete floor will be leveled. When installing beacons, it should be remembered that in order to smoothly remove water from the concrete floor surface, it is necessary to make a slope of 1-2 cm per 1 meter of length towards the exit or drain grate, if there is one in the garage.
Installation of beacons for leveling concrete mortar
Beacons can be made from a smooth metal rod, a water pipe, or use special purchased products. Stands for lighthouses are made from a quick-hardening mortar of gypsum, alabaster or a mixture of cement and sand. After the beacons have been leveled and the fixing solution has dried, you can proceed directly to installing the concrete screed.
After thoroughly mixing the dry components of the solution, the mixture is mixed with water and evenly distributed over the floor surface. The amount of water added to the mixture depends on the moisture content of the sand and is selected individually in each specific case. Those who want to do the filling with their own hands are strongly recommended to take one or two assistants to this stage of work, who will mix the next portion of the solution while leveling the previous one
It is very important to fill the entire floor surface at one time, with breaks between portions of the solution of no more than 30 minutes. This way you can guarantee the solidity and strength of the entire coating
Filling and leveling the mortar along the beacons
After leveling the surface, the screed should be left for 4-5 hours to allow the emerging water to dry and the poured mortar to pre-set. This time depends on the thickness of the screed in the garage and on the amount of water used when diluting the mixture.
After the excess water has dried, it is necessary to grout the top layer of the screed using a manual metal trowel or, which is much better, a rotary trowel. During grouting, a layer of dry cement or a special reinforcing compound 2-3 mm thick is applied to the surface of the screed, which provides the floors with increased strength, moisture resistance and the absence of dust formation - the main disadvantage of all cement floors.
The entire process of pouring and leveling garage floors can be seen in the video.
Installation of beacons for wet and semi-dry screeds
In finishing work, various types of screed beacons are used, each of which has its own advantages and disadvantages. The easiest way is to install point beacons, but to navigate using such marks you need to have considerable experience in pouring screeds.
Setting the fill level using the CPR is also not difficult, but this option requires a lot of time and also serious experience. It is difficult to install a profile for beacons, but working along such guides is much more comfortable and easier.
To understand how to make floor screed beacons in different ways and choose the most suitable option, you need to familiarize yourself with the order of work for each type of marking.
Linear beacons
For novice builders, it is best to install floor screed beacons with your own hands, focusing on the design of the guides. There are two options for mounting the planks: on self-tapping screws and on mortar.
How to install beacons on self-tapping screws using guides? Initially, you need to prepare the necessary tools and material:
- aluminum rule, at least two meters long;
- laser level;
- hammer drill or impact drill;
- yardstick;
- dowels;
- self-tapping screws;
- bowstring;
- U-profile;
- screwdriver
The number of profile rows depends on the length of the rule.
Number of guides. A – walls, B – guides.
Start marking from the wall. The first self-tapping screw is tightened at a distance of 40 mm from the vertical surface. The height of the screw takes into account the thickness of the profile, i.e. The thickness of the guide is subtracted from the desired fill level mark and the self-tapping screw is tightened to this height.
In the same way, install a self-tapping screw on the opposite side and connect them with a stretched bowstring. Self-tapping screws are placed along the string line with a run of 400-500 mm, bringing them to the desired level. This is how each marked row is installed, after which the height is checked with a level and, if necessary, adjustments are made.
There is no need to worry about how to secure the U-profile to the screw heads. It fits on the heads and holds up perfectly. After pouring is completed, the strips are removed and the screws are unscrewed. The installation locations of the slats correct the central position and bring them into the general horizon.
Mortar beacons
How to properly install beacons from a profile on a solution? You will need to purchase a special mixture for beacons, which hardens faster than the usual CPR. Usually a rotband is used. Any material can be used as guides, but a metal profile is most convenient to use.
Initially, the level required for pouring the screed is marked, and the installation of each guide is marked, taking into account the length of the rule. Focusing on the markings along the line where the guide should be installed, small piles of rotband are laid at a distance of 300-400 mm from each other. The height of each pile is aligned with the fill level minus the profile height, after which you can begin installing the guides.
To fix the profile on the pile, it is grabbed with mortar from the sides, but it must be remembered that the rotband will have to be removed after filling the CPR, so you should not apply too much mixture to install the guide. After pouring, the screeds, profiles and excess rotband are removed, and the unevenness is sealed with mortar and leveled.
The use of alabaster for installing guides is not recommended, since it does not adhere reliably to cement-sand mortar.
Point beacons
Any novice builder can figure out how to install point-type beacons, but for further laying of concrete along these beacons, you will have to invite an experienced craftsman.
The heads of self-tapping screws, set to the height of the pouring level, act as beacons. Self-tapping screws can be installed in the same way as in the version with linear beacons, only a profile is not used.
Beacons from the Central Station
Pouring screed over mortar beacons requires a lot of experience and skill, so this method of installing beacons is used mainly by professional finishers. The beacons are set in the same way as in the case of installing linear beacons on the solution, only without the use of guides.
In order to perform high-quality pouring of the screed along the mortar beacons, it is necessary to begin work only after the mortar has completely risen.
Concrete plates
It is convenient to make a floor from concrete slabs
Before the walls are erected, a concrete slab is placed on the foundation of the garage. This option is more simple and requires less effort, but it is more expensive, since it involves the purchase of a floor slab. In addition, you need to hire a crane, which in itself is not something cheap.
A floor made of slabs will be quite durable, however, it also requires additional finishing, since the slabs themselves have never been perfectly flat, and a cement-sand screed was required to level such a floor. In addition, the slab must be leveled, and most often this is impossible to do by eye, so you have to resort to the help of specialists.
The disadvantage of installing slabs as a garage floor is that they are tied to dimensions, unless, of course, you ordered a product with custom dimensions at the factory. Finished slabs, made according to standards, most often have a certain width and a fixed length. So, if you want to build a garage with a width of, for example, 3.5 m and a length of 5 m, then the width of the slabs can be selected, but only the 6-meter slab will be suitable in length, which will protrude beyond the garage. It may be necessary to pour a monolithic section of concrete next to it - in the end we come to the conclusion that it is better to immediately make a ready-made concrete floor, especially since such work does not require heavy construction equipment and the help of specialists.
Installation of beacons for self-leveling floors
Professional builders do not use beacons when working with liquid compounds. The self-leveling mass evenly fills the space and is installed in the horizon, but this rule is only valid for small areas. If large areas need to be filled, it is recommended to use floating screed beacons.
In such situations, use benchmarks or self-tapping screws.
This small tool allows you to set a limit for a self-leveling screed. The design of the benchmark consists of support legs and an adjusting screw located in the middle, which serves as a measure.
To understand how to install beacons using benchmarks, you need to refer to the instructions:
- The distance between beacons is determined within one meter. Install the devices in a staggered manner on the prepared base;
- By setting a laser mark on the level or using a cord stretched along the marks, set the central screw to the required pouring height;
- After completing the work on filling the floor, the benchmarks are removed, and the small holes left from the legs of the device are tightened themselves.
It’s even easier to build guides from self-tapping screws. Self-tapping screws are installed in pre-prepared dowels in the corners of the room with a distance of 200-300 mm from the vertical surface.
Having secured the screws at the required height, they are connected with fishing line. The result should be two parallel strings along the length of the room. Self-tapping screws are screwed in along the length in increments of 300–400 mm, which are also connected with fishing line across the room, forming string beacons. The result is a fairly convenient marking for filling.
Concreting
The concrete mixture is prepared from cement, crushed stone, sand and water.
In construction there is such a thing as “concrete grade”. It determines what load the material can withstand per 1 sq. cm. or 1 cc. For a garage floor, grade 200 is sufficient. To prepare a concrete mixture of grade 200, grade 400 cement is purchased.
Cement
Next, the components will be mixed in the following proportion: 2 buckets of sand and 5 buckets of crushed stone are added to a bucket of cement. The amount of water depends on how thick the mixture is intended to be made. It is more difficult to work with a thick solution; it has to be constantly “bayoneted” with a shovel and compacted, otherwise unwanted voids are possible. If the concrete is too liquid, then cement laitance, as a rule, initially creates the appearance of a flat surface, but after the water evaporates, holes and depressions will appear on the floor.
The concrete mixer is loaded correctly as follows: first, water is poured, then sand, cement and crushed stone are poured. During the stirring process, the thickness of the mixture in the drum is controlled and, if necessary, water is added.
Concrete mixer
How thick should the floor be? A layer of concrete of 150-200 mm will withstand all kinds of loads with a margin. If a standard size garage (2x3 meters) is being poured, then with a floor thickness of 200 mm you will need 1.2 cubic meters of concrete.
The prepared solution fills the space between the beacons. The concrete mass is leveled by a rule, both edges of which slide along the upper surfaces of the beacons. As a rule, several movements are made until a thin layer of cement laitance appears.
The concrete mass is leveled by the rule
At the same time, while there is access, carefully trim the junction of the floor with the walls or columns with a trowel or trowel.
It is important to remember that well-mixed and densely placed concrete will significantly increase the strength of the coating after hardening.
It is advisable to fill the entire garage floor area in one day, so the necessary materials must be prepared in the required quantities. The pouring work begins on the far side of the garage and will be completed at the goal line.
Installation of beacons for floor screed
Greetings, friends.
Have you decided to renovate and are faced with the problem of uneven floors?
In this case, you will have to level them, because finishing floor coverings such as carpet, laminate or linoleum require a flat floor surface.
The best option for eliminating uneven floors is to make a screed. There are several types of screed - dry, semi-dry and wet. Each has its own disadvantages and advantages, and we will get acquainted with them further. But there is a key point that unites all types of installation - the installation of beacons . The evenness of the floors depends on how correctly and competently the floor screed beacons are installed.
Here you won’t be able to work by eye, and even liquid self-leveling floors require the installation of special benchmarks that control the future floor level.
So, friends, no matter where you are going to pour the screed: in the garage, in an apartment or in a private house - follow my step-by-step instructions for installing beacons. Thanks to them, you will not only save money, but also not lose quality :)
A reliable base for garage flooring
The main problem with arranging a garage floor is that it is located close to the ground, which contains a large amount of moisture. This feature can cause serious trouble to the car owner and cause significant material damage. The concrete floor screed in the garage is laid on the prepared base. Concreting the floor in the garage and installing the floor covering is carried out according to the so-called “pie” principle, which is considered the most optimal option.
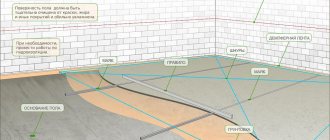
The sequence of layers in the direction from the ground upward looks like this:
- Gravel (crushed stone) embankment. Performs the function of a kind of drainage that helps remove excess liquid and prevent its penetration into the concrete.
- Soft clay or sand. This layer is responsible for removing moisture from the concrete and transferring it to the gravel.
- Strengthening layer of concrete mixture.
- Waterproofing. Thanks to it, groundwater does not penetrate into the floor of the building. The starting layer is made of mastic, and the main layer is laid in two layers.
- Insulating material.
- Concrete screed plus reinforcement.
- Self-leveling floor covering. This layer is poured at the request of the garage owner and is not necessary, but it will significantly improve the quality of the concrete-based screed. By the way, a properly made base allows you to pour inexpensive compounds.
Preparing the base
In order to properly fill the screed, you need to correctly install the beacons, but before that it is necessary to carry out a number of preparatory work. Preparation for screed is similar in essence to preparing the floor for laminate.
- We dismantle the old floor covering to a solid base. If the floors are wooden, I recommend that you disassemble them. In principle, screed is poured over wooden floors, but this is a separate topic. It is necessary to remove all irregularities and flaking pieces. Cracks, if any, in the subfloor are sealed with plaster or mortar.
- Oily or shiny surfaces should be treated with a metal brush to ensure better adhesion to the screed. Then you need to remove all dirt and dust the surface.
- We prime the surface. You can use a roller or brush. The surface is primed in two stages. The second time the primer is applied only after the first layer has completely dried.
- After the primer has completely dried, waterproofing is rolled out on the floor. Typically, a film with a thickness of 200 microns is used for this.
- You need to glue damper tape around the perimeter of the room. This is especially true for unheated rooms. Let's say you need to install beacons in the garage, then sticking a damper tape will be mandatory. It is glued to prevent cracking of the screed, which changes in size due to changes in temperature characteristics.
The preparation of the floor for the installation of beacons is completed and now you need to determine the floor level.
How to make an earthen floor
The cheapest floor is earthen. It does not require financial costs, has a very simple structure, but at the same time it has low strength and strongly absorbs moisture. Such coverage can be done temporarily if the construction budget is very limited. This option is also suitable for those who do not often use the garage and are on the road most of the time.
Arrangement of clay backfill for waterproofing the earthen floor in the garage
pros
- minimal costs in a financial sense;
- no special knowledge and skills are required for its design;
- execution time is minimal.
Minuses
- a lot of dust is generated (especially in dry weather), so keeping the car clean is a pressing and painstaking task;
- dirt in rainy weather from drops of water flowing from the body and wheels of the car;
- in the cold months of the year it will feel cold;
- inability to carry out insulation;
- constant filling and compaction of soil in places where ruts form due to frequent vehicle entries/exits.
The process of arranging an earthen floor is very simple:
- when marking the area for the foundation, the entire plant layer is removed;
- after pouring the base, the internal space is cleared and leveled;
- Using a tamper, thoroughly compact the base;
- when the roof has already been installed in the garage, a layer of greasy clay 10 cm thick is poured onto the floor;
- carefully compact the base.
Prices for soil compactor
soil compactor
The principle of laying a clay floor along guides
You can do without clay, but it significantly increases the strength of the floor and provides good protection from moisture.
Determining the zero floor level
There are two ways to determine the level of floors - using a laser level and without one.
- How to Determine Floor Level Using a Laser Level
We install the laser level in the middle of the room. If available, it is better to use a laser barrier builder.
Using a tape measure we find the highest point. It will be the starting point in calculating the minimum thickness of the screed. To find out how to calculate the thickness of the screed, read this article.
We add the height of the screed to the zero point and get the level at which the beacons will be placed.
- How to determine floor level without a laser level
If you don’t have a laser level, you can do without it. Next to the doorway we mark a point at a height of 100 mm. We mark a line from it along the entire perimeter of the room with a building level.
Using a tape measure, we find the highest point and make a mark taking into account the thickness of the screed.
IT IS IMPORTANT TO KNOW!
According to SNiP, the minimum floor screed cannot be less than 4 cm.
Now we beat off the found screed level around the perimeter of the room.
We drill several holes on the sides of the walls (the number depends on the area of the room), install self-tapping screws and stretch nylon cords, along which the level of the beacons will be set.
Floor insulation
If it is decided to make the floor insulated, then polystyrene foam boards up to 10 cm thick are laid on top of the waterproofing. This can be PSB-S-35 grade insulation.
Facade foam plastic PSB-S-35
Rolls or tiles are placed as tightly as possible, and the cracks are covered with construction tape. After the entire floor area is filled with heat insulation, polyethylene is again spread on top of it. In a heated garage, insulation will save about 20% of the energy used to heat the room.
Installation of beacons for wet and semi-dry screeds
Let's look at the main types of beacons for wet and semi-dry screeds and how to install them.
A very productive and fast method of installing beacons, as it does not require time for the mixture to dry. First you need to purchase mounts for beacons. The most common are Knauff creamers and Zubr fasteners. The kit includes:
- self-tapping screw with plastic dowel
- direct fastening, consisting of two parts
- Mark the locations for drilling holes in 30 cm increments
- We hammer in the dowels and screw in the screws to the required level.
- We put the lower part of the mount on the screws and install the beacon in it.
- We fix the beacon with the upper part of the fastener.
As you can see, it's fast and practical.
Installing beacons on the solution is not difficult. If the first method required special construction beacons, then for the solution you can use improvised means. For example, I used a 20 by 40 mm profile pipe.
- Using pieces of drywall or wooden backing, we set the beacons to the level.
- Mix the solution and secure the beacon
IT IS IMPORTANT TO KNOW!
The drying time of the solution is quite long, so I advise you to use quick-drying mixtures with the addition of gypsum.
3. If you use factory beacons, then first throw on the mortar pads in increments of 40 - 50 cm, and then recess the beacon into them to the desired level.
4. The remaining solution is carefully applied to the beacon for better adhesion.
- Combined installation option
The combined option for installing beacons is a mixture of the first and second methods. It’s just that instead of attaching beacons, a solution or mixture is used.
- Drill holes and screw in screws until they are level.
- Mix the mixture and apply it directly to the screws.
- We recess the beacon until we hit the self-tapping screw.
- Distribute the remaining mixture evenly throughout the lighthouse.
- Lighthouses from solution
There is still a debate among builders about whether to leave the beacons in the screed or not. So, particularly smart installers figured out that it was possible to make beacons from a building mixture. And we will adopt their method.
- We install self-tapping screws along the entire length of the room to the level of the screed.
- We spread the mixture along the entire length of the lighthouse.
- We turn the building rule over and push it down to the screws.
- Carefully remove the remaining mixture with a spatula, forming a beautiful plaster beacon.
IT IS IMPORTANT TO KNOW!
- Beacons for semi-dry screed
Semi-dry screed has a number of advantages over wet screed. This includes speed of installation and hardening time. The installation technology is similar to the creation of mortar beacons.
- We form blobs from semi-dry screed, placing them level.
- After they harden with the reverse side of the rule, we form a beacon along the entire length and wait for it to harden.
- Beacons for floating screed
When carrying out renovations, many people want additional insulation for their floors and use penoplex for this. The screed that lies on top of the insulation is called floating.
» width=»560″ height=»314″ allowfullscreen=»allowfullscreen»>
- We screw in the screws, adjusting from level to level.
- We install beacons using either a mixture, as in the combined method, or fastenings for beacons.
Tips for making your own concrete
We will look at an example of making concrete with an electric concrete mixer. The equipment must be clean and in good working order, connected to power in compliance with all requirements of the PUE and mandatory effective grounding. The concrete mixer works with wet components and is constantly touched by workers. This mode of operation requires unconditional compliance with safety regulations. Concrete grade M 200 is being prepared; it is a mixture of universal use and is suitable both as a load-bearing base for finishing floor coverings and as the main floor of some buildings and structures.
Calculator for calculating the amount of ingredients of a mortar for floor screed
When making concrete, you need to give three and a half parts of sand and five and a half parts of crushed stone for one part of M 200 cement. The proportions are written with the formula 1:3.5:5.5. Water is added taking into account the moisture content of the ingredients and the required density of the solution. Before starting work, it is necessary to calculate the amount of cement, sand and concrete. You need to buy them with a reserve of about 10%. The fact is that it will never be possible to accurately determine the volume of building materials; unforeseen situations always arise that increase the actual consumption.
Example of proportions for preparing concrete
Step 1: Turn on the concrete mixer and pour water into it. Depending on the planned volume of the mixture, you can pour one or two buckets.
The concrete mixer turns on
Water is poured into a concrete mixer
If there is a need to increase the strength of concrete, then various plasticizers and fiber fibers can be added to it. Proportions and technology are indicated by manufacturers on the packaging. You must follow their recommendations exactly.
Step 2. Practitioners advise throwing several shovels of crushed stone into the water; it speeds up the process of cement dissolution. Then you need to add cement in the required quantity.
Gravel is added (crushed stone can be used)
Adding cement
Step 3. After the cement has completely dissolved, begin to gradually add the remaining portion of crushed stone.
Step 4. At the last stage, sand is added. It absorbs water perfectly, and with its help you can precisely regulate the viscosity of the solution. Water is added as needed.
Sand is added at the end
Step 5. The finished solution is poured into a special container or onto a prepared area on the floor. The choice depends on the volume of the solution and the practical skills of the builders.
The solution is almost ready
Beacons for self-leveling floors - benchmarks
If floor differences do not have any prohibitive values, then it would be more advisable to use self-leveling self-leveling floors. Many beginners make the mistake of naively believing that the mixture itself will fill all the unevenness.
When pouring the self-leveling mixture, special beacons are used. You don’t even have to buy them, but make them yourself.
If you don’t want to bother making beacons for screeded floors, you can buy them. A benchmark is a professional beacon, which is a tripod with a rotating mechanism.
By rotating the central bolt you set the required filling level. Benchmarks are placed in 1 m increments. After pouring the self-leveling floors, the benchmarks are removed.
Rubber tiles
Rubber tiles, having a size of 50x50 and a thickness of 1.6 cm, are increasingly used for covering garage floors. It is durable and can withstand heavy loads well, and is frost-resistant, since it is laid not only indoors, but also outdoors - on sports fields. It does not react to aggressive substances such as acids, oil, gasoline, solvents, etc.
Quick to install and very practical rubber tile flooring
This coating perfectly waterproofs a garage floor when it is laid on a level surface of concrete or asphalt.
To install this covering, the locks provided on each tile are used. Laying the material is quick. If the tile locks get to the wall, they are carefully cut off.
After laying the covering, you need to walk around the perimeter of the room with sealant.
Practical use of various grades of concrete
When developing the architectural elements of a building project, architects fulfill two important conditions: they guarantee sufficient strength for long-term and safe operation of the structure and achieve the minimum estimated cost. The higher the grade of concrete, the higher the cost of its production.
Table. What grades of concrete are used during construction work?
As can be seen from the table, it is advisable to use concrete grade M 200 and higher to fill the floor, but in each specific case an individual decision should be made
At the same time, attention is drawn not only to indicators of physical strength and performance characteristics, but also to the cost of the material and the complexity of its manufacture.
Kinds
When choosing flooring in a garage, you can’t go wrong and many car enthusiasts get lost among the large number of options. To make it easier to make the right choice, you need to understand what the main types of garage flooring are.
Concrete floor
Concrete is a traditional and budget material for the specified premises, this is due to the fact that it can withstand high loads, has a long service life and low cost. If cracks or chips have formed on the floor, you can easily fix them with your own hands.
The disadvantage of this coating is that it releases a large amount of dust and if oil, gasoline, or dirt gets on it, they are quickly absorbed and stains remain on the surface. To eliminate these shortcomings, it is enough to cover the concrete floor in the garage with varnish or paint
A concrete floor in a garage can serve as a stand-alone coating or be used as a base for the installation of other finishing materials.
Painted concrete surface
To get a high-quality concrete floor, it is enough to paint it, this will increase the strength, wear resistance and durability of such a coating, and avoid increased dust formation. This is a simple and cheap way to improve a concrete floor, so it is often used in the garage; all painting work can be done yourself using a roller or brush.
Self-leveling floors
In this case, the base is a concrete screed, which is coated on top with a two-component composition consisting of resin and hardener. This material, after mixing, is applied to the finished base and a smooth, strong and durable surface is obtained.
In order for the self-leveling floor to fully demonstrate its characteristics and advantages, its thickness must be at least 5 mm.
This option allows you to obtain not only a perfectly even coating, it can be of different colors and patterns, and looks beautiful in both matte and glossy versions.
Ceramic tile
To obtain a durable and beautiful coating, the floor in the garage can be laid with ceramic tiles. Here you cannot use those materials that are used in residential premises, since under load they will very quickly become covered with cracks and begin to peel off.
The following materials are suitable for the garage:
- porcelain stoneware, which has sufficient thickness and strength, it consists of clay and granite chips and resembles natural stone in appearance;
- clinker tiles, thanks to firing at high temperatures, have high strength, frost resistance and durability;
- Exterior floor tiles are also suitable for garage floors.
PVC plates
This coating consists of separate modules, the manufacture of which uses durable polyvinyl chloride, which is resistant to the chemical effects of various substances. This material can be used not only in the garage, but also outdoors, as it has high frost resistance, is not afraid of moisture, and absorbs shock and vibration well. PVC boards are simply laid using special locks, so their installation is very quick. If necessary, such a coating can be quickly disassembled and laid in another place.
Wooden floor
If you want to make an environmentally friendly floor, you can lay a wooden floor. A wooden floor does not create dust, does not emit harmful substances, is easy to repair and has a low cost.
As a disadvantage of such a coating, it is worth noting its high fire hazard, so all elements must be treated with fire retardants before installation.
Since such a coating will often get wet in a garage, the service life of the boards is about 4-5 years. But not the entire coating deteriorates, but only some boards, which you can quickly and easily replace.
Requirements for a garage floor
Let's start with the fact that pouring the floor in a garage with concrete can be done either at the stage of constructing the foundation, or after the building frame has already been assembled. The first option is preferable because the space is not limited in any way, which makes it more convenient to carry out some operations.
Now about the requirements:
An important component of the technology for constructing a concrete floor is the strength and reliability of not only the body of the floor base itself, but also the sub-base, as well as the outer covering. Everything in the compartment will resist the formation of cracks and subsequent disintegration
Therefore, it is important to consider the loads to which the floor will be subjected. That is, you will have to first take into account the weight of the car for which the garage is being built. Detergents, fuels and lubricants, solvents - substances that have a negative effect on the flooring in the garage
These are aggressive materials that deteriorate not only concrete structures. Therefore, one of the important requirements for a concrete screed in a garage is a durable outer coating that will easily withstand the chemical attack of the above-mentioned materials. The concrete floor structure should easily withstand moisture and temperature changes.
Durable floor coveringSource agora-elles.com
- During the construction process, a slope of the plane must be left so that water flows in a certain direction without forming puddles inside the garage.
- Surface smoothness is not the most stringent requirement. But a smooth floor is easier to clean.
- Fire resistance of the floor is an important factor.
- Long-term operation. Today, concrete floors, as such, even with cementation, are no longer left. They try to cover them with durable flooring material. Fortunately, today the construction market offers them in a large assortment. This is additionally a decorative cladding, plus protection of the floor from the negative effects of gasoline and technical oils.
True, cladding is an additional financial investment, and sometimes a considerable one. And if someone is limited in funds, they should understand that concrete screed cannot be left in its pure form in the garage. It will quickly fail under significant loads. It is recommended to use deep penetration waterproofing for strengthening and some operations that increase the strength of the concrete structure.
Cracked garage floorSource remontik.org