Home |Construction |How to place beacons under a floor screed?
Date: August 28, 2017
Comments: 0
The technology for installing any type of floor covering requires the elimination of defects and unevenness, followed by planning and ensuring the horizontal surface of the floor. In order to level the base, a dry or wet cement-based composition is used, which is distributed evenly over the surface. Beacons for floor screeding are used when performing this operation, serving as a guide, as well as simplifying the process of pouring the base and facilitating the work. Let's dwell on the varieties, figure out how to install beacons for screeds, study the specifics of installation, as well as the technology of implementation.
Peculiarities
In order for the floor finish to look flawless, without wrinkles, cracks and unevenness, it is necessary to first level its surface. Most often, a screed is used for this - a special mixture that is evenly distributed over the entire surface of the room. It is difficult to visually bring even a few square meters under one level, so you have to install special rigid guides - beacons.
Placing beacons is only necessary in some cases; for example, when using a self-leveling floor, they are not needed, since the mixture itself, which has leveling properties, spreads evenly over the entire surface. But for concrete and cement-sand screeds, their presence is simply necessary. The minimum layer thickness for such solutions is 3 cm, and at the lowest points it can be more than 10 cm, so you have to use beacons.
Metal beacons look like hollow pipes, profiles or corners. They can be attached to cement mortar, gypsum plaster or self-tapping screws. Some make them from strong and smooth wooden beams or from the same mortar. The main condition is to maintain an ideal horizontal level on the entire surface of the floor in the room. After the beacons are installed and firmly fixed, they begin to pour the screed.
Why are beacons needed?
Any type of tie requires the use of beacons during manufacture. Even self-leveling floors are best made along guides. Although such a finishing solution has the property of self-leveling. But without beacons, the quality of the fill may suffer.
The use of guides is required when:
- Floor covering with any finishing coating. From linoleum to tiles.
- Leveling the floor with differences in level.
- Arrangement of thermal and waterproofing of the surface.
- Installation of "warm floor".
And the most experienced professional builders, when installing floor slabs, will not be able to position them in the same plane. Changes are always inevitable. And even with successful installation, you need to remember about the shrinkage of the building. But it happens unevenly.
It is simply not realistic in all respects to produce a screed of the required thickness without special devices. Even a talented master will never rely on his eye. In addition, floor beacons also perform additional functions.
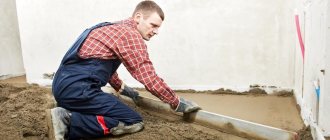
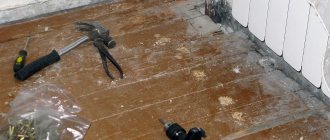
Surface prepared for pouring Source pol-spec.ru
Technologically, it is much easier to carry out backfilling or filling in already fenced areas. They also help to navigate with bringing the floor to the desired level. They can also be used to easily determine the future amount of work.
Various materials can serve as guides:
- wooden slats or bars;
- metal pipes;
- plaster profiles;
- logs;
- adjustable benchmarks;
- profiles for drywall;
- self-tapping screws;
- cement mortar;
- combined options.
The master himself always chooses the material. Any of them will provide sufficient accuracy when pouring the screed. And builders always use the one they are more used to.
Purpose of beacons for floor screed
Beacons for floor screed represent the actual level of the new floor, marked throughout the entire area of the room. Essentially, these are marks (markers) located throughout the room, which are at the same horizontal level. This horizontal level coincides with the pre-made marking of the floor screed level. Beacons for screeds must be installed according to pre-made screed markings and after preparing the base of the floor for the screed.
Briefly about the main thing
It is impossible to make a perfect floor screed using only an eye. Therefore, special devices are used in the work - beacons. They are installed on the base, maintaining a width distance between each other slightly less than the length of the rule. After the solution has set, the guides are removed.
Beacons can be made of any hard and strong material. From wooden slats to steel profiles or pipes. Craftsmen often place guides on self-tapping screws screwed into the base. The latter are easy to adjust during installation, thereby setting the desired level.
Classification of lighthouses
Very often, the functions of beacons are performed by metal profiles, but in addition to them, other materials can be used, for example, pipes or wooden blocks. Depending on the type of screed, the type of beacon and the method of its installation are determined.
Metal profiles
These are guides, sort of “rails” along which the rule is moved, leveling the layer of solution, turning it into an ideal surface. If a thin screed is intended, conventional profiles for plastering work can be used. But remember that these products have a small margin of safety and the solution can deform them. It is better to use more durable U-shaped profiles, which are used for working with drywall.
Advice! In the case when we are laying heavy concrete mortar, we can increase the strength of the lighthouse by putting two U-shaped profiles together.
Wooden lighthouses
These are blocks of wood (30 x 30 mm), which are first soaked in water so that they do not subsequently absorb liquid from the mixture; Moreover, their evenness is checked before and after the “water procedure”. The leveling of the bars is done by placing pieces of wood or wedges, after which they are attached to the base with self-tapping screws.
Important! Since a humid environment contributes to the rotting of wood, it is recommended that when the screed hardens a little, remove the wooden beacons and fill the resulting cavities with concrete mixture.
Landmarks made from concrete composition
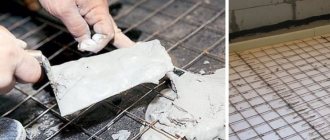
This technology of placing beacons on the floor using only cement-sand mortar is quite painstaking, but it is worth it, since they do not have to be removed after pouring the screed, that is, the beacons become part of it. The process algorithm looks like this:
- We screw self-tapping screws into the floor along the entire length of the lighthouse, adjusting their height above the floor according to the level;
- We stretch steel wire between the screws (the number of rows of wire depends on the thickness of the screed), which serves as a reinforcing element;
- cover the entire line of screws and wire with mortar;
- As a rule, we give the structure the required height, focusing on the heads of the screws;
- We form a narrow concrete path, which will serve as a beacon.
Important! Beacons of this kind must be given time to dry completely in order to give them the required strength (about two to three days).
Benchmarks
A bench mark is a tripod with an adjustable central rod, which allows you to set the desired tie level. Benchmarks should be placed on the floor in a checkerboard pattern in 1-meter increments. After the fill begins to set, such landmarks can be easily removed.
Lighthouses made of wooden slats
The use of wooden slats is becoming less popular today. They are usually chosen when you need to save on the amount of materials and you need to create coatings of minimal thickness. With wooden slats it is more difficult to achieve evenness. Therefore, this option is not convenient for beginners; it is usually used by professionals.
A semi-dry screed is more suitable for this work. The slats themselves must first be soaked so that they do not later draw moisture from the solution.
Their device is made according to the level, first they operate from scratch. The height can be adjusted using wedges, screws, or spacers. After installation, the floor is poured, and after setting, the wooden slats are carefully removed. The resulting gaps are filled with the same solution that was used for the main part of the work.
They are usually chosen when you need to save on the amount of materials and you need to create coatings of minimal thickness.
Dimensions
It is best that the beacons for the screed are solid, spanning the entire width of the room. If their length is not long enough, then you can change the installation across the room.
It is also worth remembering the standard sizes of different types of profiles:
- plaster beacons T-shaped 10x26 or 6x21 mm have a length of 2.7-3 m;
- guide profiles, rack-mount, ceiling profiles can be 2.75, 3, 4 and 4.5 m;
- bent profiles can reach a length of 6 m.
Tubular beacons with a rectangular or round profile come in different lengths, depending on their purpose, but most often it does not exceed 6 m.
What kind of wire is needed for string beacons?
What to use as a string for beacons?
The first and most common option (1) is stainless steel wire (GOST 9389-75). The string can be made of wire, which remains after electricians pull the cables in the corrugation (4).
What are strings for lighthouses made from?
The string may also be made of thin cable (3). When assembled, it is more compact, but cuts a wedge when plastering.
Another option is copper-plated welding wire (ER 70S-6) with a thickness of 1.2 mm. It is designed for semi-automatic welding of various types of steel (2).
Which ones are better to choose?
It is quite advisable to pour a floor with minor differences of up to 3 cm under profile perforated plaster beacons, those that are used for walls. Their advantages are that they are cheaper than metal profiles for gypsum boards or profile tubes, they are very lightweight and can be easily cut with metal scissors. Their standard cross-sectional dimensions are 10x26 or 6x21 mm, the most common length is 3 m.
Plaster perforated beacons can be secured to a quick-hardening gypsum mixture, metal or plastic fasteners. The best of them are “ears,” which are thin metal plates with a hole in the middle and small curved ears. Such fasteners are mounted to the floor using ordinary dowel screws. The advantage of fastenings for beacons with “ears” is that there is practically no gap left between the floor and the beacon, this allows you to save on screed mortar.
To perform screeds with high differences, when a layer of more than 3 cm is needed, it is best to use metal profiles for gypsum plasterboard. The required length and width of the guides are selected, then they are cut and mounted under the level using mortar or screws. Their surface is smooth enough to guide along them with a rule.
If the width of the floor being poured is large and requires several layers of thermal insulation, protection from steam and moisture, then the best option is profile pipes installed on cement or gypsum putty mixtures. The design is strong, rigid, and allows you to pour a floor screed on top of penoplex, mineral wool, polyurethane foam, polystyrene foam and other insulating materials.
Installation of beacons for different types of screeds
Beacons for dry screed
Dry screed is made from expanded clay. These are small clay balls that are scattered into a “tray” and compacted. This method has many advantages, but the main thing is warmth, simplicity and purity.
According to technical documentation, the minimum height of the embankment should be at least 30 millimeters, so ordinary beacons will not be suitable. The best option is a plasterboard profile with a thickness of 27-30 millimeters. Subsequently, it will be possible to place sheets of drywall on it.
So how to set beacons for floor screed? First you need to set the level. The upper plane of all beacons should be the same, so it is better to place them on “splashes” of plaster or cement (more on this below).
Afterwards, the distance between the beacons is filled with expanded clay into a level and leveled using the rule. There is no need to wait for drying and hardening - everything happens quickly.
By the way, after the beacons can be easily removed and the gap filled with expanded clay.
Beacons for semi-dry screed
Semi-dry screed is a mixture of sand and Portland cement with water. For it, ordinary construction beacons are used, as for walls. Typically the screed has a height of up to 5 centimeters. The beacons are placed according to the level on the mortar “bugs”.
Beacons for arranging a floating screed
Beacons under a floating screed are installed on polystyrene foam with reinforcement. It is better to watch the video for more information about this method.
Installation of beacons for wet and semi-dry screeds
In finishing work, various types of screed beacons are used, each of which has its own advantages and disadvantages. The easiest way is to install point beacons, but to navigate using such marks you need to have considerable experience in pouring screeds.
Setting the fill level using the CPR is also not difficult, but this option requires a lot of time and also serious experience. It is difficult to install a profile for beacons, but working along such guides is much more comfortable and easier.
To understand how to make floor screed beacons in different ways and choose the most suitable option, you need to familiarize yourself with the order of work for each type of marking.
Linear beacons
For novice builders, it is best to install floor screed beacons with your own hands, focusing on the design of the guides. There are two options for mounting the planks: on self-tapping screws and on mortar.
How to install beacons on self-tapping screws using guides? Initially, you need to prepare the necessary tools and material:
- aluminum rule, at least two meters long;
- laser level;
- hammer drill or impact drill;
- yardstick;
- dowels;
- self-tapping screws;
- bowstring;
- U-profile;
- screwdriver
The number of profile rows depends on the length of the rule.
Number of guides. A – walls, B – guides.
Start marking from the wall. The first self-tapping screw is tightened at a distance of 40 mm from the vertical surface. The height of the screw takes into account the thickness of the profile, i.e. The thickness of the guide is subtracted from the desired fill level mark and the self-tapping screw is tightened to this height.
In the same way, install a self-tapping screw on the opposite side and connect them with a stretched bowstring. Self-tapping screws are placed along the string line with a run of 400-500 mm, bringing them to the desired level. This is how each marked row is installed, after which the height is checked with a level and, if necessary, adjustments are made.
There is no need to worry about how to secure the U-profile to the screw heads. It fits on the heads and holds up perfectly. After pouring is completed, the strips are removed and the screws are unscrewed. The installation locations of the slats correct the central position and bring them into the general horizon.
Mortar beacons
How to properly install beacons from a profile on a solution? You will need to purchase a special mixture for beacons, which hardens faster than the usual CPR. Usually a rotband is used. Any material can be used as guides, but a metal profile is most convenient to use.
Initially, the level required for pouring the screed is marked, and the installation of each guide is marked, taking into account the length of the rule. Focusing on the markings along the line where the guide should be installed, small piles of rotband are laid at a distance of 300-400 mm from each other. The height of each pile is aligned with the fill level minus the profile height, after which you can begin installing the guides.
To fix the profile on the pile, it is grabbed with mortar from the sides, but it must be remembered that the rotband will have to be removed after filling the CPR, so you should not apply too much mixture to install the guide. After pouring, the screeds, profiles and excess rotband are removed, and the unevenness is sealed with mortar and leveled.
The use of alabaster for installing guides is not recommended, since it does not adhere reliably to cement-sand mortar.
Point beacons
Any novice builder can figure out how to install point-type beacons, but for further laying of concrete along these beacons, you will have to invite an experienced craftsman.
The heads of self-tapping screws, set to the height of the pouring level, act as beacons. Self-tapping screws can be installed in the same way as in the version with linear beacons, only a profile is not used.
Beacons from the Central Station
Pouring screed over mortar beacons requires a lot of experience and skill, so this method of installing beacons is used mainly by professional finishers. The beacons are set in the same way as in the case of installing linear beacons on the solution, only without the use of guides.
In order to perform high-quality pouring of the screed along the mortar beacons, it is necessary to begin work only after the mortar has completely risen.
Linear parameters of the created beacon system
What rules should be followed when placing a beacon system on the floor surface:
- First of all, direction. As a rule, the direction of the beacon lines or installed guides is always (with rare exceptions) parallel to the long side of the room, i.e. exactly the way it will be poured. If the configuration of the room requires changes in the direction of pouring at its final stage, then the beacon system can repeat this pattern.
- The distance from the outer guide to the parallel wall should not exceed 250 ÷ 300 mm. If this is not observed, when pouring, areas with a low level may appear along the wall - dips that will have to be added additionally.
The rule must move freely along the guides with a certain margin on the sides
- The distance between adjacent lines of beacons is, in principle, arbitrary. They are approximately evenly distributed across the width of the room, but taking into account that the rule by which the screed will be leveled protrudes on both sides of the beacon lines by 150 ÷ 200 mm.
There are, of course, exceptions to this issue. So, for example, to lay a dry screed, you may need 6 ÷ 7 support guides per 3 meters of room width, regardless of the length of the existing rule.
General practical advice
Despite the existence of a large number of methods for installing beacons under floor screed, professional builders have developed general tips for all cases.
Tip #1
Before starting work, it is recommended to check the condition of the base using an ordinary lath or a long rule. Apply the tool along the diagonals of the room, then at several points around the perimeter. As a rule, install a long bubble level; with its help, try to hold the tool in a horizontal position and measure the gap between it and the plane of the base. The purpose of the preliminary inspection is to detect the area of the floor with the maximum protrusion. If it is small in area, then it is much more effective to cut off the protrusion with a hammer drill than to increase the thickness of the screed by several centimeters. This not only speeds up the work process, but also reduces the estimated cost of floor installation.
Bubble level for construction
Tip #2
If you don’t have a laser device, you can set the level of the beacons using an old water level. By the way, this is the most accurate instrument in nature. No modern laser can compare with water in these indicators. A water level is an ordinary flexible transparent hose filled with water; it can be painted in different colors to improve visibility. The water level works according to the fundamental law of physics - the law of connected vessels. This means that the liquid level in such vessels will always be the same; it is leveled by gravity.
Water level
You need to make marks using this level in the following sequence. You need to work with an assistant; you cannot complete the markings alone.
- Place a mark on the wall at a distance of about a meter from the floor, the specific height does not matter.
- Place one end of the water level to this mark, the other end should be located against the opposite wall. Achieve a position so that the water level on the wall coincides with the zero mark on the hose; in this state, make a mark for the location of the water level at the second end of the hose. Both lines will be strictly horizontal.
- Using the same pattern, make marks around the entire perimeter of the room and connect them with lines using upholstery rope.
- Now you have a horizon throughout the room, use it when placing beacons.
How to use a water level
At first glance, it seems that working with a water level is much more difficult than working with a laser level. This is not true, it all depends on the practical skills of the performers. Of course, a laser device has many significant advantages; you need to know them and use them in practice. But the ability to use traditional measuring instruments will always be useful in life.
Tip #3
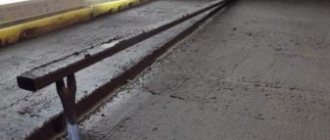
There is a method for installing beacons on a line made of cement-sand mortar. In essence, it is not much different from those described above, only under the metal profiles, not individual buns are made, but continuous tubercles of the appropriate height. Professionals try to use this method whenever possible. Its disadvantages are fully compensated by its advantages.
Lighthouses are installed on a line made of cement-sand mortar
There are two disadvantages: an increased amount of solution is required to install beacons and its preparation requires additional time. But when laying the screed, significant time savings are achieved. The fact is that it is necessary to push a mass under the freely sagging beacon profiles; this takes a relatively long time and is very inconvenient. If the beacons have a solid base, then there is no need to push anything anywhere; the screed is made faster and easier.
Tip #4
The accuracy of the beacons depends on the parameters of the finishing coatings. If the screed for joists may have deviations of up to 1–2 centimeters in the corners of the room, then for linoleum the tolerance range is reduced to several millimeters. Keep this in mind and, in accordance with technological requirements, adjust the screed tolerances. There is no point in wasting time on excessive screed precision if the quality of the floor finish does not depend on it.
The accuracy of the beacons depends on the parameters of the finishing coatings
Tip #5
Never rush, the time required to re-check the position of the beacons is always much less than the time required to redo the tie. There is no need to talk about the price of the work. If you have absolutely no experience in performing this type of work, then it is better to practice in utility or technical rooms, and only then work on living rooms.
Beacons for screeds are checked
How to find the zero mark
To create a perfectly flat plane near the future floor, it is necessary to correctly mark the room by level. To do this, you can use a conventional hydraulic one. But working with a laser analog will give more accurate results.
Working with a water level Source ppt-online.org
The device is installed in the center of the room according to its manufacturer's instructions. The laser pointer is fixed at a height of one meter and is first directed at any of the walls. A mark is made on it. Moving the pointer in a circle, you need to repeat the operation with each wall.
By the way. Experienced craftsmen claim that such a procedure can be performed easier and faster with a simple water level. And no less accurate. From arbitrarily placed marks on any of the walls, points are marked on the others.
The resulting marks are connected by a line to obtain the base level. Now you need to measure the distance from it to the base of the floor near each wall. The smallest one is selected from the results obtained. This size is laid out on each partition from the base line strictly vertically down.
The newly plotted points are again connected to each other by a solid line. And this marking is considered level zero. This should not be confused with the floor level. To get the latter, you need to do some calculations. To do this, sum up all the elements of the future finishing coating. For example, the height of the joists and the thickness of the floor board. Or a layer of glue and tile parameters.
Screed level Source sense-life.com
Do I need to clean up after?
Since metal profiles or plaster beacons are made of metal, over time they tend to rust. Even in a dry environment, the material can oxidize and form rusty stains or cracks. Therefore, it is best to remove thin profiled beacons after pouring, when the mixture has not yet had time to dry and become extremely strong. For T-shaped beacons, their upper edge is clearly visible above the screed; you can pull them out with the corner of a spatula. If the floor is already dry enough and the mortar has set, then you will have to remove the beacon using a pick or chisel with a hammer.
After removing the plaster beacons, grooves remain in the flat floor, which can be easily leveled using the same solution that was used for the screed. You can also seal cracks after removing the profiles with gypsum plaster. Pointed beacons-benchmarks in the form of metal tripods are easy to remove from a fresh screed thanks to sharp legs with a smooth surface. Also, immediately after pouring, you need to remove the plastic markers.
It is quite difficult to remove tubular beacons from a poured screed. Typically, such thick guides are left in the finished floor, plus they additionally reinforce the concrete layer.
Plastering walls along strings.
After installing the strings, the technology remains almost unchanged:
- Lubricating the lighthouse with some mixture to prevent sagging during the application of plaster. The mixture for lubrication is different and depends on the situation. It can be gypsum, cement-sand or glue.
- Plastering the surface after the compound has hardened.
- Removing the wires and sealing the places where they were installed.
But there are cases of “perversion” of this method, when easy ways are not sought. Two horizontal beacons (along the strings) are made only in order to additionally place vertical plaster ones along them:
Zero level
The zero level is a horizontal line along the entire room, which is decisive when calculating the fill height. Correctly set zero level is the key to the success of arranging any screed. The sequence of work is as follows:
- we step back up from the floor, say, 1 meter and set the starting point;
- using a level (laser or water), from this point we draw the initial level along all the walls of the room;
- Using a staff and a marker, we take measurements and determine the largest and smallest distance from the original level to the surface of the base;
- we calculate the difference between these two values and, based on this, determine the type of screed (whether it will be made with self-leveling mixtures, or using a concrete mixture, with or without reinforcement, and so on);
- the point with the shortest distance from the original level to the surface of the base is the starting point for the zero level, which we draw along the entire perimeter;
- Having determined the type of screed, select the thickness of the fill; we set this value upward from the zero level and draw another line along which the landmarks will be set (that is, the upper part of the beacons should be at the same height as the markings on the wall).
The most important task is to draw the “zero” line
All subsequent work will only gain some meaning if the zero level is very accurately determined, corresponding to both the horizontal and the required thickness of the future screed.
To work, you will need a water or laser level (the second, of course, is preferable - it will greatly facilitate the process).
Water level
You can, of course, use a building level, but in this case it must be quite long (1.5 - 2 m), very precisely calibrated, and the worker himself must have an excellent eye, since an error with this method is most likely.
Building traditional level
- So, on the wall of the room, in the corner, which, according to a preliminary visual estimate, is located higher than the others, a mark is placed. Its height from the floor can be arbitrary, but it is better to choose, firstly, a multiple value, and secondly, such that it is more convenient to work - for example, 1.5 m.
Punching a reference horizontal line
- With the help of the mentioned devices and tools, the level of this mark is transferred along all the walls, in order to connect the resulting marks with a solid straight line around the perimeter of the room. If everything is done correctly, then the line should close at one point, without the slightest difference in height. This reference line can be useful later not only for pouring the screed, but also for carrying out some other finishing work.
- The distance from the reference line to the floor surface is carefully measured every 0.5 m. The obtained values are recorded on paper or simply on the wall surface (if possible). Now, by simply comparing the results, the highest point of the floor along the perimeter of the room is determined - this is the place where the obtained value is the smallest.
In the example, there is a clear excess of 50 mm
- If you have already decided on the minimum thickness of the future screed, then you can proceed to beating the so-called zero level. At the highest point, mark the required height from the existing base. Let, for example, it be 30 mm - this is the minimum thickness a concrete screed should have to ensure its strength and solidity.
- Next, you can do two things. So, you can apply the method already described above and draw a zero line along the floor surface in the same way. This is not entirely convenient at such a height. Therefore, you can do it easier - measure the distance between the marked mark and the reference horizontal line. Then transfer this value strictly vertically at several points on the walls, so that the distance between the marks allows you to draw a line using an existing ruler. The resulting line, completely outlining the perimeter of the room, will be the zero level.
- It’s too early to limit ourselves to this. In construction practice, it is rare, but still there are times when the floor level in the center of the room is slightly higher than near the walls. This is easy to check - you need to stretch the cord between opposite walls along the zero mark, and check the distance between it and the floor in the center of the room. This check is done in several places. If the distance between the cord and the surface is less than the required minimum thickness of the screed, then you will have to move the zero level up slightly - to the height required to ensure the required thickness.
If everything is normal, the zero-level tapping can be considered complete.