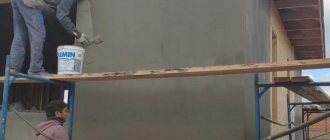
Plastering walls is one of the stages of renovation of premises. Application of the mixture may be necessary in a new building with bare supporting structures or in older houses with uneven or dilapidated walls.
Non-professionals often have questions about what mixture to choose and how to apply it correctly; for this you need to know the characteristics of different types of materials and their scope of application. If a beginner takes on the job, then you should start with the basics, with what plaster is, what compositions there are, whether you can apply them yourself or entrust the work to professionals.
When choosing a material, it is necessary to take into account a number of features: the properties of the mixture itself, the characteristics of the base, and the method of application. The combination of these factors determines the appearance, service life and quality of leveling.
Plastering walls poses a big task - to level out the unevenness of the base wall by applying a concrete or gypsum mixture. And sometimes to give the surface a decorative look. Depending on the composition and size of the drops, it is performed in different ways.
Types of plaster
The main principle for choosing plaster is its purpose. It is necessary to consider where the work will take place: indoors or on the facade. What properties should the mixture have, and what is the base for finishing made of?
All plasters are divided into three large groups:
- simple (for leveling the surface);
- special (compositions with additives to improve individual characteristics);
- decorative (finish coatings that do not require additional processing).
Interior plastering of house walls requires that the composition be safe and smooth out perfectly. For outdoor work, a mixture that is resistant to adverse environmental factors is required.
Cement
Dry mixture of cement and sand. The ratio of components in the composition is on average 1 to 2-5, respectively. Before application, mix with water to the consistency of thick sour cream.
Cement plasters are used for interior and exterior work. To improve plasticity and adhesion, plasticizers and PVA glue are added to the composition. When working in rooms with high humidity and outdoors, add slaked lime to the solution.
Apply 3-5 layers. The maximum thickness of one is no more than 20 mm, optimally 10 mm. The total thickness of the coating can reach 100 mm, but reinforcement will be required.
The task of this composition is to level out unevenness for further finishing. Suitable for brick, concrete and wooden bases. Before application, prime the surface, then plaster the walls in three stages (spray, primer, cover).
It is applied manually and by machine, leveled with spatulas and a rule.
Plaster
The mixture is based on gypsum powder, fine filler and polymer additives. It does not tolerate moisture and temperature changes well, so it is used only for interior work. Sold as a dry mixture for preparing a solution with water.
The maximum layer thickness without reinforcement is 5 cm. Can be applied to any substrate. Suitable for creating a smooth surface for painting or wallpaper. It dries in just a few hours; the finished solution must be used within 40 minutes.
The technology for plastering walls with gypsum composition differs from cement. The mixture is applied in one layer, leveled with a rule, minor irregularities are corrected with a spatula.
Decorative
Mixtures of decorative plaster perform two functions at once: they hide minor defects and give an aesthetic appearance. No additional finishing is needed. Pigments and insoluble granules from stone, sand, and plastic are added to such compositions.
Depending on what mixture and technique of plastering the walls is chosen, a different pattern, relief, pattern or texture is obtained.
Produced on acrylic, silicone, silicate and mineral bases. If you follow all the rules for plastering walls, it adheres well to any substrate. There are compositions for external and internal work.
Silicone
Silicone-based compounds are used for external and internal plastering of walls. The mixture remains flexible even after drying, thanks to which the surface is not afraid of sudden temperature changes and mechanical damage. It tolerates moisture well, so it is suitable for finishing bathrooms and kitchens.
The finished surface can have a “Bark beetle”, “Lamb” relief or imitate marble (Venetian). It all depends on how to plaster the walls, what tools to use and what size and shape of the solid particles in the composition.
Sgraffito
Sgraffito is not a separate type of plaster, but a method of applying it. Using this technique, you can create carved color designs. As a result, the plastered walls look like real paintings.
To create a beautiful effect, pigments are added to compositions based on different bases and the plaster is applied in several layers that differ in shade. Next, patterns, ornaments, and figures are cut out on the dried finish.
Decorating walls with sgraffito plaster requires skill and experience. A person who knows how to draw and work with the mixture can cope with this task.
Venetian
These mixtures imitate a smooth or textured marble surface. It contains a polymer binder or lime, pigments and mineral dust. Since the plaster needs to be applied in 5-6 layers, the work takes a lot of time. To obtain a marble pattern, the mixture is applied unevenly, gradually creating a play of shades.
Depending on how the plaster is applied to the wall, the intensity and depth of color, contrasts and texture of natural stone vary.
Textured
Textured plaster creates an imitation of stone, wood and leather. It can contain any binder and solid fillers of various fractions and shapes. The larger they are, the more pronounced and relief the pattern will be.
This plaster is used for interior and exterior wall decoration. For the former, the fillers are thinner, so the texture is elegant; for the latter, the fillers are large, creating a rough relief.
What mixtures should I use?
The choice of putty mixtures is huge. They differ:
- quality;
- technical characteristics;
- at a price.
The following mixtures are suitable for working with wallpaper:
- Acrylic-based polymer putties. Their advantages: easy to apply to different surfaces, easy to sand, have a high degree of protection, and additionally strengthen the base.
- Water-dispersion mixtures. Popular because they are suitable for different types of surfaces, durable, strong, and easy to work with. They are produced in dry and ready-made form.
- Cement-gypsum putties. They form a durable layer, are easy to apply, and are moisture resistant. The compositions are sold in dry form and are diluted with water during preparation.
- Plaster. They are easy to apply and process, are not afraid of moisture, and practically do not shrink when dry.
Putty compositions are:
- Leveling (starting). Used to apply the first layer. They help remove significant differences on uneven grounds and hide their defects. The starting mixture is applied in a layer of 1.5 cm. To improve the adhesion of the material to the surface, craftsmen recommend using a painting mesh.
- Finish. Apply a small layer before wallpapering the walls. They remove all small irregularities and create a perfectly smooth surface.
- Universal. Suitable for applying both first and second layers.
Preparation of the solution
Upon completion of the formation of the beacons, they begin to prepare the solution, mixed on the basis of a purchased dry mixture.
To obtain the composition of the required condition, it is recommended to use the instructions located directly on the packaging. It describes in detail the required proportions for manually diluting the powder with water.
Manual cooking
The instructions for preparing the finished solution indicate approximate data on the mixture consumption, taken per square meter. Thanks to this information, you can determine in advance the volume of solution needed to finish the entire room. To do this, it is enough to calculate the total area of the surfaces being treated and multiply it by the consumption rate.
When working with gypsum-based plaster, it is recommended to dilute it in small portions, which is explained by the rapid setting of the working composition. Once this has happened and the solution has dried, it will no longer be possible to dilute the plaster again, so you will simply have to throw away the frozen mixture.
Mechanical mixing
In order to facilitate the mixing of the finished solution, they resort to a mechanical method of preparing it, for which you will need to stock up on a special construction mixer. With its help, the solution is prepared according to the following method:
- At the initial stage of mixing, the required amount of water is poured into a previously prepared container.
- After this, the dry mixture is added to it in small portions (according to the proportion indicated in the instructions on the package).
- Next, begin mechanical stirring using a mixer, adding portions of dry powder to the container as necessary.
As a result of such manipulations, a moderately thick and fluid composition is obtained. Its condition is assessed by a trowel inserted into the solution, which must remain calmly in an upright position. In addition, the solution placed on the trowel must be firmly held on its plane.
The best way to plaster walls
Which plaster is best for leveling walls depends on a number of factors: the size of the differences in the base surface, resistance to moisture, type of finishing coating, operating conditions.
| Criterion | Cement | Plaster | Decorative |
| Amount of irregularities | Up to 100 mm | Up to 50 mm | From 8 to 17 mm |
| Moisture resistance | Yes | No | Yes |
| Finish coating | Suitable for tiles, wallpaper and painting (subject to puttying) | For wallpaper and painting (no puttying required) | No additional finishing needed |
| Operating conditions (temperature, humidity) | from -50 to +80 degrees, at any humidity | From +5 to +30 degrees Celsius, only for dry, heated rooms | From -50 to +75 degrees, tolerates humid environments well |
| Recommended application | Facade of the building, rooms with high humidity (kitchen, bathroom, industrial buildings) | Bedroom, children's room, corridor | Depending on the type of binder, you can choose a composition for external and internal work |
Important! Plastering walls in an apartment requires the mixture to be environmentally safe, so using the composition for exterior work indoors is prohibited.
Applying plaster to the wall can be done with different tools: wide and narrow spatulas, or a special machine. For decorative compositions, rollers with embossed attachments, a trowel, an applicator, and brushes are used.
Advantages and disadvantages of gypsum solutions
An excellent alternative to cement would be gypsum plaster. It is suitable for leveling walls in rooms with little moisture. This type of cladding is not used for external processing.
The disadvantages include the rather high price, especially in comparison with cement ones. Gypsum is also afraid of water, so it is not recommended to mix a large volume of plaster at once; it may simply dry out.
The advantages include high plasticity and ease of application. You can level the walls almost immediately after applying the plaster, which significantly speeds up the work. It has excellent sound insulation properties and also does a good job of retaining heat in the room. The layer dries quickly enough, so you won’t have to wait long for the result.
Advice! When choosing gypsum plaster, remember that it must be applied quickly so that it does not have time to dry out. Dry finishing is not suitable and is usually discarded.
The main advantage is the ability to apply a thick layer. Therefore, it is better to choose it specifically for the final leveling of the wall. In addition, one layer is usually enough for complete leveling, and as a result you get a smooth and even wall.
Ways to level walls
It is already clear which plaster is best to choose for leveling the walls; all that remains is to determine the method of applying it to the surface.
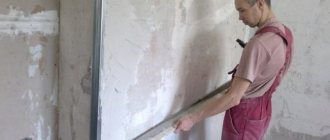
Plaster can be applied to walls in two main ways: without beacons (by eye) and using beacons. The first method involves applying and leveling the mixture with spatulas, a rule or a trowel; it is suitable if the surface has slight differences of up to 2-3 cm. The second method is more reliable and accurate. For it, a plane of metal profiles is pre-set on the walls.
You can determine the size of the differences using a plumb line or building level, and then choose which wall plastering technology is most suitable.
Plastering the interior walls of an apartment is often done without beacons, since the differences are usually insignificant. In industrial buildings with high ceilings, it is better to use beacons.
Types of plaster beacons
Plastering walls along beacons involves the use of different types of slats. They can be homemade or ready-made. Ready-made beacons are also divided into different categories. Ready-made ones include metal profiles made of aluminum or galvanized, as well as corner strips, which can be found in hardware stores. Homemade ones include guides made from plaster mortar, as well as even wooden slats (used when plastering wooden bases).
Types of lighthouses
When constructing mortar beacons, “islands” with a flat top are made around the screws with mortar. A rule is placed on the hardened “islands”, under which the solution is poured so that there is no gap left between the rule and the wall. Gypsum beacons are made when walls are leveled with gypsum plaster.
Excess mortar is cut off vertically with a spatula. In this way, according to the rule, a rectangular edge is created from the solution. When the mortar edge begins to set, as a rule, it is first shifted along the vertical axis and then carefully removed from the edge. After the solution of plaster beacons has hardened, fill the recesses and pores on the upper side of the rib with a spatula, achieving the creation of a flat supporting surface (on which the rule will be followed when leveling with the beacons).
Required tools and materials
To plaster walls you will need a large set of tools and materials:
- A hatchet or hammer with a pick (for removing old coating or protruding parts);
- Brush (for applying primer);
- Primer composition suitable for the type of base;
- Plumb line or building level (to control the plane during work);
- Square (for drawing out corners);
- Large capacity (for mixing the solution);
- Construction mixer;
- Plaster spatula and trowel (for adding mortar to areas where there is not enough of it);
- Wide and narrow spatulas;
- Guiding beacons;
- Rule and grater (to level the layer);
- Plaster corners (for reinforcing external corners).
In order for plastering walls with your own hands to be of high quality, you need to study the technology of applying the mixture. If you are a beginner and not confident in your abilities, it is better to entrust the work to professionals than to plaster the walls again. They have all the materials for plastering walls, and they know exactly what is best for plastering walls.
Dry or wet plaster?
The procedure for preparing walls for subsequent finishing may differ slightly. Depending on the conditions of subsequent use of the room and the timing of the work, craftsmen choose wet or dry plaster.
In the first case, a special solution is applied to the base, consisting of the main component and a number of additives. The dry powder is mixed with some water and then applied to the base. Drying time depends on the composition of the plaster, humidity level and room temperature. Cement-based coatings take longer to dry than gypsum coatings.
When dry plastering, sheets of plasterboard are installed. The material is attached to the sheathing or directly to the wall. In the latter case, the base must be fairly level. As a result, there is no need to wait for the applied layer to dry, which significantly reduces the time required to complete repair work. Another advantage of dry plaster is the absence of dirty work, during which the floor and other surfaces become dirty. In addition, there are no strict requirements for the qualifications of the master. The entire range of work can be completed on our own.
At the same time, when installing plasterboard sheets, seams are formed, which complicate finishing work. Wet plaster ensures the formation of a continuous surface. In this way, you can prepare walls in all rooms of the apartment, and dry plaster is only suitable for residential areas with a normal level of humidity.
When choosing between wet and dry plaster, most prefer the first option. Thanks to it, it is possible to form a durable monolithic coating with a sufficient level of strength that can withstand external mechanical influence. plasterboard sheets are afraid of exposure to moisture and significant temperature fluctuations, which can occur if no one permanently lives in the apartment. However, if the time frame for completing repair work is limited, installation of plasterboard sheets is preferable. With their help, you can not only level the walls, but also build partitions and decorate window or door slopes.
Attention! When choosing a finish, operating conditions are important. If you plan to attach shelves or cabinets, you should avoid dry plaster.
Preparatory stage
Preparatory work consists of surface treatment before applying the first layer of plaster. The nature of the work is determined by the type of foundation:
- Preparing the brick surface. For better adhesion, you need to fix the reinforcing mesh or make indentations in the mortar between the bricks. Next comes cleaning of dust and debris and priming.
- Preparing concrete walls. If the material is not very dense, shallow cuts are made with an ax, then treated with concrete contact.
- Foam block surfaces are coated with a deep penetration primer.
- Preparing wooden walls for plaster. It is necessary to fill the diagonal slats in increments of 5 cm so that the solution is better retained on the surface.
There should be no large protrusions, loose old coating, metal elements, dust or debris on the surface of the walls. Once the base has been prepared and the primer has dried, you can begin the process of applying plaster.
The procedure for plastering walls
After the solution of the required condition is ready, proceed to its application to the surface to be treated. To do this you will need a falcon, a trowel, grout and a building code. The procedure for applying the composition to the wall is as follows:
- First, the prepared solution is taken from the container using a trowel, and then spread over the surface of the falcon held in the left hand.
- After this, with fairly sharp and energetic movements, he throws himself onto the surface of the wall in the intervals between the beacons.
- The sharper and more vigorously the mortar is thrown with a trowel, the better the plaster will adhere to the base.
- The solution should be applied from the bottom of the wall, gradually moving through its middle to the ceiling.
- As soon as the next strip of the wall is completely covered with plaster, they move to the neighboring area and work on it closely, leaving the first one until it dries completely.
- After some time (usually 15-30 minutes are allotted for this), you should return to the previous section, the surface of which is brought to the level of the beacons by means of a rule.
- For this purpose, it will have to be laid flat at the level of the marks, and then carefully moved upward, simultaneously removing all excess solution.
By alternately performing all the procedures described above and moving along the wall (strip by strip), after some time it is possible to cover the entire surface with the solution. Having finished with this, all that remains is to remove the beacons, and then carefully plaster the recesses remaining from them. After this, the well-leveled surface of the plaster is left for about an hour, during which time it will probably set. At the final stage of finishing operations, finishing of the finished wallpaper coating is organized. To do this, take a grout, and with its help the surface of the plaster is carefully smoothed with smooth movements made from the bottom up.
In the final part of the review, we note that everyone who wants to independently prepare walls for wallpapering has the opportunity to organize and carry out these activities if they carefully study the proposed material. All recommendations contained in it fully comply with the requirements of current standards and are based on the experience of professional craftsmen.
Application technology
Plastering walls begins with preparing the solution. To do this, the dry mixture is diluted with water in the proportions recommended by the manufacturer. Concrete and brick walls are moistened with water so that the plaster takes longer to set and does not lag behind the surface.
The plastering technology includes three stages. This is the sequential application of three layers of a mixture of different thicknesses and thicknesses.
Instructions for plastering walls with your own hands:
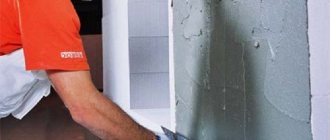
- Spray. This layer is the most liquid in consistency. It is thrown onto the surface using a trowel with little effort. Then they are slightly leveled with a falcon. The thickness of the plaster layer is 5-10 mm.
- Priming. When the first layer has set, but has not yet dried, apply the second layer. It is thicker and thinner. It is placed on the falcon and applied to the wall, then leveled with a wide spatula using sweeping movements. One portion of plaster should be enough for approximately 1 square meter. area.
- Covering. Layer thickness 2 mm. The solution should be thick. Apply to hardened soil. Its task is to level out all minor irregularities. The mixture is no longer thrown on, but spread with a spatula, pressing the sharp edge to the surface. Apply using bottom-up movements. You can move in an arc. After the mixture has set, the surface is rubbed with a trowel.
Other methods of applying plaster are also practiced. For example, in one layer, without splashing. This method is suitable for those who do not have professional skills, since only a person with experience can properly plaster walls.
Criteria for choosing plastering technology
Different types of plaster, even those made by professionals, differ in the quality of roughness:
- Cement-sand mortars are not suitable for gluing paper wallpaper, since even high-quality grout leaves a strong roughness. Thin wallpaper requires smoothing with putty.
- Lime plaster made with a coating allows you to paste wallpaper with a thicker canvas, as well as duplex wallpaper.
- High quality surfaces can be achieved by treating gypsum plaster even without puttying, which is necessary for photo wallpapers and silk-screen printing.
Several types of wallpaper do not require such ideal surfaces:
- vinyl;
- glass fiber;
- non-woven fabrics;
- liquid wallpaper.
Vinyl wallpapers
Non-woven wallpaper
Glass wallpaper
The first three types are due to the thickness of the canvas, the last are the characteristics of the material, as well as the technology of its application.
According to SNiP (updated version of standards 3.04.01-87), the quality of the surface intended for wallpapering can be of two categories:
- K3 - under panels on a paper or non-woven basis, the presence of traces of processing with abrasive materials up to 0.3 mm deep is acceptable.
- K4 - under glossy and metallized thin wallpaper, any scratches are not allowed; there should be no shadows when illuminated from the side.
Application of liquid wallpaper
Grouting plaster
The last stage of plastering is grouting. Its task is to bring the surface to ideal smoothness. Grouting of the surface must begin when the last layer of plaster has hardened. The work is carried out in stages using different tools:
- Grout with a trowel onto the wooden surface of the set covering layer. You need to smooth out the spatula marks and bumps. Performed without pressure in a circular motion.
- Smoothing with a felt grater using sharp, straight movements.
- Smoothing with a grater with a rubber or metal strip. These tools prepare the surface for painting. Movements first vertically, then horizontally.
After grouting, the wall is cleaned of dust and coated with a primer. You can proceed to further finishing when the surface has dried well.
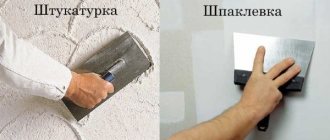
Plaster and putty: differences
Without being an expert, you can get confused about the difference between putty and plastering. The technology is the same - prepare the solution, apply it to walls, ceilings or other surfaces.
But there is still a difference:
- Puttying is carried out with solutions based on gypsum (less often, other components containing only fine particles). The master uses putty to finish leveling the surfaces, which after completion of the work are smooth. Plaster is intended for rough leveling or creating a decorative effect. The fraction of particles in it is larger.
- You cannot putty the outside of the building. External putty, intended for finishing facades, exists, but it is inferior to plaster in all respects.
- You can only putty the prepared surface, and not the “bare” masonry. There is no such problem with plaster.
- Surfaces are puttied exclusively by hand, while machine plastering is a proven, effective technology.
Rice.
1. Plaster and putty There are other differences regarding the tools used in the work and other aspects. These are different, independent technologies, each of which was created for its own tasks.
What is lighthouse plaster?
The process of leveling walls with beacons begins with installing profiles that will set the desired level.
Installation of beacons is carried out as follows:
- A self-tapping screw is screwed into the wall near the ceiling and floor, and their position is leveled using a plumb line. Their caps should be in the same plane.
- Measure the distance between the screws, subtract 5 cm and cut off a profile fragment equal to the obtained value.
- Draw a line between the screws with a pencil.
- Throw the plaster solution onto the line in 3-4 places with tubercles, press the profile into them so that its plane meets the heads of the screws. Remove the fasteners.
- Repeat the procedure at a distance of no more than 1 meter from the first beacon. Thus, a plane is created along all the walls of the room.
At this point, the installation of the beacons is completed, and you can begin to apply the first layer of the mixture. After the plaster has been completely applied, the beacons are removed and the areas where they were located are leveled.
How to putty drywall
Very often, builders assemble plasterboard partitions too quickly, and therefore the quality of work suffers. The fact is that not every builder is a master at using a spatula, and responsibility for puttying the partition, unfortunately, passes to the owner. But if you use the guide and still try, you can achieve an excellent result.
Self-tapping putty
The main condition here is that the screws need to be well sunk. Before you begin to putty, run a putty knife along the plasterboard sheet. If the screw is not sunk well, the spatula will stumble. The irregularities need to be recessed inside the sheet; to do this, use a screwdriver. Next, use a primer, wait for it to dry and start puttingty. It is advisable to process all screws separately. To achieve a smooth surface, putty the drywall locally, this will improve the quality of the work.
When you have completed the putty, let it dry for 24 hours. Next, go through the sandpaper and check the evenness of the surface; if there are unevenness, putty again.
Seam putty
First you need to prepare enough putty. Apply the first layer of putty to the entire seam, and then use a serpyanka. Gently apply it to the new layer of putty and use a putty knife to press it inward. Next, apply a second layer; it should cover the serpyanka completely. Then wait until the layer dries and sand.
Puttying internal corners
Here you will have to try very hard, because you need to apply the putty on both sides of the corner at once. After this, gently press the serpyanka, but make sure that it is distributed between the walls very clearly and evenly. When the procedure is completed, cover the tape with one layer of putty. Then everything is as always - leave the putty to dry for one day, and then use a spatula to clean the wall from dried bumps and treat it with sandpaper. If there are any irregularities left somewhere, you will have to apply putty again in these places.
Putty on external corners
You will need a metal corner to facilitate the putty work and save the corner from damage. A very durable and comfortable corner - galvanized, it will last longer and will not break after one blow. When you cut the corner to height, you need to make the ends pointed, just trim each side from the side. Next, apply one coat of putty to the two outer sides of the corner and gently press the corner to the desired size. Apply a second coat of putty and cover the corner, but very often a third coat is needed. If you wait for the putty to dry, but you are not satisfied with the quality, apply a third layer and smooth out all the unevenness.
Plastering walls with your own hands
You can apply plaster yourself if the differences are not very large and the layer of the mixture does not exceed 2-5 cm. Only mixtures for rough leveling and easy-to-work decorative ones should be applied. For example, decorating a wall with Venetian plaster with your own hands without experience is too reckless. Compositions that are difficult to work with are best left to professionals.
Some formulations can be prepared independently. Cement plaster consists only of cement and sand; knowing the required ratio of components, you can prepare a mixture.
How to make plaster:
- Pour cement of at least M200 grade and 3-4 times more sand (depending on the fat content of the composition needed) into a large container or concrete mixer and mix dry;
- Pour in water in small portions until the desired consistency is obtained, stirring the mixture periodically;
- To improve plasticity, you can add a little detergent (at the rate of 30-50 ml per 5 liters of water).
The finished mixture must be used within an hour. Since plastering with your own hands can take a long time, you should not prepare a lot of solution at once.
If we plaster ourselves, then we need to take care to protect the skin from the composition, as well as cover the furniture and floor in the room where the work is taking place.
Since plastering walls with your own hands without any experience is not easy, you can first watch a video of how the craftsmen do it.
How to choose the right materials?
It’s not news to anyone that before gluing wallpaper, the walls need to be not only plastered, but also puttied. Such actions help you create the most even base with your own hands and ensure high-quality fixation of the wallpaper to the wall.
Plastering the wall
Of course, if experience and knowledge allows you, wallpaper can be glued directly to the plaster. The service life of such adhesive will be an order of magnitude shorter, but by performing the work adhering to certain rules, the number of risks can be reduced.
When purchasing all the necessary materials, you need to pay attention to the following nuances:
- You can immediately glue only medium-density wallpaper onto the plaster, because due to low adhesion, the strip can fall off under its own weight, and all the unevenness of the wall will be visible from under the thin roll;
- select the right leveling solutions (it is better to choose materials that contain gypsum binders, in this way you will achieve high-quality wall covering and effective penetration of glue);
- Do not under any circumstances use plaster with coarse sand fractions under wallpaper (coarse-grained compositions reduce the level of wallpaper pasting by 35-45%, and fine-grained compositions, although they are more expensive, can significantly reduce the cost of putty).
We plaster the wall under the wallpaper in the room.
Also, for the work of gluing the walls, you will need consumables for grouting, such as emery, mesh with an abrasive coating, etc. Whatever one may say, you will not be able to properly level the surface with your own hands, so you will need to use a machine method, which will require high-quality sandpaper.
Saving Tips
You can save significantly on plastering walls in an apartment only if you prepare the solution yourself and apply it yourself.
You can reduce costs a little more by using materials sparingly:
- Dilute the composition with water in small portions so that you have time to use it;
- Carefully monitor the differences in the wall; perhaps in some places it is enough to cut off the bumps and the mixture consumption will be reduced;
- Apply only two layers without covering, but this is acceptable if the differences do not exceed 1-2 cm.
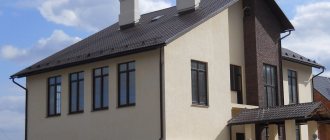
Plastered walls improve the heat and sound insulation of the room, acquire a flat and smooth surface, ready for further finishing with thin coatings - wallpaper and paint. Some types of compositions also have decorative functions. You can apply the mixture in different ways, but it is important to do everything correctly, otherwise the coating will not last long.
Share in the comments your experience of applying rough and decorative plaster without any skills.
Preparation of the solution
There are three possible options here:
- preparing the mixture by mixing the components yourself;
- dilution of the SS composition with water or a diluent;
- mixing the finished plaster dough before use (with or without adding a small amount of liquid).
If you prepare a mixture yourself from components purchased separately, then you need to follow the sequence of mixing the constituent substances.
DSP is prepared in the following order:
- Bulk dry substances (sand, cement powder, perlite, stone chips) are placed in the container;
- stir;
- prepare the liquid separately (lime milk, water with a plasticizer, etc.);
- while stirring, gradually pour the liquid into the dry mixture until the desired consistency of the solution is achieved;
- The composition is allowed to “rest” and brew for about 5 minutes, after which it is stirred again.
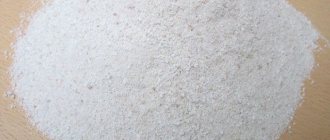
Preparation of dry mixtures
Mixing the solution
Ready-made solution
If the mixture is prepared in a mortar mixer, then it is permissible to first pour some water into it, then add other components. The remaining water is added little by little, controlling the consistency of the dough.
Purchased SS are closed following the manufacturer's instructions, which are in the detailed instructions on the package. The prepared mixtures in buckets are also mixed before use to restore homogeneity to the composition. If the plaster solution is painted, it’s time to add color.
Some plaster compositions have their own nuances. For example, perlite sand is very dusty. It is moistened before kneading. In addition to knowledge about the rules for preparing the base, you will need information about how to properly apply the plaster itself to the walls, in what sequence, how long and how it should dry.
How to prepare the base for plaster
The first stage is preparing the surface on which the plaster will be applied. The features of the process depend on the material of the walls, but there are several general rules:
- Remove old materials. If we are not talking about renovations in a new building, before plastering the surface, you will have to remove wallpaper, old dried plaster, traces of paint, etc. from it. If this is not done, the solution will not adhere properly. There are different techniques for quickly and easily removing coatings: for example, for glass wallpaper you can use special removers, and for paper wallpaper a sharp spatula is often enough.
- Inspect the area and remove defects if necessary. It is better to plaster walls that have no cracks or chips, so all noticeable defects must be repaired in advance.
- Clean the base from any dirt. If there is soot, oil stains, or other contaminants, they are removed. If there are no noticeable stains, you can simply wash the surface with clean water.
- Take care of good adhesion. Improving adhesion is an important stage of work that should not be skipped when plastering walls with your own hands. To increase the adhesion of wall materials, various methods are used.
Preparing brick walls
When plastering brickwork, you need to take into account the specifics of the material. If the masonry is old, even before starting work it is worth assessing whether it needs repairs. If there are loose, unreliable bricks that fall out, they are removed, cleaned of mortar, and laid on fresh masonry mixture or polyurethane foam. Protruding uneven areas (for example, traces of hardened mortar) are removed.
To properly plaster brick walls, you need to ensure good adhesion. A popular method of improving adhesion is notching, which is applied over the entire surface. To do this, you can use any available tools: for example, a hammer and chisel or a hammer drill. Notches improve adhesion and are especially important for walls made of smooth brick.
The last step in the preparation of brick bases is a primer for walls, which you can purchase in our store in bulk. You can choose any composition suitable for brick.
Preparation of concrete surfaces
To improve adhesion, you can also use the notching technique before plastering concrete walls. Shallow (approximately 0.5 cm) recesses do not affect the strength of concrete structures, but significantly increase adhesion. Additionally, primer treatment is performed: it creates a film on the surface to which the plaster mixture adheres well.
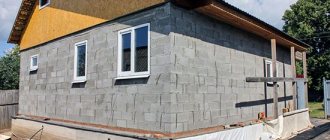
Features of working with aerated concrete
The aerated concrete surface to be plastered can be prepared in different ways. One option is cutting out notches and then treating them with a penetrating primer. You can also mount a reinforcing mesh, which will not only improve adhesion, but also increase the strength of the structure. Light non-metallic meshes, such as fiberglass, are well suited for aerated concrete.
If cracks or other damage to the aerated concrete masonry were discovered before plastering work, they must be repaired. For small defects on interior walls, gypsum wall putties, which you can buy in Minsk, are well suited.
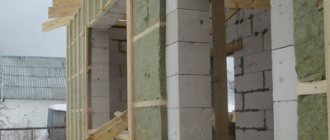
Preparation of wooden surfaces
Wood has poor adhesion to plaster, so wooden structures must be prepared for work. If the house is new, you need to wait until the building shrinks before plastering the walls. In order for the solution to stick to wooden bases, shingles are stuffed onto them or a mesh is installed.
Using shingles is an old method that was used decades ago. To obtain a reliable base with good adhesion, thin wooden slats are nailed to the base crosswise, in increments of 4-5 cm. As an alternative, you can use plaster mesh - metal or polymer.
Features of wooden walls
Wood is an environmentally friendly, breathable material. Houses made from it have an optimal microclimate for health. But it has a drawback - exposure to moisture and high temperatures. Therefore, in such houses plaster is still used:
- In traditional wooden log houses - in bathrooms, the area where the stove and fireplace are located.
- In buildings made of timber - according to a similar principle, as well as in basements and semi-basements.
- In frame buildings, plastering and putty often become the main materials.
It is rarely possible to do without plaster at all. Even its targeted use allows you to extend the life of the building.
Final recommendations
Optimal materials for different types of walls
The most versatile are gypsum-based plasters, which are applicable in most types of buildings.
| Cement-sand | Plaster | Cement-lime | Acrylic based | Silicone based | |
| Aerated concrete | Acceptable | The best option | Acceptable | Acceptable | It is forbidden |
| Brick | The best option | Acceptable | Acceptable | Acceptable | Acceptable |
| Concrete | The best option | The best option | Acceptable | Acceptable | Acceptable |
| Foam block | Acceptable | The best option | Acceptable | Acceptable | Acceptable |
| Tree | Acceptable | The best option | Acceptable | The best option | The best option |
Manual or mechanized plastering?
Machine plastering is faster and cheaper compared to manual plastering. At the same time, the quality of work and its speed are higher due to automation of application.
| Hand plastering | Machine plaster | |
| Speed of work completion | from 10 sq.m/day | from 40 sq.m./day |
| Finishing | needed | surface ready for finishing |
| Average cost of work | 420 rub./sq.m. | 220 rub./sq.m. |
| Foam concrete plaster | Yes | Yes |
| Brick plaster | Yes | Yes |
| Concrete plaster | Yes | Yes |
| Foam block plaster | Yes | Yes |
| Wood plaster | Yes | limited |
Functions of plaster inside buildings
Plastering is performed both as the main finishing and as an element of preparing surfaces for the application of finishing decorative and finishing materials. Theoretically, if you plan to install roll, sheet or panel decorative materials, the walls and ceilings do not need to be plastered.
This is done because plastering allows you to solve the following problems:
- increasing the strength of structures;
- improvement of sound insulation properties;
- improved thermal insulation;
- additional moisture protection;
- plane alignment.
A “bare” wall, which is simply blocks, is unsuitable for wallpapering or painting. It needs processing. Even a small layer of plaster can be used as a surface ready for painting or wallpapering, or a base for other materials.
Rating of plaster mixtures for interior work
When deciding which plasters to choose for the walls of an apartment, it is more rational to divide the space:
- dry rooms;
- to places where humidity periodically rises.
For the former, the best option is gypsum plasters. As practice shows, in the end, repairs will cost less time, effort, and money. There will be a healthy microclimate in the room, the walls will not suffocate. In addition, owners will save their nerves, since repairs are a semi-stressful state.
For the latter, it is possible to use the three types of plaster considered:
- It is advisable to use gypsum materials that the manufacturer allows for use in wet areas with protective measures taken.
- Cement mixtures (for strong bases) are used where there is a possibility of direct contact of the plaster with water.
- Cement-lime compositions can be an alternative to cement when plastering rooms with high humidity.
For a beginner, choosing plaster for facade or interior work becomes a difficult task. Choosing the right CC means creating better protection for the apartment walls for many years, providing residents with comfortable conditions, reducing in advance the possible risk of unplanned repairs, and economically managing the contents of your wallet.
Internal plaster and its differences from external
Technologically, the plastering of a house outside and the treatment of surfaces (walls, ceilings) inside the building differ little from each other. In both cases, similar actions are performed. But unlike exterior, interior plastering of walls made of brick, aerated concrete, foam block, and other materials is more demanding in terms of quality.
When performing external work, visually minor defects in terms of plane, angles, etc. insignificant. Firstly, large areas hide problems, and secondly, decorative finishing is often applied, which is used for finishing leveling.
Inside, surface treatment should be close to ideal, since all corners turn into clearly visible quality markers, uneven planes will be noticeable. Even if subsequent puttying, laying of lining or other types of finishing is expected, it is easier to decorate smooth, well-plastered walls and ceilings in such a way as to obtain a 100% aesthetic result.