Advantages of the material:
- large size of blocks, thanks to which work is carried out quickly;
- light weight of the material, which ensures ease of transportation and the ability to be easily carried around the facility;
- low solution costs;
- low price compared to most other materials for construction.
Along with this, the use of cinder block for construction also has disadvantages, for example, the fact that the material actively absorbs moisture. Therefore, it is practically not used for the construction of residential buildings.
To ensure that the material does not crumble and is not destroyed as a result, it must be finished. Therefore, plastering cinder block walls is a mandatory process. Moreover, this must be done in the first time after completion of construction, since the material begins to deteriorate almost immediately. It must be said that in order to slow down this process, the construction of the structure should not be carried out in the autumn-spring season, when it rains and the snow melts. Dry summer months are ideal.
So, let's look at how to plaster a cinder block wall with your own hands so that the building is protected from external destructive factors and lasts as long as possible, maintaining the necessary microclimate inside the building.
How to decorate the facade of a cinder block house
Author: How to decorate the facade of a house.
Created: May 14, 2012. . Published in: Finishing of facades Most building materials used for the construction of houses: concrete, foam block, cinder block, brick (not facing) require further finishing work in order to give the facade of the building a high-quality appearance. What is preferable to cladding a private house, let’s try to understand the proposed options.
We have a fairly large selection of cladding; you can use suspended facade systems, decorative plaster mixtures, natural and artificial stone, ceramic and concrete tiles, and finally ordinary brick. Let's summarize the data.
Hanging facade systems.
A curtain façade is essentially a false wall on a metal frame, located at some distance from the main wall, onto which finishing material is hung. The most important advantage of this system is the ability to insulate the walls of the house and by insulating the outside and not the inside, free space in the rooms is not lost. Relevant for cinder block houses that need to be insulated. Another advantage is the large selection of finishing materials.
Developers of high-rise buildings, when faced with the need for façade cladding, in most cases use hinged ventilated facades with modern materials, such as aluminum composite panels (alucobond), but these materials are slightly unsuitable for a private home. The house will stand out with its office or shop appearance among private buildings, which will not be to everyone’s taste.
The most popular facing materials are vinyl and metal siding, less often ceramic and fiber cement panels, and porcelain tiles.
Vinyl siding is the most inexpensive and practical solution to give the facade of a private home a look, but it is not the most successful, since the plastic is electrostatic and attracts dust. And if the facade is also required to give a high-quality aesthetic appearance to the entire house, then the striped look of either vinyl or metal siding will not help with this.
Ceramic and fiber cement panels, porcelain tiles and some types of metal siding are currently the best facade materials that will give the building a magnificent appearance; they offer a wide selection of colors and textures: imitation of stone and brickwork, timber, wood structure and decorative plaster . It is difficult to give a specific recommendation here; when choosing, you must proceed from what you like best and from the manufacturer’s guarantees.
Decorative plaster mixtures.
Perhaps the most popular type of facade finishing.
The technology is quite simple, ordinary sand plaster on which a layer of decorative mixture is applied to create a relief surface of the walls and then painted with paint. If it is necessary to insulate the walls, before plastering, first insulating material is attached to the walls, mainly polystyrene foam and then mesh, so that the plaster holds well. The most popular wall surface textures are: fur coat - already known as one of the few facade materials of the Soviet era and bark beetle - a pattern similar to the life activity of this insect. The result is an original, durable and mechanically resistant surface. The only thing you need to do is choose high-quality facade paint. Paint not intended for facade work fades in the sun.
Natural and artificial stone.
One of the best materials in luxury construction that will help to adequately refine and give individuality to a private home.
There are many materials that imitate the structure of stone, but why use a fake if there is a time-tested material - natural stone. Marble, granite, shell rock are some popular types. In the cities of the North Caucasus, finishing with Dagestan stone is common; tiles and decorative elements are cut from it. Artificial stone has the properties of natural stone, but at a more affordable price.
The installation technology is not complicated, stone and stone tiles are glued to the cement-adhesive mortar, and a special grout is used for the seams.
Ceramic, clinker and concrete tiles.
Most people are already familiar with concrete slabs; essentially, they are paving slabs that have been increased in size and given a certain shape and structure.
Conditions on the walls are more gentle than on the ground and the tiles have a longer service life. In addition, it has a low price, which will be useful if you have a modest budget. Ceramic decorative tiles are generally the same as those used on curtain walls, only they are attached directly to the wall using mortar.
Clinker tiles will help you get a brick facade of a house, for which it is not at all necessary to use natural bricks.
Brick cladding
Brick as a finishing material is of course possible, but it is correct to take it into account at the design stage, for pouring the appropriate foundation and laying the main walls together with brick ones, for a strong connection with the walls. Houses whose owners have neglected this rule can be recognized by the iron ties located at the top and bottom of the walls, which are designed to prevent further discrepancies in the brickwork.
And finally, one cannot fail to note the simplest and most affordable option for finishing a house made of cinder blocks - simply paint it with facade paint. As they did during the construction of a five-story building in Mineralnye Vody in the photo.
Step-by-step instructions for plastering walls
The plastering process is simple:
1. A plaster mesh is attached to the surface using dowel-nails; 2. Beacons are displayed; 3. The wall is wetted with water - using a brush or sprayer; 4. The surface is primed; 5. The solution is poured onto the mesh; 6. The plaster mixture is leveled using a rule; 7. Grout.
Methods for plastering “fur coat”
Cinder concrete buildings are plastered in a certain way and a relief is created. This method of applying the solution is simple and economical: the composition is diluted with water by approximately 1⁄2. Using a large brush, spray the walls. From the first time the “fur coat” looks modest, so the spray is repeated 4 times (drying intervals for the previous layers are required).
Methodology and qualitative components of coating leveling.
• On a plane, usually without using beacons. The walls are visually aligned. The method is applicable when there is no need for perfect alignment of walls in the horizontal and vertical directions. • Plastering according to control beacons. It is used if there are unevenness or deviations at the base and it is necessary to create an even rough finish.
How to insulate a bathhouse or house made of cinder blocks
It is better to insulate cinder block buildings inside and outside.
To insulate walls you can use:
- foil; expanded polystyrene; polystyrene foam; mineral wool; basic insulation.
The choice of materials is quite wide and varied, so the choice of how and with what to insulate the walls of buildings made of cinder blocks depends only on you. It is worth noting that insulation will become more effective if you use different materials.
It is especially important to properly insulate the walls of the bathhouse so that they effectively retain heat. Good insulation will help reduce fuel costs.
Cinder block is an ideal material for building baths; it is not subject to rotting, it is not susceptible to fungus or mold. A bathhouse made of cinder blocks stands out for its fire safety.
But, although porous cinder blocks retain heat remarkably well, they easily absorb water. Because of this property, the cinder block loses all its positive qualities. Therefore, in order to prevent the formation of dampness inside the blocks, they are insulated.
Cinder blocks have gained wide popularity in the building materials market not only due to their low price, but also because all the necessary equipment for the production of cinder blocks can be purchased and made at home. The economic benefits of making cinder blocks yourself are quite obvious; in addition, you will not need to look for carriers to deliver the finished material.
However, we should not forget that any violation of production technology can lead to a deterioration in the technical characteristics of the cinder block. You can read about the main ones in this article.
Stages of insulation work
- wooden slats are placed on the interior walls; insulation is placed on the slats; they are covered with aluminum foil or foil film on top (this is another layer of hydro- and thermal insulation); wooden slats are stuffed onto the foil and finishing material is attached to them. The slats help create an air gap.
For external cladding, a ventilated facade is installed and the walls are also insulated, especially in the place where the steam room will be located. For finishing, you can use siding or other facing materials, but most often cinder block buildings are plastered on the outside.
Today, the construction market offers a new, modern method of insulating walls made of cinder blocks, which can be used both in a newly built room and in an old building.
Thermal insulating foam is introduced into the hollow cinder block through a pre-prepared hole or two, if the cinder block is double-hollow. The foam supply hose is inserted alternately into each of the holes. As a result, the building is insulated and sound insulation is increased by filling the voids with foam.
Composition options
It must be said that some components may not be entirely safe, let's look at a certain standard option for the mixture:
- Water.
- Knitting element.
- Filler.
- Supplements
We will get a standard mixture for cinder blocks, which we will decompose into the following components:
- The binder is Portland cement . Most often used in all brands of products.
- If cement is used, then it is best to use the M 500 grade , it will reduce cement consumption and increase the strength of the product, that is, at the end we get a reinforced cinder block.
- You can often see the use of slow-hardening gypsum as a binder.
Example of a reinforced product
It is worth mentioning separately about the filler, because it is with it that the greatest number of disputes are associated, or rather with its safety.
Here is the most complete list of what we can do with our own hands and distribute into a form:
- Plain sand of any origin.
- Screenings of crushed stone, both river and granite.
- Expanded clay.
- Any type of slag, as it is, can be toxic.
- Ash.
- Sawdust and peat.
- Marble chips.
- Expanded polystyrene.
- Break of brick, concrete, glass.
It turns out that depending on the filler we get such a “gap” in weight terms.
Broken bricks for cinder block production
Important! The selection of a mixture should be based not on the availability of one or another component at hand, but on the features and characteristics of the weather conditions of a particular area. And based on this point, you can adjust the mixture as you like.
By the way, the instructions for producing the material are somewhat different from what we encounter when working, for example, with concrete. The principle is the same, but the proportions are different.
For cinder blocks, we use the proportions of 1 part cement to three parts sand and 5 parts filler. There is no point in saying that a small concrete mixer is best suited for optimal mixing! In addition, the mixture must be well mixed into a homogeneous mass so that all components can communicate as much as possible.
And yet, we can often see colored cinder block, which may not be so common, but, nevertheless, it is present in construction on a par with ordinary material.
The colored version of the wall stone is impressive
It is quite easy to achieve color; for this, either colored chalk or crushed red brick is added to the mixture at the manufacturing stage. Depending on the color scheme, we get the desired appearance of this product.
How rational is this? In principle, this option can be successfully used in the construction of cinder block fences, decorative pillars, and pediments.
An original type of building, isn’t it?!
How are cinder block houses insulated from the outside and inside?
The use of cinder blocks in the construction of structures is economically beneficial and the dimensions of the material elements allow achieving high speed of construction of the walls of the house. But its insufficient thermal insulation properties and the ability to lose strength under the influence of critical temperatures forces thermal insulation, with the help of which the required level of durability of the structure will be achieved, as well as the ability of the structure to accumulate heat will be increased.
Next, we’ll look at how to insulate a cinder block house, the main points of this process and the materials that are used for this.
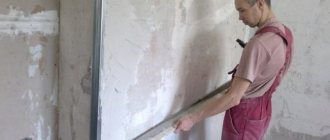
Plastering cinder block walls with your own hands
Cinder block is quite popular today in the construction of country houses.
Garages and even residential buildings are built from it. After completing all work on the construction of the building, you need to think about what material to use for finishing. It could be plaster. Among its main advantages, we should highlight not only its low weight, which does not put a load on the foundation, but also its attractive appearance, as well as ease of application. Plastering cinder block is usually done with a mixture to which lime is added. For easy application, a composition that is thick enough not to roll down is suitable. After protecting the walls in this way, they can be painted if desired. In general, protection from the outside will definitely be needed, because this material is very porous, which indicates its hygroscopicity - the ability to absorb moisture well. If no facade work is carried out, you may encounter the fact that during the first precipitation the walls will become saturated with moisture, which will then simply freeze in the pores. Frosts will lead to further freezing of water, and ice will inevitably begin to destroy the walls from the inside. But this is not all the negative impacts on the building. External freezing will lead to the formation of mold, but only indoors.
- Types of plaster compositions and their features
- Criteria for choosing plaster
- Preparation of the solution
- Sealing cracks
- Installation of beacons
- Step-by-step instructions for plastering walls
- How to plaster cinder block walls using the “fur coat” method
- How to paint a cinder block
- Advice from the experts
External insulation
We will begin to consider methods of insulating a cinder block house with external thermal insulation. Experienced specialists, whose field of activity is the insulation of buildings, claim that external finishing of cinder block walls with thermal insulation materials increases the ability to retain heat by 70%. Therefore, it is precisely this solution to the problem, which can reduce the thermal conductivity of the building frame, that will achieve a good result.
In most cases, the exterior of cinder block walls is finished with foam. The purchase of material implies a minimum level of costs (if you take into account the cost of polystyrene or penoplex), in addition, its thermal conductivity allows you to achieve a high thermal insulation effect.
Please note that if the ability of the walls to let air through (breathe) is important to you, then it is better to replace polystyrene foam with mineral wool.
External thermal insulation with such material has another great advantage - ease of work. It is enough to attach the foam to the wall surface using dowels. The length of the latter must be selected based on the thickness of the sheet. The length of each dowel should be equal to twice the width of the foam.
It should be taken into account that insulation with foam plastic from the outside requires that each sheet fits as tightly as possible to the wall surface. If the latter has some unevenness, then you can simply use additional glue during installation, which will help compensate for this deficiency. If damage appears on the cinder block wall before insulation, the surface must be puttied.
Conventionally, the entire insulation process can be built in the following algorithm:
- Leveling the surface (putty).
- Fastening insulation sheets.
- Installation of reinforcement mesh.
- Second alignment.
- Primer.
- Preparation before painting – finishing with “Finish”.
If you plan to paint the walls after insulation, you should use acrylic or silicone plaster to level the surface.
Insulation of the outside of a cinder block house can be done with mineral wool, but this will require additional financial investments - it is difficult to prepare such a surface for painting, so this means covering the walls of the house with siding or other facing elements.
Styrofoam fastening
Installation of expanded polystyrene sheets begins with gluing the first row of material, focusing on the starting profile. The prepared adhesive composition is applied with a trowel to the middle of the sheet, then to its edges so that the glue does not get on the ends of the part when gluing the insulation.
The quality of installation of subsequent rows depends on the correct installation of the first belt. It is important to carefully monitor the vertical and horizontal position of the sheets. The insulating blocks are mounted so that the seams of the top row are offset relative to the bottom ones by at least 15 cm.
To avoid the appearance of cold bridges, the ends of the foam plates should fit together as tightly as possible. When making window openings, the insulation seams should not coincide with the edge of the slope. Installation of thermal insulation boards at the corners of the building is carried out using the gearing method, in which part of the sheet protrudes beyond the cinder block wall.
After the adhesive composition has partially hardened, which takes 12 hours, the seams between the sheets of expanded polystyrene are sealed with polyurethane glue. After it hardens, the surface of the insulation is cleaned to eliminate irregularities in the area of the seams. After 72 hours, you can additionally secure the foam sheets with dowels.
The process of insulating cinder blocks is completed by reinforcement with fiberglass mesh. After the reinforcing mortar has dried, a primer is applied to its surface, and then façade plaster.
Internal insulation
If you listen to the opinion of experts, it is preferable to carry out all insulation processes outside the structure. But this possibility is not always present, and external insulation does not always allow achieving the desired level of energy efficiency of a building.
The inside of a cinder block house is insulated using the same polystyrene foam or mineral wool.
Using the first will simplify the work and allow you to achieve high thermal insulation performance of the walls. In addition to high efficiency, it has disadvantages:
- The thickness of the material will reduce the internal space of the rooms.
- The very fact of its flammability and the release of harmful substances during combustion reduces the fire safety of the building.
- Some substances contained in its composition must be kept away from the human environment.
Mixtures for plastering
It was previously noted that the plaster mixture can be made independently or purchased at a specialized store.
The purchased mixture already has a rationally selected composition and the required amount of additives that improve the properties of the material, however, this option will cost more than individual components. You should focus on your experience, scale of work and budget. To make the right choice, you can consult with store employees or seek help from specialists.
How to choose the thickness of insulation?
The effectiveness of insulation depends not only on the selected material, but also on the thickness of the thermal insulation layer. In order to make an accurate calculation, you need to take into account the totality of the characteristics of the cinder block, insulation, as well as the climatic conditions of a particular region. Therefore, to simplify orientation, we present data based on the long-term experience of builders:
- The optimal level of thermal insulation thickness throughout Russia is 10 cm.
- In the southern regions, a layer of 5-7 cm is sufficient.
For a more accurate calculation, contact a specialist or ask for advice from local construction companies.
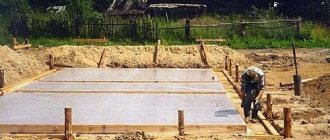
Start designing a house
To design houses, you will need to “arm yourself” with an ordinary checkered notebook sheet and a pencil, while setting the appropriate scale.
The most rational thing to do in this situation would be to do the following: ten meters of land should be designated by two squares. Thus, one centimeter on a ruler will equal 1 meter in real life - the ratio is one to one hundred. Step 1: draw the outline of the house on a notebook sheet using a ruler and pencil on a scale of 1:100, i.e. 1 cm on paper is equal to 1 meter
Drawing on paper the outline of the site itself, as well as future buildings. In this case, all work must be carried out in strict accordance with the correct scale - by carefully measuring every meter on the ground and putting it on paper in accordance with dimensions one to a thousand, you ensure the reliability and aesthetics of the building being constructed. You can draw a project this way very quickly. It is imperative to take into account not only the contours of the site allocated for design and construction, but also all the objects located on the site that were there even before its planned construction, and at the same time there is no possibility of moving them. After this, it will be possible to begin designing the building itself - to simplify the task, we will assume that the designed house will consist of four rooms, a kitchen and two bathrooms (standard housing for a family of several people).
Insulation using a spray solution
In order to simplify the thermal insulation process and achieve its high efficiency, modern insulation methods are being developed. These include treating walls with a special material – polyurethane foam. In addition to reducing the thermal conductivity of walls, it functions as a protective coating, which greatly simplifies and speeds up surface treatment.
Its peculiarity is that there are no fastening elements, which creates the effect of a continuous coating, without the presence of “weak points”: seams, dowel installation points, etc. The use of polyurethane foam is possible for the purpose of external and external thermal insulation.
It is worth noting that the sprayed surface will already have the most even structure for further processing, and the small thickness of the material will preserve the internal space of the structure and reduce the cost of purchasing external finishing elements.
The disadvantages include cost, but in some cases the use of sprayed thermal insulation will even be economically beneficial (if you take into account the additional characteristics of the material). The manufacturer also claims the durability of the coating (about 30 years), but the product is new and there is no actual confirmation of such statements yet. When choosing a material for insulating a cinder block house, pay attention not only to the allocated budget, but also to the compliance of the material with the needs of a particular case. You should also not forget about the advice of experts and the level of harmful substances in some insulation materials. Always try to insulate the exterior first, and only then, if absolutely necessary, insulate it from the inside.
Cover the house with bricks: Building blocks made of cellular concrete
Despite the differences in the manufacturing technology of aerated concrete and foam concrete, their load-bearing and thermal insulation properties are similar, there are only differences in vapor permeability (aerated concrete is higher).
Facing for blocks made of cellular concrete is mandatory - the reasons are, in principle, the same as for cinder blocks.
As with cinder blocks, insulation is not necessary, but a ventilation gap is needed. Therefore, the method of attaching the facing masonry to the wall is similar.
Why protect cinder blocks on the facade?
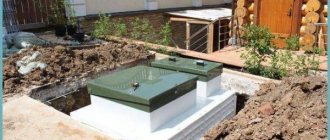
Cinder blocks are often used in construction for facades and walls: for the construction, if not of a residential building, then of a garage or outbuildings, foundations (primarily, focusing on the inexpensive cost of the material). The composition of the raw materials of this material: slag, lime, cement (sawdust or shavings are possible as additives).
Cinder block facades themselves are durable and can serve well for many decades. But only if the wall material is reliably protected. The fact is that cinder blocks have high absorbency: if a wall or foundation constantly gets wet from rain and snow, they inevitably begin to collapse. Therefore, the finishing of walls and facades made of cinder blocks requires finishing.
In addition, over time, individual components erode from them. At first, small defects (cracks, potholes) may appear, but then they expand, and the cinder block may simply crumble.
Should you use cinder blocks?
is one of the cheapest building materials.
To do this, you need a special vibrating machine that will compact the mass from the mortar into shapes.
If a house on a site is built from cinder block, then it would be more expedient to make a garage with a shed from this material. In this case, the owner can save a lot on construction work. If the house is being built from a different material, then you can use cinder block, but this will not bring much benefit.
Since cinder block is a fire-resistant material, it is perfect for domestic and commercial buildings: owners do not need to fear for the integrity of the building in case of possible fires. But it is worth considering that cinder blocks do not absorb sounds, so if you do not want to hear everything that happens in these rooms, you will have to finish them and additionally insulate them, which will entail expenses.
Plastering and painting cinder blocks
The simplest and cheapest protection for a cinder block building is finishing by plastering with a regular cement-sand mortar (using metal or glass reinforcing mesh).
If thorough plastering is not yet possible, you can strengthen the walls by painting. This is a good option for finishing such a facade. To do this, the walls must first be puttied with facade putty, and then painted with facade paint. True, putty for facade work is not cheap.
The most economical and easiest to implement option for finishing a cinder block facade: dilute a semi-liquid cement-sand mortar and spray (using a large brush or broom) a “coat” on the cinder block walls. After drying, repeat the procedure. If the decor of the building is not too important, the “fur coat” can be left in this form, but can be painted with the same façade paint.
Why do you need a mesh for plaster?
Plaster mesh is used during construction work as a reinforcing material. ... The use of plaster mesh helps prevent the appearance of cracks and destruction of the plaster layer, increasing its service life and improving its decorative properties.
Interesting materials:
Is it possible to trim yellowed leaves from an orchid? Is it possible to prune remontant strawberries? Is it possible to prune rhododendron? Is it possible to prune a rose at the root? Is it possible to prune roses in summer? Is it possible to prune roses in sub-zero temperatures? Is it possible to prune roses in May? Is it possible to prune roses in frost? Is it possible to trim the neck of an orchid? Is it possible to prune lilacs after flowering?
Cinder blocks under siding
If the walls of a residential building are made of cinder blocks, you can “hide” them behind a facade of siding or a layer of decorative facade plaster. This is a fairly common finish in this case. By the way, cinder blocks are a fairly warm wall material (it is considered warmer than brick). In addition, manufacturers are trying to make it even warmer by introducing various additives into the raw material: caramzit, perlite, polystyrene, etc.
And if the façade of slag concrete blocks is finished with siding or warm plaster, with thermal insulation (slab or mineral fiber) underneath the finishing, there is no doubt about the comfort and efficiency of such a structure.
Do-it-yourself technology for applying plaster to walls: step-by-step instructions
How to plaster cinder block walls
Novice builders do not know how to plaster cinder block walls correctly. To simplify the process, you can use the technology of layer-by-layer application of the mixture.
How to plaster cinder block walls using the fur coat method
There is a special way of applying plaster - “fur coat”. It is characterized by simplicity and low composition consumption.
- dilute the cement-sand mixture with water by 1/2 volume;
- start spraying the solution with a large brush;
- wait for the layer to dry and apply the next one;
- spray the surface 4-5 times.
How and how to insulate a cinder block house from the outside
No matter what material the house is built from, the owner always tries to reduce the cost of heating and repairs. An excellent solution to such problems is the installation of insulation.
It is especially important to carry out such measures as quickly as possible if the structure is made of material that does not retain heat well. Therefore, today we will look at the insulation of a cinder block house from the outside.
Cover the house with bricks: Wooden houses
This is perhaps the rarest case of brick cladding.
It is almost impossible to veneer a log house with bricks due to the characteristic corner cuts of the crowns. Log houses do not have this problem, but the feasibility of cladding is very doubtful - the acquired advantages are much less than the disadvantages.
Frame (or frame-panel) wooden houses are attractive due to the absence of “wet” work, speed of construction and relatively low cost. Brick cladding is possible and practiced, but it neutralizes these advantages.
In any case, insulation when facing a wooden house with brick is, in principle, not necessary, but a gap is necessary - the lack of ventilation and weathering of excess moisture will lead to rotting of the wood. In addition, it is mandatory to treat the walls with antiseptics.
If insulation is carried out, it is performed using mineral wool mats, which have high vapor permeability.
Installation of insulation is carried out over the lathing, using the technology of ventilated facades - with laying on top of a windproof, vapor-permeable membrane.
When insulating, as a flexible connection, they use not masonry mesh, but pieces of wire attached to the wall with nails or self-tapping screws (at the rate of 4 pieces per 1 sq. m).
Why is external insulation better?
Qualified craftsmen advise insulating a cinder block house from the outside, since this option has many advantages:
- Extends the service life of the main structure. External thermal insulation must be protected from external influences. The trim not only becomes a barrier to the insulation, but also to the cinder blocks.
- Saves usable space in living spaces.
- Protects against the formation of dew on the walls of the house, and therefore prevents the appearance of fungus or mold.
- Allows you to save up to 70% of heat. Internal walls accumulate heat and release it back when the air temperature in the room drops.
The final stage of work
At the final stage, all beacons are removed from the plaster layer, which, as a result of corrosion, can form dark spots on the walls. The resulting grooves are covered and leveled. After this, it is necessary to wash the surface with water.
To do this, simply pour it onto a section of the wall and rub it with a soft polyurethane trowel. This process corresponds to sanding the finished surface and facilitates final filling.
Choice of insulation
Houses made of cinder blocks do not retain heat well, so either polystyrene foam (or its cousins) or mineral wool are chosen as insulation. Each option has its own advantages and disadvantages. Let's take a closer look at each of them.
Styrofoam
If the question arises about how to insulate a cinder block house from the outside and spend a small amount, then it is better to use polystyrene foam. The material has excellent technical characteristics, but several shortcomings cause slight concern. Therefore, it is important to study all the positive and negative facts before choosing polystyrene foam for insulation.
- The smallest thermal conductivity coefficient.
- Light weight, which makes it easy to transport and install the material yourself.
- Low moisture absorption rate. Even if the foam is completely immersed in water, it can absorb only 4% of its own weight, and this is an excellent indicator.
- The material is not affected by mold, fungi, or insects.
- Long service life. If the foam is reliably protected from external influences, it can last up to 50 years.
Now let's look at the disadvantages:
- The insulation does not allow steam to pass through. The effect of a thermos is created. Heat is retained inside the house both in winter and summer.
- Low temperatures combined with a small amount of moisture destroy homemade foam insulation.
- Before starting installation, you need to level the base.
- Toxicity when burning. But for cinder block walls this drawback is not so important. Polystyrene foam burns only in the presence of a constant source of fire. In this case, there are no components of the structure that could quickly ignite and burn for a long time.
- Rodents love to make their homes in polystyrene foam.
Minvata
You can also insulate the house with mineral wool. Moreover, without unnecessary fears, you can choose any type of material proposed and get a good result. Qualified specialists recommend using this particular option for arranging thermal insulation for the walls of a cinder block house.
The main advantages of this insulation:
- Low thermal conductivity coefficient.
- Possibility to create additional sound insulation.
- Fire resistance.
- Can be mounted on walls with slight unevenness.
- Environmentally friendly.
The disadvantages include:
- High moisture absorption coefficient. Mineral wool must be treated on both sides with water-repellent glue. Difficulty in installation.
- If you lay and fasten mineral wool incorrectly, then in some places it may mat (shrink), which will lead to a decrease in thermal insulation properties.
Having become familiar with all the positive and negative aspects of using one or another insulation, each owner will choose the option that, in his opinion, is the most optimal.
How to prepare the solution and what is its consumption
For plastering, the composition is selected according to the purpose of the room and operating conditions. If the building is not heated, a cement-sand-lime mortar is used. It enhances protection against humidity and temperature fluctuations.
Stages of solution preparation
1. Preparation of lime dough. You will need water, the composition is mixed in a ratio of 1:3. 2. Everything is mixed and left in a closed container for a day. 3. Lime dough is mixed with sand in a ratio of 1:3, pour everything with water and mix. This is a strong solution. If more strength is required, add more sand (1:5).
Attention! To plaster the walls of the material, we use a lime-clay solution.
• Lime dough; • Clay mass; • Sand.
Important. The preparation of clay dough follows a similar recipe to lime dough.
Lime-gypsum mortar is used. To prepare it, you will need to add gypsum mass. Gypsum, diluted in water, is mixed with a lime composition, and the wall is plastered without waiting. The solution quickly hardens in the container.
Polymer composition - after drying, a smooth surface is formed, which is most often taken for a unique finish: it does not require gluing or wallpapering. The only drawback is the cost. It is more expensive than an ordinary finishing mixture.
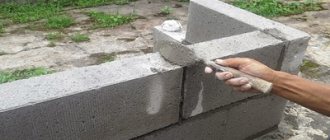
The brick is laid in the same way. There is a bandage of rows and reinforcement with masonry mesh. Levels are also monitored and identical tools are used. In addition to the devices, there is a rubber mallet (hammer), which shrinks the cinder block onto the solution by tapping. The material requires a much larger amount of mortar, since a bucket of mortar is used to lay 4 cinder blocks. It would be a good idea to rent a concrete mixer. This will reduce physical costs and save energy. Masonry occurs with voids down. The evenness of the rows is maintained by stretching a cord along the rows. The base should be waterproofed before laying.
Installation
Once the appropriate material has been selected, the question arises: how to insulate a cinder block house from the outside? If a person is far from the construction business, then it is advisable to use the services of professional teams, but you can do everything yourself. The main thing is to strictly follow the chosen instructions.
Each insulation has its own technology for constructing a thermal insulation structure. Therefore, we will not consider a generalized picture, but will propose a work plan for each option separately.
Insulation using foam plastic
Any process begins with a preparatory stage. It is definitely present when installing foam plastic.
- Protruding elements are removed from the base. This may include excess mortar, fasteners and hanging structures (antennas, drainpipes).
- If there are deep potholes, cracks, or broken pieces of cinder block, you should get rid of them. To do this, the surface is plastered.
- When the layer of plaster has dried, you need to apply primer. Such measures will help increase adhesion (adhesion of the adhesive solution and the base) and protect the wall from mold.
Only after the primer has completely dried can you begin installing the foam.
- The first step is to install a starting galvanized or stainless steel profile. It serves as a support for the entire structure. It is necessary to correct the horizontal. A building level is suitable for this. If there is even the slightest distortion, it can cause deformation and even collapse of the insulated and finished facade. The profile is attached to dowel nails.
- Next, prepare an adhesive solution that is suitable for outdoor use and for foam plastic. If you buy the first one you come across and do not read the instructions, then the consequence of such a rash step may be a poor-quality facade that will peel off from the cinder block walls. Before cooking, be sure to read the instructions; manufacturers indicate the exact quantities of ingredients.
- The glue is applied in small blots at the corners of the foam and in the center.
- The first insulation board is laid with its lower edge in profile towards the lower left corner of the building. It is necessary to press the element a little and move it from side to side so that there are no voids left.
- The next sheet of material is coated with glue in the same way, only the composition is also applied to the end part. Press the part tightly against the first one so that there are no gaps or cracks between them.
- The second row is laid so that the joints do not coincide. To do this, the slab is shifted a third or half to the side. In the same way, insulation is carried out over the entire area.
- After the glue has dried, you also need to fix the foam mechanically. This will make the structure more reliable. You will need dowels with a wide head. The approximate number of fasteners is calculated as follows: 5 pieces are needed for one slab.
- Now you can move on to the façade cladding.
Mineral wool
The installation process of this insulation is a little more complicated, but it all starts with preparation. The base is cleaned of stains, dust, dirt, and protruding elements. It is not necessary to plaster the surface; it is enough to seal deep cracks and treat the walls with primer.
Then a metal profile is installed to create a support. Next, prepare the adhesive solution according to the instructions indicated on the package. The glue is applied in a thin layer to the entire surface of the slab (it creates a water-repellent layer), and then several small blots are made in the corners.
The material is pressed tightly against the wall. There should be no joints or gaps. It is also not advisable to do it with a whip. They start doing everything from the bottom left corner. The slabs are glued according to the principle of brickwork.
After the mineral wool has completely covered the walls, you need to glue the reinforcing mesh. The same adhesive solution is applied to the surface of the slabs and fiberglass is embedded in them, smoothing it with a spatula. After this layer has dried, you can begin decorating.
Preparing the walls
The following operations are performed:
- Leveling the surface by removing protruding parts and filling depressions;
- Filling through joints with mounting solution;
- Repairing chipped cinder blocks with cement mortar;
- Cleaning cinder blocks from debris and dust;
- Two-stage treatment of cleaned surfaces with a penetrating primer.
Installation of the starting profile, carried out by attaching it to the facade along a pre-marked horizontal line. The profile is secured with screws and dowels inserted into pre-drilled holes.
The starting profile is attached at the junction of the walls and the base of the building, becoming a support for the insulation, while simultaneously protecting it from rodent infestation. Its installation becomes the final stage of preparing the surface of cinder blocks for insulation.
The installation of each type of insulation is carried out differently, so it is worth getting acquainted with the technologies of each of them separately.