Beton-House.com
Website about concrete: construction, characteristics, design. We combine the experience of professionals and private craftsmen in one place
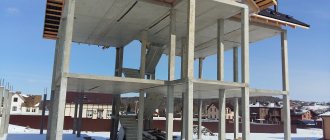
House made of aerated concrete
The construction of houses from aerated concrete has become widespread due to the positive qualities of this building block material. However, some of them, for example: high vapor permeability, force the use of measures to protect the facade from moisture. The most popular is plastering of aerated concrete facades. How to plaster aerated concrete outside will be discussed in this article.
- Mineral plaster
A little about aerated concrete
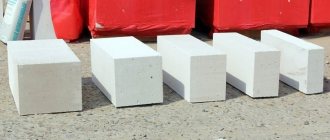
Aerated concrete blocks
Aerated concrete is produced industrially using the autoclaving method. There is also a non-autoclave production method, when aerated concrete hardens in molds naturally. But the first option makes it possible to produce more durable blocks that can be used for the construction of load-bearing walls. Typically these are structural and thermal insulating blocks of the D500 and D600 brands.
Cellular aerated concrete blocks are made using quartz sand, lime, water and aluminum powder as a gas-forming agent. As a result of the chemical reaction, gas bubbles are formed and distributed in the solution, forming a large number of pores.
Pore distribution in cellular concrete
Positive traits
Positive qualities of aerated concrete
Due to the presence of air in the pores, aerated concrete is endowed with thermal insulation and other positive qualities:
- Aerated concrete is an environmentally friendly “breathing” material, the microcirculation of air in the pores of which can be compared with the same process in the structure of natural wood;
- Aerated concrete is lightweight, so it does not bear any load on the base. However, the choice of foundation should be approached responsibly - cracks on the surface of aerated concrete masonry appear due to the mobility of the foundation. In this regard, experts recommend installing a monolithic strip base;
- Aerated concrete is a fire-resistant material and can withstand the effects of open fire for more than 5 hours without contributing to its spread. Aerated concrete blocks can be used for fire protection of metal structures;
- Frost resistance of aerated concrete blocks is ensured by the distribution of frozen water into free, dry internal pores when the air temperature drops;
- If you place aerated concrete in water, it will float on its surface, which indicates a certain degree of moisture resistance of the material;
- Aerated concrete is easy to process and lay, which can be done by one or two people. The block is light in weight, it is easy to carry, thanks to the end recesses, and its dimensions, which exceed those of a brick, allow the building to be erected quickly and at the same time save mortar.
Carrying an aerated concrete block
However, some of its positive qualities turn out to be the other side in the absence of external finishing of the aerated concrete facade.
Be that as it may, over time, moisture will begin to destroy the aerated concrete masonry, as it inevitably penetrates the outer layer of the block. It is the hydrophobicity of aerated concrete that requires exterior finishing. And the appearance of the plastered facade looks much nicer. Therefore, the question of whether it is necessary to plaster aerated concrete is not worth it.
Plaster
The plaster base, which includes gypsum, has the following positive qualities:
- dries quickly;
- the solution does not shrink;
- the mixture goes on smoothly;
- no finishing coat required.
Disadvantages of plastering walls with gypsum:
- average level of vapor permeability;
- a larger amount of water is required compared to special mixtures, approximately 10-15 liters per 1 bag of 25 kg;
- the surface will quickly get wet after rain and snow;
- spots appear on the surface that need to be painted over.
When work needs to be done
Plastering an aerated concrete facade
The beginning of finishing work begins after the construction of the building box. Experts insist that before carrying out external work, the aerated concrete must be plastered inside.
The interval between the internal and external finishing of the facade should consist of 3 - 4 months. Before plastering the aerated concrete inside, the exterior finishing of the facade is carried out only in conditions where it is at risk of intense regular moisture - for example, when the house is located on the shore of a reservoir.
Important! After building a house, you need to wait about 6 months for the moisture accumulated during the construction process to naturally evaporate from the aerated concrete blocks. The favorable period for façade work is from April to September.
Facade
The mixture is most effective for treating both external walls and indoors; the material is easy to apply with your own hands. Plaster has a number of positive qualities - good adhesion to the base, attractive appearance. Including the material has vapor permeability indicators identical to those of aerated blocks. When choosing plaster for building aerated concrete, it is better to choose a high-quality special mixture, this will simplify the process of finishing the house.
If you have to choose plaster or drywall, which is better for aerated concrete inside the house. The following facts should be taken into account: walls made of aerated blocks are smooth, and they do not require leveling. Accordingly, plaster will cost less, and the solution will form an even and beautiful layer.
Is it necessary to insulate the facade before plastering?
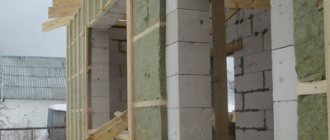
Insulation of aerated concrete walls with mineral wool
Before plastering aerated concrete, it is necessary to carry out external insulation of the walls. The photo above shows the process of insulating walls with mineral wool. This material is best suited for insulating aerated concrete walls.
First, it’s worth figuring out whether it is necessary to insulate walls made of aerated concrete. One of the positive qualities of this material is its thermal properties and the absence of the need to additionally insulate the wall.
However, it is important to know that sometimes insulation is necessary:
- In conditions where the thickness of the aerated concrete wall does not comply with building codes. When building a house in the middle or northern climate zone of the country, it must be at least 60 cm;
- Insulation of aerated concrete may be required when connecting blocks of cement-sand mortar - the seams are thicker than with an adhesive connection and act as cold bridges through which heat loss occurs.
Important! When using an adhesive composition in masonry, the adhesion of the blocks to each other is obtained more tightly due to the thin masonry seam.
- Insulation may be required when constructing a reinforcing belt and a simple concrete frame, which has higher thermal conductivity and forms a cold bridge.
Important! An increase in the vapor permeability of wall materials, in accordance with SP 50.13330.2012, in houses with heating should occur from the inside out. This will ensure the correct functionality of the wall structures. With the vapor permeability of aerated concrete from 0.11 to 0.23 mg/(m h Pa), the plaster layer should have a value of 0.12 mg/(m h Pa). The same quality applies to the vapor permeability of the insulation.
It is mineral wool that has the necessary vapor permeability, eliminating condensation and the formation of a dew point.
Mineral wool slabs are light in weight, so they do not put a load on the aerated concrete base. And the method of their fastening - using an adhesive solution, eliminates drilling holes in aerated concrete masonry or installing a frame.
Structure of mineral wool
Self finishing
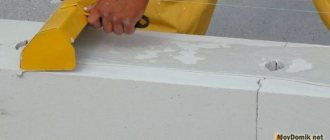
We plaster the aerated concrete on the outside with plaster intended for exterior use. There are two options for applying the mixture - a thick layer or several thin layers, which are applied in no more than 3 layers and no more than 1 cm each.
Work order:
- the surface is prepared for plastering - contamination is removed;
- Next, you should hang the surface with your own hands using beacons;
- spray is applied - the first layer of plaster coating;
- the primer is applied and leveled;
- cutting corners;
- finishing of slopes;
- a covering layer is applied;
- the surface is rubbed.
Types of plasters for aerated concrete
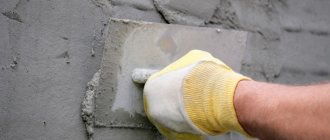
Plastering a wall
There are several types of plaster for exterior work on aerated concrete surfaces. To understand how to properly plaster aerated concrete, you need to know about the general requirements for plastering compositions for exterior work.
- The plaster must have vapor permeability , and its coefficient must be higher than that of the previous material - aerated concrete or insulation;
- The plaster layer must be frost-resistant and resist other environmental influences;
- The layer must have elasticity so that cracks do not appear on it;
- The plaster must have strong adhesion to the aerated concrete surface.
Mineral plaster
Lime plaster
How to plaster aerated concrete? Experts recommend the use of mineral-based plaster compositions. They belong to thin-layer compositions that are specially created for finishing aerated concrete. You can make such a solution yourself.
Ready-made formulations are characterized by the presence of:
- Lime;
- White cement;
- Marble chips and other fillers.
The color range of such plaster compositions is limited, but they can be easily painted. It is also important to use vapor-permeable coloring compounds. Painting is necessary to protect such a coating from moisture, since this is a vulnerable point of mineral plasters.
Silicate plaster
Silicate plaster
This type of plaster is made on the basis of potassium liquid glass, which acts as a binding component.
The advantages of silicate plaster include:
- Ease of application;
- Moisture resistance;
- Vapor permeability;
- To be painted;
- Affordable price;
- Durability – up to 25 years;
- Decorative.
Silicone plaster
Silicone plaster
Is it possible to plaster aerated concrete? Of course yes! And the best way for this is façade silicone plaster, which is superior to other plaster solutions in many technical and operational characteristics.
The positive qualities of silicone plasters include:
- High water-repellent properties;
- You can do the application yourself without involving specialists;
- High degree of resistance to atmospheric phenomena;
- Vapor permeability;
- Durability;
- Texture and variety of fillers;
- Elasticity. Thanks to this quality, cracks do not appear on the plaster on aerated concrete.
Silicone plaster solution is sold ready-made; detailed instructions for use are on the packaging.
Acrylic plaster
Acrylic pebble plaster
Acrylic plaster is highly decorative and durable. But a significant disadvantage regarding the use of these compositions specifically for aerated concrete blocks and other cellular concretes is their low vapor permeability coefficient. This causes the formation of condensation inside the plaster layer with all the ensuing consequences.
The most common plaster mixtures for aerated blocks
When choosing facade plaster compositions for aerated concrete, it is best to give preference to ready-made mixtures from well-known manufacturers, which guarantee high quality material, durability, and compliance with all specified characteristics.
The most popular plasters for aerated concrete blocks:
- Ceresit CT 24
– a mixture of mineral type, plastic, comfortable to work with. The coating can withstand about 100 freeze/thaw cycles. For greater protection, it is best to paint the plaster layer 7 days after it has completely dried.
- Ceresit CT 77
– acrylic mixture, used for finishing facades, gives high strength with a thin layer of coating. The plaster is frost-resistant and is not afraid of external influences. Typically used when there is ventilation and waterproofing inside the house.
- Founds Startwell T-21
– cement-lime type plaster, characterized by a high level of adhesion, frost resistance, and is not afraid of moisture and shrinkage.
- Baumit Silicone Top
– good adhesion and plasticity are ensured by the solution due to the presence of silicone resins in the composition. The coating retains its original appearance for a very long time, is decorative, demonstrates dirt-repellent characteristics and good vapor permeability; the grain size may be different. There is a large selection of colors and shades (about 200).
- Weber.pas silicone
– the mixture is made on the basis of silicone emulsion. It is possible to choose the grain size of the plaster. The material is resistant to moisture, is not afraid of sudden changes, low/high temperatures, and various types of pollution.
- Ceresit ST35
– decorative composition with the “bark beetle” effect. It can be applied to mineral wool and any other insulation material, is suitable for painting, and demonstrates good vapor permeability and decorative properties. The consumption is low, the mixture resists various influences well, and is highly durable.
Cement mortar
Damaged layer of cement plaster
Is it possible to plaster aerated concrete with cement mortar on the outside? The answer to this question is unequivocal - no. It is worth taking a closer look at the reasons why this common material is not suitable for cellular concrete and aerated concrete in particular.
- The cement mortar does not have sufficient adhesion to securely adhere to the smooth surface of aerated concrete. If cement plaster is used on aerated concrete, the video in this article clearly demonstrates the consequences. This is due to the high weight and density of the solution;
- In addition, aerated concrete is saturated with moisture from the cement mortar, weakening its adhesion to the surface and compromising its integrity as a result of uneven rapid drying;
- The low level of vapor permeability of cement mortar leads to non-compliance with building codes and violation of optimal microclimatic parameters in a residential area. But if cement plaster is used for interior decoration, it will protect the aerated concrete from steam penetration into the thickness of the walls.
Important! Materials that should not be used to cover the surface of aerated concrete are polystyrene foam and polystyrene foam.
Video description
For more information about economical exterior finishing of aerated concrete, and not just plaster, see the following video:
Optimal conditions for applying plaster
External plastering of aerated concrete must be carried out under certain conditions. It is important to first complete interior work with high humidity levels. The load-bearing structures of walls made of aerated blocks must be completely dry, not exceeding 27%. Otherwise, high humidity will cause adhesion problems and lead to peeling of the finishing layer of the façade.
The optimal time for finishing the interior of the house is spring, the façade of the building is the end of summer.
External temperature conditions for work must correspond to +5-+30°C, with air humidity not exceeding 80%. If it is necessary to perform finishing at low temperatures, it is recommended to use a special deep-penetration primer composition until the onset of acceptable weather conditions.
Carrying out the work correctly will help avoid peeling, cracks and defects. It is forbidden to apply the coating in hot weather, under direct sunlight and in windy weather.
Plastered facade of aerated concrete house Source econet.by
Tips for carrying out work
Plastered facade of an aerated concrete house
When aerated concrete is chosen as a wall material, you can learn how to plaster it correctly and preserve the properties of this building material by reading the tips below.
- It is necessary to carry out work on plastering facades only with compounds specially designed for this purpose;
- Allow time after the construction of the house for the natural evaporation of internal moisture;
- Strict implementation of the sequence of work - first work inside, then outside;
- Compliance with the temperature regime for carrying out external finishing work from +8 to + 30 degrees Celsius;
- Mandatory compliance with building regulations regarding increasing the thermal conductivity coefficient of each subsequent material installed or applied to an aerated concrete surface.
Aerated concrete blocks - the video in this article will tell you how to plaster.
Acrylic
The material has high decorative qualities and durability. The big disadvantage of acrylic plaster for processing aerated concrete and other cellular textures is the low level of vapor permeability. For this reason, condensation forms in the inner layer of the plastered surface. As a result, such exposure causes surface deformation - peeling and cracking.
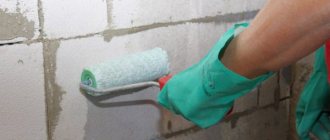
Surface primer
The role of priming is to provide the wall with water-repellent properties. Therefore, the composition of the primer material should be based on acrylosiloxane.
Such material is able to provide protective properties and prevent precipitation from destroying the material.
The surface on which the priming composition will be applied should not be cracked or contaminated.
It is recommended to carry out the priming process at a temperature of 10 to 25 degrees Celsius .
Priming begins after the surface of the walls has been completely prepared, namely, all dust has been removed and all irregularities have been eliminated. Once the cleaning water has completely dried, the priming process begins.
You can often come across recommendations that the material for priming must be diluted with water in a 1:1 ratio. However, this is wrong; such a technique will significantly reduce the properties of adhesion to the surface. You don’t have to worry about this property if the wall is pre-prepared correctly.
Reinforcement
To the question whether it is necessary to reinforce the plaster, and whether a mesh is needed. The answer is simple, since the plaster layer of aerated concrete can vary from 5 to 15 mm. If the layer exceeds 10 mm, a metal mesh with a fine cell texture is used as a reinforcing layer. For example, a mesh with a wire diameter of 0.1 mm and a cell size of 0.16 x 0.16 mm, or fiberglass mesh with cells of 5x5 cm, is suitable.
The mesh must be installed with an overlap of 5 cm; for the corners of the house, perforated corners with mesh are used. This method will help prevent the formation of cracks in the plaster after the building shrinks. It is better to install the mesh into the applied solution using a spatula. A particularly important point is the installation of the mesh in places with a high level of stress - the area of windows and doors.
Advice! If you attach the mesh to a dry surface, the result will be zero. Because the mesh needs to be fixed to the wall using self-tapping screws, and then a layer of mortar must be applied. Otherwise, the unfixed mesh will move along with the putty.
Work order:
- Level the plaster layer over the mesh using vapor-permeable plaster.
- It is necessary to wait until the first layer is completely dry. Otherwise, it will fall off under the weight of the next layer. This technique involves thin-layer application of the mixture. You will have to wait three to four days for complete drying. Accordingly, the thicker the layer, the longer it takes to dry. Checking whether the surface is dry is done using water. Having splashed the liquid onto the surface, it was quickly absorbed - this means that it is time to begin further work.
- A second layer of plaster is applied, which is considered leveling. Therefore, the layer should be even and smooth;
- A third finishing coat of plaster is applied and will require further grouting if necessary.
- Painting the surface with materials for exterior work or applying putty.
- Treatment with a water repellent. Experts recommend applying this solution 12 months after painting and completion of all facade cladding work. A water repellent gives any coating additional water-repellent properties.
Note! When the plaster layer dries, it must be protected from the influence of such undesirable environmental factors as moisture, snow, rain.