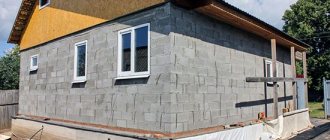
To make the facade of the building more attractive and aesthetically pleasing, façade plaster on concrete is used. External plastering allows you to decorate building surfaces made of various materials and protects from weather influences. The construction market offers a lot of compositions with different finishing techniques for all types of laying compositions.
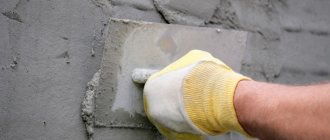
Technology of plastering concrete walls.
Preparing the base.
The condition of the working surface is critical: weak, loose, peeling wall fragments will cause the destruction of the new plaster.
Plastering concrete walls, the technology of which is standard, requires the preparation of concrete, reinforced concrete and monolith for plastering, consisting of several stages:
- Removing weak areas. If the concrete base has poorly strengthened coatings, swelling, peeling, etc., they should be removed. Fragments that adhere well but can be pressed should also be cleaned off: sooner or later they will still collapse. Everything that wobbles, moves and does not hold well must be knocked down and cleaned off. The base must be completely stable.
- Cleaning. The concrete must be completely exposed. Therefore, all layers covering it (pieces of putty, paint and paint) are completely cleaned off.
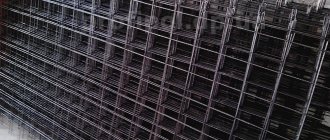
- Alignment. Small potholes (3-5 cm square) can be filled with cement-sand mortar as is, larger ones require reinforcement.
Reinforcement (wire, mesh) is also necessary when leveling differences (from 1.5 cm thick) in the wall.
- Checking flatness. Before applying plaster, it is better to once again make sure that the walls are perfectly level using the rules and the building level. If necessary, beacons made of cement-sand mortar are placed in the recesses.
- Padding. The concrete surface is prepared with primers. They perform several functions:
- Dust removal.
- Filling the pores of loose surfaces to avoid increased absorption.
- Increased (and more evenly distributed) wall adhesion.
The primer allows you to increase the degree of adhesion of the plaster to the wall. This is important for the durability of the layer. It is applied after the leveling concrete inserts, filling cracks and potholes have completely dried.
- For block concrete walls, additional preparation is recommended - sizing. The smooth surface of the slab will not allow the plaster to adhere securely. As preparation, a solution of tile adhesive is used, which is applied with a notched trowel.
Selecting materials
There are several types of concrete plasters:
- Cement-sand mixture. Durable and durable plaster is suitable for rooms with high humidity. It has good thermal conductivity and vapor permeability. Provides reliable sound insulation.
- Gypsum mixture. It is also used for finishing on concrete walls, but it is not suitable for bathrooms, toilets, kitchens, and other rooms with high humidity. Gypsum is more susceptible to mechanical damage.
- Polymer mixtures. These materials are used when it is necessary to eliminate minor defects on a concrete surface. They are not afraid of moisture, have waterproofing and antiseptic properties. Such mixtures are suitable for interior decoration and exterior work. However, such mixtures are used only on an already leveled concrete surface.
Sometimes plastering is carried out with tile adhesive. Its properties are approximately the same as those of cement mortar, but adhesion is higher. However, the composition exhibits noticeable shrinkage, and cracks appear on its surface. It is suitable in cases where the depth of unevenness does not exceed 8 mm. Apply in two layers. The first is up to 6 mm. Then the second one. While the plaster has not set, processing is carried out for leveling. This material can also be used to putty the façade of a building.
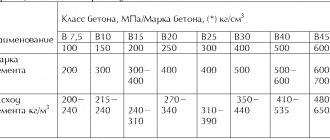
Rice. 2. Materials for plastering concrete walls
Another option is gluing using a notched trowel. Applicable only to block concrete surfaces to improve adhesion with subsequent materials.
Blend selection
For plastering concrete walls indoors, you can use cement-sand or gypsum mixtures, which you can buy in ready-made dry form or make yourself
Cement-sand mortar
The main advantages of cement-sand mortar:
- high strength;
- after mixing the solution, it can be used for a long period of time;
- low cost;
General benefits
The main advantages of plaster:
- Moisture protection.
- The ability of the wall to allow air to pass through.
- The texture may vary.
- Radiation protection.
- Protection from extraneous noise.
- Thermal insulation properties.
Plaster has many useful qualities
In addition to the above, unlike drywall, plaster can withstand large mechanical loads and temperature changes.
Selection of plaster
Before you start work, you need to decide how to plaster the concrete walls.
There are quite a few different types of solutions, however, only two can be identified as the most optimal for these purposes:
- Cement-sand mortar - excellent for rooms with high levels of humidity or for exterior wall decoration.
- Gypsum-lime is a good option for finishing dry rooms.
Preparing a cement-sand mortar is not difficult. To do this, mix one part cement with three parts sand and mix with water until a creamy consistency is obtained.
To prepare a lime-gypsum mortar, you need to mix gypsum with water until a dough-like consistency is obtained and then add 3 parts of lime mortar (lime diluted in water in a 1:1 ratio).
Priming a concrete wall
Modification of concrete screed using liquid glass
An aqueous alkaline solution of sodium or potassium silicates can improve the resistance of the coating to moisture, elevated temperatures, mold and other external influences.
Liquid glass additives are used in two ways - by introducing them into a solution or by treating an already finished surface.
To prepare an anti-dust impregnation and improve waterproofing, 1 kg M400 Portland cement is mixed with water and mixed with 1 kg of liquid glass.
One of the most inexpensive and effective supplements
Silicates are not used in their pure form, as they are quickly washed out with water.
Dilute silicates with clean tap water with a minimum content of impurities and salts. One glass of silicate glue is poured into 10 liters of water and stirred until a homogeneous solution is obtained. Next, add the dry ingredients in parts with continuous stirring.
The resulting solution is consumed immediately, after which the instruments and containers are cleaned.
Technology of work using the example of a bathroom
- The current finishing is removed from the walls. Detergents and water are used to remove oil stains. Use a metal brush to remove mold and mildew. Then the surface is primed.
- Tile adhesive is prepared in a container. Detailed instructions are provided by the material manufacturers.
- The adhesive composition is applied to the cleaned and dust-free surface with a notched trowel; the optimal tooth size is 6 mm. The glue is leveled and the beacons are installed.
- The solution is then given 24 hours to dry.
- Next, seal and stir the cement plaster. It can be applied to the wall manually or mechanically.
- They start plastering from the corners and then move on to the row sections. To level the layer and remove excess solution, the rule is to work from the bottom up.
- Leave to dry for 2 days. After this you can lay the tiles.
Architectural concrete: types and differences from ordinary concrete
Architectural concrete is often used to decorate walls. The material is flexible, so it is suitable for creating individual design elements.
Architectural concrete allows you to achieve a perfectly flat surface. It has minimal hygroscopicity, so it retains its integrity for a long time. Another important property is resistance to external factors. The composition does not crack, does not fade, does not wear out.
Material Components:
- Water;
- Portland cement;
- Fractions: sand, marble chips;
- Pigment;
- Modifying and reinforcing additives.
Such concrete in the interior of the apartment looks like natural stone. It acts as an independent element of decor and goes well with other atypical finishing options.
Another popular material is concrete slabs. In terms of texture and properties, they are no different from the usual original. The structures are based on MDF and a decorative layer of spatula. You will be able to cope with laying such slabs, even if you have not had such experience before. You will also be pleased with the variety of shades of the finishing material - from rich gray to white.
Rolled concrete, a material made like wallpaper, is also suitable for independent decor. To decorate the walls, you need to strengthen the strips on the surface with an adhesive mass. Such architectural concrete looks natural in the interior and allows you to realize any design fantasies.
Architectural concrete on walls and ceiling
Architectural rolled concrete on walls and ceilings
How to properly apply plaster to a concrete wall
Before moving on to the main process, it is necessary to prepare concrete surfaces for plastering. This will speed up and simplify the work when using the plaster mixture. Only through careful preparation is it possible to obtain an ideal result.
Preparing the concrete surface
The plastering technology is standard and requires preparing a concrete, reinforced concrete, monolithic layer for finishing, which has a number of stages.
- Remove weak areas - poor quality strengthening, bloating, exfoliation.
- Clean - the concrete slab is completely opened, the paint and putty are removed.
- Level out - minor potholes can actually be filled with a mixture of cement and sand, large ones need to be reinforced.
- Check for smoothness – Before applying concrete plaster, you should ensure that the surface is smooth by using a level. If necessary, slats made of a mixture of cement + sand are placed in the potholes.
- Prime – the surface must be primed with primers. Priming will remove dust, fill loose surfaces to avoid increased absorption, and increase wall adhesion.
- Block concrete walls need to be glued. A smooth surface will not allow the material to adhere securely, so tile adhesive is used, which is applied with a notched trowel.
Important! The primer helps to increase the degree of adhesion of the mixture to the plane. This is important for the long service life of the layer. The product is applied to the concrete panel when the leveling concrete insert, filled crack, or depression is completely dry.
Necessary tools
To apply and distribute the material you will need to use:
- trowel;
- spatulas of different sizes;
- brushes;
- rule;
- stick;
- rollers.
We install beacons
Those who do not know how to properly plaster concrete walls should definitely pay attention to such an important stage as installing beacons. The beacon can be a metal profile or a plastic one.
It is installed like this:
- First, a self-tapping screw or dowel is installed. It must be installed under the ceiling, approximately 15 cm from the corner. The thickness of the plaster will be commensurate with the distance from the head to the wall;
- The second one is installed on the same line with the first screw. It will be located near the floor;
- Next, balls of gypsum mortar are placed between them, which should protrude slightly beyond the screws;
- Then the profile is applied and embedded in gypsum mortar. The rack level must be checked with a special device. If there is a deviation from the norm, you will need to remove one of the screws and use the building level again;
- The beacon is installed on the other side according to the same principle;
- Between the installed beacons you need to tension the thread and install the remaining slats along it. The distance between the beacons should be less than the rule itself, which will be needed for work. The result is a vertical arrangement of the slats in the same plane.
After completing all the preparatory work, you can proceed to the main part, because you must learn how to properly plaster a concrete wall, which still remains relevant.
- We start by preparing the solution. The mass prepared for the first layer should not be very thick;
- If you do not know how to plaster a concrete wall with cement mortar by spraying, we recommend that you carefully study this item. You need to throw the solution sharply so that the finished mass sticks to the wall and does not deform. Thus, the entire surface must be treated. The first layer will reach about 10 mm. Excess material protruding beyond the beacons will need to be removed as a rule;
- The first layer must be well dried. The second batch should be thicker. The application method can be either spraying or using a trowel. Often two layers of plaster are sufficient;
- Using the rule, stretch the solution along the beacons in the direction from top to bottom. Movements should be smooth and swaying, without breaking away from established guidelines.
- Before the front layer dries, you need to grout it. Take a special grater and, using one of the methods, finish leveling the surface. Movements can be in a circle, or running, that is, vertically, horizontally.
- After finishing work with the walls, you can start working on the corners. A special spatula and profile will help you make them even and avoid chipping.
To avoid the formation of lumps during the mixing of the solution, it is necessary to add water to the dry ingredients.
Alignment of walls
You can make walls smooth in different ways. The result is better when plastering the walls along the beacons is used. This topic will be discussed in our article.
The plaster composition can be applied mechanically or manually. From an economic point of view, machine plastering of walls is justified for large volumes.
Modest scales can be leveled in the old “old-fashioned” way, that is, by hand.
All that remains is to decide: do the work yourself or entrust it to a specialist. At first glance, plastering walls using beacons with your own hands seems complicated and time-consuming. However, practice shows that, in general, there are no difficulties - the same plaster, you just need to figure out the installation of beacons.
What tools will you need?
You can use different tools for plastering. If the amount of work is small, you can get by with the minimum set:
- Hammer or drill with mixing attachment. It is impossible to make a high-quality mixture by hand, so you need to use additional tools or buy ready-made decorative plaster.
- Devices for throwing mortar. When plastering walls manually, one of the main working operations is throwing on the mixture. Professional finishers use a trowel for this, but beginners often find it more convenient to use a spatula. To apply the mixture to different areas, you will need at least two spatulas - a wide one and a narrow one.
- The rule is a bar for leveling the mixture along the beacons and cutting off excess. It is best to use the h-profile rule for leveling, the trapezoidal profile for trimming.
- Graters and graters for grating and smoothing the solution.
- Beacons, screws, fishing line or twine for installing them, pliers for removing profiles.
To dilute the composition you will also need a container. Before you learn how to properly plaster walls and apply the mixture quickly, it is better to prepare the solution in small portions, so you don’t need too large a container. To work with gypsum and cement compositions, you can take a regular 20-liter bucket.