Previously, this part of the house was called the basement, now – the basement. Various materials are used to protect and decorate the base (foundation) of a private house. Plastering the base is the best option for protection, insulation and decoration.
Owners of a home or home under construction, when considering a renovation plan, often wonder how to plaster the foundation of a house, what materials to use, and whether it is possible to do anything with their own hands. We will try to answer the main questions.
Requirements for basement plaster
The location of the plinth in the structure of the house dictates its requirements for the quality of finishing of the plinth with plaster. This is the facade part of the building, possibly in contact with the ground, and is subject to frequent, abundant moisture and increased mechanical stress.
Therefore, plinth plaster must have the following qualities:
- high strength;
- resistance to aggressive substances;
- frost resistance;
- easy to clean;
- UV resistance;
- fire resistance;
- high hydrophobicity;
- vapor permeability;
- resistance to fungus and mold;
- ease of local and general repairs;
- durability;
- environmental friendliness;
- solidity;
- aesthetics.
A beginner needs to know which plaster composition satisfies these needs.
Selection rules
The main plastering is carried out using cement mortar, on top of which decorative layers are often applied.
Plastering of the plinth should be carried out according to the requirements
Therefore, such a vapor-permeable material must have a high adhesion coefficient and good strength, and also meet the following basic requirements, including:
- the presence of sufficient biochemical stability;
- high fire safety indicators;
- increased hydrophobic qualities;
- resistance to low temperatures and ultraviolet radiation;
- durability and environmental safety;
- ease of use and ease of independent work.
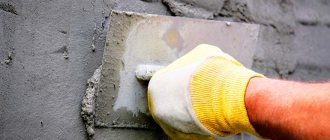
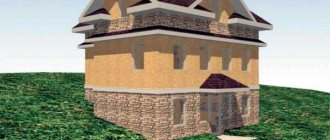
Basement finished with plaster
A correctly selected and high-quality base plaster mixture allows you to not only imitate the texture of almost any finishing material, but will also serve as additional protection to the main layer.
Decorative plaster of the base
Suitable types of plasters
There are many types of ready-made (already mixed) or dry mixes (hereinafter - SS) with which you can plaster the base. These are compositions for external use (universal ones are also suitable). Decorative plasters (also façade) are used for finishing.
For leveling, conventional cement (mineral) compounds with sand filler are often used.
However, if a new private house is still undergoing the process of shrinkage, is experiencing vibrations from the railway, or is located in a seismically unfavorable area, conventional cement compositions are not suitable, since they are easily covered with cracks. Other mineral plaster mixtures are not suitable for the plinth.
In general, for basement plaster, compositions based on the following types of base are used:
- mineral (strong, but easily soiled, susceptible to cracking, vapor permeable, durable, cheap);
- acrylic (sufficiently durable, elastic, available in a variety of colors, waterproof, and low vapor permeability);
- silicate (durable, have high vapor permeability, hydrophobic, easy and quick to clean, taking into account the fact that they require a preliminary primer on a liquid glass base. They are more expensive than mineral and acrylic compositions, they set very quickly);
- silicone (super elastic; very durable, breathable, water-repellent, durable, but expensive);
- polymer-cement (budget option, durable, breathable, resistant to cracking).
Also, for the plinth, if necessary, special plasters are used, for example, waterproofing, warm, sanitizing.
Sometimes the base of a wooden house is also made from waterproof wood. Such structures especially need protection.
Briefly about the main thing
The plaster is notable for the fact that it forms a durable monolithic coating, suitable for independent use or subsequent painting.
For finishing, you can choose ready-made compounds (silicone, acrylic, cement-sand, decorative) or mix them separately from cement, sand and functional additives.
According to the technology, the process includes preparing the base and forming a coating with intermediate priming. Additionally, reinforcement, protective antiseptics and anti-corrosion compounds may be needed.
Making your own plaster mixture
To plaster the basement of a house, you can prepare a cement plaster composition with your own hands. It will be cheaper than buying a CC. All components are easily accessible. The filler in this composition is sand (river or quarry), the binder is Portland cement grades 400 or 500. The silty sand is sifted and washed. For mixing, use cold, clean water, to which detergent or PVA is added as a plasticizer.
A regular solution has the formula 1:3-4 (for 1 volume part of cement take 3 or 4 parts of sand, 4 parts for M500). The amount of water varies during the mixing process, so it is added as needed.
The main thing is that the composition is mixed, plastic, and not too viscous or liquid.
If the solution is prepared in a container, then the dry ingredients are mixed in it first, water is added last:
- step 1 – sift the sand using a metal sieve;
- Step 2 – pour the specified amount of sand into the trough;
- step 3 – evenly scatter the measured volume of cement over the sand;
- step 4 – mix everything thoroughly (add dry dye at the same time, if necessary);
- step 5 – dissolve the plasticizer (PVA, liquid soap) and color (if necessary) in water;
- Step 6 – gradually add water, mix the solution to the desired consistency.
Coating methods
When choosing the appropriate application method (manual or mechanical), you need to take into account the amount of work to be done. If the area is small, then you can choose the most primitive and accessible tools; if the volume is large, then you will need a mechanized application technique.
Brush and board
This method is the most ancient, it was used by several previous generations. For manipulation, you will need a high-stiffness brush and a small board. The brush should be dipped into the prepared mixture, then turned over with the bristles up, and kept next to the wall. You need to move the board along the bristles of the brush in the direction from the wall towards you, bending the bristles. Under this influence, the hairs will straighten due to their elasticity, and the mixture on them will shoot out onto the wall. The plaster is spread over the surface in a thin layer, but does not serve to obtain a heat and sound insulation effect.
Net
This method is not as popular as the previous one, but is still sometimes used. A fine-mesh mesh is fixed to the wall, maintaining a certain distance. Using a construction trowel, the mixture is poured onto it. Flying through the mesh cells, the solution forms interesting patterns on the wall. At the end, the mesh is removed, since it is an auxiliary material.
With a broom
To implement, you need two tools: a broom and a stick. The stick should be held perpendicular to the wall. A broom is dipped into the plaster, and it makes sharp blows to the stick. When these two tools collide at high speed, the plaster from the broom will simply fly off, creating “fur coat” patterns on the surface to be decorated.
But this method is the longest and most labor-intensive. One portion of the mixture is enough to cover a small area. You will have to perform a large number of similar movements. Therefore, when decorating large areas, it is better to abandon this method. A broom made from thin twigs of any tree is ideal for the job; sorghum should be avoided.
Roller
The roller is a more modern and advanced tool. After the roller, a thicker layer of “fur coat” plaster remains on the walls with a minimum amount of time. The procedure is similar to simply painting vertical surfaces with a roller. To make it more convenient to work, you need to choose a flat rectangular container, dilute the mixture in it or pour it already prepared. It will be much more convenient to dip the roller into this. Then, using simple rolling movements, you need to evenly distribute the solution on the surface. You can work with a roller in another way. Using any tool, immediately apply a significant amount of mortar to the future facade, and then begin rolling out.
Manual sprinkler
This method reads semi-professionally. There is a special tool, plaster is poured into it. The person independently untwists the handle, which causes the shaft to rotate, which will push out the solution, spraying it on the wall. It will be distributed in a shooting motion thanks to a large number of metal tendrils.
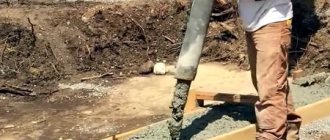
Gun with compressor
This method is already considered professional; the mixture flies out of the apparatus under the influence of air pressure. The compressor creates it. With a convenient tool, you can decorate large areas of walls efficiently and evenly. The result looks perfect, has texture, roughness, and lasts much longer than plaster applied with a broom or roller. But the equipment has a significant cost.
Surface preparation
The base can be of different designs from any materials. Preparing concrete or brick, as well as any other surface for plaster, has its own characteristics.
Preparing a brick plinth
After removing the old plaster, an unpleasant picture may appear as the mortar filling the seams of the old brickwork begins to crumble over time. You can see the bricks that need to be replaced. Then the seams are cleaned of crumbs, parts of the rejected brick are removed, the old mortar is removed with a wire brush, and dust is removed.
Preparing a brick plinth before plastering
After wetting the surface of the masonry with water, they carry out repairs (insert new bricks, placing them on the mortar). Deep seams are filled with mortar, leaving the upper part of the seams 10 mm deep unpainted. New masonry is also cleaned with a wire brush. The seams are deepened by a centimeter to increase the adhesion of the base to the solution. Before applying the plaster, the brickwork is generously moistened.
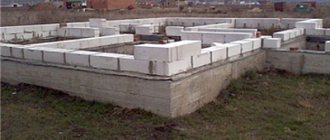
Preparation of rubble and rubble concrete base
This base may also require replacing unusable stones and removing crumbled mortar. The loose stones are removed, the area is cleaned, and the stones are placed in the solution in the same place. The resulting voids are filled with a non-shrink solution.
Preparation of concrete and reinforced concrete foundations
Identified potholes, chips, and cracks require repair. If cracks are evidence of displacement of the foundation, it is strengthened. The cracks are being repaired. The surface is cleaned of dust. The cracks are sealed with cement mortar with the addition of sand. Strengthen by reinforcing with mesh. Concrete contact is used as a primer.
How to properly dilute cement mortar without sand?
To make such a solution, you need to dilute the cement with water. Its addition should be portioned. The mixture should be stirred until it reaches a uniform consistency.
The main rule of using this technology is that such a solution must be used very quickly for your purposes. This rush is due to the fact that the cement will begin to harden quickly and then nothing will be done.
Cement is mostly used as a substance necessary for binding other building materials. Therefore, in its pure form it collapses very quickly and crumbles after hardening.
Technology for plastering the basement of a private house
Now about how to plaster the foundation (basement).
Features of the technology for plastering the basement floor of a house:
- optimal air temperature +20°С (possible to work at +5,+35°С);
- humidity – 60% (it is impossible to work during precipitation; for normal hardening, it is recommended to choose a weather “window” of several days without precipitation, without wind, or to protect fresh plaster with film);
- the base must be protected from direct sunlight;
- plastering the foundation is carried out in several stages;
- at each stage of plastering, a solution of a certain consistency (composition) is used, two or three such layers - spray, primer, covering (in the case of painting, for tiling or decorative plastering, it is not needed);
- observe the minimum layer thickness – 10 mm;
- when leveling, beacons are used;
Preparatory work
The features of foundation preparation in special cases were discussed above.
General principle of work:
Old unusable foundation plaster is removed. Cracks and potholes are repaired with cement mortar, using reinforcing mesh for large damage. The base for applying the solution must be cleaned of grease stains, grease, rust, and salt protrusions.
Do not leave pockets of mold or mildew. Foreign stains are washed away, dried, and treated with special means. Excess metal parts are removed, the remaining ones are insulated with oil paint. Apply notches to the concrete surface (sufficient depth - 2 mm). The surface is cleaned of dust.
Application of primer
After drying, the prepared base is primed by applying two layers of a suitable primer.
Typically, deep penetration compounds are used for porous substrates, such as brick. The primer is applied with a roller or brush (brick, hard-to-reach places). Dry after applying each primer coat. Before painting, the plaster coating is also primed, but another product (usually acrylic based) is also used that is water-repellent and has deep penetration.
The façade primer is used.
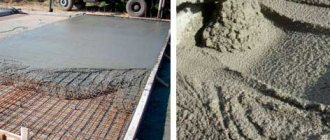
Fastening the plaster mesh
To plaster the foundation of a house, it is necessary to take into account the fact that the result is a multi-layer structure. If it is composed of different materials, then the linear temperature stretch of the materials may differ, which leads to delamination and disruption of the integrity of the entire structure. Therefore, they apply plinth plaster over a mesh.
The mesh is also needed when the plaster thickness is > 20 mm, as well as when using insulation. It is recommended to use galvanized low-carbon steel mesh, which has an expansion coefficient similar to concrete, or stainless steel wire mesh 20x20 mm. The mesh is secured to the base with special dowels or nails (nails can be driven into the seams of the brickwork). The mesh panels are overlapped.
Possible errors in the process
When plastering a plinth with your own hands, you should fulfill the following requirements to prevent mistakes:
- When removing the old base, you should remove any elements that move or do not hold together well. The surface must be cleaned. If you apply concrete to a weak layer, the coating will quickly crack and fall off.
All deep depressions in the plinth must be sealed.
If possible, the cracks are widened, reinforced with reinforcing mesh and sealed with mortar. All recesses must also be sealed with plaster and leveled. If the base is finished to look like stone, then the unevenness can be preserved.- If the masonry is damaged, the gaps must be filled. To do this, you need to throw in the solution and put in a stone that is suitable in size.
- Before applying the plaster layer, it is necessary to make a high-quality primer of the base. Thus, all pores are filled and adhesion increases. The solution will not absorb water and the plaster will not fall off after a certain period.
The surface of the plinth must be hard, clean and secure.
Features of decorative finishing
Decorative plaster of the foundation adds completeness to the appearance of the entire building. To finish the foundation, the base can be tiled, painted or decoratively plastered.
To create various effects, the following compositions are usually used:
- textured;
- structural;
- pebble (mosaic plaster).
The base covered with pebble plaster looks elegant. For the base it is better to use compositions with a large fraction of filler. If you want to decorate the foundation using an imprint method, using figured rollers, stamps or a matrix, choose textured mixtures.
Creation methods
The process of plastering according to the chosen texture with your own hands can be done in two ways:
- Stamping. Stencils of several contours are made, which are applied to freshly applied plaster and tapped. The resulting print is embroidered. Rollers are also used for shallow relief. The decorative pattern is rolled in even rows.
- Cutting. Recesses in the solution are made with a sharp tool (a fragment of a sheet of metal or tin, cut to resemble a characteristic groove). The lines are expanded by inserting a metal ruler, tapping until the required clearance and angle are obtained. Complex transitions in the cladding can be formed from a notch made with a spatula using a rubber-gloved hand. The hardened solution is amenable to the action of a circular saw, but the shape is already limited. A wide seam requires two cuts with the middle removed.
The plausibility of large details of the image on the finishing of the foundation of the house is achieved using a combined method. A characteristic pattern of the material is applied to the block formed by cutting using a metal impact stamp with protruding parts measuring 15x15 cm.
The surface is leveled by wet grouting the plaster, for example, with a tarpaulin mitt. The roughness of natural stone is created with soft metal brushes.
How to paint the base of a house over plaster
Painting the plinth over plaster – finishing. The paint must be selected and applied so that it does not fade or peel prematurely. For painting the plastered surface of the plinth (and this is the outer element of the house), not any paint is suitable, but only facade paint. A suitable option would be compositions based on acrylic, silicone or a combination. These paints are durable, elastic, UV resistant, and vapor permeable.
Combine the color of the basement with the overall color scheme of the house. You can paint the base with resin, which, when dried, becomes matte and dark. The resin is diluted with kerosene and applied with a roller.
Dirt is less visible on brown and gray exterior surfaces.
Painting
The most successful color scheme for finishing is to choose a base color that does not contrast with the main tone of the house. It’s even better if the shade of the resulting stone looks a little darker, “heavier” than the wall material. However, the choice of color depends only on your desire, and the base can be painted or plastered:
- in one tone (the plaster is not painted or a continuous coating is done with one composition);
- two tones (the stone differs from the seam cut);
- several tones (color transitions imitate real material. This is the most expensive, effective and labor-intensive execution of finishing the foundation).
Tips and tricks
- Any technology only leads to the expected result when it is implemented correctly. This also applies to repairing the basement of a private house.
- If the base is made with a blind area, then less water gets on it. But if there is no blind area, then the bottom of the base is plastered with a waterproofing compound.
- Remember about protective equipment and use them during work.
- Do not use fans or heaters to dry the plaster. When the mortar gains strength naturally, cracks will not appear and the strength of the plaster will become higher.
Main characteristics
The main characteristic of masonry mortar is strength (compressive), measured in kilograms per square centimeter and designated by brand.
- To work with stone, grades from M4 to M300 (simple and complex types) are used.
- For grades M200, M300, only cement binder is used.
- The least durable grades M4 and M10 are the simple type, lime.
In addition to strength, the following parameters are also important:
- Mobility (on which ease of installation depends). It depends largely on the amount of water added to the mixture, measured in centimeters, determined by lowering a special cone-shaped metal part weighing 300 grams into the mixture. For different tasks, mobility can range from 4 to 15 centimeters.
- The ability of a solution to retain moisture is another significant indicator. The masonry mixture should not delaminate, separating into water (which can be absorbed by light, porous materials being laid) and sand. To prevent this from happening, special additives (surfactants) are used.
- Plasticity - the mass should lie on the stones in a thin layer, without draining from them, adhering to the surface and smoothing out all roughness.
- Frost resistance is important for outdoor work, especially when laying a foundation.
Plastering the foundation with your own hands: from choosing cement to grouting the surface
- What kind of cement mortar is needed?
- Preparation of the solution
- Foundation preparation
- Foundation finishing stages
Regardless of what kind of foundation is made, sooner or later it will still begin to collapse.
Cracks and damage appear especially quickly on brick and block foundations. It's no secret that cement is short-lived. It is not able to withstand the influence of rain, and therefore is washed out quite quickly. It goes without saying that every home owner thinks about protecting the foundation. In this case, the best defender will be foundation plaster, and anyone can do it with their own hands. What are the positive aspects of foundation plaster? First of all, of course, it is easy to update and simple repairs. It is very important to remember that plastering the foundation and the interior are two completely different processes. In order for the plastering work to be carried out correctly, and for the coating to last for many years, you need to know some secrets of preparing the plaster solution along with the rules for its application. It is worth noting that adding a color pigment to the solution will further decorate the foundation.
Nuances of using building materials
White cement, produced using a special technology, should also be used under certain conditions. In particular, you need to avoid interaction with a number of substances:
- fats;
- iron oxides (rust);
- dust released during construction site preparation.
Accordingly, it is necessary to clean everything that the cement will come into contact with. Pre-treat metal objects with anti-corrosion mixtures. This will avoid the appearance of rust stains on concrete surfaces or decorative layers. Otherwise, the process of using white cement is similar to that which is implemented when using ordinary Portland cement.
Scheme for mixing white cement mixtures
You can prepare a high-quality product using the following components:
- white cement;
- gravel;
- ordinary sand (quartz or washed river), or marble flour;
- purified running fluid.
For mixing, you will need a container that satisfies the above rules regarding substances that negatively affect the quality characteristics of white cement. The working tool can be a regular shovel.
- The required amount of filler, sand and cement is poured into a dry and cleaned container. Mix everything until smooth (no lumps).
- Then a little liquid is poured in. The consistency is mixed evenly until it turns into something creamy.
- If the product is crumbly, you can add a little more liquid.