Columnar foundation for a house Quite often, private developers do not have the financial ability to buy reinforced concrete blocks or do not have the technical capabilities to install them using powerful mechanized equipment.
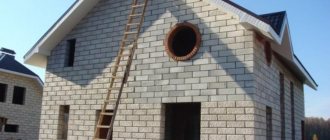
Now factory-made aerated concrete blocks such as foam blocks for the home have appeared on the building materials market, which are distinguished by their low price and low weight. They also have a number of advantages:
- Due to the presence of air cells inside the blocks, such structures have high heat transfer;
- Frost-resistant, because the cells are covered with a layer of concrete;
- Lightweight due to the cells not filled with concrete, and therefore suitable for the construction of small commercial and residential buildings;
- For load-bearing walls there is no need to use various thermal insulation materials, and this significantly reduces the cost of building construction;
- Due to its lightness, there is no need to use mechanized equipment;
- Cheap and accessible to everyone.
But there is one key disadvantage of aerated concrete - it is hygroscopic. If you destroy a thin concrete layer, then water will gain access to the cells and, under conditions of sudden temperature changes, simply destroy them. And this entails rapid destruction of the entire structure as a whole. Therefore, aerated concrete is not recommended for foundations built on heaving soils, as well as those subject to a constant rise in groundwater levels.
But, on the other hand, it is an excellent building material when constructing a country house, as well as when using a grillage of a columnar structure made of wooden beams. After all, aerated concrete is very light and compact, which is why the structure is light, elastic, but subject to deformation.
Therefore, the technology for constructing a foundation from aerated concrete is complex, but it can be done with your own hands for a country house, outbuildings made of wood, or even a small cottage.
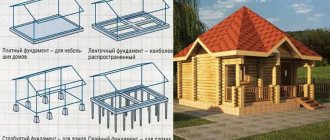
Types of foundations for foam blocks.
A heavy foundation for the construction of a building made of foam blocks will lead to unnecessary expenses that will not justify themselves.
Therefore, already at the initial stage of building a house from such material, the benefits are quite obvious. Three types of foundations are considered the most suitable for foam blocks: strip, columnar and slab. Each type is used depending on the structure of the soil, the value of its heaving, and the depth of groundwater. For example, if groundwater is located at a depth of three meters or more, a shallow strip foundation is suitable for a house made of foam blocks. Its difference is that the trenches for such a foundation go deep into the ground to a distance of 50 cm, so one person can dig such holes.
Final stages of work
The cast tape is aged for 28 days. The first 3 days it is necessary to water it with water every 4 hours, then for a week watering is done every 8 hours. This allows you to equalize the stress and humidity of the outer and inner layers of the tape.
The formwork is removed 10 days after pouring.
NOTE!
Despite the long curing period, you should not try to shorten it, even if you feel that the concrete is already quite hard. The foundation is a critical element of the building, which does not allow for a free approach to technology.
Strip foundation.
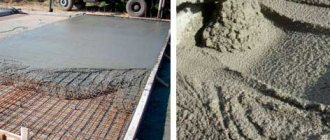
Trenches 50 cm deep are located around the entire perimeter of the house and under the planned load-bearing walls. The base of the foundation must be made wider than the walls themselves by 100 mm; a cushion of sand and crushed stone should be laid at the bottom in 2 layers, the thickness of each of which is approximately 10 cm. Then the formwork is installed and a two-layer reinforcement frame is laid. Metal rods with a diameter of 10 mm are suitable for it. Concrete is poured into all trenches at once. To prevent concrete from drying out quickly in summer, its surface is watered and covered with film after it begins to set. The hardening of the foundation continues for a month from the date of pouring. When building on a site with a high level of groundwater, the foundation is protected with waterproofing material.
Pile-grillage on bored piles
Such a foundation can be considered a reinforced version of the MZLF or pile foundation. It is reliable in almost all types of soils, including weak and waterlogged ones.
For a house weighing about 100 tons, the optimal diameter of piles is 30 cm. They are placed at the corners of the building, at the intersection of walls and every 1.5-2 m around the perimeter. According to SNiP, the distance between the supports should be no more than 6 pile diameters, that is, in our case, 1.8 m.
The diameter of the working reinforcement rods is 12 mm, the clamps are 6 mm. Each structure will require 4 rods. The pile must be immersed to a depth below the freezing level of 10 cm, which can be accurately determined in the manual for foundation design SP 22.13330.2016 or in tables posted on the Internet.
The standard dimensions of the grillage tape are 400x400-600x400 mm. For pouring, you need to use concrete of a grade not lower than M250-350.
The pile-grillage structure is installed in several stages:
- Site layout. It is usually carried out using specialized equipment - an excavator, a bulldozer. They cut off the fertile layer and move it to the dump.
- Marking. Both instrumental and manual methods are used. The first ones are more accurate and faster, the second ones are free.
- Drilling holes for piles. It is almost impossible to drill wells of large diameter and depth with hand drills, so it is advisable to do this using automated installations.
- Manufacturing of frames. Working fittings are bundled in 4 pieces. clamps in increments of 30-70 cm.
- Installation of formwork in wells. Cylinders made of roofing felt, pipes made of asbestos cement or polyethylene are used. In dense, non-shattering soils, it is possible to concrete piles without formwork.
- Installation of reinforcement cages strictly vertically and alignment under the level. To fix the protective layer, special plastic gaskets are put on the rods.
- Preparation and pouring of concrete. The proportions for M250-M350 can be found in the table:
- Filling of crushed stone cushion to a height of 20 cm with layer-by-layer compaction. It is carried out no earlier than 3-5 days after pouring concrete. Crushed stone fraction - 30-50 mm.
- Laying thermal insulation - 50 mm thick polystyrene foam boards.
- Installation of grillage reinforcement. The pile outlets are tied to the foundation frame. At this stage, sleeves for communications are installed so as not to make holes in reinforced concrete later.
- Assembly and installation of formwork. At home, plank boards with spacers and supports are made.
- You can use reusable plastic formwork, which after installation can be used on other objects. Technologically advanced and convenient is permanent formwork made of rigid extruded polystyrene foam or DSP boards, which does not require dismantling and at the same time insulates structures.
- Pouring concrete. During monolithic work, you need to take as few breaks as possible and try to fill the entire volume at once. If this is not possible, the cold seam is placed in the least loaded place. During the process of laying the solution, compaction is carried out using deep vibrators or improvised means to expel air bubbles out.
- Excerpt. Concrete must be protected from precipitation, overheating or freezing. In hot weather, the surface is periodically moistened with water and covered with film, and insulated in cold weather.
- Dismantling of formwork.
After the concrete has hardened, waterproofing is carried out, as well as thermal insulation, if it was not performed during the installation process. After 28 days the base can be loaded.
Columnar foundation.
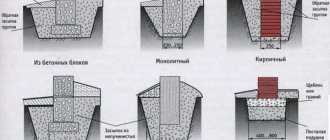
A columnar foundation for a foam block house is used on soft soil, mainly consisting of peat, clay or loam. Also, this type of foundation for a house is used on heaving soil with a freezing depth of 1.5 m. The pillars for this type of foundation are made of reinforced concrete. They must be located under load-bearing walls, corners of facades and other places with heavy loads.
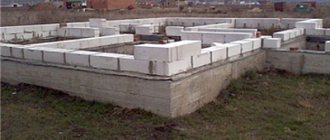
The depth of reinforced concrete pillars is equal to the depth of soil freezing, but it cannot be less than 1 meter. The distance between the pillars varies from 1.5 to 2 m. If the planned house consists of three floors, this type of foundation for foam blocks is usually reinforced with a reinforced concrete grillage. Formwork in a columnar base has a bottom supported by special supports that are installed in the ground. The reinforcement frame is attached to the mounting loops of the posts using a special knitting wire. Concrete grade M200 and rods with a diameter of 8 mm are used.
Technique for installing reinforced concrete foundation pillars
The simplest technology for installing reinforced concrete pillars is their arrangement in special wells. The process itself is extremely simple; you only need to organize a well of the required diameter (20-25 cm). If the construction is carried out with your own hands, a hand drill is suitable for this. The technology of self-production of concrete mixture is well known to all builders. It is important to remember that only concrete that is resistant to water is suitable for use in the construction of foundations, since it is not possible to organize waterproofing in the well itself.
To increase the supporting area of the foundation, which can withstand the effects of soil heaving forces, you can turn to TISE technology and equip foundation pillars with an expanded base.
There is another way to build reinforced concrete pillars. It requires the preparation of a pit that is ½ meter larger than the pillar itself. Before pouring the concrete mixture, it is planned to install the formwork. In this way, rectangular or square underground support columns for the entire foundation of the house are obtained.
All options for reinforced concrete foundation pillars require additional reinforcement. Non-reinforced structures will not be able to resist the tearing force of frost heaving of the soil. To strengthen all individual elements, it is customary to use from 2 to 4 reinforcement rods, connected to each other in a kind of frame for both pillars and grillage.
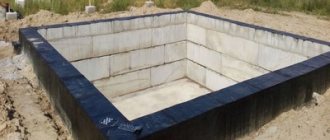
Slab foundation.
A slab foundation for the construction of a foam block foundation is installed on any type of soil with the exception of clay. This type of foundation is called floating because of its ability to move along with the soil, preventing the walls of the house from collapsing. When constructing a floating base for foam blocks, a 60 cm pit is dug under the entire surface of the house. Of the entire depth of the pit, 40 cm is allocated for a cushion of sand and crushed stone, the thickness of the layers is 25 and 15 cm, respectively. After this, waterproofing is carried out and the frame is installed. It contains two layers of reinforcement with a diameter of 8 mm and a pitch of 25 cm between the rods. Such a foundation has great strength due to rigid reinforcement.
The information presented above about the types of foundations gives a brief idea of their characteristics, which allows you to make the optimal choice of the type of foundation, taking into account the structure of the local soil, the number of floors and the size of the foam block house itself.
There are other types of bases, but they are used for heavier materials. As a rule, in private construction it is considered optimal to build a strip shallow foundation for a foam block house. One of its advantages is the ability to build a basement.
We choose the best option for the basis for the house.
What kind of foundation is needed for a foam block house that will be most rational to use? Here we will immediately disappoint many - there is no universal answer to this question. There are several options, both the base itself and the selection parameters.
Let's immediately define two directions in which we will consider options:
- Soil type. In any case, we will have to build on this in foundation work.
- Building type. But rather the load that this building will exert on the foundation.
Problematic soil.
And we will start our conversation from the ground. Before starting work, we will definitely need to conduct a geological analysis of the soil at the construction site. (see also the article Do-it-yourself country house made of foam blocks - we build it simply and quickly)
Based on its results, it will be possible to draw the first conclusions.
So, what problems can the soil hide:
- Flowability . This is a weak type of soil, in which we may experience skewing and subsidence of the building from one of the corners. As a result, serious deformations of the base and walls themselves.
- Water saturation . This suggests that when making a foundation for a house made of foam blocks, we will have to carry out large-scale drainage work, which will not be limited to draining water only during construction. The drainage system will have to work afterwards.
- High groundwater table . The difference from water-saturated soil is that here water will wash away the base and destroy it.
- Difficult terrain . This moment can also be displayed in the area of the problematic soil. In any case, with such a terrain it is quite difficult to build a classic strip foundation, for example.
Foundation for a house made of foam blocks on a slope.
Solving the issue with the relief.
This is the main point in the development of any foundation, because, in fact, the foundation is a supporting structure that takes on the loads of the building and distributes them, releasing them to the soil.
The instructions for creating any foundation always assume that all loads will be collected, that is:
- Wall weight.
- Roof weight.
- Floor weight.
- Household appliances and utilities.
- Weight of all proposed occupants.
- Variable loads.
Based on these two parameters, we draw a conclusion about what kind of foundation is needed for a house made of foam blocks.
The cheapest foundation for a house.
Foundation for a foam block house.
Pile type.
The pile base is perfect for foam block construction due to several points:
- Relatively cheap with excellent quality.
- Short construction time.
- Possibility of installation on problematic soils.
- Possibility of independent construction.
To consolidate all the above advantages, we suggest considering the option with bored piles, which we will step by step lead to the foundation for our foam block house. (see also the article House for a summer residence made of foam blocks - a very interesting option)
- Site marking.
- Drilling of the wells. A hand-held hole drill is also suitable for this, since the depth should be at the freezing level, which is a maximum of one and a half meters.
- Well expansion. Filling the cushion with sand and compacting it.
- Installing a glass can be made from simple roofing felt.
- Immersion of the reinforcing element.
- Pouring concrete.
Bored foundation with grillage for a house made of foam blocks.
Bored base with grillage.
As you can see, there is nothing complicated in the design of such a basis. The main thing will be to strictly adhere to the design requirements. And this is the number of piles and their location.
And after the piles are filled, we have two options:
- Create a grillage and fill it with foundation.
- Place monolithic slabs on top.
In principle, we can only build a grillage with our own hands; special equipment will be required for the slabs.
Advice! To make the grillage even more durable than even originally planned, you can increase the cross-section of the reinforcement and use granite rather than the usual limestone type of crushed stone in the concrete batch.
Releases of reinforcement for the foundation of a house made of foam blocks.
This was the first version of the base structure.
Tape base.
And here is our tape base. Often, when asked what kind of foundation to make for a house made of foam blocks, the answer follows precisely the theme of the strip type. (see also the article Projects of country houses made of foam blocks: features of design and project selection)
Indeed, this is one of the simplest types of foundation that we can easily build with our own hands.
If the soil and the project allow, then step by step everything looks like this:
- Marking the foundation.
- Excavation. Depending on the size, you can dig everything up yourself, or you can rent a small excavator.
- Laying sand at the bottom of trenches and compacting.
- Laying the reinforcing element.
- Installation of formwork.
- Pouring concrete.
What is the cheapest foundation for a house.
Trench and reinforcement.
There are also some interesting nuances here. Firstly, we will need to take care of waterproofing. To do this, after removing the formwork, we treat the concrete with mastic. This is the simplest and most affordable version of waterproofing.
We always suggest using reinforcement with a certain margin of safety. Of course, the price increases somewhat, but still we are talking about creating a foundation.
Speaking of materials, there is nothing unusual here. However, returning to waterproofing, you can use liquid glass in the concrete batch; this material will also significantly increase the water resistance of the base.
When installing formwork, it would be more rational to use construction moisture-resistant plywood, which can then be used in a variety of jobs. And during the fastening process, wood screws are excellent. They connect the parts of the formwork better and are much easier to dismantle.
Another type of foundation that we can also quite successfully use is a monolithic slab. Moreover, it can be either a simple monolith or a Swedish stove, in which we will immediately arrange communications.
In this case, the question of which foundation to choose for a house made of foam blocks depends rather on the functional component of the monolith and the cost. Let's consider the basic principles of the monolith design:
Monolithic foundation for a foam block house.
Monolith for a foam block house.
- Excavation. If the pit is in a water-saturated area, then drainage work is necessary. We definitely can’t do without an excavator here.
- Compacting a sand cushion. If we assume a Swedish stove, then we also level the bottom of the pit.
- We install waterproofing. This is either roofing felt or dense polyethylene. Moreover, we install everything in several layers.
- We used a Swedish stove and installed thermal insulation boards.
- We knit the reinforcement. For the monolithic type, we choose reinforcement with a cross-section of 12-14 cm, and knit it in increments of 15-20 cm.
Here is a lyrical digression. Before making a foundation for a house made of foam blocks, we calculate all the loads, and accordingly we can accurately select the required reinforcement section.
How important is it to choose it with a margin of safety? In principle, no one forbids us to do this, the main thing is not to choose a smaller section.
Important! The reinforcement should be positioned taking into account the outlet at the edges, where it bends and will be connected to the walls.
In addition, even if we install it in one horizontal row, we will have to raise it so that it is approximately in the middle of the slab. To do this, we install it on special supports.
- We install the formwork.
- We fill everything with concrete.
The monolithic slab is ready.
An approximate diagram of the construction of the cheapest foundation for a house made of foam blocks.
Approximate diagram of the foundation structure.
Important! If we have a Swedish stove, all communication pipes or heated floors are filled with air before pouring concrete, so it will definitely not deform under the weight of the concrete.
So, we answered the main question, what kind of foundation is needed for a house made of foam blocks, giving an example of three main types of foundation that can fully meet all the requirements of a house made of foam blocks.
In addition, these types of foundations can be selected depending on the condition of the soil at the construction site, that is, we have several options. And this always means more opportunities.
Let’s not forget about the financial component; foam blocks initially save some costs, so you can optimize the foundation of the house. In the video presented in this article you will find additional information on this topic.
Checking the soil and depth for laying the foundation of a one-story and two-story house made of foam blocks.
The construction of a private house begins by checking the soil, and only then laying the foundation. First, the type of load-bearing surface is determined, the depth of the foundation itself is calculated, and only then the walls are erected. There is no point in saving on such events.
With the advent of durable, lightweight, and most importantly warm materials for quick construction of walls, the cost of constructing foundations has decreased significantly. These include: aerated concrete, gas silicate, foam concrete and expanded clay concrete blocks. A good choice if there is a need to lighten the structure of the house, make it warm, and there is an opportunity to save on work. It is much more expensive to build a brick house than a house made of foam blocks.
Prices for turnkey foundation installation.
The cost of foundation of your building consists of:
- cost of design documentation;
- prices for materials (concrete, reinforcement, formwork);
- transportation costs;
- payment for earth and concrete works;
Reputable construction companies will easily tell you the cost of constructing any type of foundation for a house made of foam concrete blocks. For this purpose, a special program was invented - a calculator that calculates the volume of concrete and the amount of required reinforcement. He will make calculations both for a small one-story house with an area of 10x10 m, and for a luxurious three-story cottage with a complex design.
How to check the soil under the foundation yourself.
Checking the depth of the foundation for a foam block house.
Checking the soil by color.
Drilling test wells. By drilling a small shaft 1-2 meters deep, you can visually determine some of the qualities of the soil. You can also dig a small pit, thereby determining the location of the load-bearing layer of soil, loam or clay. But this is all relative; if analysis is impossible, a reinforced foundation is laid on piles or concrete pillars.
Direct factors, such as the presence of water, sand particles and stones, will prompt the choice and direction. But they do not cancel the need to do an analysis.
Of course, in most cases of construction of country houses, few people conduct such an analysis. Then it is recommended to develop the trench to a dense load-bearing layer. Here we will analyze more precisely all the stages, both for a one-story house and for a two-story one.
Features of the material
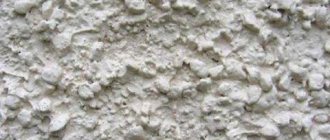
Aerated blocks are less dense than regular bricks
Aerated concrete has a number of technical features that distinguish it from other building materials. In this regard, the entire construction technology of aerated concrete has its own nuances. The method of selecting and laying a foundation for a house made of aerated concrete is no exception.
To understand what requirements apply to load-bearing foundations and how to choose the right foundation for a house made of aerated blocks, you need to become more familiar with the technical and operational characteristics of the material.
| № | Characteristics | Indicators |
| 1 | Density | 300 – 1000 kg/m³ |
| 2 | Linear compressive strength class | V-2.5 ... V-3 |
| 3 | Moisture resistance | Low |
| 4 | Fire resistance | Not flammable |
Mass and density
Due to their low density, the blocks are lighter and place less load on the base
The density of gas silicates is much less than that of building bricks or cinder blocks. For comparison: if this indicator for fired clay bricks is about 1.5 tons per cubic meter, then the density of gas silicate blocks varies from 0.3 to 1 t per m³.
That is, their density indicators are comparable to the density of wood. This significantly lightens the load on the load-bearing foundation of the building, so the foundation for a house made of gas silicate blocks can be built using lightweight technologies, which speeds up the construction process and also reduces estimated costs.
Vapor permeability
The blocks absorb moisture well, and therefore require additional external finishing
Aerated concrete does not interfere with the free exchange of gases between interior spaces and the atmosphere. This allows you to create and maintain a comfortable microclimate inside the building, with a natural content of moisture and oxygen. This is due to the high porosity of the material.
But, on the other hand, high porosity also determines the greater hygroscopicity of gas silicates - the ability to absorb moisture from the environment and retain it inside itself.
This is why aerated blocks must be carefully protected from dampness: a block that has absorbed water can collapse at sub-zero temperatures: the water frozen inside will simply split it.
To avoid getting the wall blocks wet, the height of the foundation for a house made of aerated concrete must be at least 40 cm. This will protect the walls from rain and splashes from water flowing from the roof during bad weather.
Strength
Very often, inexperienced builders complain about the low strength of gas silicate material, but this should not be attributed to its disadvantages, but rather to its operational features. It requires special conditions during transportation and storage, due to its fragility.
But due to their low strength compared to concrete and brick, aerated blocks can be processed with ordinary carpentry tools: sawing with a hacksaw, planing with a plane, processing with a chisel.
Foam concrete is easy to saw with improvised tools
Among the disadvantages of low strength, one should note the tendency of aerated block walls to crack when the base is deformed. This imposes special requirements on the foundation for an aerated concrete house.
The foundation for gas silicate blocks, despite its lightness, must have maximum strength and stability. The foundation for a house made of gas silicate must be selected and installed in such a way as to minimize any movement and deformation during operation.
Thus, the forces of frost heaving acting on an improperly constructed foundation for an aerated concrete house can lead to its bending and cracking, and this, in turn, will cause a violation of the integrity of the masonry walls.
Backfill depth for a one-story building.
Having set up several mines, we check after 24 hours whether there is any water in it. If it’s dry, you can look at the depth of the dense soil. When drilling with a change in soil layer (determined visually), measure the depth with a tape measure. It is better to make holes along the entire perimeter of the site, drawing up a map of the occurrence of load-bearing soil.
When checking, use a drill diameter of 200−250 mm. By drawing a preliminary sketch, you will have an idea of where and how much to dig. You will have to take into account several more important factors, the level of freezing and the depth of the bearing layer of the earth. This is also relevant for one-story and two-story houses made of any material, not just foam blocks.
Freezing level.
In the middle zone, ground freezing is not so deep, about 1.5 meters. In the northern regions, the level of freezing is always taken into account; development is carried out taking into account the average temperature over 3-4 years. Everything can be calculated using the formula. We will proceed from it.
Let's look at the notation. The M value shows the average monthly temperature taken in the desired climate zone. The D1 indicator is the depth figure, and D0 is the coefficient of the soil itself. Its limits can vary, from loam and clay 0.23 to rock and clastic rock 0.34. Having finished with the miscalculations, let's begin the process itself.
Excavation and compaction.
What is the depth of a strip foundation for a one-story house.
Foundation arrangement option.
At a short distance from the city, soil development is carried out using a tractor. A house made of foam blocks weighs little, so a trench is dug to a depth of 1.3-1.4 meters, taking into account the crushed stone cushion. The width for a one-story house is 800 mm, leaving space for insulating the base. The standard foundation for a small building made of foam blocks is 600 mm in width. The cross-section of the monolith will be 1200×600 mm, reinforcement with fittings is mandatory, the optimal thickness of the rod is 12 mm, for both transverse and longitudinal strapping.
Compaction of the bottom of the trench is carried out with vibrating plates or gasoline rammers weighing from 100 kg. The coefficient must comply with the regulatory framework SNiP (building codes and regulations). Usually it is adjusted to 1.85−2.15 in relation to non-compacted soil. In muddy, silty or clayey soils, when tamping is carried out, a cushion of sand 200-250 mm thick is arranged, compacting it in stages.
Advice: If the bearing capacity of the soil is weak, piles are driven along the bottom of the trench at a distance of 3 meters from each other. The diameter of the pipes is chosen to be no less than 89 mm, with a length of 2.5–3.0 meters. These measures will prevent the foundation from sagging under the load of a one-story house.
General installation diagram
Procedure for the construction of a shallow strip foundation:
- Removing the top layer of soil, leveling and marking the site.
- Digging a trench to a certain depth and width.
- Creating a sand cushion.
- Assembly and installation of formwork.
- Arm belt knitting.
- Pouring concrete, holding until the desired degree of hardening.
- Completion of work.
Without exception, all steps must be completed in the correct sequence.
IMPORTANT!
The depth of the trench should be increased by the thickness of the sand backfill layer, about 20 cm.
Pillow under the foundation
A layer of sand backfill is necessary to level the bottom of the trench and create a drainage effect. Screened river sand is used (ideally), without clay admixtures (this is important!) . Backfilling is done to a thickness of 20 cm.
The pillow is checked for horizontalness and compacted thoroughly. The possibility of tape subsidence depends on the quality of the seal. therefore it is necessary to achieve maximum density. The quality is checked by walking over the cushion - if no traces remain, then the tamper is of high quality.
Brand of concrete and reinforcement
For pouring strip foundations, M200 concrete is mainly used. This material has sufficient strength to support heavier buildings, but using concrete of a lower density is not recommended .
The quality of the material varies, but a certain margin of safety in this case will not hurt.
The thickness of the working reinforcement rods for the foam concrete tape is 12 mm, and for vertical (smooth) reinforcement, 8 mm rods can be used. This is quite enough, given the relatively small size of the tape.
When using composite (fiberglass) reinforcement, you should adhere to the same dimensions, since reducing the diameter of the rods can lead to deformations when pouring concrete.
Installation of formwork
To create formwork, you need to stock up on wooden edged boards.
The dimensions of the tape are small, so 25 mm thick lumber is suitable, but if the foundation parameters are large enough, you can use boards 30 or 40 mm thick.
The formwork is assembled in stages:
- Next to the trench, shields are assembled with a width of no more than 10-15 cm than the height of the tape.
- The shields are lowered into the trench, aligned along their axes and connected with crossbars. Their size determines the width of the tape.
- From the outside, the shields are fixed with inclined stops and vertical support bars.
When assembling the panels, it is necessary to monitor the tightness of the connection. There should be no gaps larger than 3 mm, as this will cause concrete to leak out. If gaps are found, they must be plugged with tow or hammered with wooden slats.
Reinforcement and knitting
The assembly of the reinforcement frame is carried out according to the standard scheme. It is necessary to form a spatial lattice of four working rods (two at the top and two at the bottom), with a depth of immersion in concrete of 2-5 cm . Vertical elements (clamps) are installed in increments of about 40 cm.
The corners are carefully designed, at which additional rods are installed to strengthen the joints.
The rods can be connected using electric welding, but for reinforcement of this size, annealed steel wire (1-1.5 mm) is usually used. A piece of wire about 25-30 cm long is bent in half, then the connection of the rods is grasped from below in a diagonal direction.
The ends rise up, grab the loop with a special hook and twist it 4-6 turns, tightly pulling the rods towards each other . The connection is strong, and the skill of work is acquired very quickly.
Fill
Filling must be done in one go. This is important, since the connection of concrete that has begun to set with fresh pouring cannot be strong enough; if a break occurs for more than a day, you will have to stop pouring and wait until the concrete hardens completely.
At the same time, it will no longer be possible to create a full-fledged monolith, so it is necessary to organize the work in such a way as to fill it in one go.
It is recommended to order ready-made concrete, which will be delivered directly to the site. This will free up labor and help obtain material of guaranteed and uniform quality.
Pouring is done from different points so that the concrete spreads evenly along the entire length of the formwork. To remove air bubbles, use vibrating machines or ordinary pitchforks.
After pouring is completed, the surface of the tape is smoothed, then the formwork is covered with polyethylene to protect it from sunlight or rain.
Bookmark depth for a two-story building.
What is the depth of a strip foundation for a two-story house.
Sketch of optimal depth.
Such construction of a house made of foam blocks requires a reinforced foundation and careful preparation of the pillow.
The development of a pit with a depth of at least 2 meters is inevitable, since the weight of one block is 24 kg, and at least 800 blocks will be needed to build an average house with an area of 100 m², one floor.
Plus the weight of floors, floor slabs, roofing, windows, finishing inside and outside the building. It is necessary to prepare concrete for the foundation by distributing the load evenly over the entire area of contact between the foundation and the load-bearing surface of the earth.
Foundation for a foam block house made in our own design
Many are attracted by the foundation for a house made of foam blocks with a basement. The energy-saving characteristics of the material make it possible to use this room as a workshop and storage room, boiler room and laundry room. Here you can also equip a place for a car.
For structures being built that have a large weight and dimensions, for example, 10x10 or a two-story mansion with a basement, a strip foundation is suitable. Despite the fact that a large amount of work and precision execution is expected, it is realistic to build such a foundation from foam blocks with your own hands. The order of work is as follows.
Classic foundation made of foam blocks
- Use a level to mark the perimeter.
- Mark the corners.
- Excavate the top layer of soil (0.5 m deep).
- Dig a trench under the foam block with a width greater than the thickness of the wall by 0.01 m or more. If the foundation is shallow, then its depth should not exceed 600 mm. Make the edges of the trench with a slight bevel so that they do not crumble.
- The bottom is well compacted.
- A sand layer is formed with the addition of crushed stone. The mixture is poured in a thin layer, watered and compacted well. The total thickness of compacted sand is 0.4 m.
- The boards are knocked together into shields. Of these, formwork is installed vertically on both sides along the trench.
- To fix the panels, spacers are made in increments of 0.5 m. They hold the formwork when filling the trench with concrete so that the panels do not warp. Instead of boards, you can use sheets of slate and plywood.
- Concrete is purchased ready-made or the ingredients are mixed on site in a concrete mixer: ¾ parts sand and ¼ parts cement. For weak grades of cement, fine crushed stone can be added. The proportion of water to cement is 0.5.
- The solution is poured onto the prepared cushion layer by layer (the thickness of each layer is 70-100 mm), periodically compacting it with a tamper. In this way, voids in the solution are eliminated. In this form, the solution matures for a week, but not until it dries completely.
- Reinforcing rods are laid on the raw material. They are first tied with wire into a belt. It is placed in a trench and filled with concrete.
- The last layer poured to the desired height is made a little thinner, compacted with a wooden hammer, and final leveling is carried out.
- Wait until the concrete hardens over its entire height. It is necessary to avoid overdrying it and ensure that cracks do not form. To do this, the foundation is covered with oilcloth or film. It is moistened periodically.
- A waterproofing compound is applied on all sides.
- The formwork is removed when the base has completely hardened: after 4-5 days.
- Foam blocks are laid on the finished foundation.
Preparing a foundation pit and load-bearing cushion for a two-story house.
Strip foundation depth for the house.
Preparing a pit for a two-story building.
Having developed a foundation pit, the bottom is measured using a level and the edge and area are cleared of crumbling soil. Then markings are made for the load-bearing concrete pad. The width of such concrete preparation is 100−1200 mm, with a thickness of 150−250 mm. It can be used to mount both a monolithic foundation and a block one. The formwork is prepared according to the diagram, installed around the perimeter, using reinforcement as stops, simply driving them into the ground.
Reinforcement is done in one tier, with class A 1-3 reinforcement. The mesh cell has a size of 200×200 mm, the joints are knitted with wire. The laying depth of the load-bearing belt is at least 1.8−2.2 meters for medium heaving soils of type 2. What is important when laying is to make a cushion of crushed stone under the base. The thickness of the pillow for a two-story house must be at least 120 mm. Crushed stone is laid on compacted soil. Then water drainage measures are installed or waterproofing material is laid. If construction is frozen for the winter, a pit is dug at the lowest point of the pit to collect water. The size of the sump (storm pit) must be at least 6 cubic meters.
Issues of waterproofing and insulation
The tape is waterproofed on all surfaces. Horizontal ones are insulated using a double layer of roofing felt, with an intermediate application of bitumen mastic . The bottom layer is installed under the formwork before the tape is poured, and the top layer is laid after reaching technological hardness.
The side surfaces are covered with bitumen mastic, hot tar or other means. Modern impregnations that cut off moisture from concrete at the capillary level have performed well. You can use roofing felt by gluing it to the walls with tape on a layer of bitumen mastic.
The insulation of the tape must also be done both from the outside and from the inside. For this purpose, polystyrene foam or liquid polyurethane foam is used. The choice of material is made based on the availability and financial capabilities of the owner.
Laying the foundation.
Strip foundation depth for a house.
The depth of laying the concrete foundation for a house made of foam blocks plays an important role. The entire system of load-bearing concrete structures has considerable weight. Monolithic casting (frame) of the future house is made of class B-26 concrete.
The main weight of a two-story house falls on the monolith. The entire load falls on the monolithic frame and grillage. The walls are self-supporting structures; foam concrete is simply placed in the openings. Therefore, the optimal laying depth for a house made of foam blocks in normal soils will be minus 2200 mm from the zero level of the project. But this is for the middle zone. In each case, the depth will be different; when building a two-story building, you need support with the installation of special load-bearing pillars or pillows (glasses).
To accurately calculate and optimize the costs of constructing a monolithic house, it is advisable to invite specialists from a design bureau. Specialists will carry out thorough calculations for any house and not only those made of foam blocks, clearly organize designer’s supervision during construction, and put the facility into operation. Saving you from mistakes and unnecessary waste on rework.
Combination options
There is no single formula for combining different materials, since developers pursue different goals. Some want to minimize costs by reducing costs. Others consider this method a promising investment in a luxury mansion with unusual architecture.
Be that as it may, such construction solves a complex of problems. Combination options:
- Wood-stone. This option is suitable for creating durable housing. Includes a strip foundation, lined with natural stone on top. Log house, processed by hand. Moss serves as a sealant (also acts as an antiseptic). Stone, excellent protection from groundwater and strong winds.
- Wood-brick. The foundation used is strip and rubble concrete. If the soil is dense, formwork may not be required. Walls made of silicate or ceramic bricks provide protection from moisture, fire, and pests.
- Wood and concrete. The base is made of concrete blocks. They save construction time, but have low sound insulation properties. Heat is retained worse compared to brick.
- Wood-foam blocks. High level of thermal insulation; serious insulation is not necessary. But, given the fragility of the blocks, proper reinforcement should be performed when laying.
Brick (stone) and wood: advantages and disadvantages
The combination of these two materials helps to compensate for the disadvantages of one with the advantages of the other.
The advantages of a house where the first floor is brick (or stone) and the second floor is made of wood (logs or timber) include:
- stone walls will protect from the spread of fire during a fire, from subsidence of the second tier;;
- the upper floor will not be affected by fungus at high humidity;
- the service life of this combination is longer than that of a wooden building (more than 100 years);
- savings on finishing, wall insulation;
- wood retains heat, saves energy, and uses less natural gas for heating;
- the weight of the finished structure is not large;
- no need to build a solid foundation;
- presentable appearance.
Disadvantages include:
- different service life of building materials (to extend the service life, you need to choose dry, high-quality processed wood);
- the tree needs time to shrink (up to a year);
- additional care for the drainage system for the walls of the second tier.
Wood and foam blocks or aerated concrete: advantages and disadvantages
Thrifty developers prefer to use block materials in the construction of the first floor. Simple, quick construction, affordable price - these are the main factors of popularity.
The positive characteristics of this type of construction include:
- both building materials are lightweight, the construction of a strong foundation is not necessary;
- construction of the first floor is accelerated due to the large size of the blocks;
- working with the material is not difficult, foam blocks are easy to process and cut;
- the design does not shrink, the façade can be finished immediately after installation;
- decoration is not difficult to do, it is facilitated by a flat surface (siding, stone, decorative panels, plaster);
- aesthetic appearance, allows you to fit into any landscape;
- the wood-block combination increases service life (up to 100 years or more);
- an optimal microclimate is created, the tree regulates humidity and ensures air exchange.
Disadvantages of combining:
- thorough finishing of the first tier, taking into account the implementation of the waterproofing layer;
- it is necessary to fill a reinforcing belt to secure the wooden structure;
- periodic wood processing, care to extend service life.