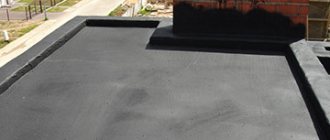
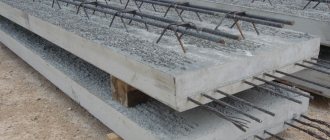
Concrete floor finished with epoxy paint
Many different compositions are available to protect and decorate the concrete surface. Some of the most durable products are those based on epoxy resins. Let's look at what epoxy paint for concrete is, its strengths and weaknesses, areas and technology of application.
What are the main properties of impregnation?
Concrete resin is used when necessary to fill voids and microcracks.
This mixture has a durable composition - a hardener and epoxy resin, colorless or with any pigment. Hardeners are most often phenols and tertiary amines. The hardener penetrates the pores and reacts with concrete particles. The shelf life of the impregnation is about six months. Resins for concrete are used in cases where it is necessary:
- fill microcracks and voids;
- be resistant to chemical influences;
- achieve complete dust removal from concrete;
- absence of unpleasant odor from materials;
- ease of cleaning the finished coating.
Resins also protect the surface from the penetration of mold, fungi, direct sunlight and acid precipitation. If structures are used outdoors, then impregnation, repelling moisture, increases frost resistance. Therefore, they are also used in open areas. However, when directly exposed to sunlight, they turn yellow. Concrete impregnations prevent the coating from deteriorating under the influence of acids, alkalis, and oils. You can paint the top surface with regular paint or a special compound. The intensity of the color of the mixture is maintained for a long time, even after prolonged use of the floor.
Advantages of impregnation for concrete
The following are the advantages of using an epoxy composition:
Impregnation has a number of advantages, including frost resistance and vapor permeability.
- no organic solvents;
- temperature conditions can vary from +5 to +25 °C;
- strengthening the base;
- frost resistance;
- surface leveling;
- economical in use;
- completely hardens in 7 days;
- vapor tightness.
Step-by-step installation instructions
How to do
filling
yourself
? It's not difficult if you follow the instructions.
Tools and materials
The first step is the purchase and preparation of tools and materials:
- two-component epoxy coating of a suitable grade;
- rollers on long rods, long-haired;
- needle shafts;
- paint shoes and respirator;
- plastic mixing container without corners;
- wide rule and spatulas;
- construction mixer (drill with a special attachment);
- deep penetration primer (concrete contact type);
- construction vacuum cleaner or broom.
If the concrete base is old, with many defects, its restoration will require:
- putty;
- Grinder.
Preparation
At this stage, you can act alone. If the concrete slab is new, it will be enough to remove dust and cover it with two layers of primer. If there is damage - cracks, areas that are crumbling, potholes and chips - it is necessary to carry out restoration. The recesses are covered with putty.
Areas where the concrete crumbles are hollowed out to solid material and filled with a cement mixture or a special repair compound. After filling the defects, it is necessary to sand and go over the entire surface with a vacuum cleaner or broom. Using rollers with a long question, the dust-free coating is treated with a primer.
Fill
Two or three people should fill the floors, because... The epoxy mixture dries quickly; it must be spread over the surface within 30-40 minutes. The process is carried out in several stages:
- Underlying layer. The mixture, diluted and thoroughly mixed in a container, is poured onto the floor and leveled using the rules. Thickness – one or two millimeters. After pouring, treatment with a needle roller and drying for six hours.
- Decorative layer (filling). This can be photo printing, drawing, glitter, quartz sand and other materials that give the floors an interesting look and additional strength.
- Finish coating. Two options are epoxy resin or clear protective varnish. The first is applied if there is no pattern on the floors, the second - if there is a decorative layer.
Quartz sand is applied to the wet underlying layer - immediately after pouring it, in an even layer. The excess is removed after six to eight hours, when the bulk of the quartz has adhered to the polymer. The scattering can have either a natural color or painted in any shade.
Decoration options for epoxy floors:
- tinting;
- drawing – hand painting using acrylic paints;
- photo printing – installation of a banner made in a printing house or vinyl stencils;
- three-dimensional image using microlenses;
- quartz or any other filler with an interesting texture;
- tips, glitter.
The finished polymer coating looks attractive and original - it has no seams, like linoleum. The quality of the decor depends on the skill of the craftsman - if you want to get a beautiful design solution, turn to professionals.
Order high-tech epoxy floors for industrial premises at. We offer a wide range of colors, we carry out strictly according to technology and using high-quality materials. with the conclusion of a contract and provision of a guarantee. We take on projects of any size.
#Floor #Self-leveling #Industrial #Polyurethane #Epoxy #Dust-free
Facebook Comments
Similar news
- Insulating walls with polyurethane foam with your own hands With the onset of cold weather, the issue of insulating a house always becomes relevant. The modern construction market offers a wide…
- A high-quality floor is a guarantee of the success of a modern warehouse. A high-quality floor is a guarantee of the success of a modern warehouse. A modern warehouse logistics system involves maximum use of available…
- Screed on a wooden floor Screed on a wooden floor Screed on wooden floors is not often done, but in some cases it is necessary...
Post Tagged with Dust-free, Self-leveling, Flooring, Polyurethane, Industrial, Epoxy
Application of epoxy resin: rules and recommendations
Before applying the material, the surface to be treated must be cleaned with a grinding machine.
When mixing the components in the impregnation composition, take into account that the mixture will harden after 30 minutes, as a chemical reaction will occur with the release of heat. Therefore, the prepared solution must be poured onto the cleaned concrete surface with a grinding machine or brushes. The top layer dries in 16 to 24 hours. The epoxy primer is applied in layers on top of each other until it becomes completely glossy. It is used for interior and exterior work, as a finishing or intermediate layer.
The higher the grade of concrete (M300 and higher), the lower the primer consumption and the better the efficiency. It is unacceptable to reduce the consumption of impregnating compounds for the sake of savings. To accurately determine the amount of material, a trial treatment of a small area is carried out.
Epoxy impregnation is widely used for concrete floors. The material is environmentally friendly. During construction and repair work, the coating costs minimal costs and looks like varnished concrete. The impregnation does not peel off, provides dust removal and resistance to surface damage.
Compositions for repairing concrete floors
Repairing a concrete floor depends on the type of defects formed and their number. If the damage is less than 40% of the floor area, then repairs can be made. Otherwise, it is better to replace the old floor with a new one.
To repair defects on a concrete floor, use mastic based on epoxy resin ED-20. After hardening, the mastic becomes absolutely waterproof and waterproof. It is also highly resistant to weather conditions and cleaning agents. Mastic can be applied to a dry or damp (but not wet) substrate.
Review of popular epoxy paints for concrete
Modern industry offers a large selection of compositions for finishing concrete pavements. They differ in the characteristics of the work and have different purposes. All types of epoxy enamels for concrete can be divided into two large groups:
- Hot curing. Difficult to use, therefore they are mainly used in industry.
- Cold polymerization. Such compositions can also be used at home. Hardening of the surface occurs at room temperature and does not require additional heating.
For finishing concrete coatings, water-borne and two-component epoxy mixtures are used.
The following epoxy paints/enamels for concrete can be distinguished, which are the most popular:
| Name | Purpose | Characteristics |
| KrasKo-Epostone (water soluble) | used on any construction sites (including children's and medical facilities), also applicable in everyday life | environmentally friendly, odorless, high strength, weather-resistant, available in gray color and not subject to additional tinting |
| Elakor-ED Enamel-2K/100 (water-soluble) | wide range of uses, used for any concrete bases, creating poured decorative floors with an anti-slip effect | high protective performance in terms of wear resistance, exposure to aggressive chemicals, low temperatures and atmospheric agents |
Manufacturers may also add additional inclusions to epoxy mixtures for concrete coatings. In this way they improve certain technical characteristics of paints:
- acrylic resins to increase the resistance of coatings to ultraviolet radiation;
- phenolic resins to improve resistance to chemical reagents;
- glass chips and quartz dust to give the coating particularly strong resistance to mechanical and impact loads.
Causes of cracks and their main types
The most common causes of cracks include:
- poor-quality soil preparation for the foundation;
- savings on the purchase of materials for construction;
- natural soil shifts;
- non-compliance with house construction technology;
- construction of a new facility nearby.
There are two main types of cracks on the foundation surface:
- horizontal;
- vertical.
Horizontal cracks do not pose such a danger. They can occur for various reasons. The main ones are:
- exposure to low temperatures (concrete dries out);
- increased pressure from wet soil.
Long cracks and horizontal faults with bulges on the external wall of the house indicate possible displacement of the foundation or pressure exerted on load-bearing walls. To determine the specifics of faults, you should use a level. If there is a bulge of more than 1 cm or a ridge has formed on the edge of the wall, major repairs to the base are necessary.
What to do when the crack in the foundation is vertical? Such breaks in the walls do not bode well. If there is only one crack at the base of the building, its parameters need to be determined. If there is a fault with smooth edges and a small thickness (about a hair's breadth), repairing a crack in the foundation will not be difficult.
More difficult work lies ahead when the vertical edges of the fault are uneven and the gap widens in any direction. It should also be taken into account that the crack can be located underground. In this case, you need to excavate the entire area near it.
Repair of seam edges
27. Destroyed seam edges are cleaned of dust, dirt and mastic. If there is damaged concrete, it is removed using pneumatic tools (to the depth of destruction to healthy concrete). The cut-out concrete is removed, and the bottom and walls of the cut-out are washed with a stream of water under pressure, using a sprinkler-washing machine, and blown with compressed air from a compressor.
28. When repairing an expansion joint, install a board in the joint with a thickness equal to the width of the joint, to a depth of 30 - 40 mm from the surface of the coating, lubricated on the sides and bottom with petroleum jelly or technical petroleum jelly.
29. When repairing an expansion joint, the board is laid on the seam gasket so that there are no gaps between the board and the gasket. The laid board is reinforced with two bars with slots, which are installed on the covering across the seam. In this case, as in the previous one, the board is lubricated from the bottom and both sides with auto scrap or technical petroleum jelly.
30. After completing the preparatory work, the area to be repaired is filled with epoxy mixture, lightly tamped down and smoothed with a trowel. 10 - 12 hours after sealing the edges of the seams, the boards are removed, the seams are filled with mastic and then movement is opened.
Manufacturers
The manufacturer of paints of this type is the Tikkurila brand. Epoxy mixtures are popular due to their high performance characteristics.
It is worth highlighting Tikkurila two-component paint, which is suitable for both new and old concrete floors. It does not contain organic solvents. This mixture allows you to obtain the desired decorative effect, since it can be tinted in any color (according to the RAL catalogue).
The Jotafloor series products have proven themselves well. They are resistant to shock loads, abrasive cleaning agents, chemicals and ultraviolet radiation. The product formula contains additives that provide anti-slip properties. The mixture consumption level varies between 100-120 ml/sq.m.
Properties, positive and negative points
Epoxy self-leveling flooring is not that new. It just began to be used not so long ago - 10-15 years ago. It’s worth saying right away that before hardening, epoxy resin releases toxic substances. Therefore, you need to work in a respirator. Just a “ventilated room” will not provide the required level of safety - you can get poisoned. So if you are going to pour epoxy floors yourself, stock up on protective equipment.
Even if you are making an epoxy floor only for yourself, and will not do it professionally, you need protective equipment. The main thing is a respirator and a protective suit
pros
Why is it still used? After all, it’s expensive and unsafe... But because the properties of epoxy self-leveling flooring are ideal for some industries or situations:
- Very “sanitary” coating. Doesn't absorb or absorb anything. Resistant to oils, chemicals, paints. Everything spilled on the surface remains. Due to this property, it is always easy to wash/clean. Therefore, it is often used in industries where hygiene is very important.
Epoxy resin flooring is not perfect, but it is hygienic. In the bathroom, shower, toilet, hallway and kitchen - this is perhaps the best option - Dense, smooth, durable. The surface is smooth and hard. There may be problems with household use, since the surface is slippery when wet. There are non-slip variations with quartz sand, but they are good for industrial premises, garages, etc. They are not used at home because, well, they don’t look “homey” at all, and they are difficult to clean. There are also those in which dullness and some roughness are achieved by adding special substances. A small layer of matte resin forms on the surface. But under significant load, it can wear out, which looks unsightly. In principle, it is almost impossible to erase epoxy resin in the house. And for production, such coverage requires updating.
- Epoxy flooring feels a little “softer” than tile. Due to its greater elasticity, it absorbs shock loads better. But if you drop something really heavy, it may chip.
The positive aspects include the seamlessness of the coating. You can also have the degree of gloss that you need. In some interiors, such a floor is simply a godsend. And it is difficult to replace it with something else.
Minuses
The disadvantages of acrylic self-leveling floors include high requirements for the base (more details below). Another minus is that the epoxy self-leveling floor is not as wear-resistant as we would like. Wheeled chairs will leave marks on it. It also gets scratched by high-heeled shoes. Where they walk more, changes will be clearly visible - less shine, more scratches. The appearance is restored by sanding, but with a coating thickness of several millimeters, you can’t sand it much.
Epoxy coating is the sequential application of polymer-based materials to a concrete base.
For longer service without changing the appearance, it is recommended to apply two layers of polymer (polyurethane) varnish over the epoxy coating. Polyurethane is much stronger and scratches less often. Why not use a self-leveling polyurethane compound then? But because it turns out to be almost twice as expensive.
Epoxy resin flooring is repairable. Yes, chips and dents can be filled. But the “repair zone” will be visible. For industrial premises this is not a problem. This is not very good for offices and apartments/houses.
Another disadvantage emerges from its advantage: complete impermeability to any substances. That is, the epoxy self-leveling floor does not conduct water and its vapors. If it is poured onto a concrete slab in ground floors, moisture entering through imperfect insulation can tear off the polymer layer from the base.
Is it possible to make a self-leveling epoxy floor yourself? Yes. Buying it is not a problem, and no special equipment is required for application. But you need a flat, dry concrete surface and knowledge of some of the features of the process
All these shortcomings would be more or less tolerable even for use in private houses and apartments. But the high price neutralizes all the advantages. For the same price you can make more practical coatings. But it is, of course, up to you to decide. From an aesthetic point of view, it is difficult to find a replacement. It is difficult to make an absolutely smooth surface, shiny or not, by other means. An alternative is to pour a self-leveling cement floor and cover it with polymer (even epoxy or polyurethane) paint. Costs are lower, the effect is the same. It’s still difficult to come up with other options.
Preparation of epoxy mastic
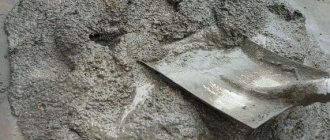
To prepare epoxy mastic for repairing cracks, potholes and other defects in concrete, you need to mix Portland cement, ED-20 epoxy resin and aminophenol AF-2 hardener in a ratio of 1:10. For mixing, use a drill with a stirrer attachment. The rotation speed of the nozzle should be 300-400 rpm.
Mixing should be done in a water bath at a temperature of 60 degrees. After the mixture becomes homogeneous, transfer it to a flat container and mix again. The mastic must be prepared in such quantity that it can be consumed before hardening begins.
The hardening time of epoxy mastic depends on the air temperature. At 10 degrees this time will be 2 hours, at 20 degrees - 45 minutes, at 30 degrees - 30 minutes. The material consumption for putty is 1.2-2 kg/meter.
Quartz sand can be used as a filler. In this case, when making the repair composition, the following proportions are used: 1 part resin and 4-5 parts quartz sand. Material consumption with an application thickness of 1 mm is approximately 1.8-2.2 kg/sq. meter.
Composition of the substance
The main components of epoxy adhesive consist of resin, special hardeners and additional components. The adhesive composition is represented by hardeners, solvents and other substances.
Hardeners (up to 15% of the total composition):
- polyamine;
- carboxylic acids;
- anhydrite;
- polyethylene polyamine;
- organophosphorus modifiers;
- laproxy;
- aminoamide
Proportions of adhesives Source gidpokraske.ru
Solvents (up to 3%):
- acetone;
- alcohol;
- xylene
Other substances:
- metal oxides;
- chalk;
- fiberglass;
- formaldehyde;
- metal powder;
- clay;
- synthetic rubber.
Additional components improve the characteristics of the adhesive composition, making the seams of the joined surfaces harder and more durable. Experienced craftsmen add industrial additives to the composition:
- Aluminum (powder). Positively affects strength and thermal conductivity.
- Silica. Gives viscosity and strength.
- Asbestos. Produces hardness and resistance to temperature changes.
- Iron powder. Gives seams a reddish tint, increases fire resistance and thermal conductivity.
- Titanium dioxide. Capable of turning transparent color into white.
- Soot. Used for painting seams in a dark shade (asphalt, black).
- A combination of glass fibers and wood chips. Adds volume to the mixture to fill large voids.
A large role in the composition is given to plasticizers - phosphoric and phthalic acids. Polymers and oligomers regulate the technical properties of the adhesive, ensuring reliable installation.
How to dilute glue and use it for installation
Factory-made liquid formulations do not require additional addition of polymers and solvents. Dilution will only be required for two-component and plastic species. Instructions on how to dilute two-component epoxy adhesive are indicated on the packaging and include the following points.
Preparation for installation:
- prepare a container (can be disposable) and a spatula (spatula, stick, any convenient tool for stirring);
- Wear rubber gloves and work clothes to limit skin contact with the chemical. If you plan to work with a large volume of glue, wear a special construction mask to protect the upper respiratory tract from toxic fumes.
Appearance of polymers for dilution Source polymerika.ru
How to choose paint
To get the desired effect, you need to pay special attention to the choice of product. In this case, the following parameters must be taken into account:
- Where concrete floors will be covered, what conditions will surround the surface. If painting is carried out on the street or in a garage, where mechanical and chemical influences are more common, then you should choose a more sustainable option. The powder type requires the use of heating chambers during preparation, so it is not suitable for household needs. An excellent alternative is two-component concrete paint;
- What loads will be placed on the coating;
- It wouldn’t hurt to know the floor area so that you can calculate the amount of paint composition.
Epoxypol is a two-component epoxy enamel for concrete floors, which is excellent for covering surfaces subject to high mechanical, chemical and atmospheric influences. At the same time, it gives the surface a pleasant appearance. It can be applied in a thick layer up to 500 microns, it is easy and convenient to apply.
To get the desired effect, you need to pay special attention to the choice of product.
Installation of a protective leveling wear layer using surface treatment
31. On cement concrete pavements subject to peeling, in order to protect them from further destruction, a protective leveling layer 5-10 mm thick is installed.
32. The installation of a protective leveling layer by surface treatment includes the following operations:
— preparation of the surface to be repaired;
— preparation of epoxy glue;
— distribution of epoxy glue over the surface to be repaired;
— distribution of stone fines over the coating;
— compaction of stone fines.
33. Before installing a protective leveling layer using surface treatment, the surface to be repaired is thoroughly cleaned chemically or mechanically, and deep sinks and potholes are sealed in the manner set out in paragraphs 25, 26 of these “Recommendations”.
34. Epoxy glue is prepared in accordance with paragraphs 16 - 18 of these “Recommendations”.
35. Apply epoxy glue in a thin, even layer onto the thoroughly cleaned and dry surface to be repaired.
The consumption rate of epoxy glue, depending on the condition of the surface being repaired, ranges from 1 to 1.5 kg/m2. The lower limit is accepted for concrete pavements with a peeling depth of up to 3 mm, and the upper limit in the presence of peeling with a depth of up to 1 cm.
With deeper peeling, the consumption of epoxy glue increases. If peeling is present at the initial stage, the consumption of epoxy adhesive can be reduced to 0.5 - 0.8 kg/cm2.
36. Following the pouring and distribution of epoxy glue, freshly crushed clean and dry stone fines measuring 2.5 - 3.5 mm or dry clean medium-grained quartz sand are scattered at the rate of 5 - 7 kg of mineral material per 1 kg of epoxy glue.
To obtain a rougher surface, it is necessary that the maximum particle size of stone fines does not exceed their minimum size by more than 1.5 times.
37. Rolling of stone fines is carried out with a light roller weighing 1 - 1.5 tons in 2 - 3 passes along one track. If, when rolling stone chips, epoxy glue comes to the surface, then these places should be sprinkled with stone chips, followed by rolling with 1 - 2 passes of the roller. For powdering, stone fines measuring 1.25 - 2.5 mm or 0.65 - 2.5 mm can be used. Before compaction, the roller rollers must be lubricated with auto scrap, grease or technical petroleum jelly.
38. 5 - 7 hours after completion of compaction, before movement begins, excess stone fines are swept away from the coating and used to install a protective leveling layer in another place.