The screed for a warm water floor is a simple cement pour. It is called roughing and is done to level the surface, prevent heat loss, and pipe deflections. In addition, it affects the durability of the finishing layer, which is poured on top of the heating system. It can be laid in three ways. Let's talk about them first.
Tasks of screeding heated floors
To figure out how to make a screed for a heated floor, let’s define its tasks more precisely. First of all, remember that ties are fundamentally divided into tied and floating. The floating screed is not connected either to the base of the floor or to the walls of the room. If, relatively speaking, you look at a floating screed, then it is a separate, often concrete slab in the room that performs its tasks.
It is worth noting that a floating screed is the priority type of screed in the construction of a concrete heated floor.
The tasks of a floating heated floor screed include:
- Holding pipes or underfloor heating cables;
- Be a heat exchanger between the floor heating system and the room, ensuring uniform heating of the floor surface;
- Take on the power load of operating the premises.
It is to solve these problems that specific requirements for installing heated floor screed are aimed.
Requirements for a heated floor screed
This is the time to remember about the types of heated floors. Fundamentally, there are two types of underfloor heating: water and electric. In a water heated floor, heat is transferred to the screed from the water circulating through the system. In an electric heated floor, heat is obtained from heating special heating cables laid in the floor.
Note: When we talk about heated floor screed, we mean only water heated floors and cable electric heated floors. Covering electric heated mats with screed is not required. Also, a screed is not required for TP (warm floor) flooring systems used in wooden houses and in houses with floors on joists.
Commissioning
Full maturation of the cement screed occurs after a month, which is when balancing needs to be done using collector flow meters.
Using balancing valves, the coolant flow is regulated; it should become the same in all circuits. If you have no experience with self-balancing, it is better to invite a specialist.
After manipulating with cold water, if the system is working correctly, you can conduct tests with heated coolant. At this point, the installation of the heated floor is considered complete.
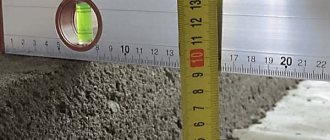
Total screed thickness
So, two tasks of the TP screed, distribution of operating load and uniform distribution of heat, are a priority. It is to accomplish these tasks that all further discussions about the thickness of the screed will be directed.
Two parameters are important in screed thickness. The first is the overall thickness of the screed, which is usually left out of brackets. The second parameter is the thickness of the screed layer above the pipes. First things first.
The total thickness of the heated floor screed, namely the screed, and not the entire heated floor structure, should be as follows:
- If the heated floor is installed above an unheated room, basement, or ground, the minimum thickness of the screed is 85 mm. This standard value is very controversial (more on this below);
- If the TP is done on a concrete slab, the total minimum thickness is the sum of 10 mm of screed under the pipe (cable), the diameter of the pipe (cable) and the permissible technological thickness of the screed above the pipe.
- It is recommended NOT to make the maximum thickness of the screed more than 100 mm, due to the large inertia of the system. Thick screeds will take a long time to heat up and spend heat not on warming up the room, but on heating the screed itself.
Note: if you need to raise the overall floor level, you do not need to do this with a heated floor screed. You need to first make a leveling screed, and then install a warm floor, and not try to solve all the problems in one screed.
Screed thickness over pipes
This is an important parameter on which, first of all, the uniform heating of the floor depends, and secondly, the load perception (strength).
I’ll tell you right away about durability. The following rule works here: the thicker the underlying insulation in the TP structure, the greater the thickness of the screed above the pipes should be. For a central climate, a sufficient insulation thickness is 2, maximum 3 cm.
To answer the question about the relationship between the thickness of the screed over the pipes and uniform heating, let’s look at the thermal diagram of the heated floor.
As you can see, the heat from the pipes rises along the screed along peculiar cones. Optimal heating of the floor will occur if these cones “end” on the surface of the screed. If the screed is made thinner, then not so much the screed will heat up as the finishing coating, which is bad. If the screed above the pipes (cable) is made thicker, then the heat will not reach the surface of the screed. On the surface we get the so-called strip, uncomfortable heating of the floor, otherwise “zebra”. Walking along the floor you will feel the change of warm and cold stripes. This is also bad.
As you can see, it is the thickness of the screed above the pipes that is the most important technological parameter of the TP screed. The load on the floor in residential premises is moderate and the thickness parameter is not affected by the load on the floor.
So, the thickness of the screed over the pipes. Without further ado, let’s look at the recommendations on this parameter from the main manufacturers of water heated floor elements, namely Oventop, Uponor, Valtac, Thermotech, KAN. Summarizing their recommendations, I can draw the following conclusion:
When installing a heated floor on a concrete base, with a layer of insulation no more than 20 mm, the thickness of the screed above the pipes should be:
- At least 30 mm for a wet solution with the addition of plasticizer and fiber;
- At least 50 mm for wet mortar (concrete or cementitious mixture);
- At least 45 mm for machine-made semi-dry mortar.
Video description
In this video you will see the secrets of good screed pouring:
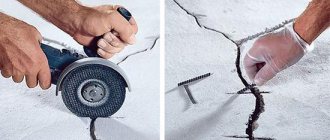
The mixture is laid out in small slides. A shovel is used to level them. Pouring a heated floor with a perfectly flat surface is not always possible. Therefore, in order to achieve this result, the solution is laid above the established profile. The next morning they come and remove the excess. But you don’t need to wait until the mixture hardens completely. It should harden a little.
Upon completion of the work, they begin to remove the guide profiles. The places where they were are treated with cement mortar and leveled.
Finally, a small amount of water is applied to the surface and covered with a polyethylene film. This will prevent the base from cracking. To prevent the floor from drying out too quickly, it needs to be moistened for at least 3 days.
See also: Catalog of companies that specialize in heating systems.
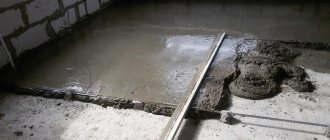
Option 1. Concrete screed for heated floors
Wet concrete screed for heated floors is made using floating floor technology, based on a solution of cement, sand, crushed stone and water. To make your own solution, you need to make a B22.5 (M300) solution with the obligatory (!) addition of crushed stone or gravel of 5-15 mm fractions to the solution.
The classic concrete mortar M300 (concrete B22.5) is made on the basis of M400 cement. Concrete proportions (Cement: Sand: Crushed stone) - 1: 1.9: 3.7.
It is important to note that this brand of concrete is heavy concrete and is difficult to install. The load of such a screed per 1 m² of flooring will be 125 kg, with a screed thickness of 50 mm. And this does not take into account the weight of the heated floor “pie”.
All this reveals the disadvantages of the “concrete” option:
- When laying concrete, damage to the pipes (cables) of the heated floor is possible;
- Not possible to compact, may lead to the formation of air bubbles;
- The difficulty of leveling concrete will require an additional layer of leveling screed.
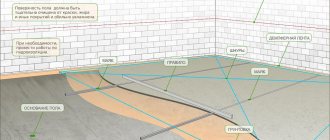
The floating concrete screed (6) is necessarily reinforced with a mesh (2), welded in knots, with cells of 10 by 10 cm. The reinforcing mesh not only holds the screed together, preventing it from cracking when the floor dries and is in use, but also serves as a base for fastening ( 4) pipes (5) water floor and electric floor cable. It is important (!) to ensure that the mesh (3) rises 10 mm from the insulation (film) (1).
The concrete screed must be insulated from the walls with a damper. This is a special tape or any dense insulation no thicker than 1 cm.
Preparatory work
Before pouring the screed onto a warm water floor, some preparatory work is required:
- level and clean the base;
- install a heating system.
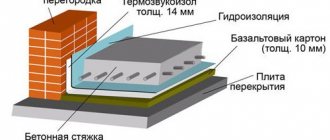
When installing a heated floor, you need to fill it after installing the entire “pie”; it is important to lay all its layers correctly.
The sequence of laying layers in the “pie” of a warm water floor is as follows:
- Rough screed - it is cleaned and leveled.
- Waterproofing - a polyethylene film with a thickness of 200 - 250 microns is placed.
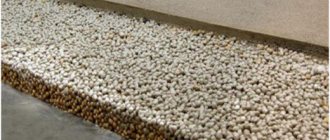
- Thermal insulation - foamed polyethylene with foil coating is installed.
- Reinforcing mesh - it is necessary to give strength to the structure. In addition, pipes can be attached to it if the polystyrene foam base with bosses does not fit.
- Heating circuit (metal-plastic or polypropylene pipes with a cross-section of 20 mm) - it is fixed either to the mesh with special fasteners, or is laid on polystyrene plates between the bosses.
- Reinforcing mesh - it can be laid on top of the heating system, if desired, to give greater strength to the structure.
Before filling, it is necessary to connect the system to the collector, check it for leaks and how it heats . After which, a beacon is installed, which helps to obtain a level base from the concrete composition.
Option 2. DSP
Cement-sand screed for heated floors is made using floating floor technology, based on a solution of cement, sand and water with the addition of plasticizer and fiber, or based on ready-made dry mixtures.
Important! Plasticizer and/or fiber are mandatory in underfloor heating screed.
- If you are doing TP at home, M200 grade cement is sufficient to prepare the DSP solution. The sand needs to be clean. Sand/cement proportions, 3/1 (three sand - one cement).
- If the heated floor is made in a garage, then the grade of cement is taken higher from M300 to M500, optimally M400.
An obligatory element in the DSP TP solution is reinforcing fiber and plasticizer fibers. Fiber fiber is added in a volume of 900 g. per cube of solution. Fiber plays a reinforcing role.
Important! A plasticizer (this is not fiber) is added to any type of DSP underfloor heating. It (plasticizer) compensates for the thermal expansion of the heated floor, protecting the central fiber board from cracking.
The TsPS TP screed is separated from the base of the floor. For this purpose, a layer of polyethylene with a thickness of 200 microns is laid on the base. For better heat transfer, a layer of heat insulation with a thickness of 20 mm or more is placed under the screed. Important! The foil backing is not insulation.
Important! For trouble-free operation of the heated floor, the heated floor screed must be laid only on a flat, solid base. Unevenness of the base can lead to the formation of air cavities, which can shrink under load. If the base of the floor is uneven, under the heated floor screed, you need to make an additional leveling bonded screed.
The DSP screed will be separated from the walls of the room, for which a damper tape or strips of any solid insulating material 5-10 mm thick are fixed around the perimeter of the room.
A floating DSP screed must be reinforced with a mesh with 10 by 10 cm cells. The reinforcing mesh not only holds the screed together, preventing it from cracking when the floor dries and the heated floor is in use, but also serves as a base for fastening water floor pipes and electric floor cables. It is important to ensure that the mesh rises 10 mm from the film.
The thickness of the screed layer, in the version of a cement-sand screed without fiber with a reinforcing mesh, cannot be less than 10 cm. It is this layer that will ensure the creation of a durable floating slab. In this case, the thickness of the screed must ensure that the pipes (cables) are covered with a layer of at least 30 mm, otherwise there will be strip heating of the floor.
Ready-made mixtures will simplify the work
There are a lot of manufacturers producing ready-made mixtures (levelers), including those suitable for installing heated floor screeds. A solution from this mixture is made by adding water in the proportion indicated on the package. The leveler is laid with or without beacons, depending on the brand and manufacturer.
The use of ready-made mixtures is the best option for installing screeds for heated floors yourself.
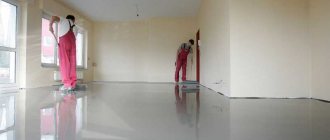
Self-leveling solutions
You can use a self-leveling mixture to screed a warm water floor.
This building material is not cheap. Labor costs are noticeably reduced. Simply add water to the dry mixture, stir, pour it onto the floor and you don’t need to do anything else. The mixture will even out on its own.
The advantage of self-levelers is the harmoniously selected components of the solution, mixed in the factory. The mixture is already enriched with the necessary additives and plasticizers.
The finished leveling solution is poured onto previously prepared floors and stretched over the beacons. If you follow the manufacturer's recommendations, you will get a durable surface that is resistant to temperature changes.
There are some subtleties that you should know about before purchasing a self-leveler. It sets very quickly, and you will need a lot of solution. If you fill the floors in small bathrooms, then there will be no problems. The mixture can be stirred with a drill mixer. But how to quickly mix, at one time, a cubic meter of solution for a room of more than 20 square meters? This is impossible to do in a regular trough. If you fill it in parts, in layers, the quality characteristics will deteriorate. To make such a solution, you need special equipment, a compact mortar mixing plant.
In order to fill large volumes, you can buy or rent such equipment. But under normal conditions, for apartment renovation, this is impractical. The self-leveler will still have to be leveled manually.
Such a solution will pay off on site if you have an unlimited budget. Or when laying heated floors in a small area. There are brands of self-leveling that can be laid in a thick layer. You should know: despite the fact that such a solution sets quickly, it reaches “standard” within 7-15 days, no less.
Option 3. Semi-dry screed on heat-reflecting boards
To simplify the installation of heated floors, companies began to produce special slabs of remarkable designs. These slabs, on the one hand, are ready-made channels for laying cables or underfloor heating pipes, on the other hand, they take on part of the operational load and create a layer of heat insulation.
In this version of underfloor heating, a semi-dry screed is usually made, based on cement-binding mixtures with the addition of plasticizers. The best quality of such a screed can be achieved by using ready-made mixtures of levelers for heated floors or by purchasing ready-made semi-dry factory-made mixtures.
Pros and features of semi-dry screed
- A semi-dry screed does not require reinforcement and dries much faster than wet screeds.
- The semi-dry screed is laid with a damper tape.
- The thickness of the screed should ensure that the pipes (cables) of the heated floor are covered with a layer of 40-60 mm.
Minuses
- However, a semi-dry screed, porous and in the construction of a heated floor, will significantly increase its inertia;
- In addition, semi-dry screed requires serious professional skills, which makes it difficult to recommend it for independent use.
Installation errors and their consequences
Strict adherence to the recommendations of specialists when installing heated floors yourself is an important condition for the successful functioning of the system.
Most often, beginners make the following mistakes:
The height difference between the beginning and end of the pipe. If it exceeds half the diameter of the pipes, air pockets will form inside. As a result, the circulation of the coolant will be difficult and the quality of heating will decrease. To prevent this from happening, it is important to place the pipes strictly parallel to the floor.- Connection of pipes within one circuit. There is no point in installing a circuit of 2 pipe sections and filling it with concrete. This may cause leakage. Each circuit must consist of a whole piece of pipe. Connections should only be made to the collector group.
- Neglect of hydraulic testing. A test run of the system at maximum pressure must be carried out before pouring concrete into the pipes. Otherwise, it will be almost impossible to find a leak, if one occurs.
- Pouring screed onto empty pipes. The concrete pushes through the pipe material and the circulation of the coolant will subsequently be difficult.
- Premature heating start. Heating the pipes until the concrete gains strength will lead to cracking of the screed.
conclusions
The article discusses several options for screeding heated floors:
- TP screed in a high-load room. It is made with B22.5 concrete, possibly on soil with a thickness of 85 mm or more, with obligatory mesh reinforcement. Concrete underfloor heating system.
- TP screed in a house (apartment) is made with a cement-sand mixture reinforced with mesh or plastic fiber on a 2-3 cm insulating substrate with the obligatory addition of a plasticizer.
- The semi-dry screed technology is NOT recommended for independent use , excluding small rooms (bathroom, toilet) due to the complexity of the technological processes in the production of the solution and its installation.
Temperature gaps
The main reason why cracks appear on a concrete screed is the incorrect location of expansion gaps.
According to the instructions, when installing a screed heated floor in rooms with a complex layout or having a large area, it is correct to divide the room into zones before pouring the concrete. The demarcation needs to be done with a damper tape, 5-10 cm thick, and the entire area along the walls is laid with it.
The damper tape helps protect the heating system from damage, because during the heating process the structural elements expand. If you do not install the damper tape, the concrete floor screed will quickly crack.
There are several points by observing which you can correctly arrange expansion joints:
- Each zone that is fenced with tape should be no more than 30 m2, and the sides should be no more than 8 meters long.
- If the room has a complex layout, it is divided into square or rectangular zones.
- In some conditions, it is possible to make divisions at 1/3 of the depth of the solution.
- After the floor screed has hardened, the seams are sealed.
Regulations
- SNiP 2.03.13-88 paragraphs 2.144-1/88 (nodes 63, 69, 75, 81, 87), 2-244-1 (nodes 140,147,149, 160, 161).
- Design of heated floors: DIN 18560 and SNiP 41-01-2003.
©Opolax.ru
Articles on the topic
- Water heated floor temperature adjustment
- Wooden floor heating system
- Warm floor in the hallway: features of the device
- Concrete underfloor heating system: device features, technology
- Electric heated floor under tiles