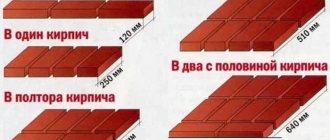
If the water supply system of a suburban area cannot be connected to the public network, there is a need to install an individual source. To provide a beloved estate with drinking or technical water, a well is most often dug.
This is the most affordable development that does not require the use of an excavator or drilling rig for development.
Understanding construction technology, it is quite possible to build a well with your own hands and provide your home with drinking water. Agree, before starting work, it is necessary to study the theoretical aspect of the issue.
We will help you determine the optimal place to dig a well, and we will tell you in detail about geological surveys that you can carry out yourself. In addition, we will offer several options for arranging water intake points and describe step-by-step technologies for their implementation.
Stage one. Choosing a place for a well
First, let's consider the basic requirements for the location of the well.
- It should be as close to the house as possible, but not close to the walls.
- Also important is the maximum distance from all possible sources of pollution - cesspools, landfills, etc.
- In the chosen location there should be no high water (they are found in swampy areas) that could pollute the water in the well.
Choosing a place for a well
Despite the mentioned low cost of building a well, certain costs and efforts are still required. Therefore, it is so important to choose the right location so that this well provides a constant water supply in the required volumes.
There are many methods for finding a place for a well - using aluminum frames, willow vines, glass jars, by observing natural phenomena or animal behavior. But one of the most effective and at the same time accessible ways is to study the features of the landscape. We definitely won’t find water (or we will, but in an insignificant amount) in those areas that:
- have significant elevations of relief;
- located near wells or other water intake points;
- located near the steep shore of a reservoir;
- densely planted with acacia or pine.
Note! There are also places where the well will produce low quality water. Such places include low coastlines and dried swamps - the water here often contains large amounts of manganese and iron.
Various recesses and depressions are our areas of search. Some kind of indicators of the presence of underground aquifers are plants such as willow, lingonberry, birch, etc. A specific place for digging should be selected where the crowns of these plants lean. Finally, if the fruits of a recently planted apple tree are rotting and the tree itself is sick, it means that groundwater lies nearby, since this garden tree is susceptible to moisture-saturated soil.
How to find water for a well
From the diagram below you can familiarize yourself with the types of plants, as well as the depth of their corresponding groundwater.
Note! Fog can be another effective indicator. In hot summers, in the evening or morning, fog spreads where the water is very close to the surface. The density of the latter is directly related to the proximity of the aquifer. It is characteristic that observation of fog makes it possible to calculate the location for building a well with an accuracy of up to 75%.
Where does water come from?
Types of wells
At the bottom of the constructed well, water begins to accumulate (it comes from the aquifer, which is also called the horizon) with an area ranging from several tens of meters to several square kilometers. The horizon, the “thickness” of which is sufficient to fill the well, usually lies at a depth of 4 to 20 m. If at around 20 m the aquifer is still not detected, then further digging of the well is unprofitable - it is easier to equip the well.
Where to install a water supply facility
Choosing a location for an individual water supply source is not very easy, especially if a small area is already occupied by impressive residential and commercial buildings.
Even if you want to save meters, when planning a place to build a personal well with your own hands, it is recommended to adhere to the following rules:
- A drinking well should not be located near manure heaps, latrines, bathhouses, cesspools, barnyards and similar objects. There should be at least 20-25 m between the well and the source of probable contamination.
- There is no need to build a well on the slopes of river banks or ravines. Due to the decreasing flow of underground water, the flow rate will be significantly reduced.
- The minimum distance between the well and the foundation of a house or utility block must be at least 5 m. Water currents will be directed into the well, like into a reservoir formed in the ground, washing away the soil from under the foundations, particle by particle. The corner of the building located nearby will certainly sag.
Ponds with standing water are considered an undesirable neighborhood. Water will certainly infiltrate through permeable rocks, which is extremely dangerous for the drinking category.
According to sanitary standards, the distance from the well to the specified objects should be at least 20 m, ideally 50 m (+)
It is prohibited to locate a well near sources of biological and chemical pollution, as well as on slopes, near ravines and on river banks.
Stage two. We prepare everything you need
Water supply from a wooden well
The procedure for constructing wells is not regulated by any government regulations or standards. The classical device was formed for more than one century until it acquired its modern form.
To make a well with your own hands, you need to prepare:
- a tripod made of metal corners or wooden poles;
- winch;
- rope ladder;
- shovel;
- scrap;
- material for strengthening the mine.
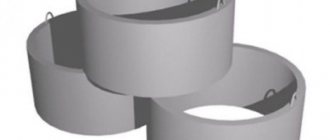
A well made of concrete rings
Regarding the last point, the most promising material is concrete rings. They are strong (reinforced with steel rods ø1 cm or more), durable (service life is 50 years), frost-resistant and waterproof.
| product name | Height x Wall thickness, cm | Internal diameter, cm | Weight, kg |
| KS-7−1 | 10x8 | 70 | 46 |
| KS-7−1.5 | 15x8 | 70 | 68 |
| KS-7−3 | 35x8 | 70 | 140 |
| KS-7−5 | 50x8 | 70 | 230 |
| KS-7−9 | 90x8 | 70 | 410 |
| KS-7−10 | 100x8 | 70 | 457 |
| KS-10-5 | 50x8 | 100 | 320 |
| KS-10-6 | 60x8 | 100 | 340 |
| KS-10-9 | 90x8 | 100 | 640 |
| KS-12-10 | 100x8 | 120 | 1050 |
| KS-15-6 | 60x9 | 150 | 900 |
| KS-15-9 | 90x9 | 150 | 1350 |
| KS-20-6 | 60x10 | 200 | 1550 |
| KS-20-9 | 90x10 | 200 | 2300 |
| KO-6 | 7x12 | 58 | 60 |
| KS-7-6 | 60x10 | 70 | 250 |
Concrete rings can be:
- wall (abbreviation - KS), which are used to arrange the neck and are suitable for all types of wells;
- additional - used in cases where standard options are not suitable, because these have non-standard sizes;
- Reinforced concrete rings - used for drainage and sewer wells, communication systems, gas and water supply.
Well ring
There are other types - with a covering slab, with a bottom, prefabricated, etc. To avoid displacement of the rings after installation, they are equipped with special grooves that prevent the moment of displacement.
Note! For a well in a suburban area, it is best to use wall products KS-10 or KS-15 (the numbers are the internal diameter in decimeters).
After choosing a location and preparing everything necessary, we can begin construction.
Types of wells and their purpose
Depending on the location and functions performed, concrete prefabricated wells are divided into:
- observation rooms – installed on long sections, turns, and differences in height. Serve for periodic inspection and cleaning of pipelines;
- flushing - used for flushing networks, therefore they are mounted at their highest point;
- settling tanks - designed to clean wastewater from heavy particles;
- drop-offs - installed in places of steep descents or in case of a drop in the flow rate of wastewater;
- rain - intended for collecting atmospheric water;
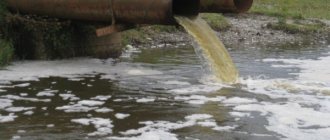
- drainage – used for post-treatment of wastewater. They are installed in areas located too far from reservoirs, ravines and centralized sewer networks. They are divided into audit, storage and filtration.
Concrete rings are also installed for drinking water wells in country cottages.
Stage three. Well construction
Construction of a well
Let's say right away that we can't do it alone - we need at least one more person.
- One of the workers (let’s call him a “miner”) begins digging the earth in a selected location along the diameter of the ring. To destroy heavy soil, he uses a crowbar, and stones that come across the path are also removed.
Digging a well
Construction (digging) - At this time, the second person is located near the mouth of the mine and lifts the selected stones and soil to the surface using a tripod, winch and bucket.
Tripod from which a hand chain hoist is suspended - It is recommended to acquire a third assistant who will replace the “slaughterman”, say, every half hour.
- It is important that the slaughterer be provided with the most comfortable working environment possible. To do this, the mine must be ventilated - with a mechanized pumping device or with an ordinary umbrella.
We perform all actions in this sequence.
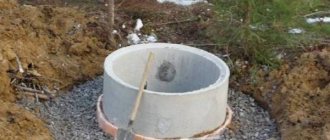
Step 1. Lay the first concrete ring in place of the future shaft. The “cutter” digs through the walls of the ring, and as it gets deeper, it sinks deeper and deeper. It is advisable to use a product with pins or cone-shaped points for the first ring to facilitate downward movement.
Installation of concrete rings
Step 2. After the top edge of the ring reaches the same level with the ground, place another one on top and continue working. The weight of each ring is approximately 600-700 kg.
Step 3. Two people are enough to roll the ring to the place of work. But if it is possible to use a crane, then it is better not to neglect it, because with the help of such special equipment you can more accurately lower the ring into the seat.
If the soil is dry and strong, then you can go deep 2-3 meters, and after that, use a crane to install several rings in a row.
Digging a well
Digging a well
Digging a well
Step 4. We continue the procedure in a similar way until the aquifer is reached. As practice shows, in a standard work shift (8 hours) 3 concrete rings can be laid.
Note! The proximity of the aquifer can be seen by the small springs gushing from the walls and the rapidly decreasing temperature.
After the fontanelles appear, we go deeper a few meters, after which we cover the bottom with a “cushion” of crushed stone (it will serve as a water filter).
Step 5. The mine is pumped with a submersible drainage pump. The more water is pumped out of the well, the greater its debit will be.
Well drainage pump
Well drainage pump
Advantages of concrete well rings
Prefabricated concrete wells have high performance qualities, so they are widely used when laying underground networks in various sectors of economic activity in all regions of the country, except for the regions of the Far North.
There are a number of positive advantages of concrete rings that consumers appreciate:
- strength, allowing wells to be installed to great depths;
- resistance to aggressive environments, allowing the rings to be used in aggressive environments;
- simple and quick installation, making it possible to put utility networks into operation in a short time;
- the integrity of the finished structure due to the presence of specially shaped protrusions, which increases water resistance and resistance to soil movements;
- the ability to order wall rings with holes for inlet and outlet pipes in accordance with the drawings;
- convenient operation;
- durability.
The production of concrete well rings is carried out using the vibration pressing method. In this case, fine-grained heavy concrete is used. Reinforcing bars and wire are placed in the walls as reinforcement.
The disadvantages of prefabricated ring wells include:
- heavy weight of elements, requiring the use of special equipment when installing the structure;
- the need to organize access roads to the installation site;
- requirements for thorough sealing of joints;
- fragility and the appearance of cracks due to uneven applied loads.
Stage four. We protect the structure from surface water
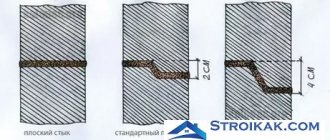
To keep your well clean, it must be properly protected. Water should enter the shaft only from below, and therefore the walls must be reliably insulated. To do this, we firmly connect the rings to each other, resorting to one of two possible methods.
Well
- We drill the walls of the rings and fix them with metal brackets mounted on bolts.
- We twist the rings with steel wire, catching it on the loading eyes. To twist the wire we use a metal rod, for example, a crowbar.
Pay attention to the waterproofing of the seams between the rings! If water leaks through the seams, this will lead to contamination of the well. To seal the seams, you should use a substance that will not affect the quality of the water.
External and internal sealing of concrete rings with traditional bitumen materials
We strengthen the seams according to the following scheme.
Step 1. Place pieces of linen rope in the voids between the rings (an excellent material - natural and environmentally friendly).
Step 2. Cover the ropes with a solution of sand, cement and liquid glass. By doing this we will achieve reliable waterproofing, which will also be completely neutral when in contact with water.
Step 3. On top of the upper rings, dig a meter-deep pit.
Step 4. Waterproof the outer surface of the rings using liquid bitumen mastic.
Step 5. Place a thermal insulation layer around the upper rings (we can use any foamed polymer, for example, polystyrene foam).
Step 6. Fill the pit around the well with clay. This is called a "clay castle".
Clay well castle
Clay well castle
Video – Clay castle
Digging a pit
It is better to start excavation work in a season with low groundwater levels. It begins to decline around the beginning of summer. After making all the necessary measurements and calculations, you can begin to work.
Pit
The area around the casing is excavated taking into account the required volume of the container. It is recommended to leave approximately 2 m more space. This space will be needed later for waterproofing work. If you are absolutely sure that there is no groundwater, you can leave a gap of 30 centimeters from the pipe.
In this case, waterproofing will be installed in a simpler way. The hole should be dug so that the wellbore is in the center, this contributes to the overall stability of the structure. A depth of two meters under the concrete caisson is sufficient. Then the earthen bottom is leveled with tools, and all the loosened soil rises to the top.
Stage five. Setting up a well
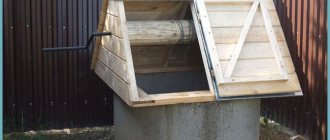
But the construction of a well is not limited to drilling a mine and strengthening it. To do this, we arrange the upper part of the structure - the head.
Insulation of the well head
We will equip a blind area around the well - a small platform made of concrete or carefully compacted crushed stone. The blind area must extend at least 1 m from the shaft on each side and, importantly, is constructed a certain time after completion of construction, when the soil settles.
Blind area around the well
Scheme of structural layers of the blind area
Blind area made of a mixture of crushed clay and crushed stone
Insulation of the blind area
We also build a canopy over the structure to prevent precipitation from entering the mine. If a pump is used to supply water, it is better to close the shaft completely, leaving a small hole for the hose and cable.
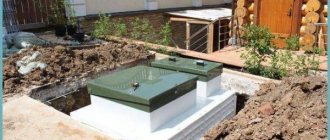
Why are caissons installed?
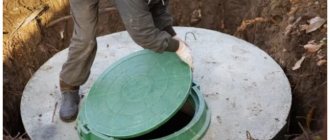
To supply water to residential premises, it is not enough to drill a well and install pumping units; you also need to take care of protecting the structural elements from external influences. To achieve this goal, a special device is installed - a caisson. It will not allow equipment to fail and water to freeze in pipes at subzero temperatures.
In addition, installation of a caisson is necessary:
- to prevent melt and groundwater from entering the volume;
- for ease of maintenance of units that deliver water, as well as purify it due to its location in one place;
- to prevent animals, people, insects from entering the closed area;
- to ensure an acceptable distance between the wellhead and the pump.
The caisson is installed for ease of maintenance of units delivering water.
Device
This is a sealed container made from different materials. At the bottom there is a pipe coming out of the well with water and a casing. The terminal should be located below the freezing level of the soil in your area. The height can be from 1 m to 2 m. The diameter of the structure must allow for normal installation and maintenance of the installed equipment.
Advice: in case of flooding of the caisson, it is recommended to make drainage.
Tools
The set of construction tools largely depends on the type of container, or rather, what material it is made of. However, in any case, a shovel and buckets are needed.
Advice! You can speed up the digging process by renting special equipment. But sometimes this is impossible due to its size and the difficulty of accessing the source.
The following tool is needed:
- Concrete mixer.
- Shovels.
- Master OK.
- Tamping.
- Hammer.
- Trowel.
- Level.
- Buckets and the like.
The work may require:
- Sand.
- Cement.
- Crushed stone.
- Pure water.
- Fittings.
- Additives (giving concrete improved properties) and so on.
Arrangement of the CDS
Equipped with the following equipment:
- Pump: submersible or surface pump.
- Filtration system.
- Hydraulic accumulator.
- Automation block.
- Shut-off valves.
- Pipeline.
- Check valve.
- Measuring instruments (pressure gauge, etc.).
Installation must be carried out in accordance with certain requirements:
- Depth not less than 2000 mm.
- The casing pipe should be in the center of the pit.
- When constructing a container made of concrete, a base of crushed stone and sand is built.
- The walls of a concrete or brick KDS must be waterproofed.
- The pit should have dimensions 300 mm larger on all sides around the perimeter.
- When purchasing a PVC structure, waterproofing work is not required.
- From the inside, the structure must be insulated with heat-insulating material.
- Subject to the presence of groundwater, the chamber is mounted ready-made. All actions to prevent moisture penetration occur on the surface.