How to concrete a basement floor is of interest to many owners of private houses and cottages. The comfort of the room and the ease of its operation depend on the correct performance of the work.
Filling a basement floor with soil is quite simple, but there are several nuances that should be taken into account when doing this. The article suggests learning how to concrete a basement floor, what is needed for this, and how to save money during the construction process.
What to consider when installing a concrete floor in the basement
When constructing concrete floors in the cellar, some nuances should be taken into account.
They should be:
- Determining the depth of groundwater under the building.
- The need to take into account possible flooding of the device and the slope of the site where construction is planned.
- You can avoid severe shrinkage of floors by high-quality compaction of the soil underneath them.
- To increase strength, you need to wait a certain period of time before performing the next step.
- When leveling the concrete, you should remove as many air bubbles as possible that form in the solution, otherwise unwanted voids will form in the screed.
- The waterproofing of the floors must be good, without flaws, otherwise you can damage the screed and provoke the appearance of dampness and fungus in the basement.
How to choose material for pouring the base
Before pouring the floor in the basement, at home you need to decide on the composition of the working mixture from which the concrete will be prepared.
In this case, the following components are used:
- Crushed stone or expanded clay.
- Sand.
- Cement.
- Water.
Before you cement the floor in the basement, you should familiarize yourself with the basic characteristics of the materials.
The properties of crushed stone and expanded clay are presented in the table:
| Characteristics of crushed stone | Characteristics of expanded clay |
| Standard granite stones are distinguished by a high level of strength. Floors made of this material can withstand increased loads | Not very high strength, which does not allow expanded clay to withstand high loads on the floor. But if you need to concrete the floor in the basement, this property is not so important. This does not require a large margin of strength for the base. |
| They have excellent inertness, which in practice means repelling moisture from stones contained in concrete, rather than absorbing it. This increases the service life of the floor | This material absorbs moisture well. On the one hand, this is good - the moisture remains inside the stone and does not enter the room. But as humidity levels increase, the strength of concrete will begin to weaken. |
| The price is quite affordable | The cost of expanded clay is not too low |
| Has insufficient thermal insulation characteristics | Has excellent thermal insulation properties. Floors made of such material will be much warmer than with crushed stone |
| A large mass of material, but it can be used to fill the floor in the basement, but working with such stone is physically difficult | Expanded clay is quite lightweight, which makes it easier to work with |
Based on the above, we can conclude: if the basement is dry and used as a living space, when concreting the floor in the cellar with your own hands, it is better to use expanded clay.
Tip: If you want to get a floor with high thermal insulation characteristics, but you cannot use expanded clay due to high humidity, you can fill the floors with crushed stone and insulate the concrete on top with polystyrene foam. If there is a high level of humidity in the room and it is used only as a basement, crushed stone should be used.
Composition of building materials
The thickness of the concrete walls in the cellar is selected based on the load on them. If the building is an independent room, then the voltage is minimal. Accordingly, the thickness of the concrete will be less. The concrete mixture includes the following components:
It is better when crushed stone of different fractions is added during mixing of the solution.
- Cement. The grade of material is chosen depending on the marking of the concrete. Cement has a figure less than 2 times.
- Sand. It is selected without clay impurities, since this substance disrupts the adhesion of cement to sand.
- Crushed stone. For a minimum number of pores, it is recommended to use a mixture of building materials of different fractions.
- Water. The liquid must be clean, without impurities, with minimal hardness. To improve the characteristics of concrete, various additives and waterproofing additives are added to the water. The quality of raw materials is regulated by GOST 23732–2011.
View "23732-2011" or
How to waterproof concrete floors
Before pouring concrete into the basement after final preparation of the sand bed or old coating, the floors should be waterproofed. The results of this work determine whether moisture will penetrate into the room, which can cause the appearance of fungus, which is dangerous to human health and destructive to the floors themselves.
Instructions for waterproofing floors suggest:
- The materials for it are bitumen rolls or polymer elements; sometimes a polyethylene film of sufficiently thick thickness is used.
- Waterproofing materials are laid overlapping the entire floor area and then secured with construction tape. The coating is made continuous, without any damage. At the same time, it should be placed on the walls, about 25 centimeters, which will protect the joints between the floor and the wall from moisture. After placing the last, finishing layer on the surface, excess protruding parts of the waterproofing are cut off.
- It is possible to make waterproofing on a rough concrete layer, but then you will have to use the method of coating with insulating materials.
Floor on the ground with dry prefabricated screed
In ground floors, instead of a concrete screed as the top load-bearing layer, in some cases it is advantageous to make a dry prefabricated screed from gypsum fiber sheets, from sheets of waterproof plywood, as well as from prefabricated floor elements from different manufacturers.
For residential premises on the first floor of a house, a simpler and cheaper option would be to install a floor on the ground with a dry prefabricated floor screed, Fig. 5.
A floor with a prefabricated screed is afraid of flooding. Therefore, it should not be done in the basement, as well as in wet rooms - bathroom, boiler room.
The ground floor with a prefabricated screed consists of the following elements (positions in Fig. 5):
Fig.5. Floor on the ground with dry prefabricated screed in a private house.
How to make formwork and floor reinforcement
After waterproofing has been installed, if the area of the room is large and it is not possible to concrete it in one day, formwork is installed around the entire perimeter.
For this:
- Boards with a thickness of 2 to 2.5 centimeters are used.
- They divide the floor area into squares, the sizes of which depend on the speed of work during the day.
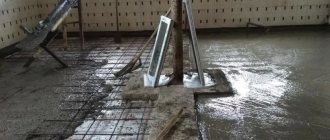
- Reinforcement for concreting is installed.
Tip: Reinforcement for strengthening floors is usually used in cases where they are expected to be subject to heavy loads. The choice of type of fittings depends on the purpose of the room.
- To strengthen the floors, road mesh is mainly used, the diameter of the rods is half a centimeter.
- When planning a very heavy load on the floors, a metal rod with a thickness of 10 to 16 mm is used simultaneously with the reinforcing mesh, and it is installed directly on site.
- Metal fiber can also be added here, which is metal fiber mixed with concrete mass.
Installation
You will need a standard set of concrete tools.
If you listened to our recommendations and decided to do the floor screed yourself, our step-by-step instructions will help you:
- The soil on the floor should be dug up to 20–30 cm and leveled, then compacted using a vibrating plate;
The floor level will have to be lowered a little.
- Then we make a bedding from clay - 10 cm, and then from gravel with sand - 10 cm. We also tamp the bedding;
For compaction we use a vibrating plate.
- Lay construction polyethylene film with a thickness of at least three hundred micrometers. The overlap on the walls should be at least 7 - 10 cm;
Lay a plastic film on the floor and connect the strips with plumber's tape.
- We lay a reinforcing grid on special plastic supports with a cell size of no more than 5 centimeters and a rod thickness of at least 3 mm. We tie the individual pieces of the lattice with knitting wire into one piece;
We lay out the reinforcing grid and raise it above the level of the film by 2 - 3 cm with supports.
- We install beacons above the grille so that the minimum distance from the beacon to the fittings is 30 mm. We align the beacons using a level in one horizontal plane. We make the step between the beacons 20% less than the length of the rule;
We place the beacons on cakes made of solution.
- Along the perimeter of the room on all walls we glue damper tape, which will level out the thermal expansion of the concrete stone. To do this, it is better to bend the film and apply the tape directly to the wall;
We glue damper tape to the walls.
- We prepare a cement-sand mortar for concreting. Proportion – 1:3:5 (cement/sand/gravel). To do this, you should use a concrete mixer, since it will not be possible to prepare a high-quality solution with a shovel;
Prepare the screed solution in a concrete mixer.
- We pour the solution between two beacons and smooth it with a rule, moving the rule along the beacons along the strip and from left to right, as if describing a sinusoid;
We pour concrete between the beacons and level it using the rule.
- We fill the entire floor and wait until it starts to set. When it is possible to walk on the floor, using a sheet of plywood so as not to leave marks, we remove the beacons from the screed and fill the grooves with cement-sand mortar;
We fill the furrows from the beacons with cement mortar.
- Cover the floor with plastic film and wait until it gains strength. Complete ripening of concrete – up to 28 days.
Important! If the dimensions of the room are more than 7 meters on one side, or it is L-shaped, then expansion joints will have to be constructed on the floor. To do this, when pouring, wooden planks are inserted into the screed by one third of the thickness so as to divide the floor into approximately equal squares, and the grooves from them are filled with a special damping material and closed.
How concrete is laid
After completing all the preparatory work, the question is how to make a concrete floor in the basement, directly concreting it.
For this:
- When preparing concrete, cement grade M500 and even higher is used for the solution, which is mixed with marble or granite chips. It is also better to add a hardener or plasticizer here for the first layer.
- The mixture is leveled along the beacons using a vibrating screed. For large areas, deep vibrators are used.
Installation of guide beacons
- Beacons are displayed as shown in the photo. For this:
- half the volume of the required level is filled with concrete mixture, on which hills are formed, which will be beacons, and the main plane will be leveled along them;
- on top of the beacons a strip with a notch is placed and aligned along the level line, which is established by leveling;
- the top of the beacons must be adjusted to the bottom of the batten;
- Beacons are placed no more than two meters from each other.
Tip: When using a vibrating screed for leveling, the guides should be placed at zero level before starting work. After this, a vibrating screed is placed on them. It is pulled along the guides on top of the concrete mortar laid 2-2.5 cm above their level. At the same time, the concrete is leveled and compacted.
- If it is necessary to harden the concrete screed faster, without losing its strength, you can use vacuuming of the concrete; this operation is performed as follows:
- after completing the leveling stage, a filter material is placed on the concrete and covered with an airtight mat on top;
- in the center of the mat, a vacuum pump is connected to the pipe, which will draw off excess moisture without damaging the quality of the concrete.
About the drainage system
Making a drainage system that will effectively remove moisture from the basement, cellar and basement is very important if there is a high groundwater level in your area. If it is absent, your cellar will fill with water in the spring months (even the highest quality waterproofing will not help). And this, in turn, can harm not only the storage facility, but the entire country house.
Using a drainage system, you can remove a huge amount of moisture that appears on the site due to precipitation and groundwater. It should be noted right away that installing a drainage system is not an easy task, so if you doubt your construction skills, hire specialists.
To equip a basement or ground floor with a drainage system, certain nuances should be taken into account: the slope angles of the drainage pipes, the size and location of the tanks, places where excess water accumulates and is drained, as well as many other important points that an ignorant person is not even aware of.
How the surface is rubbed
After that. Once the concrete has been laid and the surface leveled, time is given for it to harden. Using the vacuum method, this will take approximately seven hours.
In this case, the concrete must take on such a state that when you step on its surface with your foot, there will be a mark up to four millimeters deep.
The work is performed in the following sequence:
- Rubbing concrete with coarse grout begins with the area of walls and door openings, where it begins to harden earlier, and then the remaining areas of the floors are processed.
- For grouting, it is good to use a topping or concrete hardener. It is scattered over the surface, and grouting is done until the mixture is completely combined with the concrete.
- After rough grouting half of the entire topping, you need to start the second rough grouting.
- The last operation is performed when the mark from stepping on the concrete remains one millimeter deep.
The grout is applied as follows:
- For small loads on the surface of the screed, up to five kilograms of topping will be needed per square meter.
- For medium and heavy loads – up to eight kilograms per square meter.
- When making colored floors, up to eight kilograms per square meter will also be required.
The video in our article shows you how to cement basement floors correctly.
What you need to consider before starting work
Construction of a basement in a private house begins with soil analysis. The result of the geological study will answer a number of questions:
- To what depth can underground spaces be immersed and the level of their clean floor;
- What waterproofing to use for structures;
- Will a drainage system be required around the house?
The answer to these questions is included in the project, where the diagrams reflect all the necessary dimensions of the structures, design marks, dimensions of the foundation wall, and the material of its manufacture.
At the design stage, the issue of heating and thermal insulation of walls and floors must be resolved.
For normal operation the following must also be developed:
- Ventilation system with hood and windows;
- Methods of finishing all surfaces of the room (walls, ceiling, floor).
How to care for a concrete surface
When caring for a concrete surface, two conditions must be observed:
- Caring for it should begin from the moment the material is laid.
- Hardening concrete should not be allowed to come into contact with water. This may cause cracks to appear.
Advice: When concrete hardens, the surface should be covered with matting, sand or straw mats so that moisture evaporates gradually. For large areas, you can use a film that does not allow moisture to pass through.
These conditions must be observed until the concrete hardens completely. Making a concrete base in the basement creates a solid foundation for the installation of heavy equipment, the concrete keeps insects, rodents and other basement pests from entering the room.