When buying a plot of land, you should be prepared for the fact that it will have to be leveled. After all, building a house, laying out a lawn or laying out beds requires a smooth, even surface. Only a slight slope in a southerly direction is appropriate.
Brief overview of the article
- Why is land leveling necessary?
- Preparatory stage
- How can you level your dacha area?
- Manual leveling
- Leveling with a walk-behind tractor
- How to level the ground with a tractor
- Leveling with imported soil
- Features of leveling territory with a slope
- Useful tips
- Recommendations for replenishing soil fertility
- Photo of the land plot
Why is land leveling necessary?
Leveling a plot at your dacha means manipulating the soil, giving the landscape the desired relief. Below are the main possible reasons for making the soil cover even:
- Development. The foundation requires a perfectly flat surface. If the site is located on a slope, you will have to organize additional delivery of earth to level it.
- Arrangement of paths. It is easier to make a path out of asphalt or cover it with tiles if the ground surface is smooth.
- Laying out a garden or vegetable garden. In this case, leveling helps to avoid uneven distribution of moisture in the soil.
- Creating a lawn. A flat surface promotes better establishment of the lawn mixture, a more beautiful and healthy appearance of the green area, and also simplifies its care.
- Decorative arrangement of the territory. The implementation of most design ideas requires a leveled area.
Calculation of cement mortar
The process of making concrete footings
After marking the area planned for the installation of a sub-concrete protective layer for the foundation, the work is carried out in the following order:
- A pit or trench is dug, depending on what type of foundation is planned for the device.
- Crushed stone is poured into the bottom of the prepared pit, after which the layer is compacted. The thickness of the crushed stone layer is on average about 10 cm.
- Formwork panels are being installed. The height of the shields should be at the level of the planned filling layer; this will simplify the leveling process and allow the reinforcing frame to be correctly placed.
View of the prepared site for pouring lean concrete
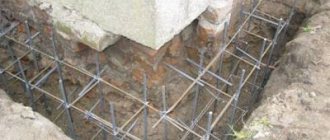
- Horizontal reinforcement is laid. Typically, periodic steel bars with a diameter of 8 mm are used. You can simplify the process by using special cards of construction reinforcing mesh.
- Vertical reinforcement rods are installed, protruding 20 - 30 cm beyond the edge of the formwork. These rods will allow you to connect the concrete footing to the base of the building. Sometimes vertical bars are installed in poured and compacted concrete.
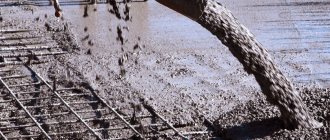
- The filling composition is mixed. The cement binder used when mixing the solution is cement grade M50 or more.
- The finished solution is poured into the formwork and compacted using mechanical vibrators.
After this, the concrete footing is left alone until it sets completely. This process takes place over 4 weeks. You can learn more about the technology of constructing concrete footings with your own hands by watching the video in this article.
Preparatory stage
Before leveling the area, it is necessary to carry out the following work:
- Using pegs and rope, mark the boundaries of the area that needs leveling. If manual leveling work is expected, it is recommended to divide the territory into sectors.
- Remove all debris from the surface of the plot of land, mow down the weeds, and uproot large roots.
- Remove unnecessary objects - dead trees, bushes, unused structures and decorative details.
Video description
How to level a construction site, watch in this video:
Layout with soil filling
Before leveling a plot of land with a slope, the required volume of fill is calculated, for which a high-altitude survey is carried out using a level. If the difference is large, it is advisable to first reduce it by moving the soil in the manner described above.
To level a large area, a geodetic survey is required Source prospb24.ru
After determining the height difference and the zero mark, the volume of soil that needs to be transported is calculated. To level it you will need an excavator or bulldozer.
The soil is poured into the depressions and leveled to the required level Source allremont59.ru
Manual leveling
This method is advisable to use only for owners of small plots. It requires significant time and effort, but allows you to save on equipment.
There are two options to speed up work:
- hiring workers;
- help from acquaintances and friends.
To level the area with your own hands, you need to stock up on the following tools:
- Shovel. You need two of them - bayonet and scoop type.
- Garden cart
- Fan rake.
- Lumber.
- Level gauge.
Algorithm of actions:
- Mark the territory.
- Remove 10-20 cm of turf, pack it in bags, take the load to the border of a private household so that it is not in the way, and lay it out. Provide the removed soil with access to oxygen, i.e., put it out of bags.
- Level the area, controlling the horizontality with a building level. For this purpose, hammer in pegs throughout the site and tighten the ropes.
- Fill holes using the removed soil. Remove excess soil. If there is a shortage of fertile land, purchase it.
- Compact the surface of the area. In this case, it is permissible to use a hand roller, a wooden ladder or planks, having previously attached them to the soles of shoes.
- Water the leveled area generously. Wait 21 days - the earth should settle.
- Plow with a cultivator and level with a rake.
Tools and materials
Foundation layout diagram.
When carrying out work related to the arrangement of the foundation, a wide variety of tools and materials are used:
- shovel;
- rake;
- tractor (if any);
- chainsaw;
- level;
- level;
- construction wheelbarrow;
- sledgehammer;
- lacing;
- cultivator;
- and others that may be required during work (for example, the same tape measure, gas drill or hammer).
Leveling with a walk-behind tractor
To speed up and simplify the procedure for smoothing out uneven areas, you can rent any small-sized agricultural device, for example, a walk-behind tractor - a compact hand tractor.
It is not difficult to use - a person follows the unit, controlling the progress of work using control levers. The advantage of a walk-behind tractor is that there is no need to remove the top layer of soil. The disadvantage is that large holes will have to be filled with a shovel.
The order of steps is as follows:
- Attach the boards to the special holder of the hand tractor.
- Align the area into sectors. The walk-behind tractor will loosen the soil, and the board will level it.
Main types of foundation
Let's refresh our memory of the main types of foundations used in private construction. Note: they can be independent or combined:
- Strip foundation is the most common and understandable design for ordinary people, suitable for almost all types of soil with design nuances. It is a continuous wall strip buried above or below the soil freezing level in the region.
- A pile foundation is optimal in cases of uneven terrain (it does not require leveling) and in the presence of a high groundwater level.
- The columnar base is suitable for light buildings: a metal garage, a small bathhouse, and outbuildings. It consists of individual prefabricated columns made of brick or concrete, sometimes from pipes filled with concrete mortar.
- A solid slab foundation is a solution for wet soils such as clayey ones. It is like a floating cushion on which the structure maneuvers during seasonal wetting of the soil.
How to level the ground with a tractor
Photos of a level area clearly show the effectiveness of leveling with a tractor. But this is an expensive procedure, because you will have to pay a lot of money to hire a specialist and rent equipment.
Instructions on how to level a site with a tractor include two steps:
- Passage of equipment along the entire site.
- Transverse cultivation of the territory with equipment.
The tractor is equipped with a special type of teeth. They provide deep loosening of the soil and dragging layers of earth. The bucket allows you to move a significant volume of soil.
Executive photography
Upon completion of the planning work, clearing the unfinished soil directly to the construction of the foundations, the processing and compilation of schematic data on the actual state of the bottom of the construction pit is carried out, on which the real height elevations from the design elevations are plotted. The permissible deviation from the design mark is 50 mm.
As-built surveying is carried out by leveling the site. In practice, a horizontal surface is divided into squares with sides of 3–5 meters and a leveling rod is installed in each corner of the finished surface, along which reports are taken through the sighting leveling pipe and recorded on the diagram. The device itself is installed at one point and all measurements are taken from this location.
As-built photography is performed in the form of text, table or graphic diagram. An as-built diagram with actual marks helps to identify errors and monitor the implementation of the design solution.
An example of an as-built survey of the bottom of a pit:
Features of leveling territory with a slope
If the land plot has a large slope, it is recommended to solve the leveling issue using more creative methods. The most aesthetically attractive way is to form terraces. Their number and configuration will depend on the size and shape of the territory.
The vertical walls of the steps can be lined with stone or decorated with climbing crops. Some enthusiasts let out small cascade streams.
Useful tips
If you decide to level the territory of your dacha yourself, study the following tips:
Before you begin to implement measures to adjust the landscape, you need to decide on the functions of individual zones. Familiarization with the site plan and consultation with professionals in the field of land works will help you avoid making mistakes in zoning. It is also necessary to clarify the direction of water flow and the slope of the terrain.
Since leveling involves moving the soil, you need to evaluate in advance the complexity of such an action. This way it will be possible to understand whether the use of special equipment will be required or whether you can limit yourself to manual labor.
Possible storage time for removed turf is 30 days. Then the aerobic microorganisms will die and the soil will no longer be usable.
Work on leveling the site must be completed before the construction of buildings, laying out paths and laying pipes begins. The optimal time for their production is autumn.
Large areas should be leveled using equipment specially designed for this purpose.
Pit dimensions
If everything is very clear with the shape of the pit: for a strip pit you need to dig a trench, for a slab pit you need to dig a pit, then with the dimensions the situation is much more serious.
Incorrect determination of values can lead to freezing of the foundation or filling of the space under the floor with groundwater.
Depth
The pit must be at least 0.4 m
The development of a foundation pit must be carried out by accurately determining the level of groundwater and the depth of soil freezing in the area. According to the second requirement, it is necessary to make a hole of at least 0.4 m.
The first parameter, on the contrary, limits the depth, since installing foundations on watery soil will require the construction of high-quality waterproofing, which will significantly increase the cost of the work.
Therefore, the pit level should be located between these two parameters.
| Estimated freezing depth of non-heaving soil, m | Estimated freezing depth of slightly heaving soil of solid and semi-solid consistency, m | Foundation depth, m |
| Up to 2 | Up to 1 | 0,5 |
| Until 3 | Up to 1.5 | 0,75 |
| More than 3 | From 1.5 to 2.5 | 1 |
Lenght and width
The size of the foundation should be 0.3 - 0.4 m larger than the facade of the house
Here the situation is somewhat simpler: the length and width of the trench for the strip foundation is guided by the architectural plan of the house. It will run along the entire perimeter of the load-bearing walls of the future building. The values should exceed the dimensions of the facade by 0.3 - 0.4 m, approximately 0.15 - 0.2 m on each side.
It should be taken into account that such values relate only to the base of the foundation; the upper part, located at the level of the soil surface, is made equal to the dimensions equal to the installation depth of the base. These parameters make it possible to create a 45-degree slope of the walls, which protects the soil from crumbling.
As an example, consider the following situation. If the foundation strip is 0.4 m, the width of the trench for the strip base must be at least 1 m. This value provides for the installation of formwork and a trapezoidal foundation.
Recommendations for replenishing soil fertility
In most cases, the procedure for making a site horizontal involves removing the top fertile layer of soil.
If you notice that the depth of the nutrient turf has become less than 20 cm, it means that fertility needs to be restored using peat humus soil mixture. The ordered soil must be distributed as evenly as possible over the leveled area.
When purchasing, you should consider the structural structure of the soil. If the site has clay or loam, they need to be diluted with fertile soil mixed with sand. And ash and lime are an excellent means for neutralizing acidic soil.
Leveling the landscape requires time and effort. But a flat area for a lawn, building or vegetable garden will repay all the efforts invested.
We build it ourselves: work order
- The area is cleared and then marked.
- To install the slab, a pit is dug 0.5 m deep. The length of its sides must be greater than the length of the walls of the building being erected (by a meter). This will make it possible to build drainage communications to drain water from wall structures. Installation of all components is carried out before pouring concrete.
- Geotextiles are laid on the finished foundation pit, creating a barrier for the penetration of a layer of sand into the soil.
- Formwork from boards or plywood sheets is prepared and installed. In the latter case, the material must be strong enough to withstand the dynamic load of raw concrete and not deform (keep the desired shape).
- Sand is scattered all over the bottom to form an air cushion. It compacts well to almost perfect smoothness. The sand mixture, thanks to its soft structure, will allow it to accept and compensate for loads, redistribute them, leveling them over the entire base and transfer them to the surface of the soil when it freezes. Sand smoothes out emerging tensions and “quenches” them.
- Another layer of crushed stone is poured onto the sand layer, protecting the sand from being washed out. It will serve as drainage. Evenly distributed and compacted thoroughly.
- Concrete preparation begins on the sand-crushed stone carpet (layer 10 cm thick) to protect the future foundation from leakage of concrete into the ground. Creates all the conditions for the distribution of reinforcement cage over the slab.
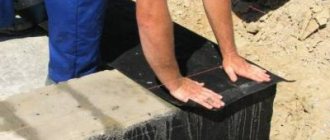
- Adhesive mastic is applied. Waterproofing is being installed. The rolled webs are fastened together along the edge using a torch or lamp. The size of the resulting canvas should be slightly larger than the dimensions of the foundation. When the slab is completely finished, the remaining fabric at the edges will be folded up and fixed at the end of the slab with the same lamp.
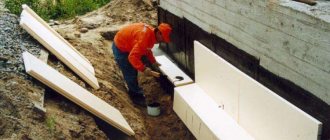
- Over the entire area of the blind area structure, a 10 or 15 cm layer of tiled thermal insulation is laid on the waterproofing layer. It is tightly fixed with a tongue-and-groove connection so that there are no gaps and “cold bridges” are not created. Extruded polystyrene boards are considered one of the most inexpensive and effective materials. They will protect the foundation from freezing.
- You can protect the insulation from the aggressive liquid environment of the concrete solution using a polyethylene film laid on them in one layer.
- Next, a metal mesh is made from reinforcement with a cross section of 12 mm, ribbed type. Vertically located rods and shared reinforcement are connected with each other using knitting wire.
Reinforcement of a slab foundation is performed with reinforcement
- The cell parameters are determined by the calculation. The indicator of the loads that are planned to be exerted on the foundation is affected. The accepted standard is 30x30 cm. But the smaller the sections, the more rods will be spent on forming the frame, the stronger the entire reinforced system as a whole will be. Two frames are formed in the thickness of the slab: one mesh will be located 50 mm from the insulation boards, the other will be on top, 50 mm below the top of the slab.
- A solution of high-quality concrete is poured into the formwork onto the finished structure. This is done manually, with shovels followed by tamping or vibrators, which allow the concrete to be distributed to the most problematic areas.
- It is best to carry out concreting immediately, without interruptions.
- If it is impossible to form a base immediately, layers of mortar are laid in a horizontal position, immediately filling the entire area at one level. But you cannot lay the composition in separate zones and then connect them to each other. In this case, cracking may occur at the junction points under the influence of loads and soil movements.
- The formed “mirror” of concrete is leveled, smoothed, taking on the required roughness.
- The finished base is covered with moisture-proof material and left to reach the required strength. The surface should not dry out or become waterlogged. Therefore, in hot weather it must be periodically sprayed with water under the film to prevent cracks from forming.
- You need to wait until the concrete has completely set. Usually this happens a month after the completion of work.
- You can continue to build walls.