For leveling backfill, expanded clay gravel of a specially selected fraction (to reduce shrinkage), which is laid on top of a vapor barrier film and leveled along the beacons, is best suited. Next, lay sheets on a gypsum or cement base (most often GVLV 12.5 mm thick); they are laid in two or three layers and fastened with screws, and then the joints are puttied. It is also possible to use ready-made two-layer floor elements with stepped edges.
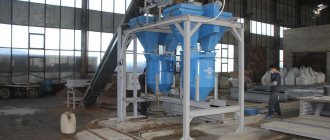
"Knauf"When installing a dry backfill screed, first of all, a polyethylene film is laid on the floor, extending onto the walls with an overlap of strips of at least 10 cm. This layer will prevent the backfill from being moistened by vapors penetrating through the ceiling from the lower apartment
"Knauf"
Then the screed is isolated from the walls using a strip of polyethylene foam
"Knauf"
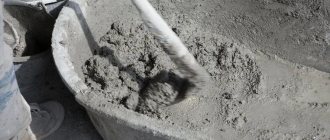
Calibrated expanded clay gravel is poured. The use of ordinary expanded clay is undesirable, as it will cause significant shrinkage
"Knauf"
The backfill is leveled using beacons and a slatted bubble level, and then two-layer GVLV floor elements are laid on top
"Knauf"
Almost immediately after this, you can begin installing the flooring, such as laminate.
Much less common are dry screeds made from high-density mineral wool mats and plywood. This design is more expensive than backfill and cannot be used to level the floor - it only provides additional heat and sound insulation.
Any dry screed is afraid of moisture, so it is not suitable for bathrooms and kitchens, and after a leak, most likely it will have to be partially dismantled. The compressive and tear strength of the surface layer is not sufficient for the use of solid wood coatings - floorboards and block parquet. However, this is one of the optimal solutions for old houses with very uneven and also worn-out and cold floors. Dry screed is ideally combined with interlocking parquet boards and laminate, and also allows for the installation of linoleum, carpet and large-format porcelain tiles.
RockwoolDry slab screed can greatly improve thermal insulation and dampen structural noise.
Rockwool
When installing it, you need a vibration-proof border along the walls and a durable plywood flooring
Floor leveling methods
The procedure has its own characteristics and rules, following which will achieve the desired result. The following methods are used to obtain:
- alignment by beacons;
- floor filling;
- building up.
Each of them has its own positive aspects and problematic factors.
| Way | Advantages | Flaws |
| Alignment by beacons | The result is a high-quality and smooth surface even with significant floor unevenness. | The screed dries from ten to thirty days, taking into account the temperature and humidity in the room and the thickness of the screed |
| Leveling with self-leveling floor | Dries faster The base layer is thinner Self-leveling base gives a smooth surface | Cannot be used on large uneven floors. |
| Leveling with floor extensions | Leveling floors with significant unevenness Possibility of floor insulation Dries quite quickly | Requires significant physical effort |
Floor leveling technology must be selected individually
Floor on joists
When it is necessary to create a reliable base for a wooden covering and the load on the floor cannot be significantly increased, logs or (much less often) so-called modular raised floors are used. These structures make it possible to eliminate any unevenness in the ceiling, but with a significant additional loss of ceiling height - at least 50 mm (the minimum intrinsic thickness of the structure).
The easiest way to make logs is from high-grade coniferous timber and level them using plastic wedges. Aluminum products on adjustable screw supports will cost several times more.
Vladimir Grigoriev/Burda MediaWhen assembling the base on joists, the horizontal can be set using a bubble level.
Vladimir Grigoriev/Burda Media
The joists are attached to the ceiling with dowel nails.
Vladimir Grigoriev/Burda Media
Plywood to the joists using ordinary self-tapping screws.
The tongue-and-groove floorboard is attached directly to the joists (with this design, their cross-section must be at least 50 × 50 mm), and the parquet and parquet boards are attached to plywood flooring with a thickness of 16 mm or more. It is advisable to fill the space between the joists with expanded clay, mineral wool or soft wood-fiber boards - this will improve heat and sound insulation.
Measuring the floor level and preparing for leveling
The choice of method and calculation of the material needed for the work is directly related to the results of the measurements taken. This procedure is mandatory, but its implementation is impossible without dismantling the old coating. It is carried out as follows.
- First, irregularities are determined and the plane is fixed with marks of the highest and lowest points. For small differences, a self-leveling floor will be effective for leveling. In case of serious damage, use special beacons.
- The premises are inspected and it is taken into account whether the doors will open after raising the floor level.
- It is enough to remove single or minor irregularities with a hammer drill, carefully clean the surface and level it with cement.
Before leveling the floor, you need to remove the old material
We prepare the base for different types of coatings
Often, leveling the floor is done to lay floor coverings on it that require a perfectly flat base: laminate, linoleum or PVC tiles. In this case, it is necessary to additionally level the concrete by grinding the surface layer with special machines. If you want to get a perfectly smooth decorative floor, use a polymer self-leveling coating made of epoxy resins. Even thin self-leveling epoxy floors, along with perfect leveling of the sublayer, strengthen it, increase resistance to abrasion and mechanical damage, and increase service life.
Leveling the floor with cement-sand screed
Correction of the base using a composition including a cement-sand mixture is one of the most durable, although its installation requires care and attention.
For high-quality work, it is better to take M-400 grade cement. Cement-sand mortar is prepared in a ratio of 1:3.
The screed should be no thinner than two centimeters, otherwise it will crack. To prevent moisture loss, plasticizers can be used, such as various detergents, lime, tile adhesive and others.
Attention! Most cement mortars shrink when they set; this must be taken into account when designing the screed.
It is worth noting that too much thickness of the base will not be good, therefore, as always, the right solution, or rather, the optimal size of the screed height, is in the middle.
When leveling with this technology you need to be careful
Types of screeds, advantages and disadvantages, areas of application
The installation of a cement floor screed depends on the technology by which the work will be carried out. Today, there are four main principles for laying a concrete floor:
- wet;
- dry;
- semi-dry (mechanized);
- floating.
Wet screed is the classic and most common method of laying concrete floors. If the screed is performed in full compliance with the technology, the result will be a strong and reliable layer of concrete.
The main positive difference between wet technology, which makes it unrivaled in the construction market, is the low cost of raw materials. In addition, every experienced builder is familiar with this screed laying technology.
Among the disadvantages, it should be noted the long period of “maturation” - drying of sand concrete, as well as the need to reinforce the screed with iron mesh if you plan to subject the floor to high loads. To make a high-quality solution for wet screed, you need to use a concrete mixer. Sometimes, upon completion of work, it is necessary to finish the floor with a self-leveling mixture.
Dry cement floor screed allows you to level the floors in the room in the shortest possible time. The main advantage of this method is the absence of a “maturing” period due to the use of exclusively dry bulk materials for laying floors. Even a person with no experience in construction work can lay a dry cement floor screed.
The disadvantages of this method can stop those who primarily seek to save money, since the materials for implementing this flooring technique are not cheap. When walking on a dry-tied floor, you can hear a cracking noise due to the friction of the material. If backfilling is done poorly, the sheets of the top floor covering may sag. The most important disadvantage of dry coating is the likelihood of mold appearing if moisture gets in. In this case, the entire floor must be replaced.
If you want to save on manual labor, you can choose a fully mechanized semi-dry cement floor screed. This technology involves the use of a special device - a trowel, which will level the surface of the screed. Semi-dry cement floor screed is impervious to mechanical loads and has good noise-absorbing properties.
The advantages of automated floor laying are rapid maturation and the absence of the need for metal mesh reinforcement. The price and strength of a semi-dry coating are equal to those of a wet coating. However, the implementation of this technology requires the involvement of qualified specialists and equipment.
Floating cement floor screed is used during construction work, especially if the structure is being built on the ground. Sometimes this technique is used in apartments. The peculiarity of a floating cement floor screed is that there is no contact with the concrete or other base. The fact that the floating coating has its own physical parameters due to the lack of connection with the ceiling significantly increases the technical characteristics of the floor in the room.
The positive aspects of using floating flooring technology are the complete absorption of noise and vibration, as well as permissible thermal expansion and load absorption. Using this method, you can significantly save on building materials, since the thickness of the leveling layer will be significantly less compared to other types of concrete pavement. If you put a thermal insulation layer under the cement, this will not only make heating the room more economical, but will also provide comfort when walking.
Also, a floating cement floor screed does not require maintenance and can be made from different classes of mortar. However, there are also disadvantages of this technique: an unaesthetic appearance due to the heterogeneity of the composition and poor resistance to chemicals. In addition, if the floor in a multi-story building is fragile, then the large mass of a floating concrete floor can create difficulties.
Using a dry screed
Leveling the floor using the dry screed method has recently become quite popular, as it allows even those who have not previously encountered repairs to make a high-quality foundation without special skills and special knowledge.
The main advantage of the method is its absolute simplicity, when thermal insulation material is poured onto the base, and a floor covering (plywood, chipboard, gypsum fiber) is laid on top. Expanded clay is an excellent thermal insulator, so the floors will not freeze even in extreme cold. All this is held together with glue and - hooray! all is ready. In addition, the cost of materials used for this type of leveling is low. For many, it is also important that working with dry screed does not leave dirt. All materials are fairly light in weight, which makes installation easier.
Experts say that this method is indispensable in old mansions.
There are several other advantages, including:
- insignificant time investment not only for installation, but also the opportunity to use the result: after leveling with a dry screed and laying the floors, the coating is ready for use;
- absolute safety and ease of installation of communications when using expanded clay or sand.
The only thing you need to seriously take care of is careful installation of the moisture-proofing layer (a polyethylene film firmly connected with tape is suitable for this). This is important, since when moisture gets in, the structure of the material is disrupted and swells, which leads to deformation of the floor covering.
Recently, dry screed has become increasingly popular.
What is it for
Many people prefer to do the repairs themselves so as not to overpay the repair team for the work. This is not surprising, because now you can find many useful step-by-step instructions for leveling the floor. But even if all the recommendations are followed, a novice master can make serious mistakes, for example, skip several steps of the work process or incorrectly mix the building composition. The end result when making such mistakes is sad - the floor surface turns out to be uneven, which is why it is impossible to install laminate or ceramic tiles.
Uneven floors threaten poor-quality installation
Note! To avoid serious mistakes, you must carefully follow the instructions for leveling the floor. High-quality work will save not only money, but also time, and the finished coating will decorate your apartment or house for a long period.
Methods for determining floor unevenness
It's no secret that additional leveling may also be required for wooden floors, especially if there are gaps or gaps between the boards. Even if the subfloor is strong enough to hold together, leveling may still be necessary. The procedure is also necessary when installing the floor on an old layer of screed, the surface of which becomes rough over time. Leveling the floor will help eliminate any unevenness.
Why do you need to level the floor?
Using self-leveling mixtures
If a specialist or home craftsman wants to ensure that the floor is even and smooth, he uses self-leveling mixtures. However, this is only possible if the composition is correctly selected, prepared in strict accordance with the recipe and used in accordance with the instructions.
Today you can find several types of mixtures on sale with a base of:
- cement,
- gypsum,
- epoxy resin,
- polyurethane,
- a mixture of the last two components.
The main feature of this material: the ability to level the surface due to its own gravity, while simultaneously giving it smoothness.
Self-leveling mixtures are perfect for leveling floors
The main advantages of such compositions are:
- increased strength;
- not susceptible to mechanical damage;
- fluidity, leveling out small irregularities.
Experts say that it is best to use leveling compounds over the rough coating. To obtain a homogeneous solution, it is necessary to thoroughly stir the mixture. The best way to do this is to use a construction mixer or other equipment.
- First, irregularities are determined and the plane is fixed with marks of the highest and lowest points. For minor differences, a self-leveling floor will be effective for leveling. Serious damage is aligned along the beacons.
- An inspection of the premises is carried out and it is taken into account whether the doors will open after the floor level is raised.
- If there are single small irregularities, it is enough to remove them with a hammer drill, carefully clean the surface and level it with cement.
This technology is suitable for leveling small irregularities
Recommendations from the experts
Recommendations:
- There are 3 types of cement screed: dry, semi-dry and regular. Before starting work, you need to clarify what type you plan to make. Each type has characteristics that are best taken into account.
- The quality of the foundation depends on the quality of installation of beacons. It is recommended to install beacons at the building level. If you plan to install an insulated floor in the future, before installing the beacons, the base is covered with expanded clay or covered with extruded polystyrene foam. This technique will make it easier to install beacons.
- To prepare the solution, first mix the dry ingredients. Before adding water to the dry mixture, you need to make sure that the cement and sand are thoroughly mixed.
To level the floor with cement, you need to calculate the proportions of the mortar, prepare the surface and fill it with mortar. If you fill it correctly with a high-quality mortar, the cement screed will be smooth and will last a long time.
Preparing for leveling
For the floor to look great, it needs to be leveled, and for this you need to carry out preparatory work. You can prepare it as follows.
- Check the condition of the base.
- Select alignment method:
– using a screed made of sand and cement;– “dry” method;
– self-leveling mixture.
- Carry out the necessary work to eliminate unevenness, cracks, chips, taking into account the base material (concrete, wood).
- Take measurements of the room.
- Install the subfloor; if it is already installed, check the quality of its characteristics at the moment.
- Install beacons and take appropriate measurements.
After completing the preparatory work and eliminating all detected base defects, you can begin leveling the floor using one of the selected methods.
Before you start leveling the floor, you need to prepare it
Step-by-step instructions for applying the mixture
The difference in height of the base is up to 10 mm, old ceramic tiles are installed on the floor. The apartment is in Khrushchev, the tiles were laid very firmly at the construction plant, it is difficult to knock them down with a hammer drill. In this regard, it was decided to level the surface with a self-leveling mixture without dismantling the old coating. A finishing composition will be used; this material perfectly levels surfaces and has high levels of physical strength and adhesion. The manufacturer's recommended pouring thickness is 1–15 mm, which suits us quite well.
Cement based finishing mixture
To carry out the work, you need to prepare a special mixer or an ordinary drill with an attachment, a wide spatula, a needle roller, a container for the solution (it is recommended to have a large plastic container for one batch at once for the entire area of the room). The zero point is found using a bubble level, the floor is primed with a roller and brushes. We have already mentioned above how important primer is; be sure to carry out this operation.
Tools and kneading container
Due to the fact that the floor in the bathroom is higher than the floor in the corridor, the leveling should be made as thin as possible; at the highest point the thickness will be approximately one millimeter. Leveling the plane in the traditional way using beacons requires not only serious construction experience, but also a lot of time; it is much easier and faster to solve problems with the help of a self-leveling mixture.
Leveling will be done on ceramic tiles
Step 1 . Determine the required amount of material. This is done in several stages.
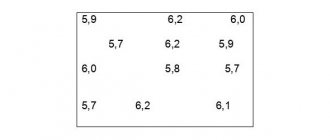
- Find the highest point of the floor in the room; in our case, it is located at the threshold. Measure the difference in relation to the lowest point, our difference is 10 mm. Such a large difference indicates the extremely poor quality of construction work. For indoors, the average layer of the mixture will be 5 mm.
- On the bag there is a table of technical characteristics, including the consumption of this material per square meter with a filling thickness of 1 mm. In our case, this parameter must be multiplied by five.
- Determine the area of the room in square meters and multiply this value by the material consumption for a thickness of five millimeters.
First you need to determine the height of the differences and the average thickness of the fill layer
The information on the packaging will help you determine the total consumption of the mixture.
Step 2 . If there are doubts about the strength of adhesion, and the surface of the ceramic tiles is quite smooth, then use a grinder with a diamond blade to cut lines; there should be a grid on the floor with a pitch of approximately 5–10 cm or strips. They can only be done on the smoothest areas; the work is very dusty and noisy, keep this in mind.
To enhance adhesion strength, you can make notches with a grinder
Step 3 . Prepare the base. Use a metal spatula to remove any remaining building materials and vacuum the floor. Seal any cracks in the walls around the entire perimeter of the room.
All cracks along the perimeter of the floor must be carefully sealed.
Step 4 . Prime the floor, use a deep penetration primer, it has improved performance characteristics. Carefully read the manufacturer's instructions before purchasing a primer; not all of them are universal; you must be careful in the selection process.
The next step is applying primer
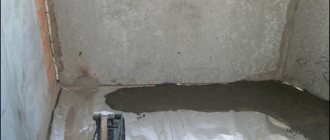
Practical advice. To prevent the mixture from flowing out of the bathroom into the corridor, you need to make a side. If you have some polyurethane foam, great, foam the gap at the threshold. After hardening, you will get a sealed barrier; the liquid mixture will not spill out of the bathroom. You can glue a strip of drywall to the threshold, its thickness is 1 cm.
Side made of plasterboard and polyurethane foam
Work with a roller, or use a brush in hard-to-reach places. If in some areas the primer is absorbed too quickly, then you need to do two layers - it takes a little time, but the quality increases noticeably.
Step 5 . Prepare the working mixture, read the instructions carefully. The amount of solution depends on the size of the room.
When kneading, it is important to follow the proportions specified by the manufacturer.
Important. Bulk mixtures bubble very much; the solution should be prepared at 400–600 rpm.
Do not allow bubbles to appear; removing them takes quite a long time. In addition, there is a high probability that some voids will remain, and this negatively affects the quality. It's better to stir a few minutes longer than to fix problems later and risk quality.
Mix only with a mixer, not by hand.
Water is always poured into the container first, and only then the dry ingredient is gradually added. If the amount of water is slightly more than normal, then the viscosity decreases and the floor is better leveled. But it takes longer to harden and the strength of the base decreases. The decision should be made on site, taking into account the finishing coating material, maximum loads, time, etc. Only experienced professionals who have been working with mixtures for more than one year can adjust the material in this way. A lot of water causes the composition to crack after hardening and peel off. An insufficient amount of moisture impairs the leveling process itself - bumps may appear.
The mixture should be homogeneous, with a minimum number of bubbles
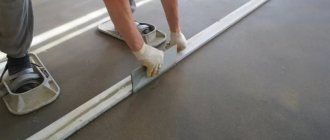
Step 6 . Start pouring the mixture from the farthest corner of the bathroom. The height of the jet is no more than 20 cm; too high a pouring speed creates bubbles, and this has negative consequences. Try to roughly adjust the thickness of the poured solution by eye, taking into account the difference in height of the base. To speed up the process, smooth the mixture evenly with a spatula; at the last stage, the solution must be carefully rolled with a needle roller. Remember that no more than thirty minutes are allotted for all leveling work; after this time, the mixture begins to harden.
Filling begins from the corner farthest from the door
Experienced craftsmen use hammer drills to level the mixture on concrete bases. Place the tip of the chisel on the plate and turn on the tool - vibration appears, which greatly helps the leveling process. But you can’t do this for a long time; the composition can stratify into different fractions, which will worsen its performance.
A spatula is used to distribute the solution over the floor
At the final stage, the entire surface must be rolled with a needle roller.
You can continue work on installing floor coverings only after the self-leveling mixture has completely hardened. The specific time depends on the brand of material and is indicated in the manufacturer's instructions.
Construction mixer price
Construction mixer
Carrying out work with large differences in the concrete base
Leveling the base is not so easy: if the detected defects are not so large, then they can be eliminated using a hammer drill and then cleaning the surface or using cement as a leveler. Self-leveling mixtures are also used.
However, if we are talking about more significant differences, additional efforts will be required to get rid of the defects. First you will have to determine the presence of irregularities and measure them. This is important in order to understand whether it is necessary to level the existing base or whether it is better to completely dismantle it and install a new one.
Analyze the floor for unevenness and only then make a decision
Having checked the integrity of the base and established the degree of unevenness and damage, the master determines ways to correct the surface. If a decision is made to carry out repairs and level the base, the necessary measurements of the repaired area are made and beacons are installed at the highest and lowest points. They will serve as guidelines when eliminating uneven surfaces. This method is considered the most appropriate for large differences on a concrete base, as it allows it to be properly strengthened.
After checking, you can begin to eliminate irregularities
When you can't do without leveling
A rule or a laser level will help determine whether leveling is necessary. When using the latter, you will get values accurate to the millimeter. What do the experts say? If the height differences exceed 3 cm, you will have to wait to lay the finishing coating. First – getting rid of the “mountains”.
If differences are within 1-2 cm, the type of finishing is used. When laying tiles, glue will help eliminate unevenness. For laminate or linoleum, bumps are unacceptable. An exception is laying on top of logs with OSB boards or plasterboard. Then you don't have to pour concrete. If the level shows that the height differences do not exceed 5 mm, you can ignore them.
Next, we will consider in detail how to level the floor in an apartment, house or industrial premises.
Basic methods for leveling wood flooring
Concrete foundations are widely used today in the construction of apartment buildings. However, in the private sector, especially in mansions, cottages, and old-built dachas, you can more often find a wooden base. Wood is a “warm”, environmentally friendly material, but it is much more difficult to restore a damaged or unusable base by leveling than a concrete one.
Various materials are used to carry out this work. Depending on the condition of the base, preference is given to one or the other.
Self-leveling mixtures can be used on wooden floors, but their use is determined by a number of circumstances that must be taken into account when organizing repairs.
Not any composition is suitable for woodworking; The most effective and efficient is the use of a P2 class leveling mixture, which includes:
- cement,
- sand,
- gypsum,
- additional components to strengthen the composition and increase drying speed;
- plasticizers that increase the adhesion of the mixture to the base.
A prerequisite is the absence of casein, which can destroy the wooden structure.
Wooden floors can be leveled with panels
In order for the material to “take”, it is necessary to strictly observe the ratio of water and dry mixture. Even with a slight deviation from the recipe, it will be very difficult to achieve the desired effect. You also need to take into account that the composition must be diluted in small portions, carefully so that no lumps remain, but very quickly in order to have time to apply it to the wooden floor before it hardens. There is not much time allotted for this: only half an hour.
To prevent the mixture from freezing directly in the mixer, you need to add the required amount of water, but too much liquid will not do any good: the resulting solution will take too long to harden and dry.
It is impossible to reuse a mixture that has already hardened, even if it is crushed.
Leveling wooden floors should not be carried out in a cold or damp room. This procedure does not “like” not only drafts, but any air movement, so it can be carried out in a warm, dry room with the doors closed. If it's raining outside, work will also have to be postponed.
Leveling such a floor should be carried out in a warm and dry room.
Although the mixture is called self-leveling, it does not always spread on its own. In order for it to reach all corners of the room, you need to help guide the solution with a rule or a roller.
Other alignment methods are also used:
- putty - simple and low-cost;
- scraping is labor-intensive;
- lag adjustment – easy to install, clean;
- installation on point supports;
- laying sheets of plywood on the frame.
Parquet, linoleum, carpet, and PVC tiles are used as a finishing coating on a wooden base. If all the steps are performed correctly, it will lie flat and neat. We must not forget about the arrangement of ventilation, which will protect the floor from dampness.
Why is the alignment procedure necessary?
A smooth floor surface is the key to its successful cladding
By leveling the floor we mean creating a strictly horizontal surface. The fact is that the installation of many modern finishing materials is unacceptable if there is curvature. Laminate or parquet boards will quickly become unusable if they are laid on a base with a large height difference.
More and more often cabinet furniture without legs is used in interior design. If the floor is “littered”, any curvature will be noticeable when installing the same wardrobe.
When should floors be leveled? There are several such cases:
- The floor is made of concrete slabs with a large height difference.
- The old parquet or hardboard, previously laid using bitumen mastics, has been removed. Small sagging cannot be eliminated, so you will have to screed the floor.
- The old wooden base creaks a lot and wobbles noticeably.
- The old screed was cracked and unusable.
- Before laying ceramic tiles.
- Before installing a “warm floor” system.
There is no need to start a complicated process if you need to hide electrical wiring. It can simply be placed in a groove or box.
There are a lot of alignment methods. Let's look at the main ones.