Beton-House.com
Website about concrete: construction, characteristics, design. We combine the experience of professionals and private craftsmen in one place
Own production tiles
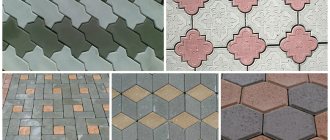
It is difficult to imagine parks and squares, areas of private country estates without paths made of tiles of various shapes and sizes. There are enough options for these products on the market. However, concrete paving slabs made with your own hands may turn out to be no worse than purchased ones.
With its help, you can create a home landscape design that is unique in its expressiveness, and at a minimal cost. In this article we will look at the composition of concrete for tiles, and also introduce the reader to the production process of such products.
- Materials for tile production
Wood is the easiest
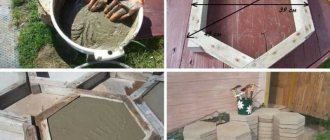
Any paving slab begins with the manufacture of a mold. The simplest and most affordable material is wood. To do this, you need several bars that are connected to each other according to the type of future tile: square, rectangle or hexagon. The slats are made with grooves at the ends to conveniently and securely attach the slats to each other. At the same time, this gives strength to the structure.
For manufacturing, slats with a thickness of at least 40 mm are suitable. Screws are definitely needed, since it is advisable to make the formwork collapsible - this way it will not warp, and it will be better preserved.
You also need sheet material: plywood, plastic, metal or others, which must be even. They will go to the bottom. It is necessary for transferring a form filled with concrete mixture, since, if it is a dacha, the form is filled with the solution in the yard, and it is brought indoors to dry. Craftsmen, as a rule, make several forms so that the work goes faster.
Some people make a large box, say one meter by one meter, and divide it with partitions to make two, four or more tiles at a time. More creative summer residents place partitions at different angles to each other, which creates an unusual tile shape - from triangles to rhombuses. It turns out to be a large square of small tiles of different shapes, which can be adjusted to each other as desired.
It should be clarified that such formworks are made collapsible, which requires certain carpentry skills and high-quality tools. Once the concrete of the tiles has hardened, the partitions are removed to make it easier to remove the finished tiles.
The internal surfaces of the wooden frame are sanded, painted or impregnated with drying oil. This is absolutely necessary: the paint will protect the form from moisture, it will not swell or warp. The fact is that sooner or later you will have to repair the tiles laid in your dacha - during use they may crack and crumble and you will need the form again.
We use purchased forms
Store-bought products are a great option. They are durable and suitable for refilling. Their cost is low, and time for independent production is saved. Plastic matrices are most often used. How to fill a path with their help?
Let's consider two options:
- pouring all fragments of the path and their subsequent laying;
- pouring a concrete path in place on a prepared base.
First option: laying ready-made elements
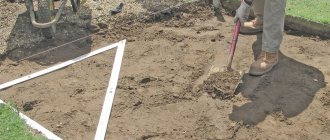
- You need to prepare the foundation. Do not pour paths onto turf or unprepared soil. Next spring the grass will sprout, the soil will shrink due to rain and the concrete will crack.
- Remove a layer of soil 5-10 cm thick.
- Cover it with crushed stone and compact it well.
- The boundaries of the path are marked by concrete curbs. For them, trenches of the required depth are dug, after which the curbs are installed on a concrete solution. Their position is checked with a level; they must be in the same plane.
- Sprinkle sand on top of the crushed stone, which is wetted with water. Level the sand so that it is in one plane. Use two pipes or two channels as beacons along which you can pull the sand with a building level.
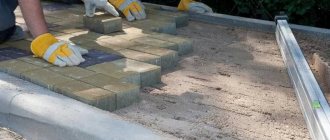
- The finished fragments are laid on the prepared base. Their position is adjusted with a rubber hammer. You can tap the protruding part a little or add sand where the path has settled.
At the end, to ensure the integrity and density of the concrete elements, the path is sprinkled with dry sand. It gets into the cracks and gaps between the tiles.
Do not forget to make a slight slope; if there is no slope, there will be constant water on the path. The slope will allow water to drain.
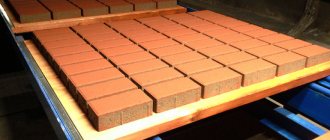
Drying concrete tiles
Drying concrete tiles must be properly arranged. Do not dry the tiles in the sun: the moisture will evaporate too quickly and the material will become cracked.
Set up a drying area in a well-ventilated area where the paving stones are not exposed to direct sunlight. Cover the tiles with plastic tiles to help the moisture evaporate more slowly.
Do not stack the tile molds one on top of the other, they may bend and you will end up with a bowed and deformed material.
Filling in place
Filling in place requires the same preparation of the base: you need to remove a layer of soil and make a backfill. Here's what to do:
- Place the matrix on a flat base. Make sure that it stands without distortions and has the required slope.
- Prepare the mortar for concreting. Cement 400 grade, sand and water are used. Crushed stone grade 5-10 can be used as a filler, which will provide greater strength to the material.
- The finished solution should not be liquid, it should not flow beyond the tile form.
- The solution is poured into the matrix, and then the reinforcement is thrown there. The solution is distributed over the entire area using a trowel.
After the solution has set, the mold for making tracks can be removed. To make this easier to do, it is pre-lubricated with mining or something greasy. You can remove the plastic matrix after 30-40 minutes. Basic steps for filling a track.
They practice ironing of set tiles: a layer of cement is sprinkled on top of the paving stones and immediately leveled over the entire area.
If a new form needs to be installed, the previous one will serve as a beacon. You need to make sure that the new fragment is in the same plane as the previous ones.
The main thing in the process of pouring in place is to protect the path from direct sunlight or atmospheric conditions. You can cover the path with a layer of wet sawdust. Under them, within two days the path will gain maximum strength.
You should also protect the flooding area from strong winds and rain by covering the paths with plastic film or making a canopy.
A plastic sheet will help with a simple design
To get tiles with a simple pattern, take sheets of plastic and soften them in hot water. Having placed the softened plate on the matrix, the finished paving slabs are pressed onto the plastic.
The protruding edges of sheet plastic are usually crimped with a wooden block and the result is something like a plastic bath - a mold for pouring future tiles. Usually this method is used for simple drawings, since getting something complex with this method is quite problematic.
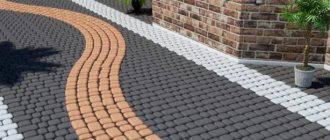
Paths made using special molds
What's the point? Cement-sand mortar is poured into the molds under the tiles. As a result, the path turns out to be blocks that imitate a path paved with stones. The result is a beautiful and neat pattern that can be diversified and enlivened with unexpected color schemes and variations.
What are the advantages of molds for pouring a garden path?
- Beautiful and neat appearance.
- The filling process is accelerated.
- Unlike a solid concrete path, which will take a long time to dry, a fragmented path will dry faster.
- If you make your own molds, you have the opportunity to come up with an individual design.
The finished concrete path will be durable, resistant to constant walking and friction, and you can even drive a car along it. Additional painting and spraying will improve the strength characteristics and improve the appearance. Purchased form for a garden path - video
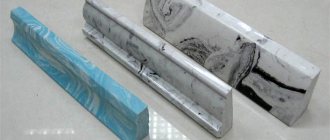
If you need a relief pattern on the tile, use gypsum
It also requires a wooden box into which liquid gypsum or a factory mixture of gypsum-based materials is poured. Then the matrix of the future tile is pressed into it. Usually this matrix is a ready-made tile, usually factory-made with an unusual, high-quality pattern. When making a box, you need to leave a 10 cm gap on each side. These will be the walls of the future shape.
Frozen gypsum is a brittle material and cannot be thrown or subjected to mechanical stress. Therefore, for greater strength, a little cement is added to it. The gypsum itself sets quickly, and in such a mixture it reaches strength only after a day.
To speed up the process, several molds are made from gypsum, since the cement mass poured into the mold takes at least a day to harden (ideally, it usually takes 1.5-2 days) in dry and hot weather. Before pouring, the matrix should be lubricated with solutions, the most common is wax mastic, so that the finished tile is easily separated from the mold and does not spoil it.
Procedure for preparing concrete
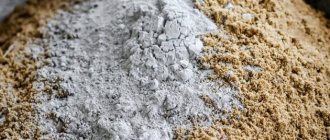
Concrete for tiles is prepared in compliance with the following sequence of operations:
- first of all, sand and cement are mixed, adding a plasticizer to them;
- crushed stone is added to the prepared mixture;
- the liquid is added only after mixing all the above components.
It is best to mix the solution with a concrete mixer or construction mixer. This, of course, can be done with a trowel, but quality kneading will take a lot of time.
Metal is good too
Metal is the most durable material for molds, and tiles of various geometric shapes can be made from it. But this requires metalworking skills, tools and the ability to use welding.
Such forms are usually made if you plan to make custom tiles. Because in a dacha cooperative, village or countryside, there will always be buyers for such tiles, since it is more expensive to transport them from the city.
Metal slats are good because they can be bent at any angle, giving them a broken, round, serpentine shape - any intricacy. If you cannot bend the slats as you would like, then a photo of a mold for metal paving slabs can be easily found on the Internet.Usually, for metal forms, they take a sheet of any metal for the bottom and steel slats with a width of at least 4 cm to match the thickness of the future tile. It is not necessary to weld the rail along its entire length; spot welding is sufficient.
Quite simply: forms from auxiliary materials
Utility materials will help make life easier, and with it the making of a mold for filling. For example, scraps of a metal corner, the main thing is that the width of the sides is at least 4 cm.
The corner is cut to the required length, welded into a square, triangle, rhombus, hexagon. A steel sheet is welded on the bottom and the mold is ready. It’s even easier to cut a square metal tank or canister; you can cut off the side of it to fit the shape, or the bottom, depending on what size you plan to make the tiles.
Photos of forms for paving slabs
0