Wood is the easiest
Any paving slab begins with the manufacture of a mold. The simplest and most affordable material is wood. To do this, you need several bars that are connected to each other according to the type of future tile: square, rectangle or hexagon. The slats are made with grooves at the ends to conveniently and securely attach the slats to each other. At the same time, this gives strength to the structure.
For manufacturing, slats with a thickness of at least 40 mm are suitable. Screws are definitely needed, since it is advisable to make the formwork collapsible - this way it will not warp, and it will be better preserved.
You also need sheet material: plywood, plastic, metal or others, which must be even. They will go to the bottom. It is necessary for transferring a form filled with concrete mixture, since, if it is a dacha, the form is filled with the solution in the yard, and it is brought indoors to dry. Craftsmen, as a rule, make several forms so that the work goes faster.
Some people make a large box, say one meter by one meter, and divide it with partitions to make two, four or more tiles at a time. More creative summer residents place partitions at different angles to each other, which creates an unusual tile shape - from triangles to rhombuses. It turns out to be a large square of small tiles of different shapes, which can be adjusted to each other as desired.
It should be clarified that such formworks are made collapsible, which requires certain carpentry skills and high-quality tools. Once the concrete of the tiles has hardened, the partitions are removed to make it easier to remove the finished tiles.
The internal surfaces of the wooden frame are sanded, painted or impregnated with drying oil. This is absolutely necessary: the paint will protect the form from moisture, it will not swell or warp. The fact is that sooner or later you will have to repair the tiles laid in your dacha - during use they may crack and crumble and you will need the form again.
What tools may be required
The use of tools largely depends on the choice of material. A standard set will definitely come in handy - a hacksaw, screws and a screwdriver (screwdriver, drill), and a hammer. To work with metal, a welding machine, metal drills, and rivet material may be useful. Practice shows that during such work there are no unnecessary tools ; non-standard solutions can be made, for which a variety of devices will be needed.
Some forms for pouring paving slabs must be protected from moisture using drying oil, paint or varnish. To do this you will need a brush, paint and solvent. The choice of protective coating is not so important; the main thing is to ensure cutoff from water .
To sand finished products you will need sandpaper , a sander or a drill with a sanding attachment.
This point is important because the surface of the tile must be smooth. In addition, it is difficult to remove finished tiles from rough formwork and can break them.
Find out on the pages of our website how to clean cement from paving slabs! We'll tell you what tools and materials you'll need for this.
And in this article you will find some useful tips on how to remove grass between paving slabs!
We have also prepared step-by-step instructions for you on how to properly make paths from paving slabs! Look for details in the following material.
A plastic sheet will help with a simple design
To get tiles with a simple pattern, take sheets of plastic and soften them in hot water. Having placed the softened plate on the matrix, the finished paving slabs are pressed onto the plastic.
The protruding edges of sheet plastic are usually crimped with a wooden block and the result is something like a plastic bath - a mold for pouring future tiles. Usually this method is used for simple drawings, since getting something complex with this method is quite problematic.
If you need a relief pattern on the tile, use gypsum
It also requires a wooden box into which liquid gypsum or a factory mixture of gypsum-based materials is poured.
Then the matrix of the future tile is pressed into it. Usually this matrix is a ready-made tile, usually factory-made with an unusual, high-quality pattern. When making a box, you need to leave a 10 cm gap on each side. These will be the walls of the future shape. Frozen gypsum is a brittle material and cannot be thrown or subjected to mechanical stress. Therefore, for greater strength, a little cement is added to it. The gypsum itself sets quickly, and in such a mixture it reaches strength only after a day.
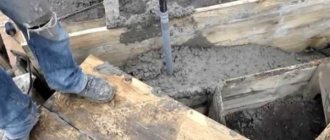
To speed up the process, several molds are made from gypsum, since the cement mass poured into the mold takes at least a day to harden (ideally, it usually takes 1.5-2 days) in dry and hot weather. Before pouring, the matrix should be lubricated with solutions, the most common is wax mastic, so that the finished tile is easily separated from the mold and does not spoil it.
Materials
In industrial production, many materials are used to create the molds in which paving slabs are cast. But to make them yourself at home, they most often use:
- plastic;
- tree;
- gypsum;
- silicone and polyurethane;
- metal.
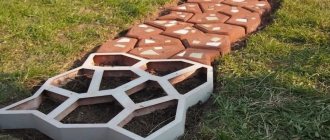
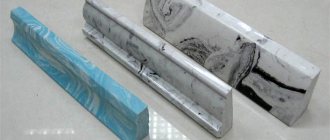
Almost any available means can act as a form for paving slabs, even circles like these, cut from plastic
These materials are always freely available either in your home or in hardware stores. They are so easy to use that you can easily create a simple form or a complex texture. Models made of polyurethane or silicone are especially popular due to their durability and ability to repeat the structure of the template in great detail.
In addition to the materials for the forms themselves, you will need tools such as a hammer, a screwdriver, nails, screws, a level and a saw, which you will use to cut boards or plywood for formwork.
Plastic
The most inexpensive material for making molds. Plastic bottles, containers, pallets - everything can serve as a mold in the manufacture of paving slabs . For example, the bottom of five-liter bottles is cut off to the required height. A plastic stand for a flower pot, at the bottom of which, for example, a large leaf of a plant is laid out, is a ready-made form.
A plastic mold suitable for paving slabs can probably be found in any home
There is also a complex way of making interesting, exclusive shapes. Plastic raw materials are melted and poured into formwork with a prepared template. When the mass has hardened, the tile mold can be used.
Tree
This is also a very simple material; it involves making a form using the principle of formwork. This product can be made from wooden beams or plywood that are resistant to moisture. To make a mold for paving slabs from wood, planks of small thickness are taken, sawn into pieces of the required length, and then connected to each other using nails .
The movement of the fasteners remains free, so that after the solution has dried, it is easy to remove the planks individually from the finished tile.
Wooden form based on formwork
Wooden formwork will allow you to make tiles of simple geometric shapes.
Gypsum
The option of making molds from gypsum is still very popular due to its simplicity and low cost. This material is so versatile that with its help you can create a template of any complexity .
All you need is:
- gypsum mixture (add plasticizer or cement for additional strength);
- wooden blocks for formwork;
- a cladding element that will serve as an example of a pattern on the form;
- fat or oil for processing the cladding element (this will prevent plaster from sticking).
Gypsum can be used to make molds of any configuration.
After rubbing the tiles with grease, lay them inside the formwork of the required size. Pour in the gypsum mass so that it covers the entire sample, plus a couple of centimeters of reserve. Although the plaster hardens quickly, to be sure, let the form sit for a day.
Note! You need to dilute the plaster immediately before you start pouring it. Otherwise, it will quickly set and will not take the proper shape.
Plaster molds also have a drawback: they are quite fragile. A small blow is enough to damage them . With intensive use, this risk increases.
Silicone and polyurethane
For the production of tiles in large volumes, molds made of silicone and polyurethane are considered the most convenient. They are used to create a wide variety of models with any design delights down to the smallest detail .
Buy a special mass at a hardware or hardware store that contains a hardener. You can lay out the pattern from wire, sea pebbles, sticks, figured products, or use one finished tile as a sample.
Silicone tile molds have many advantages over plaster and wood molds.
The sample is placed in formwork and liquid silicone or polyurethane mass is distributed on it in a layer of at least 1 cm. After initial hardening, the excess is cut off, and then the resulting form is carefully separated from the workpiece.
As a result, we will conduct a comparative analysis of materials and their use for making molds.
Table: comparison of materials for making molds yourself
| Material | Quantity per 1 form | Time | Difficulty level |
| Plastic | Up to 1 kg | 1 hour of work, 24 hours of hardening | Average |
| Tree | Up to 1.5 linear meters of boards | About 1 hour | Simple |
| Gypsum | Up to 2 kg | 1 hour of work, 10–20 hours of hardening | Simple |
| Silicone, polyurethane | Up to 1 kg | 1 hour work, 1 hour hardening time | Average |
Whatever option you choose, use simple tips in your work.
- Do not forget to make corner molds if you plan to lay the tiles not evenly, but with small breaks or corners. This will make the process much easier: you won’t have to cut the finished tiles.
- If you are making several forms at once, do not forget that their size must be strictly the same. In addition, the tiles will need to fit together well, like a mosaic.
Metal is good too
Metal is the most durable material for molds, and tiles of various geometric shapes can be made from it. But this requires metalworking skills, tools and the ability to use welding.
Such forms are usually made if you plan to make custom tiles. Because in a dacha cooperative, village or countryside, there will always be buyers for such tiles, since it is more expensive to transport them from the city.
Metal slats are good because they can be bent at any angle, giving them a broken, round, serpentine shape - any intricacy. If you cannot bend the slats as you would like, then a photo of a mold for metal paving slabs can be easily found on the Internet.Usually, for metal forms, they take a sheet of any metal for the bottom and steel slats with a width of at least 4 cm to match the thickness of the future tile. It is not necessary to weld the rail along its entire length; spot welding is sufficient.
Which material is better
In terms of surface quality, flexibility and durability, the leaders are polyurethane, silicone, and plastic . They do not react to moisture, are easy to clean, and can withstand a large number of operating cycles without any problems. At the same time, they are much more difficult to manufacture than wooden products, less durable than metal ones, and much more expensive than plaster ones.
The training of the master should be taken into account . For one it is preferable to work with wood, for another - with metal, etc. The final result is largely determined by the level of professionalism of the manufacturer.
Most often, it is not so much the material that is decisive, but the skills of the worker.
Any product bears the imprint of the master’s personality, so it is difficult to clearly name the best material.
Quite simply: forms from auxiliary materials
Utility materials will help make life easier, and with it the making of a mold for filling. For example, scraps of a metal corner, the main thing is that the width of the sides is at least 4 cm.
The corner is cut to the required length, welded into a square, triangle, rhombus, hexagon. A steel sheet is welded on the bottom and the mold is ready. It’s even easier to cut a square metal tank or canister; you can cut off the side of it to fit the shape, or the bottom, depending on what size you plan to make the tiles.
Photos of forms for paving slabs
0