The technology of creating floors on the ground is not new. There is both a simplified version of it, used, in particular, in basements, garages and other utility rooms, and one that allows you to install reliable heated floors in a residential building. Under what conditions is such a decision justified and what should be taken into account during construction?
If the house is placed on a shallow strip foundation and there is no planned underground space, instead of the classic floor, subfloors can be made that rest directly on the ground. Possible options are screed (concrete or dry) or wooden flooring along the joists.
In order for the structure to be reliable and durable, first (or rather, even before laying the foundation) it is necessary to conduct a hydrogeological study and find out the structure and properties of the soil on the site, the depth of groundwater. It is clear that the floors will be a “pie” with stabilizing, heat and waterproofing layers, but the impact of water and frost heaving on them should be minimized. From the point of view of labor costs and economic benefits, the construction of floors on the ground will be advisable in the case of non-heaving or slightly heaving soils, with a low groundwater level and no risk of flooding.
In addition to the ring drainage and protection of the foundation strip with the help of an insulated blind area, to cut off the perched water (a non-continuous layer of water accumulating in the folds of the first waterproof layer above the groundwater level) from the structure, the entire building area can be drained.
Despite their independence from the foundation and enclosing walls, ground floors are an important structural element of the building, and they should not be built by eye, but in strict accordance with the design. Engineering calculation is necessary mainly to determine the parameters of the thermal insulation circuit, as well as the thickness and strength characteristics of the screed, which must meet the expected loads on it.
In general, this is a simple construction, and it can be erected after the frame of the house is ready, which, in particular, makes it possible to spread the construction processes over time and thereby make them less burdensome financially.
Why does a basement need a concrete floor?
Why concrete floors are best suited for basements is easy to explain: if the wood is constantly exposed to temperature changes and high humidity, then the wooden floor in the cellar will not last long. As for other materials for arranging a covering, they will also have their own disadvantages under such operating conditions, but a concrete floor is precisely the ideal solution if you need to install a reliable floor in the basement of a house on the ground. The advantage of concrete over other materials is the following:
- excellent resistance to mechanical damage;
- fireproof;
- easy to repair;
- not afraid of moisture;
- not of interest to rodents;
- is an excellent basis for installing any floor covering;
- lasts a long time;
- it is easy to care for.
And most importantly, you can pour the concrete floor in the cellar yourself, since the technology for laying it is clear and simple.
Floor finishing
As already noted, finishing the floor of a cellar or basement is not a mandatory step. Of course, if you have a large storage facility that is going to be landscaped, then it’s worth using flooring.
If you want to cover concrete with flooring, use durable, quality materials.
First of all, attention should be paid to the possibility of laying tiles. The floor of the cellar or basement will not require special care. You can handle the installation yourself. For these works, it is recommended to use traditional tile options without any frills. The main advantage of such flooring is maintaining a high level of room cleanliness.
In some cases, the floor is finished with rubberized slabs, the thickness of which can vary depending on the requirements. This approach will ensure not only the availability of a safe and comfortable floor covering, but also guarantees additional insulation for the entire room.
Concrete floor on the ground - stages of its arrangement
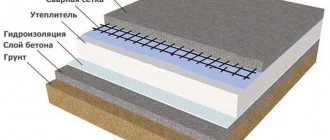
If the choice fell in favor of a concrete flooring laid on the ground, then here you will first need to make a backfill of river sand. It is poured in one layer and then compacted. Next comes a layer of backfill made of crushed stone or expanded clay. After this, a rough screed is made from concrete mortar. As soon as it dries, steam and waterproofing material is laid on it, followed by insulation.
When laying a concrete base on the ground, the penultimate layer will be the final screed of the concrete floor in the basement, on which the flooring can then be laid. Note that each of the above layers has different functional features that affect the quality and durability of the poured concrete base.
Installation of a concrete floor on the ground
Loadable floor design (floating floor)
A loaded floor, the base of which is a floor slab, is made as follows:
Expanded polystyrene insulation is laid on the floor slab, and a film is overlapped on it, which will serve as a waterproofing insulator. A screed is made on top of the film. The floating floor screed is separated from the walls by a thin layer of insulation (damper). The dry screed is covered with a vapor barrier and a base is laid for the finished floor.
What to consider when installing a concrete floor in a basement
If you have a basement and you are going to pour a concrete floor in it, in this case, take into account a number of important nuances:
- First, find out at what depth the groundwater runs under the house.
- Assess the possibility of flooding.
- To prevent significant shrinkage of the concrete floor, thoroughly compact the soil underneath.
- To improve strength, wait a while before proceeding to the next stage of work.
- When leveling the concrete mixture, remove air bubbles from it; if this is not done, voids will appear in the concrete screed.
- Before pouring the floor in the basement, install high-quality waterproofing to avoid damaging the screed and prevent the occurrence of fungi and dampness.
About the drainage system
Making a drainage system that will effectively remove moisture from the basement, cellar and basement is very important if there is a high groundwater level in your area. If it is absent, your cellar will fill with water in the spring months (even the highest quality waterproofing will not help). And this, in turn, can harm not only the storage facility, but the entire country house.
Using a drainage system, you can remove a huge amount of moisture that appears on the site due to precipitation and groundwater. It should be noted right away that installing a drainage system is not an easy task, so if you doubt your construction skills, hire specialists.
To equip a basement or ground floor with a drainage system, certain nuances should be taken into account: the slope angles of the drainage pipes, the size and location of the tanks, places where excess water accumulates and is drained, as well as many other important points that an ignorant person is not even aware of.
How to prepare a cellar floor for concreting on the ground
Each person decides for himself whether he should concrete the floor or build a base from other floor materials. However, for the basement the first option is the best solution. It should be noted that this is the least expensive and fastest way to install flooring. However, to get a truly durable and reliable floor, you will need to work with the base under it.
To do this you need:
- Level the base for laying concrete pavement.
- Compact the soil. Here it is better to use crushed stone; it will provide the surface with excellent hardness, so cracks will not form during shrinkage of a poorly compacted floor.
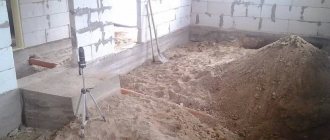
Soil compaction
- Arrange a sand cushion from half a meter to one meter thick.
Attention! The thickness of the sand cushion layer during tamping will become twenty to twenty-five percent less, this must certainly be taken into account when backfilling the sand layer.
- Level the filled sand, then pour water on it and compact it. If the basement area is large, then a special vibratory ramming machine can be used for compaction. If there is none, you will have to work manually.
Vibrating plate for compacting sand
Preparation before installing the floor
Carrying out preparatory work is an important stage in installing a floor in a cellar, regardless of its type and the presence of external or internal insulation. First of all, at this stage, the soil is studied, and the average groundwater level in the area is determined. It is because of the high level of groundwater that floors in cellars and basements begin to collapse, after which the problem spreads to the foundation and to the entire country house as a whole. If the soil around the building is saturated with moisture, a drainage support system should be made in advance.
In most cases, all survey work must be completed before construction of the building begins. If the house construction work was carried out not by you, but by the development company, you need to check with its representatives for all the data that will be useful in installing a basement or basement floor.
The basement, of course, is always built right away, but if you are building a basement and cellar several years after the construction of the house was completed, all survey work must be carried out again.
In order to independently check the groundwater level under the room, you need to make a hole about 60-70 cm deep at the base of the soil on which the future floor will be built. After that, all you have to do is wait. If after some time (from several hours to several days) water begins to appear in the dug hole, this will indicate that there is a high groundwater level in the area where your house is built. It is worth saying that it is better to check in the spring, when underground moisture rises as high as possible.
Even if there is a lot of water, you should not refuse to build a cellar. The simplest drainage system will help here, which should remove excess moisture outside the site from the foundation of a country house.
Compaction of the sand layer.
At the same time, a very important stage of preparation can be called the installation of a support cushion. To make such a pillow under the floor of a cellar or basement, you need:
- Deepen the base of the floor by 20-40 cm, then compact the resulting soil.
- Next, pour a layer of sand about 15 cm thick onto the resulting base (there is no point in doing more). After backfilling, the sand is filled with water and compacted thoroughly.
- Lay a layer of gravel (or crushed stone, preferably fine-grained) on the resulting sand cushion. The gravel layer should be no more than 10 cm thick (it also needs to be compacted well).
- A small layer of sand is again poured onto the gravel on top and compacted again.
Such a base is a traditional solution that can be used for a cellar, basement or ground floor of a country house.
How to waterproof concrete floors in a basement
After the pillow has been made and compacted, it is time to install good waterproofing in the basement. This stage is perhaps the most important, so you need to approach it responsibly. The moisture resistance of the future concrete base depends on the quality of waterproofing.
To construct this layer, high-density polyethylene film or bitumen rolls are used. Of course, there are other materials, but these are the most affordable, and their quality is almost in no way inferior to expensive analogues, and in some ways even better.
The waterproofing material is laid overlapping over the entire area of the basement that needs to be prepared for concreting. The overlap is made by fifteen centimeters, and the overlap on the wall is made by twenty to twenty-five centimeters. Excess waterproofing material is cut off. The joints between the strips are securely fixed. If you also need to insulate the first layer of the concrete floor (layer) from moisture, then coating insulating compounds can be used here.
Floor waterproofing
Do it yourself or hire builders?
A basement or basement floor is usually poured concrete over the ground. Increased attention is paid to groundwater levels.
Even with the highest quality finishing of the cellar floor, we must not forget about the waterproofing and thermal insulation of the walls of the room, through which moisture can potentially penetrate if they are not well protected.
You can do the work of pouring concrete on the floor yourself without the involvement of builders or the use of special materials. However, you will need 1-2 partners who will help you make a high-quality screed and also help you lay thermal insulation and waterproofing materials.
For thermal insulation, if possible, it is best to use modern insulation materials (for example, polystyrene foam), which are characterized by excellent performance and performance characteristics, as well as record service life.
Website editor-in-chief, civil engineer. He graduated from SibSTRIN in 1994, since then he worked for more than 14 years in construction companies, after which he started his own business. Owner of a company engaged in suburban construction.
How to make a floor in a cellar so that it is ergonomic and protects against moisture that penetrates from the ground? This question interests many people who want to make a reliable and durable concrete floor in the basement of their home. In this article we will look into this in detail, learn about the features of concrete pavements and the technology for their laying.
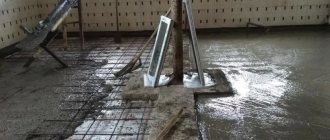
How to properly arrange reinforcement and formwork for a concrete floor on the ground
If the basement is large and it is impossible to fill it with concrete in a day, then it is necessary to install formwork around the perimeter. It is done this way:
- prepare boards 2-2.5 cm thick.
- Boards divide the basement area into squares. The size of the squares should be chosen based on the amount of work that can be completed in a day.
- Install reinforcement or road mesh. In the latter case, choose a rod diameter of 5 mm.
- If the floors will be subject to intense mechanical impact, a metal rod with a diameter of 10-16 mm is used along with the mesh.
Concrete floor reinforcement
Basement floors made of laminated veneer lumber
Glued parquet is very similar to laminate, which is produced in a similar way. Both coatings are made by pressing. However, there is one big difference between these floors - laminated wood floors contain natural wood that shapes the appearance of the surface.
Wood has endless benefits and is especially suitable for basement floors. The coating looks like real wood flooring, but is inexpensive. They can be made from relatively inexpensive materials, which reduces the cost of the floor. They can be assembled in two ways: connected like a laminate or glued together. It is also a semi-green alternative as it uses little wood.
Work on pouring concrete mortar
In order for a concrete floor to be of high quality and last for many years, you need to properly prepare the solution. Sand and cement are used for preparation; its grade must be at least M400. The sand is pre-sifted. Next, take three parts of sand and one part of cement and mix thoroughly with each other. Then gradually pour water into the dry mixture and stir until the required viscosity is formed. After this, the solution is placed on the laid reinforcing mesh and leveled. To ensure that the thickness of the layer is the same over the entire floor area, beacons are installed.
Once the concrete has matured, it is polished. However, expansion joints will need to be made first. To do this, the floor is cut with a grinder so that the seams are four to six meters apart. The seams will prevent cracks from forming on the concrete surface.
Expansion seams
Floor sanding
General information
A properly executed floor allows you to stabilize internal fluctuations in temperature and humidity and thereby creates a stable microclimate, which is so necessary for interior decoration. However, the construction of a floor cannot be considered separately from other operations, since the manufacture of a basement floor is a complex work in which all stages are interconnected .
Therefore, if any mistake was made during the construction process or the technology was violated, then the arrangement of the floor, no matter how high-quality it may be, will not give the expected result. In other words, cold and moisture will still seep into the room.
For example, if the calculation of the basement floor was carried out incorrectly, and it turned out that it is located below groundwater, then the arrangement of the floor alone will not provide the room with protection from moisture. Therefore, only an integrated approach can make a building reliable, durable and comfortable for living.
Ground floor arrangement diagram
Grouting concrete
- Rough grouting of concrete begins from the place where it was poured.
- For work, it is recommended to use special concrete strengthening compounds or topping. Such compositions will improve the strength characteristics of the concrete base and extend its service life.
- If minor loads are placed on the concrete floor, then the topping consumption will be up to 5 kg per 1 sq. m. m.
- If the floor is exposed to medium and high loads, in this case the topping consumption will be large - up to 8 kg of mixture per 1 sq. m.
If you decide to install a concrete floor on the ground in the basement, then before starting such work, watch this useful video:
Average score of ratings is more than 0
Share link
Comments There are no comments yet, but you could be the first...
Main screed
From what was said above, we can conclude that laying the floor on the ground floor can be carried out in different variations. In particular, there can be either one or two concrete screeds. The second screed is also called the distribution plate.
It is provided when necessary:
- perform insulation;
- level the surface of the bottom layer;
- create a slope;
- hide communications.
Leveling screed
The thickness of the screed depends on which of these points corresponds to the situation at your facility.
- If it is leveling and is carried out on a pre-poured concrete underlying layer, then 20 mm is sufficient. If there is insulation underneath, the thickness doubles to 40 mm.
- When it is necessary to cover the pipeline, the thickness will depend on its diameter - the screed should cover 1.5-2 cm higher.
- The class of concrete from which the screed is poured must be at least B12.5. Here, a lot also depends on what kind of finishing the floors in the basement are provided for.
- If, for example, it is a self-leveling floor made of polymer concrete, or stone (ceramic granite) slabs, which have considerable weight, the concrete must be taken class B15.
- In those places where the screed is adjacent to the walls, the joints must provide gaps of at least 25 mm over the entire thickness of the fill. They are filled with heat and sound insulating materials (the same polystyrene foam).
- The required thickness of the screed will be provided by beacons made of profiles or wooden blocks. They, as in the case of the first screed, can serve as a means for constructing expansion joints.
Beacons will provide the required thickness of the screed
Reinforcement of the floor slab with mesh
Pouring concrete along beacons
In general, you can pour a floor slab in three options:
- In the first case, it is a reinforced concrete slab, poured from heavy B12.5 concrete and reinforced with a welded mesh 3-4 mm thick, with a cell of 100 * 100 mm.
Note: This option is preferred when the floors must withstand significant loads. For example: in your basement there will be a garage, a gym with heavy exercise equipment, and communications equipment.
- In the second case, a conventional cement-sand screed 5 mm thick is made, reinforced with a finer mesh with a cell size of 50 * 50 mm. This option is suitable for residential premises.
- As an option, expanded clay concrete with the same reinforcement as in the first case can be used to fill the floor. Such a floor will be a little less durable (which is not very important for a residential building), but warmer - which is of great importance.
Note: However, such a screed takes a very long time to dry due to the properties of the filler, which, having been saturated with moisture, releases it very slowly. Therefore, if you are limited in time, the option with expanded clay concrete is not for you.
How to finish the floor
We have sorted out the design, now it remains to discuss what materials are used to finish the floor of the basement. When choosing a covering option, they are usually guided by the purpose of the premises. Therefore, we suggest you just look at the photo gallery, which will help you decide:
The carpet will provide the floor with both heat and sound insulation
If the height of the walls allows, why not make a two-level floor
Self-leveling floor
Composite board (garden parquet) in a wet room
Cork covering
Porcelain tiles
Stone effect ceramic tiles
Linoleum with imitation wood floor texture
As you can see, in recessed rooms they use the same floor coverings as in any other. We hope that you have no questions about this, as well as about the constructive part. In our next publication we will talk about how floors are installed above the ground floor. In the meantime, we wish you good luck and successful implementation of your plans!