By laying paving slabs in the courtyard of a private house or an alley along the site, you can not only achieve a practical and durable result, but also decorate the area in an original way. The article will talk about various methods and basic schemes for laying paving slabs. Technological processes and necessary materials will be discussed.
At first glance, a simple technology that requires certain skills and knowledge Source versiya.info
Laying methods
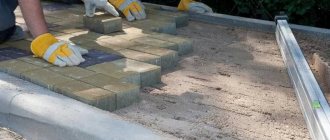
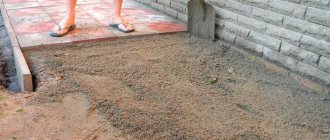
There are three main options for laying paving slabs. The main differences lie in the base; here they can use just sand, a mixture/mortar using sand and cement. When choosing any option, it is necessary to prepare a high-quality foundation. For example, if the tiles are laid on soil with grass, then crushed stone is additionally used for leveling. Then a base of 5-10 cm of sand is made. After this, the surface is compacted or watered. It is necessary to place curbs on the sides so that the path that has not yet set does not “diverge” to the sides. The curbs will continue to retain the shape of the path or platform.
Whatever option is chosen, the foundation requires good preparation Source zabor.bz
For paths in the garden, the material can be laid directly on the sand, but it must still be wet. Water does not collect on such a path; it is absorbed at the seams. This is the simplest option, but such technology will not be able to withstand heavy loads. In the second case, a mixture is prepared in a ratio of 5 parts sand and 1 part cement. It must be evenly distributed, after which you can begin the installation process. At the end of the work, the entire surface is filled with water, which ensures good adhesion. However, the most reliable is the use of a solution, although the process will be the most labor-intensive, costly and time-consuming. The ratio of materials is identical to the previous method, the solution is laid out on the base and then the tiles are laid.
Laying tiles with mortar takes the longest Source eyecorrector.ru
Rules for constructing paving stone paths
Knowing some aspects will help make a comfortable and durable design.
- The width of the path for people to move varies from 0.6 to 1.5 m . The optimal size that allows you to disperse when meeting is at least 0.9 m. A structure with a width exceeding 1.2 m will be comfortable for pedestrians.
- Curbs should be installed on the sides, preventing the path from deforming and preventing the appearance of dirt during rainstorms.
Curbs should be installed on the sides - The path should be away from trees . This is important so that their root system cannot destroy the coating. Usually it is enough to maintain 2 meters.
- When choosing the type of substrate for paving stones, it is necessary to take into account the type of soil, purpose of the coating, characteristics of the material being laid.
What types of substrates are there?
Laying options
Paving should only be carried out by a specialist. Any violation of technology or non-compliance with the rules leads to the fact that after the first rain or heavy load the masonry can deteriorate significantly and everything will have to be redone. Also, a good master will be able to offer different styling options.
- Brick. The easiest way to lay paving slabs is with bricks. Its main advantage is the saving of materials. Originality can be achieved by alternating different shades.
Sidewalk with brick laying Source ogorod.ahuman.ru
See also: Contacts of construction companies that offer the service of developing and implementing landscape projects.
- Herringbone. One of the most popular methods is to lay the tiles at an angle. Guarantees high stability of the coating, often used in the construction of driveways. However, it is important to remember that the area may visually decrease or increase depending on the chosen angle of the masonry. Imitation of weaving is carried out using longitudinal and transverse directions of masonry with alternation.
The elements are laid at right angles Source api.selcdn.ru
- Chaotic order. Tiles are used that differ in shade and size. Any masonry order can be used, and the result is very interesting. This type of masonry combines very favorably with other paving methods.
With this layout you can create drawings Source planetanovosti.com
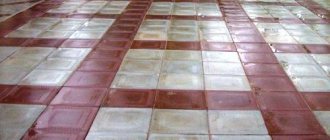
- Chess. Material laid out in this way always looks neat. The symmetry of squares is used, the best option for a strict design. The tiles can have a textured surface and alternate color shades.
Checkerboard layout Source sy.grupoquepasa.com
- Diamonds. There are many masonry options for using this scheme. It can perfectly harmonize different shades. Curly designs in the center look great on round platforms. Be sure to initially make a drawing diagram of the drawing. The special skills of the master will even allow you to achieve a 3D effect.
Tile diamonds will help create a three-dimensional pattern on the sidewalk Source pinterest.ru
- Circles. Such examples of laying paving slabs are carried out using different patterns, details, shapes and shades, which are laid out radially. Here the master can show his imagination and get very interesting results. Suitable for sites of various sizes.
Using circles you can also create an interesting styling Source kankrit.ru
Maintenance of laid paving slabs
During the first year of operation, white salt deposits (efflorescence) may form on the surface of paving slabs.
The reason for the formation of efflorescence is the crystallization of soluble compounds from cement when interacting with carbon dioxide in the air. Efflorescence is an aesthetic defect, does not affect the physical and mechanical characteristics of the coating and disappears under the influence of rain within 1-2 years of operation. If you want to quickly get rid of efflorescence and improve the aesthetic appearance of the coating, you can carry out surface treatment with special cleaning agents - efflorescence cleaners.
Regardless of the operating conditions of paving slabs, the most effective method of protection is the use of water repellents.
Water repellents prevent the formation of efflorescence and give the surface water-repellent properties. After treatment, water and contaminants are not absorbed into the surface, but flow off from it. On a paving surface treated with water-repellent agents, less ice forms and is easily removed.
Paving pattern
The choice of an interesting and suitable pattern for laying paving slabs may depend on a number of important factors that can greatly influence the choice of materials, their quantity and the additional work required:
- features of the terrain on which the work will be performed;
- the shape and size of the path or area being developed;
- architectural features of the buildings that are located around;
- the final purpose of the future site.
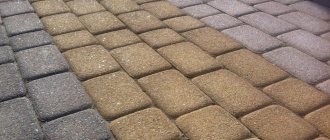
Properly laid out high quality material can last up to fifty years. Therefore, you should choose a drawing very carefully and carefully. Mostly for private houses, rectangular tiles are chosen, which are considered classic. Patterns are created by alternating colors or sizes of tiles used. Working with figured tiles is much more difficult, but it allows you to get a very interesting result.
A large selection of tile colors is an opportunity to create masterpieces on the paths Source eurolain.ru
Shape and dimensions of the “Old Town” tiles
The classic form “Old Town” (in the “Choice” nomenclature this form is called “Classico”) includes paving stones of 3 standard sizes - when laid, they can be combined with each other. The presence of characteristic rounded corners of the elements stylizes the paving as a medieval pavement.
The thickness of the tiles is 60 mm, intended for pedestrian paving (paths, sidewalks, pedestrian areas with low traffic intensity).
Attention! In the nomenclature, the series of tiles B.1.Fsm.6 and B.1.Fsm.8 “Old Town” differs from the classic one - it also includes paving stones of 3 standard sizes, but has right angles and a micro-chamfer along the perimeter of the products, which allows you to create seamless paving.
“Old Town” tiles are an excellent option for arranging garden and park paths, terraces, and making blind areas around the house.
Styling tips
When purchasing material, you must remember that there will be a certain amount of tile waste in the form of trimming elements. At the same time, you cannot purchase tiles strictly for a certain quantity for a designated area; there must be a small supply. This is due to the fact that during transportation or working with the material, defects may form. In addition, if there is not enough material, you will need to buy more, and the next batch may already have a different shade, which will immediately catch your eye against the general background. It is also not recommended to purchase very bright tiles, since a large amount of pigment leads to a decrease in the strength of the material.
It is better if the tiles have slightly muted shades Source sc-os.ru
You can carefully split the tiles only if they have been previously trimmed using a grinder. You can completely saw the required element, but this takes more time and materials. If the work is carried out to create a platform for parking a car, then a reinforced concrete base is required. The tiles themselves can have different thicknesses - from 4 to 10 cm. For pedestrian paths, material 4 cm thick is used; if constant movement along the alley on bicycles is planned, then the thickness of the tiles should be at least 6 cm. For movement and parking of passenger cars, the use of tiles is required thickness of at least 8 cm, and for the movement of trucks - at least 10 cm.
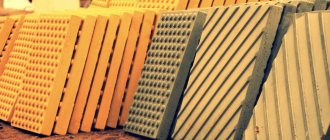
Types of paving slabs
Old Town paving stones are:
- Clinker room. Produced by firing in a blast furnace. To make such tiles, certain clay rocks are taken. Clinker tiles are resistant to sunlight and negative temperatures, do not absorb water, and retain their appearance under intense mechanical pressure.
- Granite. Made from natural stone – granite. Natural strength and durability. The service life can be up to 50 years. Granite tiles can also have uneven edges (chipped) or machined (sawed). It is considered the most durable paving stones and can be laid in any area.
- Concrete. Manufactured using vibration casting. Special pigments and impurities are added to it, which ensure high performance characteristics of the material. The tiles are durable, but vulnerable to acid.
When purchasing paving mosaics, you should consider the material used to make them.
Video description
The video shows the types of paving slabs:
Clover-shaped tiles are made of concrete with the addition of fine crushed stone. It has a very smooth surface and can be washed. Another option is English cobblestones. Such tiles can only be obtained by the vibration casting process; they imitate natural stone in color and shape, and generally have a brown or gray tint. There are bars in the shape of a wave; they are quite narrow and elongated, with a slight bend. It is this bend on the surface that creates the impression of a wave. However, brick remains the most popular and inexpensive option. It has a regular elongated shape, is characterized by high strength and long service life. Galvanized with curves has unlimited design possibilities, but the design is not very durable. These are the basic and most common options, but there are other types.
Paving slabs “Wave” Source uabruk.com.ua
Specifications
Technical characteristics and quality standards of paving slabs must meet the necessary requirements, including the climatic conditions of the region - detailed technical documentation must be requested from the manufacturer.
Vibropressed paving slabs “Vybor” are produced using modern German equipment and have durability and high performance properties:
- Type of vibration pressing: two-layer (main layer + decorative front layer)
- Concrete class for compressive strength: B25
- Frost resistance grade, cycles: F200
- Abrasion, g/sq.cm: 0.7 (G1)
- Water absorption: no more than 6%
- Product weight, kg: 2.93 / 1.92 / 0.93
- In the 1st sq.m, pcs: 138.89 / 69.44 / 46.29
- On pallet, sq.m: 11.52
Layout schemes
To ensure highly original paths, the home craftsman will not have to contact a designer. Schemes for laying out paving stones already have sufficient operating experience and are used in different climatic zones. For example, for the classic “brick” in the bottom photo there are 8 patterns, 6 ways to design a sidewalk edge and one diagram of a radius section.
Options for brick tiles.
Important! Unusual patterns and original paving methods dramatically increase the waste of tile cutting and, accordingly, the budget for finishing work.
This condition is especially relevant for winding paths, which can easily hide defects in the geometry and topography of the courtyard area. Therefore, you have to sacrifice either money and get a high-quality design, or the aesthetics of the perception of pedestrian and parking areas, but save the developer’s money when purchasing paving stones.
With minimal skills and the presence of a graphic editor on a computer, you can make a scale design of a paving area in the program and “lay out” virtually paving stones of the desired format on it to reduce cutting waste.
Layout of tiles in a graphic editor.
Using colorful tiles
The easiest way to ensure the originality of the sidewalk is with paving stones of different colors, laying them in geometric shapes, stripes of the same or different widths.
Clover stripes of different widths.
Some tile modifications allow the use of 3 or more colors, for example, “Old Town” and “rhombus”.
Multi-color tiles of one format.
Combined options
If you combine several patterns, patterns and patterns of paving stones, the aesthetics of perception increases many times over. The main nuances of combined technologies are:
- if the tile has a curved shape, it is possible to shift the seams and experiment with colors;
With clover you can “draw” stripes in any direction.
Paving stones instead of curbs.
Decorating a rainwater inlet with paving slabs.
Thus, combined technologies outperform previous schemes and paving options in terms of aesthetics.
Which tiles are suitable for radius sections?
The main reasons for choosing a curved, broken, radial shape of paths and intersections with an acute angle of junction of paths are the following factors:
- it improves landscape design;
- it becomes possible to correct the geometry of the courtyard;
- straight sections cannot be made due to the difficult terrain.
In these cases, several finishing techniques that differ in labor intensity and budget are used for paving:
- “spreading” the seams is the simplest solution, when paving is done with “brick”, the tiles are positioned with the long side across the path, the gaps between them are wedge-shaped, which is almost invisible in the overall design;
- “herringbone” - with the specified tile positioning pattern (it is better to use “brick”), the broken and winding line of paths is almost invisible in the paving pattern;
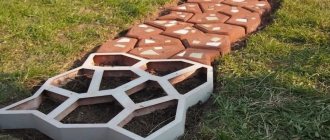
- combination with lawn grass - the technology is original in itself, you can use tiles of any configuration, free areas are left between its elements in which bluegrass, small-leaved timothy or any other low-growing grass that does not interfere with walking is sown, the disadvantage is the need to care for the plantings;
- Trimming is the most expensive option when large-format elements or collections of mosaics are used (for example, “Old Town”), laid in the usual order, in places adjacent to the borders, each tile is cut to the required size, the remaining pieces are used in adjacent areas, reducing cutting waste.
Step-by-step instruction
To eliminate possible errors in work and prevent damage to materials, before laying paving slabs, it is recommended to carefully read the detailed instructions for this process.
Marking
Immediately before starting work, you should mark the future territory or paths, which will subsequently be tiled. To do this, it is necessary to draw up a detailed schematic drawing on the site plan, taking into account the presence of plantings, buildings, and shrubs.
When drawing up a plan, it is important to take into account the characteristics of the site, the presence of slopes and lowlands in which rainwater accumulates.
- The second important nuance of drawing up a diagram is calculating the width of the tracks. The optimal option is 1 – 1.3 m. This width allows two people to move freely on the path. If you plan to create a road for a car, it is important to take into account that in addition to the vehicle, there may also be a person on the paved area, that is, the width in this case should not be less than 2.3 - 2.5 m.
- After drawing up the diagram, you can begin marking paths directly on the territory of the area being improved. This must be done using a tape measure, rope and pegs. When installing pegs, it is necessary to add 10 - 15 cm on each side to the width of the path - this distance will be necessary in the future for installing curbs.
Excavation
- Before laying paving slabs with your own hands, you need to remove the protective layer from the area chosen for finishing work. The process in this case depends entirely on the characteristics of the soil. For example, if the top layer is made of dense clay, it is enough to simply level the surface to be treated. In other situations, it is necessary to remove at least 25–30 cm of turf or soil. Next, you need to pour a layer of sand no more than 3–5 cm thick, level and compact the surface.
- The next stage involves laying geotextiles on the compacted surface of the paths. This process is not mandatory, but experts recommend including it in the algorithm of work being carried out. Geotextiles prevent the germination of weeds, soil shrinkage, and moisture penetration during spring floods.
- When laying textiles, it is important to observe the following principle: the canvases must overlap each other at a distance of at least 15 - 20 cm. When decorating the edges of the path, it is also important to take into account the above rule. The use of geotextiles and their proper installation will significantly increase the life of the paths.
Drainage
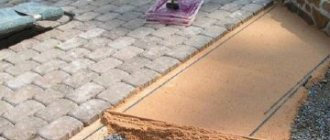
- The next step before laying paving slabs with your own hands is preparing the drainage system. At this stage, it is necessary to pour a layer of crushed stone onto the textile-lined base, the volume of which should be about 12 - 14 cm. Laying it is necessary to absorb moisture, the freezing of which during cold weather can lead to the formation of unevenness and pits on the surface of the paths.
- The crushed stone must be thoroughly compacted, then lightly sprinkled with sand, leveled and covered with a second layer of textile base, following the instructions given above. Laying textiles is especially necessary if the area to be improved is located in a lowland. The material will allow water to pass through, preventing its penetration onto the surface.
Installation of curbs
After completing the drainage work, it is necessary to install curbs. To carry out the work, you can use various materials, including slate, artificial and natural stone, wooden elements, and bricks. A mandatory requirement in this case is that the finishing material for the borders be flat.
Within the construction market, concrete and plastic piece curbs are especially popular. They are easy to install, have an excellent appearance and a high level of wear resistance. When choosing borders, it is recommended to take into account their compatibility with tiles.
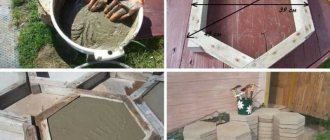
Preparing the base
One of the important stages during installation is preparing the base. The strength of the paths, as well as the external qualities, depend on the correctness of the work carried out. The type of foundation should be selected in accordance with the expected level of load on the area being improved.
For example, before laying paving slabs with your own hands to design paths that are not expected to bear significant loads, it is recommended to pour a sand base.
If significant loads are expected on the surface of the tiles to be laid, for example, use as a parking lot, it is reasonable to choose a concrete base. It is the most durable, provides a long service life, but requires quite complex work.
So, how to lay paving slabs by arranging a concrete base?
In this case, it is important to follow the following recommendations:
- Step one. The most important task is to reinforce the base. For this purpose, you can use both a ready-made mesh, the cell size of which is 10 by 10 cm, and suitable remains of building materials, fittings, and scrap metal. Before reinforcement, it is necessary to drive metal or wooden pegs into the ground so that the grid is 3–5 cm above the surface.
- Step two. Next, the concrete is poured directly. This must be done in such a way that the surface of the concrete base is located at least 3 cm below the ground surface - this is the distance required for laying decorative tiles. Filling must be done at one time - it is important to take this into account and prepare a sufficient volume of the mixture in advance.
After pouring the concrete, be sure to wait several days until the mixture sets and becomes sufficiently hard.
FAQ
There is a gap left along the edge after laying the paving stones, what should I use to fill it up?
A short distance after laying the paving stones can be sealed with glue at 45 degrees. It is advisable to do this so as not to stain the adjacent paving stones. If there is a fairly large distance of base left for laying and another row does not go there, then simply waterproof the base and bury it in the ground.
The workers rubbed the clinker paving stones by diluting the composition, and did not wash it off the surface in time. Is there anything I can do to clean the surface?
No. The paving stones will remain damaged for the entire period of its use.
Is it possible to lay steps from clinker paving stones?
Yes. Steps made of clinker paving stones are an effective element of the design of the local area. However, this work is very complex and only professionals can perform it efficiently.
A month after laying, dips appeared in places on the paving stones. Why did this happen?
If the paving stones sag, the main reason is the lack of a foundation. Incorrectly made base for paving, use of inappropriate materials for laying paving stones on a concrete base, or lack of a water drainage system.