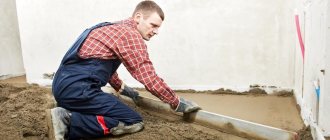
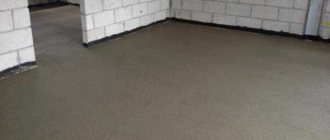
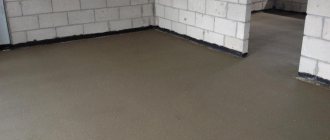
Concrete screed is used as a rough base for various finishing floor coverings and can be used as the main floor in technical production rooms, garages, warehouses and other premises. To increase strength, it is reinforced with metal mesh or construction reinforcement of a periodic profile. In some cases, water protection is used. The specific features of the concrete screed depend on the operating conditions and purpose of the structure. Regardless of the specifics of the technology for pouring surfaces with concrete, all work consists of several stages.
Concrete screed
Installation of concrete floor screed
Floor screed: what is it?
A cement layer is a base placed on an interfloor concrete floor slab, a multi-level structure, or directly on the ground. To make it, a homemade mortar, porous concrete based on binding components, or a ready-made leveling mixture is used.
Before pouring the screed, you need to determine the purpose of the room, select the necessary materials and tools. You can use the composition obtained in a professional concrete mixer. The permissible layer thickness ranges from 3.5-8 cm. If necessary, the value can increase to 12 cm or more, but here you need to pay attention to the mass of the screed and the ability of the floor slabs to hold it.
Repair
Most often, after removing old coatings, the base requires repair and restoration.
There are several possible scenarios here:
- when the project provides for the pouring of a bound screed, all existing recesses are cleaned out, cracks are expanded (groove width 5 mm or more). This way the concrete will freely penetrate there when pouring;
- When constructing a structure on a separating layer or a floating screed, defects are repaired. Voids should not remain under the waterproofing layer. This will inevitably lead to the accumulation of condensation, and areas with high humidity are always an extra headache. The composition of the repair solution depends on the nature of the damage. It makes sense to fill large recesses with polyurethane foam; in other cases, epoxy putty and concrete mortars are used. The joints between the floor and the wall are eliminated as carefully as possible, otherwise the water contained in the solution will penetrate deep into the ceiling.
Types of concrete screeds
The layer filling technology differs depending on the type of structure and operational properties.
Screed on a bound base
The area on which the solution will be poured is pre-treated with a special primer mixture. It increases the adhesion of the layer to the base. At the same time, the screed is able to withstand large mechanical loads. It is mounted on dry floor slabs.
Screed on a dividing base
This requires preliminary installation of waterproofing. You can use sheets of polyethylene film, coating or painting materials. The thickness of the screed should not be less than 3 cm. The finished layer has reduced wear resistance qualities, but good waterproofing properties. This type of screed is suitable for arranging floors in utility buildings that have a high level of humidity. This screed is allowed to be laid on the ground.
The thickness of such a screed should be more than 3 cm.
Screed on an insulating base
To create a heated floor, a leveling layer with thermal insulation is required. Its thickness ranges from 4.8-5.5 cm. In this case, the concrete floor must be additionally reinforced. It is allowed to be used in residential premises and outbuildings, houses with a basement.
Screed on a reinforced base
To ensure that cracks do not appear on this layer and that it remains resistant to destruction, reinforcing materials must be used.
There are the following strengthening options:
- Metal grid.
It has small cells of 4-5 cm. First, supports are installed on the prepared floor over the entire area, on which the mesh is laid. In this way, wear resistance and strength characteristics can be increased. The disadvantage is the risk of cracking of the concrete floor.
- Microfiber.
Synthetic polymer fibers are used as a reinforcing material. The concrete layer becomes plastic and resistant to destruction. The amount of microfiber must be calculated accurately so as not to spoil the solution.
Reinforcement of floor screed with mesh.
Reinforcement of the leveling layer is carried out before direct pouring of the mixture.
Types of screeds
Briefly described, there are four main types of screeds.
- Adhesive screed. A layer of a new cement-sand mixture is applied to a material with similar parameters. Most often - on an old screed or concrete slab.
- Waterproofed. The screed is laid on a layer of insulator. Most often it is polyethylene. This ensures good protection of the bottom layer from moisture penetration. This method is often used when applying screed to an absorbent base - sand or soil.
- Thermally insulated. The screed is very thin, fragile, a layer of thermal insulation is laid under it, and sometimes also a waterproofing material. Similar work is carried out before installing underfloor heating systems.
- Reinforced coating. This screed looks like a miniature reinforced concrete slab. Inside the mixture layer there is a wire mesh. Sometimes a binding additive - microfiber fiber - is added directly to the concrete composition.
All four types can be combined with each other. Which option to choose depends on the construction conditions. However, the most common method is a simple adhesive screed.
Selection of materials and preparation of screed mortar
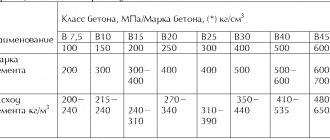
To level the floor with your own hands, you need to choose the right materials: a suitable brand of cement, sand and additional components. You can also purchase a ready-made dry mixture, which is diluted with water according to the instructions. By preparing the right grade of concrete, you can ensure high technical characteristics of the layer. To arrange a screed in any premises, it is enough to use a composition of grade M 150 or M 200. To prepare the second type of mixture, take part M 300 cement and 3 parts sand.
When preparing the solution yourself, you must observe the proportions of materials: cement - 1 part, sand - 3 parts, water - at your discretion. If the base is thick, its weight can be reduced using expanded clay. Cement M 400 or M 300 is used here.
The amount of water depends on the quality of the materials. A lack or excess of liquid will worsen the technical characteristics of the mixture, and wear resistance will decrease.
You need to prepare the solution like this:
- Sand and cement are mixed with a trowel in specified proportions.
- Water is poured into the container at the rate of 1 liter of liquid per 5 kg of mixture.
- The dry ingredients are slowly poured into the water and mixed using a construction mixer or drill with a special attachment.
The finished solution should have a gray color and the consistency of thick sour cream. If the concrete crumbles or runs, it is not prepared correctly.
Reinforcement
Reinforcement is a mandatory stage of work, especially for structures of large thickness. Typically, a ready-made metal mesh made of galvanized wire is used. The optimal cell size is 50-100 mm.
The mesh is installed on special stands, so it will be in the body of the screed. Laying directly on the base is not permitted . Reinforcement is implemented before the guides are placed. However, in practice, installation of beacons and grids is often carried out simultaneously.
In some cases, it is permissible to use a metal rod instead of a finished mesh. This will increase the labor intensity of the work, but can help out in a number of situations. The rod is laid like a net and tied with wire.
Preparing the base before pouring the screed
Before pouring the concrete screed, it is necessary to prepare the rough surface.
Surface preparation
If the leveling layer will be built on the ground, then you need to choose it to a depth of 50 cm. To improve the quality of the layer, it is necessary to arrange a sand and gravel cushion (10 cm each). These materials are compacted tightly. The use of a cushion will smooth out the unevenness of the rough foundation and also reduce the consumption of materials.
If the solution will be poured onto an existing concrete floor, it must be freed from the old floor covering and screed. It is also cleaned of debris, dust and dirt. After this, the base is treated with a deep penetration primer mixture. Further work is carried out after 5-6 hours. Cracks or potholes need to be repaired. At this stage, pipes and communications are laid and laid out.
Laying thermal insulation and waterproofing
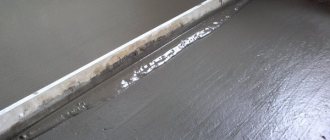
To prevent moisture from the floor slabs or leakage of liquid to the lower floors, the base must be waterproofed. For this, polyethylene film (100-300 microns), roofing felt, polymer membranes, and paper impregnated with bitumen are used. Coating materials have good protective properties. Sheet products are laid with an overlap (10-15 cm) and overlapping the walls. The edges of the material should rise 2-3 cm above the leveling layer.
To insulate the base, you can use expanded clay and expanded polystyrene boards. The main condition for the use of these materials is rigidity.
Notes on Coating Performance and Additional Precautions
The minimum thickness of the screed, excluding additional conditions, is 30-50 mm. It is not recommended to make the coating thinner, even if we are talking about a thermal insulation screed for a “warm floor”.
Concrete screed is very durable. This is its advantage and at the same time a disadvantage in some cases - the coating can crack. This occurs from temperature changes, and especially from shrinkage of the building or structure. To avoid such danger, security channels are made. These are cuts that are made using a stone circle and a grinder. You can use a special lath, which is laid at the pouring stage.
It is necessary to make cuts or safety channels around columns, wall projections and around the perimeter of the room. The depth should be from 30 to 50% of the thickness of the screed. You can make a grid of channels over the entire area and cover the recesses with sealant to maintain a continuous surface.
Determining the zero level and placing beacons
To ensure an even coating, you must first set the level to zero. To do this, marks are placed on the walls and corners, which are connected with coated thread. After this, you need to determine the maximum and minimum distance from the line to the rough base. The difference in the obtained values is the thickness of the future screed. For convenience, you can screw in self-tapping screws around the entire perimeter and connect them with thread.
After determining the level, it is necessary to install beacons. Here you will need metal profiles and cement mortar. First, the mixture is laid on the base, into which the guides are embedded. Filling the screed after this is carried out every other day. The profiles can be tightened with self-tapping screws, but here you will have to monitor their level. The distance between the guides should not be greater than the length of the rule - 1 m. If the level of the guides is not the same, then it can still be corrected, but after 1-2 hours the concrete will harden, so this should be done quickly.
Before the main stage or after laying the concrete, damping joints are made. They compensate for the internal stress of the layer that appears during drying and prevent its destruction. Seams are made around the perimeter of the room and around decorative elements.
Display of beacons
A very important stage of screeding a floor with concrete. Correctly positioned beacons make work easier and faster, and improve the final quality of the screed. Beacons can be placed under a laser level or under a water level. Due to the relatively high cost of a laser level, only professionals have it. For ordinary amateur developers it is not financially feasible to buy such a tool for one-time use; we recommend that they use a very reliable, simple and cheap water level. We will provide instructions for setting beacons using both tools. As the initial data, we assume that the concrete backfill is made of gravel. If concrete reinforcement is supposed to be done with a metal mesh, then it should first be rolled out over a gravel base. The overlaps of the mesh are at least two cells; if the edges rise, it is recommended to tie them together.
We display beacons
How to set beacons with a laser level
Step 1. Prepare pieces of reinforcement or wire rod approximately 20-30 cm long. If the base is fragile, then the length of the sections should be increased. Metal pieces will be driven into the ground, and strips will be attached to them later. The length of the segments should ensure a stable position of the beacons.
Laser level
Step 2. Install a laser level in the middle of the room, adjust the tool according to the instructions to the required height for pouring concrete.
Placing beacons and laying reinforcement mesh for pouring concrete floor screed
Important! Carefully set the laser level, the slightest inaccuracies can cause the floor to tilt.
Step 3. Drive in the first row of rods at a distance of approximately 20 cm from the wall. Hold the pieces vertically and pound them into the ground with a heavy hammer. Constantly monitor the depth of penetration of the reinforcement section into the ground. It is necessary to achieve such a position that the upper edge of the metal piece is exactly in the line of the laser beam.
Step 4. Using the same pattern, drive in all other sections of reinforcement, the distance between them is approximately 60 cm, the specific values depend on the diameter of the rod. The main condition is that the lighthouse must be strong enough and not bend not only under its own weight, but also under the load of the rules. The distance between the strips of beacons is 30–40 cm less than the length of the rule. Practitioners advise not to use a very long rule, because leveling concrete is much more difficult than cement-sand mortar. Working with a long tool does not speed up, but slows down. In addition, the quality of the screed decreases and it is more difficult to level.
Beacon installation work
Step 5. Place long pieces of reinforcement on the sections driven into the ground and use electric welding to tack them a little. We have already mentioned that in most cases concrete screed does not require great precision; anyway, a leveling screed will be placed on top for the finishing floor covering.
Step 6. Using a level, check the position of all beacons and adjust their position if necessary.
After pouring concrete onto the surface, long pieces of reinforcement can be left in place or pulled out and used for other purposes. Before pulling out with a grinder with an abrasive disc, you should saw off the weld and take out the reinforcement one by one. Shallow grooves are sealed with mortar or left in this state. The decision is made depending on the requirements for filling the floor.
For beacons, you can also use a metal profile (for example, under drywall)
How to set beacons with a water level
The water level is the most ancient, accurate, simple and cheap tool. Even professional builders often use it today. A hydraulic level is an ordinary transparent plastic flexible hose with a diameter of approximately 0.5 cm. Factory devices have glass tubes with a scale at both ends, but you can work without them. The length of the hydraulic level is 5–8 m.
Water level
Important! It is strictly not recommended to fill the hydraulic level with tap water; there will certainly be air pockets in the hose. The presence of air renders the hydraulic level useless. Fill the hose with water in the same way that drivers once filled cans with gasoline. Place the container on a hill, lower one end of the hose into it, and pull some air through the other. Sharply lower the end of the hose below the water level in the bucket and the liquid will flow by gravity. In order to make it easier to work with a hydraulic level, it is recommended to paint the water in any contrasting color; this makes the horizontal position much more noticeable. With colored water in small rooms you can do the markings yourself.
Using a water level
Step 1. Place one starting mark on the wall at the level of the top plane of the concrete being poured.
Step 2. If the room is large, then it is better to work with an assistant, and if the dimensions are small, then the markings are done independently. Make any simple device to fix one end of the hydraulic level hose at the first mark. Make sure that water does not pour out of the hose, do not lift it too high.
Step 3. Hold the other end of the hose in your hands at approximately the same level as the installation mark. Place it against the wall and slowly raise/lower the end. At the same time, monitor the behavior of the liquid at the setting mark.
Water level marking
Step 4. Once the water level is in line with the mark, mark on the wall the location of the liquid at the second end of the hose. Place the markers at a distance of 4–5 m, taking into account the size of the room.
Step 5. Using a special rope with blue paint, mark horizontal lines along the marks on the walls; the marks should be along the entire perimeter of the room.
Step 6. Drive in nails or dowels on opposite walls along the marked lines; the distance between them is selected taking into account the length of the rule. Use a tape measure to check that the hardware is parallel, otherwise the beacons will be at different angles; pull the ropes. Tie the ropes all at once or one at a time. Further work is no different from the method described above, only when driving in pieces of reinforcement you need to focus not on the laser beam, but on the ropes.
How to properly install beacons for concrete screed
You can make beacons without welding long rods. To do this, throw concrete along the lines of the driven reinforcement sections; the height of the cast should be 1-2 cm above the pegs. Pre-level the line with a shovel or trowel. Place a metal profile at least a millimeter thick on the fresh concrete (you can use an equal angle square), press it into the mass until it stops against the metal pegs. In order to tear the reinforcing mesh off the floor, lift it with your hands on both sides of the beacon line, pull it up/down several times and release. The concrete stones will fall under the mesh wire and hold it in position.
Installation of concrete screed on beacons and without them
Arrangement of concrete screed
Before direct pouring, the rough base must be coated with a primer.
The arrangement of the screed is done as follows:
- Work begins from the far corner from the entrance doors of the end of the room.
- A portion of the solution is evenly distributed between the beacons. A rule is used to align it. It needs to be placed on the guides and the excess mixture should be removed with smooth movements from side to side.
- The rest of the room is filled in this way.
- After the solution has set (3-4 days), the beacons must be removed. The resulting niches are filled with concrete.
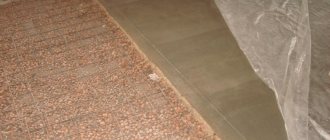
The finished screed is moistened and covered with polyethylene. After a week, the film is removed, and after 28 days the layer will become durable and completely harden. During this period, only natural drying of the solution is allowed. It is necessary to eliminate drafts and turn off heating devices. The floor covering can be laid as soon as all the moisture has evaporated from the concrete.
Padding
The surface is coated with deep penetration primers. This will improve adhesion, additionally remove dust, and bind the surface. The base will stop absorbing the moisture contained in the solution, which is important. If moisture escapes from the concrete mixture into the slab, this will cause incomplete maturation of the cement stone. The finished screed will begin to collapse and peel off even under the slightest load.
The selected primer composition is distributed over the slab in strips and spread evenly with short-haired rollers . If there are hard-to-reach areas, go over them with a brush. The primer is applied in 2-3 working approaches, observing the norms of layer-by-layer drying.
Features of work and modern approach to laying screed
When working on concrete slabs, the classic concrete recipe is often replaced with more modern solutions. Expanded clay concrete is effective in forming a rough layer, polystyrene concrete - for rough and finishing layers , as it is easier to level. Working solutions are prepared in a conventional concrete mixer.
As a rule, instead of cold and heavy crushed stone, modified materials with high thermal insulation properties are introduced into the composition - polystyrene, expanded clay
Features of pouring semi-dry screed
According to the technology, a cement-sand mixture with a minimum water content is used to construct the screed. The solution formulation may contain polymer additives, plasticizers, and fiber. For the work, special equipment is used - mortar mixers, with the help of which the mixture is supplied to the site.
Unlike classical laying technology, the solution is laid in layers and compacted . When the mixture exceeds the lighthouse row, the excess volume is cut off as a rule and smoothed out. On large areas, smoothing is carried out mechanically, on small ones - manually with a metal grater.
This solution has a lot of advantages:
- absolutely smooth finished coating;
- no additional alignment required;
- there is no need to introduce topping;
- the screed does not generate cement dust;
- short technological break until the next stages of work.
However, the implementation of the technology requires quite expensive equipment.
Features of the use of ready-made cement mixtures
When carrying out a large volume of work, especially in multi-story construction, ready-made concrete delivered by concrete trucks or concrete mixtures prepared on site are used. If the scale of work is not too large, it makes sense to turn to ready-made packaged materials.
The recipe for such mixtures is typical - they contain polymer-cement binder, fiber, and sand fillers . Solutions can be prepared in concrete mixers and mixers, in compliance with the proportions recommended by the manufacturer. If we talk about self-leveling floors, they are convenient to use on concrete foundations with insignificant horizontal differences. The finished mixtures are distributed over the surface, forming a strong, even layer.
conclusions
Concrete screed technology must be implemented at a high professional level. Only with high-quality execution will the system ensure long-term maintenance-free operation.
Experts do not advise saving on the quality of materials, waterproofing, reinforcement, brand strength of cement and quality of sand. The price for pouring concrete screed starts from 450 rubles per square meter.
The practice of installing a concrete screed in a garage is shown in the video:
Preparation of concrete mixture
To construct floors for laying sports surfaces, concrete of a class of at least B15 is required. For a significant amount of work, it is more advisable to use a factory-prepared mixture, but for a small room you can prepare the required volume yourself in a concrete mixer.
Having calculated the required amount of concrete mixture based on the area of the room and the average thickness, you need to stock up on cement, sand and crushed stone.
To prepare 1 m3 of concrete class B15 with mobility P3 it is necessary:
- cement M400 – 265 kg;
- crushed stone fraction 5-20 mm – 1170 kg;
- sand – 825 kg;
- water – 140 l.
After pre-mixing the dry components in a concrete mixer, add water to the mixture. Changing the water-cement ratio upward can lead to a loss of the design strength of concrete. In case of insufficient mobility of the mixture, it is necessary to use special plasticizer additives.
Methods for checking screed before laying flooring
Since the main requirement for the base when laying sports flooring is its evenness, before starting work on linoleum flooring, all flaws on the surface of the screed are identified. Height differences of no more than 2 mm are allowed.
Control is carried out using a two-meter strip applied to the surface of the screed. The measurement is carried out in places of the largest gap between the support points of the rack using a graduated wedge.
If there are bulges and depressions on the surface of the screed that exceed the tolerance, they must be removed by grinding or sealing with repair compounds. Cracks wider than 0.4 mm must be expanded and sealed with epoxy resins.
Laying linoleum is allowed only after the screed has dried to 75% humidity. To measure it, carbide hygrometers, electronic moisture meters or laboratory analysis using a drying cabinet are used. But there is also a simple method without the use of special equipment.
It is enough to cover an area of about 1 m2 of screed with polyethylene, gluing the sheet along the edges. If after 24 hours no condensation has formed under the film or the screed has not changed its color, further work on laying linoleum is allowed.