In this article we will look at the basic methods of creating a perfectly flat floor in an apartment. Preparatory and key stages are presented. I will explain which materials are most effective.
If you need to renovate your apartment with high quality and in a modern way, then you cannot do without replacing the flooring. In terms of price it is more profitable. And the appearance of the new coating is quite attractive.
Have questions ? Call!
Don't start renovating until you read this.
What floor to install in an apartment Warm floor in an apartment: a modern choice How to change floors in Khrushchev, Stalin, Brezhnevka
A perfectly flat floor - why is it needed?
Even in a new building, there are differences in the floors. They can reach 10 cm. Today, panel slabs are laid so that the ceiling between floors with its smooth surface is directed towards the ceiling, and its lumpy surface towards the floor. And on this side, without screeds, you can only lay linoleum. The parquet will be constantly deformed.
Thus, we fill the floor according to two main reasons:
- Laying flooring.
- Construction of a floor with water or electric heating.
- Other floor insulation.
For your information
To get a perfectly even coating, we use cement filling. This operation is also called screeding. It is necessary before laying the topcoat. In this regard, many owners have a question about how to properly fill the floors in the apartment. This technology is not anything overly complicated. The main thing is to perform all operations correctly and step by step.
Insulation materials
A special polyethylene film or membrane is often used as waterproofing. A thickness of 200 microns is enough. The future floor covering is carefully covered with such a film. If the membrane is made up of several separate pieces, then they should be overlapped with a deviation of 10-15 cm. Everything can be secured with ordinary tape. Groundwater can create serious problems for concrete floors in private homes, so waterproofing is very important.
Insulation materials
Protecting the flooring from temperature changes will help create a favorable and comfortable indoor atmosphere even in harsh winters. For thermal insulation of concrete, polyurethane foam, expanded clay, polystyrene foam, perlite, basalt and mineral wool, and polystyrene foam are used to choose from. In principle, there is no significant difference between these materials, which means you can choose any one. Most often, builders use expanded clay.
Mortars for perfect pouring - building mixtures or concrete? Choice
In modern conditions, pouring a floor screed with your own hands is quite feasible. And there is a large assortment of various Russian and foreign levelers on sale. These are innovative tools.
Their main specificity is that they are poured without much work with beacons and guides.
We breed them competently, using strict technology. They are affected by gravity and tension. And they are evenly distributed over the entire working surface. Cover all uneven areas and bumps. This is the easiest way to fill the floors to obtain an even, seamless and shiny finish.
There is also a classic - the use of cement compositions. They cost less. But the filling technology is more complicated. What to choose and how to fill the floors in the premises, each owner decides for himself, based on his budget, goals and scope of work.
Preparation steps before making a poured floor
For preparatory and main work we use the following arsenal:
- Reiki. They are necessary for beacons.
- Metal brush.
- Container for working personnel.
- Roller for priming.
- Sidewalk scraper.
- A small brush for applying primer to hard-to-reach or small areas.
- Putty knife.
- Needle type roller.
- Drill with a nozzle for mixing the solution.
- Primer.
You can fill the floors in your apartment correctly if you act strictly step by step. And the stages of work are as follows:
- Surface preparation. Removing old coating, cleaning from dust and dirt.
- Padding.
- Waterproofing.
- Thermal insulation.
- Checking horizontality.
Next comes the screed itself. Then we wait for the surface to dry and lay the base coating.
Have questions ? Call!
Selection of insulation
The type of insulation material will depend on the type of concrete screed - on the ground, ceiling or attic floor.
For example, when installing floors on the ground, it is recommended to use bulk material - expanded clay, laying it with a layer height of 30-50 mm. A more expensive, but also higher quality insulation is expanded polystyrene, the sheet thickness of which is 100-150 mm.
To insulate the attic covering, you can use polystyrene foam, polystyrene foam or mineral wool.
If mineral wool or foam sheets are used as insulation, then reinforcement of the concrete screed is required. Strengthening the fill can be done using a metal mesh made of wire with a diameter of 3 mm. The cell pitch should be 100x100 mm.
Floor insulation using polystyrene foam.
Preparing the base - leveling and waterproofing
It is necessary to fill the floors in the apartment step by step. This is the most important condition for obtaining the proper result.
The first step is preparing the base. We remove the old coating. We carry out a thorough cleaning. We eliminate dust and dirt. We use a vacuum cleaner. Degrease the surface with a simple soap mixture.
If you need to fill the floor in a room that does not have a threshold, we create one. For this we use slats. This prevents the leveling agent from leaking into adjacent rooms.
Important
Before the pouring process, it is important to remove outdated baseboards. And we must glue the wall-floor joints. There is a good tool for this - damper tape.
Next, the floor in the room is covered with a primer. Thanks to it, the floor adheres better to the base. Apply at least two layers of primer. Apply the second layer only after the first layer has completely dried. Priming continues while it is still absorbed by the base.
.
The primer enhances the strength of the surface and its adhesion to future materials.
When we work with classics (concrete-sand composition), we use a universal primer. In rooms of modest size, we apply it with a brush. In large rooms - a roller.
Before starting other work, the primer dries for about two hours.
The main work starts one day after this operation.
At this stage the level. We walk around the room with him. And we make horizontal marks on the walls. We will rely on them during the pouring process.
Professional recommendations
To make it easier to unload concrete from a concrete mixer, make a small chute. It will not only direct the material to the right place, but will also protect the mechanism from contamination. When unloading the mass from the mixer, do not place the chute on the mesh; the concrete will press it to the base. Place a piece of brick under the gutter, and raise the mesh in this place with small stones. In this position, the concrete will not violate the required distance between the mesh and the base.
Example of a small wooden gutter
If the pouring takes several days, then before resuming it, seal the joints of the old concrete with a cement-sand mortar approximately 1 cm thick. Otherwise, the hardened old concrete will interfere with the leveling of the new one, and depressions will appear on the joint line, which will have to be leveled later.
Concrete floor screed
The reinforcing mesh must be torn off from the base, otherwise it will not work. This can be done using concrete; at the same time, by the way, the stability of the lighthouses will increase. Throw a shovel or two of concrete onto each vertical post of the beacon. The quantity depends on the height of the poured layer. Then pull the reinforcing mesh up several times. Due to such actions, the mass will sink under the reinforcing mesh and lift it above the base. In this position, the concrete can completely harden, this will not have a negative impact on the final quality of the pour. The net will always be raised and its correct position will not change during walking. It is not profitable to use special plastic stands to raise the mesh. Thin wire bends a lot, you need a large number of stands. Their total price may exceed the cost of the reinforcing mesh. In addition, it takes a long time to install stands, and during work they may fall spontaneously. To correct them, you again have to waste time.
How to make a concrete screed with reinforcing mesh
For a thin screed, the concrete must be mobile, according to the existing consistency classification, approximately class P4. Not liquid, but mobile. It is much easier to work with, as a rule, there is no need to use an electric vibrator to remove air pockets. To improve the physical properties, plasticizers can be added to concrete.
Mobility of concrete
If the thickness of the concrete screed is within 5–7 cm, raise the reinforcing mesh above the base by only a few centimeters. If it is placed in the middle of the pour, then there will be no effect of strengthening the concrete in bending; the reinforcement will only work in tension. But floor coverings do not experience such loads.
When pouring concrete, do not forget to leave technological openings for laying utility networks. You can use pieces of plastic pipes or make wooden boxes from any scrap lumber.
How to quickly make a concrete floor with dropouts
How to make a lightweight concrete screed with polystyrene foam
Concrete floor reinforcement
How to fill the floor in an apartment with a reinforced screed? This issue is especially relevant when working on the ground. His solution is the use of reinforcement. We use one of these options:
- Special steel mesh.
- Fibrin. It is fibrous plastic or metal. We add it to the working solution.
At the reinforcement stage, we install wiring and install heating technologies.
Nuances of floor structure reinforcement
We reinforce the concrete floor in the house so that the structure receives powerful protection from mechanical stress and strong vibrations. This also significantly increases the service life of the floor.
Motives for floor reinforcement:
- Laying a floating screed according to the project.
- Construction of a floor on the ground.
- Compliance with certain building regulations in underfloor heating technologies.
- The floor is used for industrial purposes and is subject to enormous loads.
- The height of the concrete layer exceeds 5 cm.
If the floor structures are subject to serious loads, we give preference to metal reinforcement.
The rod diameter is affected by operating conditions and loads. Usually it is 0.6 - 1.2 cm. Cell parameters: 1 x 1 x 2 x 2 cm.
To fasten the mesh we use welding or binding wire. We often use ready-made meshes in our work. They are based on VR-1 wire and d 2-6 mm. The cell parameters are in the range 5 x 5 - 2 x 2 cm.
When reinforcing using this method, we fill the floor in the apartment in stages and follow the following order:
- The position of the mesh is in the very thickness of the concrete. This way the steel is protected from corrosion.
- Thoroughly clean the base from debris and dirt.
- Repairing cracks (if any). Their dust removal. Padding.
- Priming the base in 2-3 cycles.
- Waterproofing and sound insulation are installed.
- Marking is made and a level is applied.
- The mesh is placed on stands. This is how the material ends up in the thick of the concrete. We keep the overlap in one cell.
- Connecting butt sections using tying wire.
- Beacons are attached to the reinforcing layer. This cannot be done without metal U-like profiles.
- The train is placed between the lighthouses. It is leveled by the rule.
- After the concrete has cured, the guides are removed. The existing voids are filled with the mixture.
- A protective film is spread over the screed. Lasts 5-7 days.
For your information
We use fiber material for surfaces located in alkaline environments, where temperature parameters do not exceed 200 degrees.
You might be interested
What floor to install in an apartment Warm floor in an apartment: a modern choice How to change floors in Khrushchev, Stalin, Brezhnevka
Concrete floor technology
Pouring the coating with a concrete mixture is carried out on the ground, on a floor slab, on an old screed, on a wooden floor. The concrete mixture has a simple composition, and anyone can make it with strict adherence to process technology.
It is very important to follow the method of preparing the mixture; the strength and quality of the base depends on this.
The concrete floor is poured in the following sequence: waterproofing, thermal insulation, reinforcement, installation of guides, installation of rough screed, grinding of the coating, pouring the finished floor.
The type of base may slightly modify the work steps in this process. When installing a screed on the ground, it is necessary to make a good backfill and compaction.
Next, a mandatory condition is the installation of expansion joints, which are laid to prevent splitting of the coating.
Expansion joints are of three types:
- Shrink seams. Manufactured to relieve stress on the coating screed as a result of uneven hardening and compression.
- Construction seams. They are installed in areas where the concrete screed dries unevenly. For example, when pouring a concrete coating in several stages.
- Insulation seams. They are laid in areas where the coating is in contact with other structures of the building, namely, with a wall, ledges, columns.
If one of the expansion joints is not completed, then minor vibrations on the surface may cause ruptures, even when the concrete reaches significant strength.
The depth of the seam should be one third of the total thickness of the concreting . All seams must be sealed with special sealants.
Pouring concrete on your own is a completely feasible task, although at first glance it seems like a difficult task. By doing the concreting of the coating yourself, you can save a lot of money.
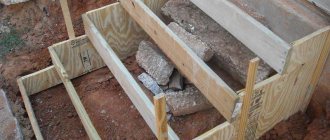
Creation of formwork. Working with Guides
We lay the concrete floor in parts - cards. These are rectangular areas. Their parameters are determined by two factors:
- Total surface area.
- Possibility of filling the composition in one working cycle.
We place formwork along the perimeter of these areas to mark the finished floor. It is created from a 5 x 10 cm board. We pre-drill holes in the boards for reinforcing pins with a distance of 50 cm. We apply the formwork lines to the seam pattern.
We fill the floor in a new house along the guides. We can use them as:
- metal profiles,
- steel corners 5 x 5 x 0.3 cm,
- profile pipe 4 x 2 x 0.2 cm.
We mount the guides by welding to reinforcement posts with a diameter of 1.2 cm. To control the evenness, we use an optical level.
All areas where the surface is adjacent to the load-bearing components are covered with Izolon with a density of 4 mm. This is a damper tape based on polyethylene foam.
So we fill the floor in parts. Just before filling, we treat all profiles with engine oil. And we moisten the rough base with water.
Have questions ? Call!
How to prepare the base
Once your home is set up, the concrete floor should be poured, but what should you do before you move on to pouring it? First of all, you need to prepare the base. As a rule, if the soil under the house is uneven, then it is leveled to a depth of 4-5 cm, compacted, and a cushion of sand and crushed stone is laid out. In order for the pit to be waterproofed , it is advisable to lubricate its surface with a layer of clay or bitumen. After this, backfill should be made by tamping a layer of crushed stone about 3-4 cm. Sprinkle a layer of sand about 1-1.5 cm on top and tamp tightly.
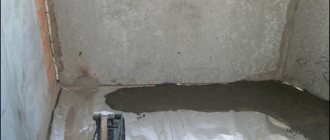
After the sand-crushed stone cushion is ready, you need to lay down waterproofing. You can use polyethylene film or membrane film as it. The material should be applied approximately 1.5-2 cm. The places where the material meets must be glued with a special tape, for example, polyvinyl chloride.
Laying waterproofing
How to fill the floor in an apartment yourself if there are significant gaps in the base? The areas where walls meet floors are considered particularly vulnerable. Areas near communications are also considered weak. Here we lay waterproofing.
To do this, we use the following types of water protection:
- Films and rolls. These are the most common types. These are polymer membranes consisting of many layers. They also have thermal insulating properties.
- Liquid. These are great pore filling products. It turns out a thin water-repellent film
- Mastics. These are adhesive plaster mixtures. Their bases are polymers, resins, liquid rubber. The mastic forms a powerful waterproof layer.
- Powders. They use plasticizers and binders. They need to be diluted with water according to the instructions.
Surface level and placement of beacons
Many owners are interested in how to fill the floor in an apartment efficiently and evenly? To do this, be sure to determine the level of the screed and install beacons (special slats).
Using a level, check the evenness of the base. We indicate the level of the intended coverage on the walls.
From plastered areas, remove the plaster 0.25 cm above this line. Using these notations we identify the highest point of the surface. This is a guarantee of proper filling.
Here the working algorithm is:
- We measure 1 m up the wall, counting from the door threshold. We draw a line.
- We draw a line around the perimeter of the room. We maintain its parallelism using a level.
- The second parallel is drawn at a distance of 1 m under the control symbol.
- We drive nails into the corners of the room on the bottom line and stretch the wire.
Thanks to the marks on the load-bearing components, it is easier to place beacons in a new apartment. The distances between beacons correspond to the length of the rule. We apply the rule to level the mixture.
The final result depends on the placement of the slats. After all the work, the slats are removed. They leave recesses that can easily be filled with the same solution that was used for the screed.
With guidelines it is much easier to fill the screed. And so we get the necessary flat surface. We install beacons even for work on a small area.
Bedding question
Before you make the working composition and pour it onto the required area, you need to make a bedding. This is the so-called pillow. It consists of three layers.
- The initial one is gravel. Density: 5 -10 cm. Water it with water and tamp it down. To control the thickness of the layer, be sure to drive pegs directly into the soil. We put them by level. Having slept and compacted this layer, we take them out.
- The second one is sandy. Density -10 cm. We also adjust the thickness with pegs. We water the sand and compact it using a vibrating plate.
- Shchebnevy. Thickness – 10 cm. We carefully level it and make it denser. There should be no sharp edges on the surface. Suitable crushed stone has a fraction of 4-5 cm. After compaction, sprinkle it a little with sand and tamp it again.
Horizontal level adjustable
Video guide for installing beacons
Stage 5. Installation of beacons
Installation of beacons
Along the long wall you need to stretch parallel nylon cords, securing them to nails driven into the level line, and place beacons along these laces.
These can be special plaster markers, as well as wooden slats, corners and metal profiles.
The beacon must be stationary, so it is installed on a solution. If the profile is higher than the level of the screed and is needed only to put a mark on it, then at the end of the work it can be removed and the free space filled with a cement-sand mixture. In the case when the beacon is made level, it can be left in the filling layer.
Creation of the working staff
This composition is not difficult to create. We dilute it in water strictly according to the instructions. Mix using a drill with a special attachment. This way we get a homogeneous composition.
A simple recipe for preparing a sand-cement mixture is as follows:
- 4 shares of perlite are used. Pour 2 parts of water on them.
- Add water and cement one part at a time to the solution. Mix.
- Add two parts of sand and 10 parts of water.
- Mix the mixture until it reaches a plastic consistency.
This option is good for use in a new private home. It is also often used on the lower floors of buildings with many floors. In an apartment it is also justified if a small layer of fill is created.
Stage 6. Pouring the solution
Filling on a flat prepared surface
Filling on a flat prepared surface
Before you start pouring, you need to make sure that all the windows are closed and there is no draft in the room. If direct sunlight falls from a window onto the floor, then it is advisable to cover the frames, even just with newspaper.
You can prepare concrete mortar for pouring yourself, or you can buy ready-made mixtures; fortunately, the choice in stores is large and varied.
Mixtures will cost more, but if you strictly follow the instructions, the risk of making a mistake is minimal. Mistakes in this matter are extremely undesirable, so you should only undertake the preparation of the solution yourself if you have experience and confidence that everything will be correct.
To prepare the solution, you will need a container and a construction mixer or a drill with a special attachment.
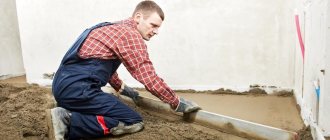
The finished potting mixture is laid in strips along the beacons, smoothing with a rule or spatula. The movements should be vibrating, shaking, so that the vibrations evenly distribute the solution and squeeze out air from it, leading to the appearance of voids, and then unevenness. After filling and leveling one strip, they proceed to the next, and so on until the end, leaving the area at the threshold for last.
A floor poured in this way dries in about 3 days, depending on the temperature and humidity in the room, and gains full strength in about a month.
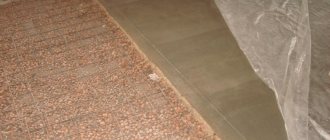
Laying screed on expanded clay
Laying screed on expanded clay
As mentioned above, the use of expanded clay cushion can reduce the cost of materials, as well as reduce the load on the floor. In addition, expanded clay is a good insulation and sound insulator.
When pouring a floor using a dry expanded clay cushion, you will need to make two marks on the beacons - one for the level of expanded clay, and the other for the level of the screed. First fill the expanded clay with so-called cement laitance, that is, a liquid mixture of water and cement, and let it dry so that the foot does not fall through when stepped on. This will take about a day. You can spread the filling solution onto the finished, dried pillow.
The second way to use expanded clay is to prepare a mixture of sand, cement and expanded clay. Its granules will need to be filled with water and allowed to soak, then add sand and cement and mix until smooth. The finished mass must be laid in strips along the beacons, compacted and leveled.
Pouring process
How to fill the surface of an existing base more efficiently? If all measures for leveling have already been provided, then the process should be completed in one day. This is the key to uniform composition.
Filling begins from the far corner of the room. To level the layer, apply the rule. We evenly distribute the material within the boundaries of the fixed beacons.
Using a needle roller, remove air from the mixture. This way we exclude the occurrence of internal voids in it. Then we level the screed completely. We repeat the operations until the base is completely filled.
If you have some misunderstandings, you can watch a video of how to pour a floor screed with your own hands.
Stage 7. Drying the screed
Drying the screed
Filling of each room should be done without interruption, in one day, so that the entire surface is uniform. The screed will harden in a few days, and you can step on it. At this time, it is necessary to finally level the surface by cutting off the protrusions and grinding the roughness.
To prevent the floor from cracking, it can be covered with a film that prevents the rapid evaporation of moisture. It’s even better to moisten the concrete surface from time to time - this will help avoid film.
All further activities related to laying the selected coating should begin only after the screed has completely dried, and this will last up to 4 weeks.
Floor work
How to pour concrete floors and when should it be done? It is important to know one specific thing here - bedding is not required.
First we study the floor slab. If there are cracks or chips on it, we fill them with a repair compound.
When working with wooden floors, we also repair them if necessary.
We provide any overlap with waterproofing - thick (200-300 microns) polyethylene film.
Next we arrange thermal insulation. Suitable for these purposes: basalt wool. expanded polystyrene or polyurethane foam.
We put up beacons, fill the composition with a density of 10 cm. Further actions are identical to those for working with a floor on the ground. If there are any incomprehensible moments, you can watch a video of how floors in an apartment are poured over the ceilings.
Tools and materials for pouring the floor
Pouring the floor is a very important part of home improvement. This stage of work requires special tools. To ensure that the work does not cause trouble, you should have a tool such as a vibrating rammer in advance. It will help to compact the concrete tightly so that it does not become porous in the future. To fill the floor you will also need :
- a certain amount of roofing felt to cover the floor;
- polyethylene film, it is used as waterproofing;
- expanded clay;
- reinforced mesh;
- limiting corners;
- level for measuring the surface;
- trowels and shovels for pouring and leveling the floor.
Choosing a filling composition
The choice of screeding agent is a very important issue. And when deciding how and what to fill the floor in a new apartment, consider the following factors:
- The cement-sand composition sets within an hour. After which it is problematic to level it. Here you need to work in a duet. One creates a mixture. The second one is to fill it and level it.
- Ready-made formulations have a more liquid consistency. They spread out, aligning horizontally. This results in a smoother surface.
- Concrete finally hardens in 4 weeks. And the composition in a couple of days.
After filling and leveling, protect the surface from the following influences:
- temperature jumps,
- ultraviolet,
- air flows.
We cover it with film. This prevents the appearance of cracks in it.
To find out whether the screed is ready, we can use a special support component. If the screed has hardened thoroughly, remove the guide rails. We fill the voids with the composition.
We grind the concrete floor. After this operation, the floor covering can be installed on the base.
Floors filled with leveling mixtures can be loaded within 6-12 hours.
The type of flooring planned dictates certain conditions. After installing the screed, some defects and sagging can be ignored if ceramic tiles are laid.
Advice
If you are planning laminate, parquet or linoleum, we use mixtures with a self-leveling effect. This way the surface will be perfectly smooth with a mirror reflection.
We prepare the mixtures strictly according to the instructions, pour them onto the floor. For leveling we use a special brush.
Then we treat the surface using a needle roller. This is a measure to eliminate air bubbles.
But even though the base is considered ready, I do not recommend placing furniture on it. This can be done in 5-7 days.
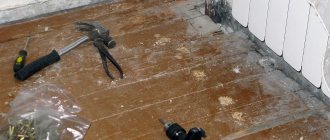
Working with wooden floors
When you need to remove wooden floors in a house and install concrete surfaces, you need to follow the following algorithm:
- Dismantling old floors.
- Leveling the site.
- Making a pillow.
- Installation of insulation.
- Creating the composition and filling.
How to remove wooden floors and then pour screed, we consider in detail according to the indicated stages.
- We dismantle old floors using a crowbar. We follow safety precautions.
- Clean the surface of debris. Level the soil with a shovel.
- Making a pillow. We use crushed stone with a fraction of 2-4 cm. We form a layer of 5 cm. We compact it.
To compensate for the thermal expansion of the entire screed, we equip the perimeter of the room with foam sheets. Polystyrene foam is also a permanent formwork here. The thickness of one sheet is 20-50 cm.
The crushed stone layer is covered with a sand layer with a density of 10 cm.
- We organize insulation using extruded polystyrene foam with a thickness of at least 5 cm. Sheet parameters: 120 x 60 cm.
When laying, their locks are fastened, creating a monolithic surface. This material is moisture resistant, so we do not waterproof it.
Sheets are laid using a level. Add sand in the required areas. Again, check the evenness of the sheet positions.
- We work in two cycles. We put up formwork from boards. The composition elements and their proportions are as follows:
- cement: 1 share,
- sand: 2 shares,
— granite screening: 3 shares.
If all the elements are dry, the granite screenings are sent first into the concrete mixer, followed by sand, and cement last. Mix everything thoroughly. Then add water.
If the sand is wet, pour water into the bucket to fill half its volume. Next comes cement. Mix it thoroughly. Add sand, then sifting. Finally, add water to obtain the mixture of the required consistency.
The mixture is neither liquid nor very thick.
Apply the resulting composition and level it using the rule. The density of the screed is 4-5 cm.
After pouring, the composition needs two days to harden.
Then we prepare the second half of the room. Operations are identical
We align the fresh screed in density with the previous screed
After complete pouring, the concrete hardens for 2 days. Then you get this result:
For your information
The screed will be completely strengthened in a month. During this period, we water it twice a day from a watering can. On the created base you can install warm floors or floor coverings.
Stage 4. Approximate calculation of the amount of materials
Approximate calculation of the amount of materials
Finding the highest and lowest points will help you roughly estimate the amount of materials required for the job. It is quite difficult to accurately determine this figure, since the surface roughness cannot be described by any formulas, but an approximate calculation will not hurt.
First, the height difference is calculated, that is, the difference between the highest and lowest points. This value is divided by 2 to obtain the average height of the screed throughout the room. The minimum thickness of the fill layer is added to it (in our case, 2 cm) and the finished number is multiplied by the area of the room. This way you can find out the approximate volume of the finished potting mixture.
If the solution is mixed in a ratio of 1:3, then for one cubic meter you will need approximately 12 bags of cement, packed in 40 kg, and 35 bags of sand of the same weight. In the case when you plan to use the finished mixture, you need to clarify the information on the label.
By the way, if the height difference is too large, then the screed layer will be very thick. This is bad.
- Firstly, pouring the floor will be quite expensive.
- Secondly, the screed will take a long time to dry. In deep holes, the solution will not have time to dry as quickly as above the mounds, and this leads to the appearance of cracks.
- Thirdly, the floor will be too heavy. In such a situation, you can use, for example, an expanded clay pillow.
Nuances of self-leveling floor
Self-leveling floor - also known as liquid floor - is a special composition. It is created on the basis of polymer elements. Before it hardens, it is a very liquid product. It is very easy to pour directly onto the prepared base. The liquid is quickly and without our intervention evenly distributed throughout the entire base, covering any defects.
There are these types of self-leveling floors:
- Cement-acrylic.
- Polyurethane.
- Epoxy.
The cement-acrylic type is usually used in industrial facilities.
The advantages of this type:
- Powerful resistance to moisture and wear.
- Acceptable price.
- No preparatory operations are required before pouring.
- Service life – 30 years.
- The presence of cracks does not affect the integrity of the surface in any way.
Minuses:
- Huge labor costs.
- The coating has no elasticity.
Polyurethane types
We use them more in residential premises. Their advantages:
- Powerful resistance to moisture.
- Good elasticity.
- Solid resistance to heavy loads and wear.
- Fast hardening.
- Service life – 40 years.
- Antimicrobial action.
Minuses:
- Dangerous odor before complete hardening - risk of poisoning.
- A significant expense is a huge financial outlay.
Benefits of concrete
It is safe to say that of the currently known materials with which floors are installed, concrete is considered one of the most affordable and widespread. High strength indicators, long service life, low probability of surface damage and ease of pouring are the main advantages of such solutions.
Concrete
It is noteworthy that during the summer months the cost of concrete may rise slightly. This is due to an increase in demand for it and the intensification of construction and repair work. In any case, if you stock up on the main components of the solution (crushed stone, cement and sand) in advance, then there will not be much difference in price.
Epoxy look
It allows you to achieve masterpiece design results. Its advantages:
- Resistance to mechanical damage.
- Easy to clean.
- Transparency. You can arrange a composition under such a floor, then fill everything with the composition. Details on how to fill such a liquid floor in this video:
A must read
What floor to install in an apartment Warm floor in an apartment: a modern choice How to change floors in Khrushchev, Stalin, Brezhnevka