Leveling the floors is a mandatory procedure that is performed during any renovation. The best way to get a perfectly level rough foundation is to arrange a screed. However, despite a lot of conversations and articles, few people know what a floor screed is and why it is needed. What types of screeds are there? Which type is better? It's time to take a closer look at this.
What is a floor screed and why is it needed?
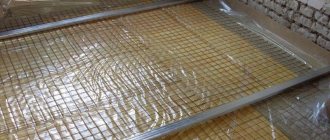
Scheme of a two-layer screed for beacons
What is a floor screed?
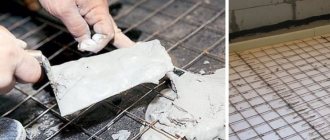
A screed is a fairly thick layer of sand-cement mixture laid on top of the ceiling, insulating layer or rough base. It is this layer that will serve as the surface on which tiles, laminate, linoleum or any other coating will be mounted.
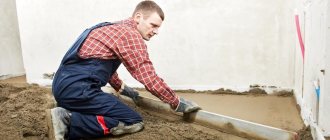
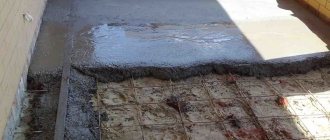
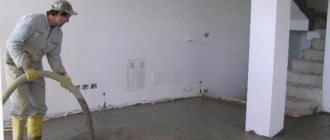
Installation of semi-dry floor screed
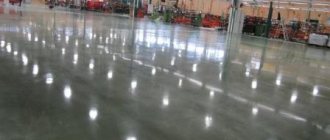
On a note! In utility rooms, basements, and garages, the screed itself can also serve as a finishing floor covering. It also becomes the final layer in workshops, warehouses, and enterprises.
Screed composition
Preparatory work
The strength characteristics of the screed and its ability to absorb acting loads depend on the quality preparation of the base. Regardless of the type of surface preparation method used, at the initial stage of work, carry out the following activities:
- dismantle electrical systems and plumbing equipment;
- completely free the work area from furniture and unnecessary items;
Cement screed is applied to a previously prepared base
- remove the previous coating;
- Dust the room using a vacuum cleaner, after removing traces of oil and greasy stains;
- treat deep cracks with putty, plan cavities;
- clean out sagging and irregularities using sandpaper;
- saturate the floor with sealant or special impregnation to improve adhesion;
- mark the coordinates of the height of the foundation being performed using a building level;
- reinforce, if necessary, with metal mesh used for layer thicknesses greater than 3 cm.
Having completed the preparatory activities, you can begin to form the selected floor screed option.
Why do you need to screed the floor?
The main purpose of the screed is to level the subfloor, but in fact this layer performs a number of other functions:
- increasing the waterproofing characteristics of the floor;
- increasing base thermal insulation values;
- increasing the mechanical strength of floors;
- the possibility of laying some communications inside the screed - wires, pipelines, etc.;
- raising floors, if necessary, to a certain level;
- creating a surface slope;
- installation of a water or electric floor heating system.
Attention! If you refuse to use a screed, the floors will not be able to be made perfectly flat.
Screed is the best way to level the floor
Expert opinion
Afanasyev E.V.
Chief editor of the pol-exp.com project Engineer.
If the floors in the room are uneven, this will negatively affect everything that is inside. The furniture will stand crookedly, warp, which may cause it to lose its appearance. Also, certain types of flooring are demanding regarding the evenness of the rough base. For example, ceramic tiles can easily break or lie unevenly if the floors are crooked. Laminate and other similar materials will quickly become unusable if they lie on such a base. And linoleum will easily “demonstrate” all the flaws of the floor with pits and bumps, as it follows all the curves of the surface. Also, parquet or laminate laid on an uneven surface will creak while walking.
Understanding the purpose of the floor screed
On a note! In a house built from scratch, the screed also becomes a protective layer. It allows you to create the best conditions for waterproofing and thermal insulation, which makes it possible to make your home warm and cozy. Also, this layer must be laid in rooms located directly above basements.
Floor screed
If all of the above does not convince novice craftsmen to install the screed, then you can turn to the regulatory documentation. According to SNiP 2.03.13-88, the screed is used for:
- creating smooth surfaces;
- distribution of thermal insulation loads;
- creating floor slopes;
- installation of pipelines;
- regulating the normalization of floor heat absorption.
SNiP 2.03.13-88 . Floors. Downloadable file (click the link to open the PDF in a new window).
SNiP 2.03.13-88
The documents that contain all these points can no longer be ignored, and the screed still needs to be done, no matter how much you want to save money on it. But then you can safely carry out other repair work and not worry about the result - it will be excellent if the screed was installed according to all the rules.
Self-leveling floor
Purpose and main tasks
What is base leveling? What tasks are performed during this construction operation?
Floor screed is a process of preparation and planning of the base, intended for:
- laying tiles;
- installation of parquet planks;
- laying linoleum;
- laminate installations;
- placement of carpet;
- formation of original floor coverings.
Screeding is a process step aimed at ensuring ideal flatness for finishing operations. The main functions of this preparatory stage:
- Ensuring a perfect plane.
- Increasing the strength characteristics of the floor.
- Creating a comfortable room temperature.
- Noise absorption for a comfortable level of sound insulation.
- Raising the level to the required amount.
- Uniform distribution of forces over the area.
There is quite a wide variety of types of screeds
The need for screed in an apartment
For some, the need to install a screed in an apartment is not obvious. However, even in such a room it is highly recommended to lay this layer. One of the reasons is that the screed can provide good sound insulation of the apartment. If there is no screed or it is of poor quality or thin, then the neighbors below will perfectly hear the stomping of children and loud conversations, and this is unpleasant and wrong for other residents of apartment buildings. Therefore, the better the soundproofing properties, the more pleasant it is to live in such a house.
Preparation of mortar for floor screed
Attention! There are certain norms and rules regarding maintaining silence in the house. They must be followed if you want to avoid problems with residents from other apartments. During the day, the permissible noise level cannot be more than 40-55 decibels, and at night - only 30-45 decibels.
Sources of noise in city apartments
Noise is divided into two categories - shock and airborne. The latter includes all everyday, “home” sounds. This is the speech of people, the sound of a working radio and TV, the growling of a dog, etc. To prevent all these sounds from spreading outside the apartment, thick-walled partitions and massive elements are used in the construction of houses. And the thicker the walls and floors, the less likely it is that this noise will be heard by anyone other than those in the apartment. The shock type of noise includes the movement of objects on the floor, jumping, and loud steps. These sounds usually travel through ceilings. It is quite difficult to make sure that none of this is heard outside the home. However, the level of such noise is well reduced by a floating screed.
Cement-sand floor screed
Attention! The absence of screeds in the apartment or improper installation will not save neighbors from any type of noise.
You will also have to install a screed in an apartment if it was laid poorly during the construction of the house. Pieces of reinforcement may stick out from it or the floor slabs, the surface may be skewed, and if the apartment is located on the ground floor, then in the absence of a screed, the floor will be very cold.
Criteria for choosing the type of screed
The choice of screed depends on several key parameters: weight, purpose, type of decorative floor covering and base. An important role is played by the fact whether the screed is done from scratch in a new building or redone during the renovation process.
Calculating the required number of layers, selecting materials and determining their mass are the main tasks that need to be solved.
Weight
When designing and constructing a building, the load that the floors can withstand is calculated and specified. It is different for each type of construction. The heaviest screed is made from cement-sand mortar; wooden floors may not support its weight, so it would be more advisable to choose a dry one. On the contrary, a CPR or gypsum layer will fit well on reinforced concrete prefabricated or monolithic floors.
Screed made from cement-sand mortar is the heaviest.
Waterproofing
Waterproofing must be done in rooms such as bathrooms, toilets, balconies, and sometimes kitchens. In addition, it is performed in apartments and houses that do not have a basement. Waterproofing materials come in the following varieties: rolled and liquid, in the form of mastics and paints with special additives. In wet rooms, 2 layers of waterproofing are performed - under and on top of the screed. In basements and on balconies they make 1, which is placed inside.
Noise insulation
The problem of poor sound insulation worries residents of multi-storey buildings, in particular panel buildings. The solution to this issue is a floating screed device. Its design involves the presence of a noise-insulating layer that prevents the spread of sound. In addition, the porous material separates the concrete from the walls, which eliminates direct contact of the screed with vertical structures and makes this method of noise transmission impossible.
Thermal insulation
Most of the heat escapes through the floor, which often worries residents of lower floors. A layer of insulating material can be hidden under the screed to prevent heat loss. In addition, the presence of such a layer is necessary when installing heated floors, so as not to additionally heat the neighbors.
A screed is needed when installing heated floors.
Types of floor screed
Screeds are different. They have several classifications, divided by the type of mixtures used, by design features, etc.
Types of screeds
For example, a screed could be:
- self-leveling;
- dry;
- semi-dry;
- wet.
Table. Types of ties depending on the material.
| View | Characteristic |
| Wet | The mixture for pouring such a screed will contain a fairly large volume of water. In appearance and composition, the installation material resembles M300 concrete. After laying this screed option, you must wait at least a month for the material to dry. To increase the strength of the structure, the surface is coated with various special compounds. As a rule, such a screed is not installed in a residential building, but this is an excellent option for a production workshop. |
| Semi-dry | A fairly commonly used base option. There will be much less water in such a solution than in one prepared for a wet screed. But there is a lot of sand. This screed dries faster and can be installed indoors. Its strength is less than that of a wet type screed. |
| Dry | As you might guess, such a screed is installed without water at all. There is no need to wait for the floors to dry before carrying out other work. The floors are leveled with a special dry mixture, on the surface of which flat sheets of chipboard, gypsum fiber board, plywood are laid and secured. The simplest option for leveling the floor in an apartment. Such a screed will not place significant additional load on the floors and foundation. |
| Self-leveling | This is the same self-leveling floor. Depending on the composition, the solution may have different consistencies and different purposes. There are finishing options for screeds, and there are also those that will have to be covered with an additional finishing coating. During pouring, the mixture is independently distributed over the surface of the base. However, such screeds are not considered complete; it is best to apply the self-leveling mixture to any other type of screed to give the base a perfectly even surface. |
Wet-type screeds are further divided into two types. There are monolithic ones, which are completely and firmly connected to the base, as they are poured without the use of other materials. And there are also floating ones. They are installed on the surface of a thermal insulation or waterproofing layer. At the same time, they are not directly connected to the rough base. It is the floating types of screeds that provide maximum sound insulation from impact noise.
Also, screeds can be made not only from cement compounds. There are plaster screeds.
Self-leveling gypsum screed
List of required materials and tools
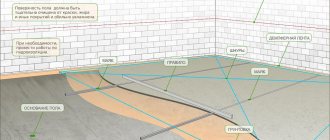
The design is a “pie”. The components for each type of screed are different. The general list of materials looks like this:
- The basis. This role is played by a polymer film that prevents the formation of vapors and leaks.
- Edge tape. It performs an insulating function and is mounted along the junction of the wall and floor along the entire perimeter of the room. The height should not exceed the thickness of the screed.
- Sound and heat insulating material. Apply as needed. Mineral wool, polystyrene foam, polyurethane foam, and wood fiber-based boards are used.
- Waterproofing. Used as needed. The following materials are used: rolls (hydroizol, roofing felt), bitumen mastics, dry mixtures.
- Leveling layer. The most important part of the pie. Most often, the choice falls on cement-sand mortar and gypsum mixture.
General tools for any type of screed:
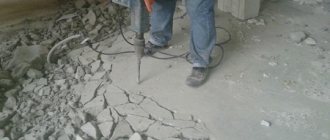
- For dismantling. Before installing a new coating, you need to get rid of the old one. For this you may need a hammer drill, spatulas, chisel, hammer, etc.
- For cleaning. During the dismantling process, debris is generated that needs to be removed; for this you need: a vacuum cleaner, brooms, mops.
- For marking. This includes beacons, levels, drawing supplies.
- For painting work: aluminum rules, trowel, trowel.
- For installation: damper tape, construction scissors.
For dismantling you will need a hammer drill.
Single-purpose equipment for a given type of coating:
- Continuous: concrete pump, large containers, grinding machine, mixing attachment.
- Self-leveling: construction mixer, containers, spatula, roller.
- Dry: knife, glue, screws, screwdriver, putty.
Features of concrete floor screed
Each type of screed has its own usage characteristics and installation recommendations. Concrete screed is no exception. Due to its massiveness, this option is not suitable for installation in rooms with a light base or a base made of wood, since such a floor may collapse. Concrete screed also has a special parameter - tensile strength. Due to the fact that the wooden base will remain quite mobile in any case, the screed itself may crack. The quality of this floor leaves much to be desired. That is why the concrete option is recommended to be installed either in apartment buildings or in private ones, where there is a solid and immovable foundation.
Example of a concrete screed
Material for screed reinforcement - which one is better to choose
The screed is a fairly durable coating that ensures floor leveling. However, even if the manufacturing and installation technology is followed, it has a significant drawback, which is expressed in low tensile strength. To increase its load capacity and strength properties, reinforcement is used, which can be done using:
- Laying metal mesh;
- Introduction of fiber fiber into the mixture at the preparation stage;
- Adding polymer and composite elements to the composition.
Reinforcing components located in the body of the screed perform different functions. They protect the surface from the formation of cracks when the solution dries and increase the service life of the rough finish. If the thickness of the cement-sand composition does not exceed 30-40 mm, and the base is strong enough, then reinforcement can be dispensed with. If the layer is more than 50 mm, there is a significant load on the surface, the solution is laid on an unreliable base, then it is better not to neglect this process.
Metal mesh
In the production of metal mesh, VR-1 steel wire with a diameter of 2.5 to 6 mm is used. Spot welding is used to connect the rods; they are also twisted with wire, forming square or rectangular cells. The smaller their size, the higher the strength of the reinforcement. Finished products have a wide variety of dimensions, are rolled up or sold in sheets.
The main purpose of the metal mesh is to increase the strength characteristics of the screed, evenly distribute the load throughout its thickness, reduce the risk of cracks and shrinkage, and increase resistance to mechanical stress. Steel rods take on tensile stress, protecting the structure from destruction and increasing its load-bearing capacity.
In order for the mesh to properly perform its function, it must be located in the body of the screed; usually it is installed in the lower third, taking into account the overall thickness. To do this, it is raised above the level of the subfloor, using special plastic stands of appropriate height. The main advantages of steel products include:
- Long service life;
- Low cost;
- Immunity to temperature changes;
- High tensile strength;
- Ability to withstand heavy loads.
Polymer and composite elements
In addition to traditional metal mesh, plastic and fiberglass analogues can also be used for reinforcement. Polypropylene models have good elasticity, they are not afraid of corrosion, and are not destroyed by chemicals. The main advantages of plastic products include:
- Light weight;
- Durability;
- Low cost;
- Plastic;
- Ease of working with building materials, possibility of installation in non-standard shaped rooms.
The fiberglass mesh is based on aluminoborosilicate glass. Its rods are impregnated with special solutions that increase the resistance of the material to alkalis. It does not additionally add weight to the structure, so it is often used when creating screeds with light and medium loads in residential premises. The only drawback is the fear of high temperatures exceeding 200 °C.
You can organize screed reinforcement using composite reinforcement. It consists of non-metallic rods made of glass, basalt, and hydrocarbon fibers. Depending on the material included in the composition, fiberglass (FRP), basalt plastic (ABP), and carbon fiber reinforcement are distinguished. The building material is characterized by high specific strength, corrosion resistance, and has low thermal and electrical conductivity. However, the modulus of elasticity is 4 times less than that of steel, it is not ductile, and has low heat resistance.
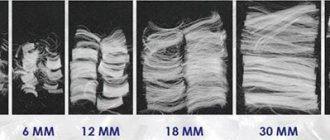
Fiber reinforcement
Fiber is a high-strength fiber made from synthetic, mineral, and metal materials that can significantly increase the quality characteristics of concrete. Thin fibers can have a length from 1.5 to 45 mm, a diameter of up to 20 microns. The building material is a good alternative to metal, plastic, and fiberglass mesh. Among the main advantages of fiber fiber are:
- The fibers are evenly distributed inside the screed;
- Significant increase in structural strength;
- Reduced shrinkage;
- Increased service life;
- Increasing the plasticity of the finish;
- Reducing the hardening time of the mixture;
- Prevention of cracking and delamination;
- Uniform load distribution.
Depending on the materials used in the production process, there are the following types of fillers:
- Polypropylene fiber. Plastic fiber is characterized by its low weight and is a good heat insulator, so it is often used when installing underfloor heating systems.
- Steel thread. Consists of steel fibers and has good frost resistance. Due to the high specific gravity, it greatly weighs down the structure.
- Basalt. Suitable for arranging coatings that are subject to high dynamic and impact loads.
- Fiberglass. Can be added to gypsum screeds. Significantly increases the plasticity of the composition.
- Asbestos. It is used very rarely, only for outdoor work.
Gypsum floor screed
This is a relatively new type of screed. The mixture is based on a gypsum composition, due to which the material dries quickly and such mixtures are deservedly popular. Gypsum is also highly environmentally friendly; it has a low density, and therefore is considered a lightweight material. This screed also has excellent noise and heat insulation properties.
On a note! Due to their high porosity, gypsum screeds can “breathe,” which significantly improves the microclimate in the rooms.
Plaster screed
Gypsum screed is suitable for installation in residential premises, but cannot be used in rooms with high air and substrate humidity. It is an excellent base option for laying almost any topcoat. The material does not require additional leveling and dries in only about 10 days.
Combined foundation
This type of floor preparation is characterized by a high quality surface and has proven itself as an effective means of foundation planning used by professional builders. The technology is used for significant differences in height, when floor unevenness does not allow the use of traditional types of screed. The order of operations is not difficult:
- perform a rough screed that hides significant irregularities. Use concrete mortar with the addition of quartz sand;
- saturate the mass after drying with a waterproofing mixture based on bitumen or rubber;
- form a finishing layer based on a self-leveling composition.
Final floor screed
All of the above floor screed options are considered draft options. But there are also mixtures that can become the finishing layer and do not require additional decoration. They allow you to make floors perfectly smooth and neat. Their thickness is usually only about 10 mm. As a rule, this option is performed using self-leveling mixtures. This screed masks minor defects in the rough screed.
Final floor screed
Useful tips and general recommendations
Key recommendations for the pouring process and care:
- You can replace the damper tape with roofing material.
- For weak floors, it is best to use a dry screed.
- A layer less than 3 cm thick will be more even and durable if the amount of sand is reduced.
- Do not install decorative flooring earlier than 28 days.
- It is better not to use artificial ventilation for drying.
- Optimal hardening temperatures: +5…+20ºС.
If you strictly follow the algorithm and do not neglect the nuances and details, then the process of creating a screed layer will not cause difficulties.
Which type is better?
It is, of course, difficult to make a choice among all this variety, especially for a beginner in construction. However, it is always important to correctly assess the operating conditions of the material, as well as the strength/structure of the base and even where the screed will be poured.
In an apartment, the best screed option is dry or semi-dry. In a garage or utility room, you can pour a wet screed, although it is not recommended for beginners to use it, since the work to create such a foundation is quite complicated. It’s rare that someone manages to create such a perfect screed the first time. A dry or semi-dry screed is much easier to install, and the drying time will be as short as possible. There is no need to dry it at all; you can continue doing other work on the same day. Both dry and semi-dry screeds fit perfectly on the ground base and cost little money.
Semi-dry floor screed
Clay seal device
If your house is located in an unfavorable area, that is, groundwater comes very close to the foundation, you need to think about installing a clay seal. It will prevent moisture from entering the internal structures of the structure. The shutter is a mixture of clay and fiberglass.
- Initially, the soil is compacted with a vibrating plate.
- The required amount of material is calculated in advance, based on area and thickness.
- The clay is placed in a funnel and filled with water a day before use.
- Mix everything in batches until it reaches the consistency of thick sour cream and spread evenly over the entire surface.
- Cover with film, pouring water, at high temperatures outside.
As soon as the shutter can be walked freely, without deformation, work can be resumed.
Clay prevents moisture from entering
Concrete floor screed and laying technology
Before you begin installation of the screed, you should carry out all the calculations. For example, it is important to know that, according to SP 29.13330.2011, the finished screed layer should not be less than 40 mm thick. Based on this, the required amount of mixture is calculated. Typically the mortar is made from a mixture of sand and Portland cement. It is also recommended to lay layers of sound and heat insulation. For example, polystyrene foam or regular fiberboard is perfect for sound insulation.
SP 29.13330.2011 . Floors. Downloadable file (click the link to open the PDF in a new window).
SP 29.13330.2011
A layer of reinforcing mesh will also be placed into the thickness of the screed to increase the strength of the base. A mesh with 5x5 cm cells is suitable for this.
Floor screed mesh
A damper tape must be installed along the walls, which will compensate for the expansion of the screed and prevent it from cracking.
Damper (edge) tape for floor screed
Step 1. The rough base is completely cleared of any debris, including dust. It is advisable that other rough work has already been carried out in the room regarding walls and ceilings, replacing windows, etc. Also, all cracks and chips in the rough base are sealed with sealant or polyurethane foam. Protrusions and bumps are removed.
Preparing the base
The floor defect is blown out with foam
All surface protrusions must be removed
Step 2. If electrical cables are supposed to be laid inside the screed, then it is done at this stage. All wires are laid inside PVC tubes (non-flammable) and laid in the places designated for them. Usually the wiring is laid along the wall. All tubes are connected to each other with plastic clamps and attached to the floors.
Laying electrical cables
Attention! If pipes or wiring are laid inside the screed, then the screed layer should be so thick that it is twice the thickness of the communications.
Step 3. The surface is primed with a special deep penetration primer or composition for concrete surfaces. The primer layer must be well dried before further work.
Applying primer
Step 4. Self-leveling mixture is prepared. It is poured onto the prepared base and leveled with a spatula. At the same time, it manages to spread and level itself. This layer also dries well.
Pouring the mixture
Leveling the mixture with a spatula
Step 5. The surface of the walls along the perimeter of the base is treated with a primer. This will improve the connection between the walls and the damper tape. The primer layer is dried.
Applying primer around the perimeter
Step 6. The damper tape is glued along the base to the bottom of the walls using glue.
Bonding damper tape
Step 7. Small defects in the base are additionally leveled with a thin layer of sand or a cement-sand mixture. The bedding is carefully leveled with a spatula, the excess must be removed.
Elimination of minor surface defects
Step 8. Polystyrene foam boards are laid. The plates must fit tightly to each other, press tightly against the damper tape and lie on the base without gaps, without being pressed through. If the slabs do not fit together, they can be trimmed using a sharp knife.
Laying polystyrene foam boards
Laying process
Step 9. The reinforcing mesh is laid. The canvases are laid with an overlap of at least 2 cells and tied together using wire.
Laying reinforcing mesh
Step 10. The concrete mixture is mixed in accordance with the instructions. To improve the physical properties of the screed, fiber can be added to the mixture. Kneading can be done in a container or on a flat surface. To do this, the cement mixture is poured onto a flat surface, a small funnel is formed, and the required volume of water with fiber is poured into it. The water is poured on top of the dry mixture. The composition is mixed until homogeneous.
Water with fiber is added
Components are mixed
Step 11. The solution is evenly distributed over the prepared base. The thickness of the layer is about 1.5 cm.
Distribution of the mixture over the surface
Step 12. The metal mesh is raised. Thus, the mixture will go lower, and the mesh itself will end up inside the screed.
The metal mesh is raised
Step 13. If it is planned to install a heated floor system, it will be done at this stage. Electrical or water cables are laid depending on the selected type.
Laying underfloor heating cables
Warm floors are a serious cost item during renovation, so it is important to accurately calculate how much and what materials will be needed. To ease your labor costs, we have prepared special instructions telling you how to calculate a heated floor - water or electric. Online calculators included. And in the article “ What do you need for a heated floor? » you will find a complete list of everything that may be needed during installation.
Step 14. The underfloor heating system is covered with the solution to the required thickness of the screed layer.
Filling the mixture
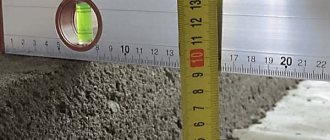
Step 15. Beacons are installed. Using a laser level, the final height of the screed can be easily indicated on the walls.
The final height of the screed is indicated
Step 16. Using the beacon rule, guide strips are created, which are also checked by level.
Guide strip example
Step 17. Using the rule, the screed is leveled along the stripes.
Aligning the screed with the rule
Step 18. Small defects are removed.
Small defects are eliminated
Step 19. A trowel will help bring the surface of the screed to an ideal state
Using a Trowel
Step 20. Next, the screed should be regularly moistened for 10-12 days. Then the screed is dried under natural conditions. Excess damper tape is cut off with a knife.
The screed needs to be moistened regularly for 10-12 days.
Prices for damper tape for floor screed
damper tape for floor screed
How beacons are placed
Beacons are guidelines that control the horizontal surface of the screed, which does not spread under its own weight. When placing beacons, ensure that their top points are located in the same horizontal plane, which will be the floor surface.
First, the zero level is determined - the “stove” from which they dance. Use a laser or hydraulic level. Laser is more accurate and easier to work with. Here is one way to define “zero”.
Points are marked on all walls at a height of 1 meter from the floor. Using a level, find the highest point and connect (again according to the level) the set marks with a solid horizontal line. Get a basic level.
They retreat from the base level 1 meter down the wall, draw a second line parallel to the first. It will be the zero level. From it, measure the thickness of the screed upward and draw a third line. Beacons are placed along it. In what follows, for brevity, we will call it that—the third line.
Beacons are made from metal profiles or mortar - sometimes the same thing that is used for screed.
U-shaped profiles with a wall height of 27 mm or more are attached to self-tapping screws, to mortar, or to both at the same time. Holes are drilled in concrete bases for self-tapping screws and dowels are driven into them. By screwing in or unscrewing the screws, adjust the position of the profile in accordance with the height of the third line drawn along the wall.
The profiles are placed back down parallel to each other with a step slightly less than the length of the rule - usually about 1 meter.
Solution lighthouses do this. Lay out piles of the mixture in rows at a distance of 0.7 - 0.8 meters from each other. The distance between the rows is chosen equal to the length of the rule. The tops of the piles are cut off as a rule, focusing on the third line on the walls or the luminous line of the laser level.
There is another method in which screws and wire are used. Screws are screwed into the base in rows at a distance between rows equal to the length of the rule. The height of the screws is at the level of the third line. A wire is pulled over the screws, a mortar is laid out along the wire, and the top of the mortar is usually cut off flush with the screw heads and the wire.
Beacons for semi-dry screed are the easiest to set. Heaps of the mixture are poured into two corners, the tops are leveled along the third line. In the same way, the following areas are formed in rows with a step equal to the length of the rule.
Types of ties according to the method of coupling
So, depending on how exactly they are connected to the foundation slab or floor slab, screeds can be connected, on a separating layer, or floating. More details about each.
Bound floor screed
This screed is placed directly on the work surface and is fastened to it due to adhesion. There is no hydro or thermal insulation between the layer and the floor. A screed tightly coupled to the floor is made in the following cases:
- when it is not possible to raise the floor level - otherwise the doors will not close later or the ceiling will become too low;
- when the screed should be very light;
- when the foundation is ideal;
- when the screed area is too large.
Basically, a monolithic interlocking screed is ideal for those rooms where massive pieces of furniture and equipment, partitions or warehouse objects will be located. This is a heavy screed, a square meter of which weighs up to 150 kg.
When arranging such a screed, remember: floor beacons are not placed on the base, but “suspended” on pieces of rigid mortar or self-tapping screws. Then these slats remain in the body of the screed. Here is the process of making such a screed:
Screed on the separating layer
In this case, the screed is separated from the lower layer by thermal insulation or waterproofing, but at the same time it does not come into contact with the walls of the premises.
So, thermal insulation is placed under the screed in order to reduce heat loss. It usually consists of hard mineral slabs, the thickness of which ranges from 30 to 90 mm - here everything depends on the heat loss of the room and its heating mode. So, for the first floor of a private house, 30 mm of thickness is enough, and for the ground floors 90 mm is already needed. Today, foam boards with foil are often used as an insulator under screeds.
The main task of such waterproofing is to protect the entire screed cake from moisture. A screed with a waterproofing layer is indispensable for arranging floors in bathrooms, toilets, basements, attics under the roof and floors of the first floors. Here is a detailed master class:
Floating screed
A floating screed is so called because it is located on a certain cushion of an insulating layer, heat-, sound- or hydro-. This type of screed is only suitable for laminate, linoleum and parquet boards. But for parquet – no longer.
A floating screed is most relevant when your floor needs to be insulated or you plan to install good sound insulation. In general, a floating screed is indispensable for the following premises:
- in which, for various reasons, it is impossible to properly prepare the base or it is difficult to remove dust, for example;
- where heated floors are installed;
- in apartments of a storey building, where it is vitally important to waterproof, thermally insulate and soundproof the floor;
- where there is a high risk of cracking;
- where the screed needs to be done quickly and inexpensively.
But keep in mind that if you use additional plasticizers to construct a floating screed, then the screed itself will need to be reinforced. And when making a screed on an electric floor, be sure to put a heat insulator under it so as not to heat the lower floor.
And finally, a floating screed rarely cracks - after all, it is not tightly coupled to the base itself, and it does not “drive”. As for its design, such a screed must be separated from the walls by insulation - this avoids unnecessary stress in the building structure. And this is especially important if you are installing a heated floor - it has a significant coefficient of thermal expansion. In addition, the damper tape, which is usually used as such insulation, can greatly reduce heat loss through the walls.
By the way, experienced builders do not glue damper tape separately to the walls - but construct it from a layer of film (up to 20 cm). It is not difficult to trim off the excess film later.
Let us also note that even a screed on a plastic film alone is also called “floating”, because without it, she already behaves differently. And another tip - when arranging a floating screed, do not overdo it with water - it will intensively come to the surface, thereby diluting the cement laitance. And this will weaken the rigidity.
Functional advantages and disadvantages of screeds
We will not write about manufacturability and ease of use using different methods, but will record what benefits or inconveniences screed technologies bring to the customer.
| Advantages and disadvantages of floor screed types | |||
| Functional Parameters | Wet process | Semi-dry screed | Dry screed |
| Requires additional leveling | Yes | No | No |
| Contaminates the object | strongly | slightly | does not pollute |
| Do this before painting the walls | Can | Can | it is forbidden |
| To do after plastering the walls | it is forbidden | Can | Can |
| Flooring can be laid | in 3 weeks | In 1 week | straightaway |
| Absorbs noise when walking | Yes | Yes | No |
| Relative strength and rigidity | high | high | moderate |
| Durability | high | high | moderate |
| Floor load | high | high | low |
| Rel. price of screed 4 – 8 cm thick | low | low | high |
| Rel. price of screed thickness 14 - 20 cm | moderate | moderate | moderate |
| Requires a specialized team | No | Yes | Yes |
Types of screeds according to the method of their installation
So, in each case and for different floor coverings, the screed is either solid, self-leveling, or semi-dry. Let's figure out what and why.
Solid screed
This screed is made by hand and then carefully leveled with a special tool. It's quite simple: mix the mixture in a gravity mixer. Add water until you hear the characteristic “plopping” sound of the solution. When pouring the screed, pay attention: if water comes out on top, it means there was too much of it, and the shrinkage will be significant. Result: cracks. Here the newly prepared mixture is poured over the entire base and leveled with a special tool. The surface of the screed hardens quickly, evenly and adheres well to the load-bearing base.
Semi-dry screed
Semi-dry screed is gradually replacing the classic liquid method. And all because such a screed does not require additional leveling with special self-leveling floors and the process itself is not complicated.
This screed is usually arranged in order to reduce the cost of the overall process. Here you can save a lot on consumable materials or on the amount of water for the sake of quick drying. And in order for such a screed to be durable, special polymer compounds are added to it, accelerating the adhesion processes and improving the final quality of the screed.
Semi-dry screed also has many valuable advantages:
- ability to withstand significant loads;
- perfectly flat surface;
- minimal risk of cracks;
- the ability to easily install heated floors;
- minimal costs and excellent final quality.
This screed is also called dry, because the leveling of the floor in this case occurs due to bulk material (usually expanded clay crushed stone) and the laying of durable slabs. The process itself:
Self-leveling screed
This screed has a composition of greater fluidity. It is applied to a sealed base, and under its own weight it creates a perfectly flat surface. For more details, see the photo instructions:
Prefabricated screed
Modern prefabricated screeds are ready-to-lay elements. They are mounted from large-sized boards: plywood, fiberboard, chipboard, gypsum fiber board and the like. In terms of weight, they are quite light, and therefore even one person can arrange such a screed. Moreover, there are no “wet” processes here anymore, and therefore on the same day you can begin laying the finished floor covering.
However, prefabricated screed is not suitable for all floors. There is an important point here: if a construction team will arrange a dry screed for you, then clearly discuss with them in advance what the permissible deviations will be. So, for laying laminate, such an error should be no more than 2 mm! But, if the work team takes responsibility, or you make such a screed with your own hands and are confident in your skill - go ahead! Also, it is worth noting that a dry screed is installed where water is not allowed to come into contact with the base (namely, cement is diluted with water when installing other types of screed).
We can say that such a prefabricated structure is only conventionally called a screed, because it is a lathing with a variety of filling and covering materials. The latter usually includes edged or tongue-and-groove boards, chipboards, fiberboard, OSB, or modern bulk floors like Knauf. The joists are adjustable so that the floor is perfectly level. And the dry screed made from GSP boards consists of two layers, the second being connected to the first with PVA glue and self-tapping screws. Moreover, recently GSP slabs for dry screed are becoming more and more popular - and even more in demand, like GVL. They are environmentally friendly and durable, and their only drawback is dust during cutting and significant weight.
It is worth noting that prefabricated flooring has approximately the same number of supporters and opponents around the world. Thus, dry floor screed is excellent for concrete floors, earthen floors, and hollow slabs. Even on wooden boards, after some modifications, you can install a screed using this technology. Subfloors over dry screed are durable, warm, do not break down, do not generate dust, are not afraid of moisture or fire, have excellent sound insulation and are quite durable. An excellent base for tiles, carpet, linoleum, parquet and parquet boards!
Here is another advantage of modern prefabricated floors - if they are installed incorrectly, you can easily disassemble them again, but dismantling a cement screed is extremely labor-intensive and expensive. See what the process of installing a dry prefabricated screed looks like:
And let’s note one more important point: the prefabricated screed can be called, without exaggeration, the most soundproofing of all those listed. And it's all about its structure. The fact is that a homogeneous thin layer for sound is an excellent conductor, but a multi-layer floor with materials of different densities is already an obstacle. Moreover, the lower the density of the layers themselves, the better. So, polystyrene foam, polyethylene foam, and the same mineral wool absorb sound almost completely. Therefore, if your neighbors below constantly complain about noise from your apartment, or you are choosing flooring for a children’s room, prefabricated screed is the best choice.
But keep in mind that it is difficult to make a prefabricated screed in an apartment on the first floor. Gypsum fiber boards, cement particle boards, particle boards and gypsum boards are completely inconvenient to lift to the upper floors. But in a private house in the middle of winter they are convenient to use and they are easily assembled with self-tapping screws, whereas another type of screed cannot be organized at sub-zero temperatures. And finally, prefabricated screeds are never installed where there is high humidity. And, no matter how the manufacturers claim that such slabs are not afraid of moisture, this is not the case.
How to calculate the amount of concrete per screed
To find out the amount of concrete mixture that will be required for the screed, you need to multiply the area of the room by the height of the screed. For example, for a screed with a thickness of 50 mm in a room of 100 m2, you will need 100 * 0.05 = 5 m3 of concrete mixture.
To calculate how many consumables are needed to mix concrete for this screed, you can use the table.
Preparing the base for the screed
Before laying the screed, the base is cleaned of dirt and debris, and cracks, cracks, and slab joints are sealed.
Using a level, determine the unevenness of the base and make markings.
If a bonded screed is planned, remove the top layer of the concrete base with a grinding machine to improve adhesion with the future screed, or cover it with a primer, for example, Betonkontakt.
For unconnected screeds, lay out underlying layers, glue damper tape around the perimeter, after which you can pour the screed.
Types of screeds according to material composition
Screeds also vary in the materials they are made from. Their strength, quality and other important characteristics depend on this. For example, according to SNiPs, asphalt concrete screed can only be placed under tongue-and-groove parquet.
Cement-sand screed
There is an opinion among builders that so far nothing has been invented better than a conventional cement-sand screed. It is durable, understandable in technology and suitable for almost all types of coatings.
It is advisable to place hydro and sound insulation under such a screed. It will never allow water to pass down - this is its structure. But during the process of its installation, a situation is quite dangerous when water from the solution is sucked into the floor slab - repairs will have to be made in the apartment on the floor below. That is why for residential multi-storey buildings it is possible to make screed only using semi-dry or dry technology.
Yes, not many people know how to make a cement screed correctly, and therefore you can often see gross violations of technology. Such a screed is no longer suitable for use, because cracks and air bubbles are not a cosmetic defect, but a sure guarantee that any floor covering will not last long. Dismantling a defective screed is expensive.
Therefore, when constructing such a screed, it is important to completely eliminate the possibility of local suction of water (through other materials). Otherwise, this will lead to uneven drying of the surface, internal stresses, and, as a result, cracking. That is why an EPP backing is almost often placed under a cement-sand screed - an excellent sound insulator and water protection.
See what the process of installing such a screed looks like:
It is also quite problematic to make a cement-sand screed in the city - it is difficult to find clean sifted sand there. In addition, cement creates a lot of dust, and it’s quite difficult to carry it to the second to fifth floors.
Plaster screed
This type of screed is also popular today. After all, gypsum, unlike cement, is absolutely environmentally friendly. Thanks to this material, it is much easier to provide the required humidity and temperature in the room, which is what is needed for a residential building.
Industrial screed
Here, concrete grades with special strength are already used, reinforcement and special measures are required to prevent cracks. After all, industrial use of floors always involves heavy loads, both static and dynamic, falling heavy objects and sometimes serious abrasive effects.
In the production of industrial floor screed, technology for separating the slabs is also used - this is necessary in order to prevent the appearance of cracks under significant loads. Industrial screed is also treated with special impregnations to give additional strength and chemical resistance.
As for the reinforcing mesh, which serves to strengthen the concrete screed, it is used once or twice - “double reinforcement”. Look at this photo instruction:
Screed with plasticizers
Today, special plasticizers are often added to concrete screeds. They increase the level of thermal conductivity and strength, reduce the surface tension of water and help increase the bulk density of the coating. The amount of plasticizer is 10% by weight of pure cement.
But keep in mind that plasticizers, especially the second efficiency group, at maximum dosages prevent the cement from setting and hardening. This is especially true for those containing lignosulfonates or their modifications. This means that screed work can take a long time, and the final strength will be 20% less.
But in general, plasticizers in screeds are good because they allow you to use less water, improve the adhesion of the screed to the base, and the mass itself becomes more plastic and easier to lay. Builders often use ordinary PVA glue as a plasticizer - 150 g per bucket of cement.
Semi-dry screed with fiber fiber
This cement-sand screed is made using semi-dry technology, but using synthetic fiber fiber. To do this, you will need mechanical mixers, into which fibers made of plastic or metal are added. They are necessary to give the screed strength - higher or similar to reinforced concrete. Here's what the process looks like: