In the process of arranging a suburban area, many owners decide to arrange a parking lot for a car on their site.
Parking for a car in a suburban area has a number of advantages:
- The car is constantly located in a fenced area.
- It does not interfere with other drivers, as if it were left on the road.
- Using parking in any weather, whereas after driving onto the ground after rain, a deep rut remains and the car can get stuck.
- Possibility of subsequent improvement of the parking lot. For example, installing a carport.
Types of country parking areas:
- Crushed stone parking lot.
- Parking lot made of road concrete slabs.
- Concrete parking lot.
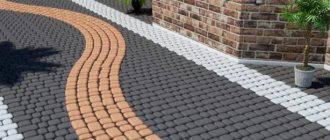
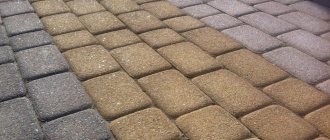
- A platform for a car made of paving slabs (paving stones).
Crushed stone parking
Cost from 1,900 rub. per m2 turnkey (labor and materials)
It is the simplest and most cost-effective option for organizing parking on the site.
Excellent water permeability, resistant to soil deformation at high groundwater levels.
- Marking the parking area.
- Excavation of soil by 30 cm.
- Installation of curbs.
- Laying geofabric.
- Sand filling in a layer of 10 cm with layer-by-layer compaction using a vibrating plate.
- Filling with crushed stone and a 20 cm gravel layer with layer-by-layer compaction using a vibrating plate.
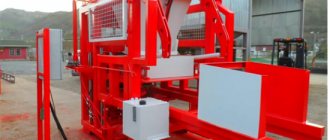
Parking lot made of concrete (road) slabs
Cost from 2,500 rub. per m2 turnkey (labor and materials)
Parking made of concrete slabs is the optimal solution for organizing parking and access for trucks during construction. You can use them as new stoves, or if you want to save money, you can also use used ones. Such a parking lot will withstand the passage of loaded dump trucks, and after completion of construction it can be used as a base for laying paving stones, or continue to be used without modification. The service life of such parking is very long. However, when constructing a parking lot from road slabs, the base must be carefully prepared and compacted.
- Marking the parking area.
- Excavation of soil by 30-40 cm.
- Laying geofabric.
- Filling of sand in a layer of 30-40 cm with layer-by-layer compaction with a vibrating plate.
- Laying road slabs using a manipulator.
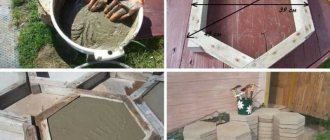
Cost from 3,800 rub. per m2 turnkey (labor and materials)
It is a platform for a car made of monolithic concrete. This parking option is the most durable and quite durable, provided the work is carried out correctly.
It should be taken into account that the concrete parking lot should be approximately 5 cm above the ground level on the site. This is necessary so that moisture does not accumulate on it; it would also be a good idea to set a slope of 2-3 cm for the same reason.
Sectional view of a concrete parking lot:
- Marking the parking area.
- Excavation of soil to 45 cm, slope control using a level.
- Laying geofabric.
- Formwork installation.
- Installation of curbs (if planned).
- Sand filling in a layer of 15 cm with layer-by-layer compaction using a vibrating plate.
- Filling with crushed stone in a layer of 15 cm with layer-by-layer compaction using a vibrating plate.
- Knitting a frame from reinforcement.
- Pouring concrete.
It is not recommended to walk in the parking lot for 3 days, but after three weeks the concrete parking lot can be used to park a car.
Parking for a car made of paving slabs (paving stones)
Cost from 3,300 rub. per m2 turnkey (work and rent)
It should be taken into account that the tile will experience constant loads from the wheels of the car, so when choosing tiles it is better to give preference to vibropressed tiles.
It is quite wear-resistant and frost-resistant.
- Marking the parking area
- Excavation
- Laying geofabric
- Installation of curbs
- Sand filling in a layer of 15 cm with layer-by-layer compaction using a vibrating plate
- Filling with crushed stone in a layer of 15 cm with layer-by-layer compaction using a vibrating plate
- Filling with cement-sand mixture 2-5 cm
- Laying paving slabs (paving stones)
- Dripping seams
Work examples
Installation of parking for a car in Domodedovo
Quite often, when arranging their backyard territory, owners do not limit themselves to paving only pedestrian and garden paths. They decide to pave the car's driveway to the garage and provide for the possibility of parking it in the yard in the open air. However, the technology for laying paving slabs under a car is somewhat different from the installation of pedestrian paths - both in the choice of materials and in the method of preparing the base for the coating.
Don't forget about installation nuances
As in every serious matter, when arranging a place for a car, there is a need to cut the product into pieces. Basically, such difficulties arise when using figured tiles. Special construction tools will be assistants in such a situation. You can use a grinder or use a machine.
But it is better to perform accurate calculations to prevent such shortcomings. A high-quality pavement made from whole products will be much more reliable and durable.
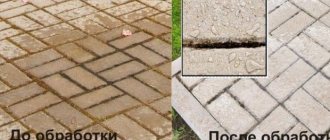
At the end of the installation work, you must carefully remove the remaining materials using a broom. Then you need to slightly moisten the coating and leave it alone for several days. Then repeat moisturizing. If voids appear, they should be filled with cement to seal them.
Such nuances will help you get a reliable coating on your own that will last for a long time without problems.
Source
Requirements for road surfaces for vehicle passage
Features of laying paving slabs for possible passage and parking of a car are associated with a large weight impact on the paved surface. In this regard, they are subject to the following requirements, compliance with which is mandatory:
- the coating must be stable and not move under heavy weight pressure;
- the surface should be smooth and dense, without loose seams between the tiles;
- the base of the road surface must be made very dense, without air voids between the components;
- the mandatory presence of a drainage drainage layer, since water can affect the strength of the base;
- use of paving slabs of increased strength and frost resistance;
- installation of stone border fencing.
Let's sum it up
To make paving not only practical and durable, but also aesthetically pleasing, careful planning and design are required. Manufacturers recommend installing a permeable base not only for paths in pedestrian areas, but also for entrance areas and parking areas. This will save not only money, but also time and effort, without compromising the technical and operational characteristics of the coatings.
The outstanding characteristics of vibropressed tiles are due to the peculiarities of the production cycle. About the popular shapes and installation patterns - in the previous thematic material. In the video - planning a garden plot, advice from a landscaping engineer, in simple language.
Source
Selection of required materials
Manufacturers of building materials offer clinker and vibropressed paving slabs on the market. The first type of materials is distinguished by bright, rich colors and a variety of shapes. Tiles made by vibration pressing are more modest in appearance, but have increased strength and frost resistance.
If the weight of the car does not exceed 1 ton, then clinker paving slabs can be used for laying. In the case when the weight of the machine is over 1000 kg, then you are better off opting for pressed products. The thickness of the tiles must be at least 60 mm.
When buying tiles, ask the seller to show a cut sample from the batch being sold. He is obliged to do this, and if he refuses, then simply do not buy such a product. The cut should have a uniform density and should not contain any foreign inclusions. Their presence indicates the low quality of the material.
We won’t talk about the importance of appearance, but checking the tiles for abrasion is easy. Take 2 stones and rub them together face to face. Look at the result: if the surfaces remain the same, then the material is good, otherwise it is better not to take such a tile.
In addition to paving slabs, to complete the work you must purchase:
- sand, preferably river sand, for the primary substrate and support cushion for paving slabs;
- crushed stone with a fraction of 20-40 mm to create a drainage layer under the base of the coating;
- gravel with a fraction of no more than 25 mm for a denser overlap of the drainage layer;
- cement grade M300-M500 for preparing concrete and forming a cement-sand mixture;
- insulating geotextile with one-way direction of moisture transmission.
In addition, it is necessary to resolve the issue of choosing and purchasing a curb stone that will enclose the driveway and parking space. You can make it yourself from concrete or buy it.
Conclusion
As our craftsman was convinced, it is not for nothing that the base is insulated on heaving soils; this allows not only to reduce the concrete layer and pour a solid slab, but also protects against deformation and cracking.
All the details are in the topic “EPS under a concrete slab for parking”; geogrids are discussed in the article about eco-parking. Garden paths and recreation areas can be paved at a lower cost, as in the article about homemade tiles. The video is about eco-friendly parking.
Source
Marking and excavation work
Laying paving slabs under a car begins with marking the area intended for paving. The width of the road should be at least 2.2 meters, and the parking area should be at your discretion. Car access to the house can be arranged close to the pedestrian path. Pegs, a strong cord and a tape measure are used for marking and measuring. The distance between the pegs should ensure good tension on the cord.
After this, in accordance with the marked contours, the top layer of soil is removed to a depth of 30-35 cm. If the area is large, then it makes sense to hire a backhoe loader to do this work. He will be able to carefully remove the fertile layer and transport it to the storage location or scatter it in the right place.
Schematic options for bases for laying paving slabs.
The bottom of the resulting trench should be sprinkled with sand in a layer of 2-3 cm and compacted well using a construction tamping machine or vibrating plate. Geotextiles should be spread over the compacted sand so that adjacent sheets overlap by 8-10 cm, and the sidewalls are turned up by 20-25 cm.
This layer will prevent weeds from growing through the base and will keep the coating looking beautiful for a long time. In addition, it will stop the possible rise of groundwater in the spring.
What are the dangers of frost heaving?
Heaving is the property of soil to significantly increase in volume when the moisture in it freezes. And although this phenomenon is strongly influenced by the GWL (groundwater level), it depends to a greater extent on the composition of the soil. Even the occurrence of groundwater at a level of several meters, when freezing, does not guarantee that the soil will not swell, since there is also capillary rise.
Frost heaving is associated both with groundwater level and with the properties of foundation soils. If the ground level during the freezing period is 2-3 m, this does not mean that heaving will not occur. There is such a process - capillary rise of water. In addition, according to the theory of heat and mass transfer, water moves towards the freezing front. Heaving occurs in the presence of free water in the soil (namely free) and negative temperatures. The silt fraction has the greatest influence on heaving in the soil. If the groundwater level remains high during the freezing period (0.3-0.5 m), then the crushed stone “cushion”, the sand-gravel mixture, and any other base will heave.
When laying foundations, there is a whole range of measures that allow you to build on heaving soils without disastrous consequences. Some of this arsenal is also in demand when arranging parking lots.
Backfilling the drainage layer
A curb stone is installed along the edges of the driveway and site. The installation height is adjusted by adding sand mixed with gravel. Vertical fastening of the curb from the inside is carried out by driving in persistent pegs, and from the outside by adding crushed stone, gravel or sand.
Now a layer of crushed stone 12-15 cm thick is poured onto the textile covering and compacted. A layer of gravel mixed with sand in a ratio of 2:1 should be laid on top of the crushed stone to level the surface. After this, you need to compact the surface and cover the drainage layer with geotextile.
Construction of the base on a sand cushion
A cushion of clean river sand 5-7 cm thick is poured over the drainage layer, spilled with water and compacted well. For the next layer, you need to prepare a dry cement-sand mixture in a ratio of 1:4 and pour the base onto the sand in a layer of 6-7 cm.
Schematic images of installation options on sand or dry mix.
It also needs to be compacted and leveled using a plaster rule. For more accurate leveling, you can install metal longitudinal beacons, securing them to bulk heaps made of the mixture.
Recommendations for arrangement
First you need to determine the type of soil. If it is sandy, the costs will be minimal. If clayey - maximum. Our employees will always help you decide on the optimal option for forming a pillow, and select materials taking into account all the parameters of the future path.
As an example, consider the base for an area where passenger cars will rarely travel:
- Compacted earth;
- Crushed stone in fractions of 0-35 mm;
- Geotextile with a density of 100-150 g/m. sq.;
- Screening for leveling – 5 cm;
- Paving stones from 6 cm thick.
If this is an area where trucks will operate, then the “pie” will be like this:
- Compacted earth;
- Sand – 25 cm;
- Geotextile with a density of 250 g/m. sq.;
- Crushed stone in fractions of 50-80 mm;
- The second layer of crushed stone in fractions of 0-35 mm;
- The second layer of geotextile with a density of 250 g/m. sq.;
- Screening for leveling – 7 cm;
- Tiles 8 cm thick or more.
For any work, it is better to take paving stones for cars, the price of which is slightly higher than average. Such material will be distinguished by quality, reliability and durability.
Laying paving slabs
After preparing and leveling the cement-sand base, paving slabs are laid under the car. It is very important that no precipitation occurs during the period between installing the top layer and laying the tiles. The surface on which the paving stones will be laid must be dry.
For the outermost row of paving slabs, pull the cord at the appropriate masonry height. Lay 1 row along the curb and 1 row across the driveway. Now begin to fill the required area, laying tiles in 1 m 2 segments, moving from one section to another across the driveway.
Preparatory stage
As a rule, paving is carried out at the stage of site improvement, upon completion of construction of a house and other capital projects. Considering that blind areas, paths, recreation areas and parking are not only functional, but also decorative elements of landscape design, preparation for paving is carried out at the design stage. Ideally, a full-fledged landscape design project is developed, based on the characteristics of the site (soil type, topography, groundwater level, etc.). And based on the chosen style of design of the yard, taking into account the expected loads and paving conditions, the thickness of the tiles, the design of the paths, and the shape and “pattern” of the installation are selected.
As with the construction of any structures, be it a permanent house, a seasonal dacha, a utility block, a garage or a gazebo, when landscaping a yard in general and paving in particular, you need a project, at least at the level of visualization in the editor or a sketch by hand. For those who prefer to do it on their own, manufacturers offer a universal “memo”.
Before you start laying tiles, the following preparations must be carried out:
Final work
Final work includes cleaning the paved surface and leveling the level of the adjacent area. 2-3 days after installation, water the surface. After it dries, repeat filling the joints with dry cement mixture. This will ensure complete sealing of the joints and prevent water from penetrating under the coating.
It’s not always convenient to drive a car into a garage at the dacha, and in the summer it’s also lazy. In addition, guests can come to the owners. And in this case, there certainly won’t be enough parking spaces in the garage at the dacha. Owners of personal plots who visit their properties only in the summer do not need a garage at all, and the costs for it are considerable. Leaving vehicles on the lawn ruins it. The way out of this situation is a do-it-yourself parking lot for a car at the dacha. This will allow you to comfortably leave your car for the weekend, and even protect it from bad weather.
Space for a vehicle, how to make it
Parking lots on heaving soil - EPS under a concrete slab or paving stones
For heaving soil, there are several technologies for constructing paths and parking lots so that the tiles or cast slabs lovingly laid in the fall do not become warped or completely broken in the spring. With the advent of materials such as geotextiles and EPS, there is a real opportunity to neutralize the effects of frost heaving forces and avoid the need for regular rework. FORUMHOUSE craftsmen choose modern technologies, which is what they wish for everyone.
Content
The easiest way to have a beautiful front lawn
You've certainly seen the perfect lawn in a movie, on an alley, or perhaps on your neighbor's lawn. Those who have ever tried to grow a green area on their site will no doubt say that it is a huge amount of work. The lawn requires careful planting, care, fertilization, and watering. However, only inexperienced gardeners think this way; professionals have long known about the innovative product - liquid lawn AquaGrazz .
Methods for arranging a parking space
When the idea of creating such a parking lot with your own hands has already taken root in your head, it’s worth deciding how it can be implemented:
- method of laying paving slabs;
- pouring concrete;
- filling with crushed stone;
- method of laying lawn grating. The article describes in detail the types and process of laying lawn gratings.
The last two methods are unreliable. But the first two methods are quite suitable in the country. Other methods can be found in the article “Building a parking lot for a car.” It is worth dwelling on them in detail.
Lawn grill for cars
Regardless of the method of execution, before starting work it is worth correctly assessing the parking space. It should be flat, with low groundwater. It is advisable to identify a site close to the entrance, then you will not have to build a long access road, making it the central element of the design of the summer cottage.
You need to stock up on all the necessary tools and calculate the exact size of the site. It averages out to be 3 m wide and 6–7 m long per parking unit. If the area allows, you can do it with a small margin.
The first method is to construct a site by laying paving slabs
The work consists of the following stages:
- Choosing paving slabs for a summer residence. It will experience constant loads, so it must be wear-resistant. Suitable tiles made by vibration pressing. It also has good frost resistance, for which special thanks to it. The thickness of paving slabs must be at least 40 cm.
Laying layers of paving slabs
Let's look at some important tips for choosing paving slabs for arranging the space reserved for a vehicle:
- If you decide to purchase vibrocast tiles, you should be especially careful. Of course, vibro-cast paving slabs are bright, have a variety of rich colors and an excellent smooth surface. The thing is that the glossy shine and smooth surface of such products can be achieved in two ways: by adding special concrete plasticizers during the production of paving slabs or by adding more water.
- Remember that truly high-quality paving slabs cannot be cheap.
- Be careful when choosing paving slabs, especially saturated colors. Currently, manufacturers offer a wide range of color solutions for paving slabs, from white to all sorts of rich shades. However, obtaining bright shades is only possible if expensive imported pigments were used in the production of paving slabs.
- The territory is marked out with wooden pegs and twine. For greater accuracy, you can mark the outer boundaries with paint. In the article you can learn about the main methods of laying paving slabs in your summer cottage.
Ready parking for a vehicle at the dacha
- Soil and earth are removed throughout the entire area of future work, and a pit 50 cm deep is constructed.
- At this stage, it is necessary to set a horizontal level on both sides of the site rectangle.
- The earth at the bottom of the pit is compacted. It is better to do this with a vibrating plate, vibrating foot, etc. However, purchasing such equipment only for setting up a parking zone is not cost-effective. You can rent it for a short term; now more and more companies offer such services. But if that doesn’t work, you can also work with a manual tamper. You just have to put in a lot of effort to do it yourself and it’s better to call your friends.
- If curbs are planned, install them.
- Creating a pillow from crushed stone and sand. The pillow has three layers: the bottom 30 cm high is laid with large crushed stone, then 5 cm of small crushed stone. The topmost layer, 4-5 cm thick, is made of coarse sand.
- The next step is to mark the site into strips for ease of work. They do this by marking the distance on the level threads at 15-20 cm. This is quite tedious work, but it allows you to do the job correctly.
- After marking, level the sand, the thread should rise 8–10 cm above the sand. The sand is compacted.
- Before starting work directly with the tile, it is carefully inspected; tiles with defects are set aside for cutting.
How to properly make a ramp in an underground garage
The garage ramp structure is a small platform that is adjacent to the entrance to the garage. It is placed at a slight angle. You can make a ramp with your own hands, both temporary and permanent.
In the first case, the entrance is made of boards - any lumber will do. The advantage of this production is:
- rapidity;
- low price;
- speed of commissioning.
Minuses:
- fragility;
- light loads;
- destruction from moisture.
The best option for making a ramp is concrete. We will tell you further how to make or fill a garage entrance.
Concrete ramp
To build a garage driveway you will need:
- cement mixture (M400);
- boards for wooden formwork;
- sand and crushed stone;
- fittings
Before you start work, prepare the area:
- Clear away any debris. Set boundaries. Compact the soil using a vibrator. Fill the resulting area with water, this will help shrink the soil.
- The next stage is the formation of formwork. Install a structure made of boards or any lumber into which the concrete will be poured.
- Weld a frame of reinforcement in the form of a mesh and install it on the bottom of the formwork. It will add strength to the concrete and help it last a long time.
- Mix all ingredients in the following proportions: cement 1 part + crushed stone 5 parts + sand 3 parts. Fill the formwork with the resulting solution immediately after production.
- The ramp is poured in several layers. You can roughly measure 10-15 cm and stretch a thread or fishing line along the formwork. The poured layer is leveled with a spatula and carefully compacted to avoid voids and internal bubbles.
- The formed layers are given time to dry, not forgetting to monitor their condition.
- A drainage ditch must be formed in front of the finished ramp for entering the garage. To do this, a trench is dug with a slope to a depth of 40-50 cm. The resulting drainage will discharge water into a specially installed reservoir or simply to a remote area.
- The ditch is concreted and grates are installed on top to prevent dirt, leaves and other debris from entering.
How to make a blind area
This design is also of great importance not only for entering the garage, but also for household needs. The blind area helps to drain wastewater from the foundation. The material for production can be concrete or paving or curb slabs. Equipping a garage entrance with your own hands with these materials not only looks beautiful and neat, but also ensures safe maneuvers when entering a car.
Basic rules for arranging equipment:
- width – up to 0.5-0.7 meters;
- the height is set depending on the characteristics of the material that will be used (crushed stone or gravel up to 50 cm; concrete or tiles up to 40-60 cm);
- entrance slope - up to 10-15 mm for every half meter (if the blind area is built in an underground garage).
Arrangement of the site for the blind area:
- Prepare the area in front of the garage. Remove debris and compact the surface until it is level.
- The next step is laying crushed stone or gravel on the ground. Instead of formwork, we install a border and begin laying tiles or paving stones.
- When laying out the material, we adjust the installation using a mallet (lightly tapping).
- Fill the gaps between the laid tiles or paving stones with sand.
Correct screed
Installing the screed is similar to the above methods. The first step is to calculate the future area of the screed, as well as the necessary materials. After clearing the area and installing the formwork with reinforcement, a sand cushion made of sand, cement and crushed stone or gravel (10-15 cm high) is laid on the bottom and then filled with concrete. If the entrance is intended for trucks, it is best to use concrete M 500, 600 and higher as the base of the cushion.
The final stage consists of aesthetic design. Various polymer coatings will decorate your site, give it a neat appearance, and also help maintain the long service life of the concrete base.