Preparing the mixture for laying paving slabs is an important stage in landscape design, which must be approached responsibly. Compliance with technological rules and requirements will allow you to create a high-quality composition and make the design reliable. Otherwise, the tiles will be laid incorrectly, and cracks will form during its operation.
Types of styling
Any work on the design of a personal territory begins with drawing up a plan, choosing materials and paving methods. To implement such tasks, it is necessary to take into account a number of points.
First of all, you should determine:
- The type of soil that will serve as the foundation.
- Anticipated surface loads.
- Relief of the area allocated for paving slabs.
- Coverage area.
- Material consumption.
- Method of paving tile products.
Experts use the following methods of laying tiles:
- On a pillow of sand.
- For cement-sand mixture.
- For cement-sand mortar.
- On a concrete screed.
Laying on sand
Paving a tiled surface on a sand cushion is justified only in cases where you need to arrange a garden path in a country house or in the courtyard of a private house. This is due to the fact that this type of foundation is not designed for heavy loads.
At the same time, laying paving stones on sand is in great demand due to the following advantages:
- The presence of a sand cushion promotes good drainage - during heavy rainfall, all the water ends up in the seams between the paving stones, which eliminates the possibility of puddles.
- Due to the absence of a monolithic connection between the surface of the track and its internal structure, with minimal seismic activity or ground movements, the structure is not subject to deformation.
- Caring for sand-mixed tiles is quite simple. If one element is damaged, you can quickly dismantle it and replace it with a new one.
However, in addition to the advantages, this installation method also has disadvantages:
- If you do not provide a good drainage system and free flow of water, accumulated moisture will lead to deformation of the structure.
- Exceeding the permissible loads will also lead to cracking of the tiles. So, if you drive a car over a tiled surface, the result will be disastrous.
Owners of private houses and summer cottages often complain that ants carry away sand from under the tiles.
For a dry mixture of sand and cement
The use of a cement base mixed with sand for paving tiles is in great demand.
This technology has the following advantages:
- Ensuring high strength properties.
- Increased resistance to heavy loads.
The disadvantage of this option is its high cost. There may also be a problem with the pillow being washed out by heavy rains. To eliminate such problems, special curbs should be provided around the perimeter. The process of securing these elements complicates installation.
Otherwise, laying paving slabs on sand is relatively easy. Even if there are no skills in this field of activity, the owner of the site will be able to perform paving. But in order to prevent possible errors and problems, it is important to strictly follow the technology and not deviate from the step-by-step guide.
On a concrete screed
The most durable and resistant to heavy loads base is concrete. It protects the tile covering from cracks and deformations when exposed to precipitation, soil movements or external mechanical loads. This makes a concrete pad the only solution for those paths on which people or vehicles will constantly walk.
To prepare the composition, you need to take 1 part cement and 5 parts sand, mix them and lay them out in a layer of 30-50 mm. Then the surface is carefully leveled and compacted.
Paving stones can also be placed on a dry cement mixture in a ratio of 1:3. To obtain the best performance characteristics, it is recommended to use a mixture of grade 400. All components are thoroughly mixed, but no water is added. The sand should remain clean and dry, so it can be sifted through a sieve to remove impurities. Only clean sand can guarantee the strength and high quality of the screed.
How to lay paving stones correctly: technology
How to lay tiles on dry mix correctly? Being carried away by the simplicity and accessibility of all the instructional details and features of laying paving slabs, you need to take everything into account.
This article will introduce you to the basic concepts of how to lay paving slabs.
When considering the solution to global issues in technology and the choice of materials, you should never miss a variety of little things. For novice tilers and lovers of independent activities in landscaping summer cottages and adjacent areas, it is necessary to carefully study all the details of this work.
If you lack skills and experience, you can always get specialist advice on the website or contact a specialized company at the location of the facility. Under the best circumstances, you should never skimp on the tiles themselves or the mixtures on which the paving stone elements will be laid . There are three main installation methods used in today's construction technology. These are the following methods:
- Lay on dry mixtures.
- Installation of paving stone fragments on cement mortar or sand concrete.
- Making a sidewalk using sand as a base.
We also recommend that you familiarize yourself with the original flowerpots for outdoor flowers.
All these methods are equally popular; the choice of one or another depends on the characteristics of the site, the designer’s recommendations, the properties of the soil and the financial capabilities of the owner. For laying on a dry mixture, as in other options, it is necessary not to forget about forming a technological cushion of sand and crushed stone. The process of laying tiles is quite simple, but it requires the worker to be thorough, self-disciplined and patient.
In addition, you also need to know how to install a curb for paving slabs.
Step-by-step laying on dry mix
Steps for laying paving slabs on dry mixes:
- Using a tape measure, pegs and construction twine, the path is marked according to the chosen design and color scheme.
- We prepare the base for the tiles by removing the excess layer of soil and deepening it from 30 to 40 centimeters. Correct laying of the base consists of first pouring a layer of crushed stone of at least 15 cm and about 10 cm of sand.
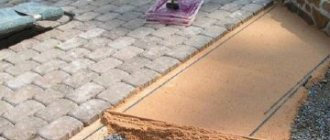
- Between layers of crushed stone and sand, geotextiles should be laid under the paving slabs. This will prevent sand and crushed stone from mixing and will strengthen the base. After this, the dry mixture should be covered with a layer of a little more than three centimeters.
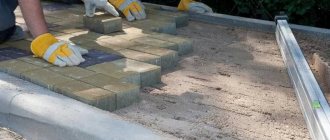
- Direct laying of paving slabs up to 5-7 centimeters thick.
You may also be interested in the properties of polymer-sand paving slabs.
Preparing the bed for the sidewalk
The process of preparing a bed for future paving with paving slabs consists of several stages. First of all, you need to choose the material and place where the coating will be installed.
Selection of location and material
When choosing a location for installing a tile covering, it is necessary to give preference to flat areas where there are no depressions and close groundwater.
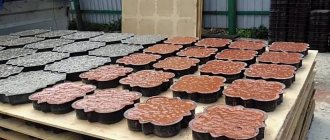
There are two types of paving slabs available for sale, which differ in their production method:
- Manufactured using vibration casting.
- Manufactured using vibrocompression.
When choosing the appropriate option, it is necessary to take into account the operating environment and expected loads. Vibropressed tiles are suitable for paths on which vehicles will travel. If you need to arrange a landscape design in the garden, it is better to choose a vibro-cast type.
Such paving stones are not able to withstand heavy loads, but have a wide variety of textures, shades and decorative solutions. So, the owner of the site can purchase tiles with an imitation of the texture of wood or stone.
When purchasing material, you need to carefully inspect it for defects, as well as surface features. Both varieties can have a shiny finish, which is explained by the presence of special additives or water in the composition.
But while additives help improve the strength properties of a structure, water worsens them. To assess the quality of the tiles, try hitting one against the other: when a ringing sound appears, you can be sure that the product is of high quality. A dull sound indicates excess water content.
When purchasing materials from different manufacturers and batches, check to see if they differ in shade. You also need to make sure that the sizes match, since sometimes it can be problematic to find similar products from different brands.
To prevent the problem of shortage of tiles, buy them with a margin of 7-10%, because... One batch may contain defective elements.
Preparing the base for installation
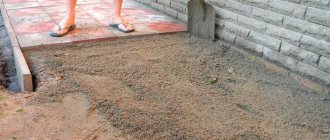
Starting the preparatory work, you should dig a 28 cm deepening (the layer consists of 15 cm of crushed stone, 10 cm of sand and 3 cm of dry mixture). If a lawn is being built near the path, then the calculation is performed using a different formula: 28 cm + height of the tile covering + thickness of fertile soil.
If the soil is soft, it must be moistened with water and then compacted. Then at the bottom of the recess a 15 cm layer of crushed stone is placed. The surface is leveled and compacted.
To prevent mixing of crushed stone with sand, the layer can be covered with geotextiles. A 10-centimeter layer of sand is poured on top of this material. After 2-3 days in sunny weather or the next day in cloudy weather conditions, the surface should be leveled.
The sand-cement mixture for laying paving slabs, the composition of which is selected in a ratio of 8:1, is poured over the sand and leveled. The screed should be level and have a height of 3-4 cm.
Mixture proportions
When choosing cement grade 300-400, the proportions of sand will be 5:1. The use of products under the 500-600 brand requires a different calculation: 1 part cement for 6 parts sand. Often the solution is diluted with PVA glue, which improves the bonding strength. The cement composition with sand and glue is mixed extremely carefully, and then used for its intended purpose.
Step-by-step production of the mixture consists of the following steps:
- 1 part of the cement mixture is combined with 3 parts of sand.
- Next, water is added to the composition - this will give it a creamy consistency.
- After 15 minutes, the components are mixed again.
The surface of the tile that comes into contact with the mortar should be moistened with water.
If the consistency is dry, the paving stones should be laid only after complete leveling. The rows should fit snugly together.
Cement consumption per 1 m2 of paving slabs
This value is of great practical importance for craftsmen who produce small volumes of material in the “for themselves” format. The technical meaning of practical significance lies in purchasing the optimal amount of cement for a specific laying area. As you know, this expensive building material has a very limited shelf life and is very demanding on storage conditions.
An example of calculating the need for materials per 1 m2 of colored paving slabs produced by vibration casting:
- We set the thickness of the elements to 35 mm.
- We calculate the amount of concrete per 1 m2 in m3: 1x1x0.035x1.15 = 0.04 m3, where 1.15 is the shrinkage coefficient of the mixture.
- Using an electronic calculator, we calculate the amount of cement, sand, crushed stone and water required to produce 1 m3 of M300 concrete: 320 kg of cement, 705 kg of sand, 1105 kg of crushed stone, 100 liters of water.
- We determine the amount of plasticizer and color for the production of 1 m3 of concrete: 320+ 705+1105x0.01=21.3 kg of plasticizer; 320x0.05=16 kg color.
- We determine the required cement consumption per 1 m2 of paving slabs in kg: 320x0.04 = 12.8 kg, where 0.04 is the concrete consumption per 1 m2 measured in cubic meters.
- We determine the amount of other components: 705x0.04=28.2 kg of sand: 1105x0.04=44.2 kg of crushed stone: 100x0.04=4 liters of water: 21.3x0.04=0.852 kg of plasticizer; 16x0.04=0.64 kg color.
Materials for filling seams
The presence of seams between each element of the tile covering compromises its integrity. Water will leak through the gaps formed, and in the cold season it will begin to freeze, causing damage to the tiles. When performing installation work, it is necessary to think in advance about how the seams will be sealed.
The next nuisance that will negatively affect the tile covering if there are seams is debris. At the same time, it can be both soft and hard. In case of vibrations that occur when moving along the surface of the tile, it will begin to destroy and scratch the material.
Often, garbage is chemically active and triggers negative reactions, including rotting. This process attracts insects and microorganisms, which begin to sharpen the paving stones.
To seal the seams on the tile surface, you need to prepare the following tools:
- Rubber spatula. For such work, it is better to choose a narrow model, but its width is determined depending on the specifics of the cracks. So, if they are long and continuous, it is better to take a wide model. The main thing is that the spatula does not damage the coating.
- Sieve. It will be used to sift sand to seal the seams.
- Concrete mixer. If the unit is missing, you can use any container and a construction mixer with an attachment.
- Shovel and container.
- Broom.
- Buckets and hose.
The materials used for sealing joints are sand or cement (you can combine materials to create a mixture of DSP or PCS), as well as water. After preparing all the tools and materials, you can proceed to the main work.
Preparing the mixture
The intermediate layer should be no more than 3 cm thick; it is better to use expanded clay. For screed construction, the material consumption will be 1:2 (expanded clay and sand concrete). Expanded clay granules will ensure the light weight of the solution, such installation will be economical and at the same time the strength properties will not be reduced. When pouring the screed, reinforcement should be laid. This procedure will prevent cracks from occurring after the solution dries.
When the consumption rate of sand concrete is known, the next step is to make the correct batch. It is recommended to perform the work in the following sequence:
- a container of the required size is filled with warm water, approximately from +15 to +25 degrees. For one kg of sand concrete, water consumption is 180-230 ml;
- Dry composition is added to the water;
- The mixture should be thoroughly mixed until even the slightest clots disappear. As a result, the solution should be homogeneous.
Water cannot be added to the prepared solution. When pouring, the mixture should be pierced from time to time. To do this, you can use a stake, rod or shovel to eliminate air bubbles.
This sand concrete mixture must be used within two hours. Performs work with M300 brand solution, recommended at temperatures from +5 to +35 degrees. It will take a day to dry completely, and you can only walk on the screed after 7 days. The formwork is dismantled on the second day. Sand concrete structures will acquire full strength characteristics in 28 days, just like conventional concrete structures.
It is necessary to reinforce the screed if it reaches a thickness of more than 2 cm. It is recommended to install the frame when pouring the foundation. There is no need to add crushed stone to the mixture; it will be replaced by sand with a coarse fraction of 3-7 millimeters. It is recommended to carry out waterproofing as usual.
Recommendations and rules
When using stale cement, its consumption should be increased.
When preparing a cement-sand mixture yourself, it should be taken into account that the instructions are advisory in nature; in practice, it is impossible to accurately maintain all the ratios according to GOST, and each new batch will be different from the others.
1-1.5 hours after mixing, the concrete solution begins to set, so when plastering, do not mix large volumes of the mixture at once.
Cracks and potholes in the foundation can seriously increase material consumption, so it makes sense to include an additional 10-20% in the calculations.
When adding fillers in order to save CSP, it should be taken into account that the properties of concrete will change.
When kneading, check the condition of the mixture by running a trowel over it. A ragged trail indicates a lack of water, a vague trail indicates an excess.
Cement-sand mixtures simplify the process of preparing mortar. Their wide variety in composition, technical characteristics, special properties and cost satisfies any needs of construction, finishing and repair work. High-quality mixtures save time and effort and guarantee results.
Plasticizing additives are presented in the catalog on our website.