Nesquik Opti-Start instant cocoa drink, 1 kg (package)
316 ₽ More details
Nesquik Opti-Start instant cocoa drink, 1 kg (package)
339 ₽ More details
Seeds
Every owner should think about what is best to build a floor in the cellar, since this is as important a component of the entire building as its other elements. It is unacceptable to use any low-quality materials. If you neglect these rules, in the future this can lead to quite serious consequences associated with subsidence of the house.
Some people do not pay enough attention to this and think that the function of the cellar is only to store food supplies, but this is not at all true. If the structure has a drawback in the form of a poor-quality surface, there is a high risk of global problems that will be associated not only with moisture getting into the room where things and food supplies will be stored.
Take care of the field in your cellar
Choosing a floor for the cellar
As with any other structure, the arrangement of the cellar depends on external factors. To decide what to make the floor of the cellar from, you need to start from the following indicators:
- groundwater level on the site (if it is too high, you will have to take care of high-quality waterproofing);
- the location of the cellar relative to the topography of the site (for example, when installing a cellar in a lowland, you need to prepare for the penetration of groundwater into it);
- financial capabilities (if necessary, you can always save money and do the work yourself).
Knowing the factors described above is only half the battle, because you still need to figure out what to fill the floor in the cellar with, or what fill to use.
There are several design options, differing in the materials used and characteristics:
- Dirt floor
. This design is the cheapest and simplest, but its effectiveness leaves much to be desired: a dirt floor is unable to protect the room from moisture and mold. In addition, from a visual point of view, this material is absolutely uninteresting, and its use will create a rather primitive design. - Concrete floor
. This material has been used for cellar flooring for quite a long time. The main advantage of a concrete floor over a dirt floor is the prevention of moisture from entering the room. If the floor is located at the ground water level or below, then a concrete floor for the cellar will be the best option, providing protection from dampness and mold. Concrete is most often the top layer of flooring, but sometimes grouting a cellar floor is done to create a preliminary layer that is subsequently painted. - Brick floor
. Solid brick is also often used when arranging the floor of a cellar. The use of this material in the cellar is an excellent design solution, which can result in a room with an antique finish. In addition to good aesthetic qualities, brick flooring is durable and reliable. - Stone floor
. If we are talking about a high-quality coating that also has excellent aesthetic qualities, then a floor made of natural stone or similar materials will be the best choice. A stone floor in combination with tiled walls will give the cellar a dignified and presentable appearance, and such a room will be a legitimate reason for pride. - Wooden floor
. Arranging a wooden cellar floor will be justified only if there is no danger of flooding in the spring. Wood allows you not only to create an interesting interior in the cellar, but also to provide a suitable atmosphere for storing food supplies, since wood is a natural material. - Clay floor
. The reliability of this coating has been tested for centuries, and when the question arises of what kind of floor should be in the cellar, the answer immediately becomes obvious. A clay floor is the best solution, but difficult to implement, since it is difficult to find good clay in sufficient quantities, and using low-quality material will not allow you to create a truly high-quality coating.
Features of each type of work
Depending on what type of floor you have chosen, the list of work may vary significantly, as well as the necessary equipment and materials. Before starting work, you should stock up on everything you need to avoid downtime due to poor preparation.
Dirt floor
The simplest option, which is very easy to do without outside help, and the price of this option is almost zero.
This method has the following features:
The floor is ready, many are attracted by the simplicity of this option, but there are also a number of disadvantages:
Concrete floor
If you doubt whether it is possible to concrete the floor in the cellar, then it should be noted that in most large storage facilities of agricultural enterprises, the floors are made of this material and the products are stored perfectly.
There is quite a large amount of work ahead, but the foundation will be much stronger:
You can make the floor in a slightly different layout:
If your groundwater is very close to the surface, the floor should be made even more protected:
Advice! For the best protection when treated with penetrating solutions, it is better to use a hammer drill to make grooves at the junction of the wall and the floor and free up the places where the pipes exit, and then seal them with a special compound. This will create additional protection in the most problematic areas.
These are the most common ways to fill a cellar floor; you should choose the most suitable option for your conditions.
Brick floor
Another fairly popular material for the floor in the cellar is red solid brick. With its help you can make not only a reliable, but also an aesthetically attractive floor. It is done in two main ways; let’s look at each of them in more detail.
The first method is very popular due to the fact that it is reliable and the floor “breathes,” as experts say:
The second option for a brick floor is used if groundwater is located close and waterproofing of the surface is necessary:
Clay floor
There is a lot of controversy about what the floor in the cellar should be, but the clay option has always been considered one of the best for cellars. The main thing is to find a sufficient amount of good quality material. In no case should you use this option if your clay is not very good - it is unlikely that you will be able to make a durable coating.
Advice! It is not very easy to determine the quality of clay on your own; it is better to consult with a specialist.
The work order is as follows:
This flooring is reminiscent of flooring in ancient rooms, in addition, it is considered environmentally friendly; such a cellar always has a healthy atmosphere.
Wooden floor
If your cellar is located on a dry, elevated area, the question of how to make a floor in the cellar is greatly simplified. It can be made from wood. Then there will always be a healthy atmosphere in your storage room.
The sequence of work is as follows:
You can decorate the walls and ceiling with wood - you will get a very cozy room. The floor above the cellar is the ceiling of the storage room; it is also better to cover it with wood.
Natural stone and ceramics as an option for the cellar
This solution is chosen by those for whom not only the practical, but also the aesthetic component is important. Although paving stones look beautiful, they are not very convenient; it is easier to take a smooth stone.
It is much easier and cheaper to use ceramic tiles - they are laid on a concrete screed, the surface is smooth, durable and resistant to high humidity.
Creating a floor in the cellar
The work on arranging the floor in the cellar will directly depend on the selected material. Before making the floor in the cellar, you need to prepare all the materials and tools so that you don’t have to stop work due to their shortage.
The work should be carried out sequentially, in strict accordance with the algorithm given for each material. It is better to study the technology of creating a floor in advance, and during the process only check the instructions to clarify some points.
How to dry a basement after a flood
If the flooding was accidental, you need to pump out the water in any available way, and then proceed according to the standard scheme:
If the flooding is periodic, in the spring, for example, you will have to build a full-fledged drainage system, and this is a separate conversation.
All the methods described above on how to dry a cellar are mostly based on practical experience. They are used everywhere and very often. In one case, one method works, in another, another. Your task is to find the most effective one for your situation.
Source
Dirt floor
A soil covering is the simplest design for a cellar floor. The advantages of such a floor are obvious: it is cheap and easy to install.
The algorithm for creating a ground floor is as follows:
- first you need to prepare the base by removing all irregularities and a layer of turf;
- Next, you need to evenly pour a small (about 10 cm) layer of gravel;
- Now the gravel can be compacted, which ends the work of creating a dirt floor.
The technology for creating a ground floor is extremely simple, but the resulting structure will have a number of extremely unpleasant disadvantages:
- firstly, such a floor is extremely unreliable, and the slightest damage to the coating can lead to sagging of racks and shelves;
- secondly, the gravel layer does not protect the room from dampness, so the humidity level will be too high, which can lead to rotting of wooden shelves and rust on metal elements;
- thirdly, such a floor design with a high level of groundwater will certainly lead to flooding of the room.
Drainage device
A basement or cellar is not always made in places where groundwater lies very deep. Sometimes there is nowhere to go and you have to get out of the current situation. Therefore, in order to reduce the negative impact of groundwater on the premises, internal drainage is first installed. To do this, at the initial stage of work you need to do the following:
- a trench 50 cm deep is dug along the entire perimeter of the room;
- Geotextiles are laid at the bottom of the trench and covered with crushed stone or gravel and compacted;
- after which drainage pipes are installed in the trench, which should discharge groundwater into a special well. The water collection point is located at the lowest point of the basement or cellar and must accommodate the entire volume of groundwater;
- then the trench is filled with crushed stone or gravel and covered with geotextiles.
Concrete floor
Concrete pavement deserves a closer look. The floor in the cellar, made of concrete, has all the necessary characteristics, but it is not easy to equip.
The process of creating a floor will look like this:
- first you need to remove approximately 30 cm of the covering from the calculated floor level;
- the resulting site is leveled in compliance with the level, since a concrete screed requires a reliable foundation;
- after creating the base layer, a cushion for the screed is created (10-15 cm of crushed stone and about 5 cm of sand);
- the sand is moistened with water and compacted;
- now a layer of bitumen waterproofing is laid, to which glass insulation or roofing felt is glued on top, overlapping the walls;
- Immediately before pouring, a reinforced mesh is laid, and only then can you begin pouring the concrete layer.
You can use an alternative method of creating a floor in the cellar using concrete.
The sequence of actions will be as follows:
- first, a layer of crushed stone about 25 cm thick is poured onto the surface;
- a 10 cm layer of sand is laid and compacted on top of the crushed stone layer;
- concrete is reinforced with metal mesh and poured (layer thickness is about 8-10 cm);
- then you need to wait about 3 weeks until the concrete hardens completely, after which you need to protect the floor from moisture penetration using a rolled waterproofing material or roofing felt;
- another layer of mortar is poured over the waterproofing.
If the cellar is located in an area with a high level of soil water, then the foundation requires additional reinforcement.
In this case, you must follow the following algorithm:
- the base surface of the floor is deepened and leveled;
- now the entire base layer needs to be covered with a 30 cm layer of clay mortar, mixed to a dough state;
- the clay layer is covered with a sand-crushed stone cushion with a total thickness of about 15 cm, after which the resulting base is carefully compacted;
- Next, cement mortar is poured to a thickness of about 10 cm with the obligatory use of a reinforced mesh or lattice, and it must be deepened into the concrete by at least 3 cm;
- after the concrete layer dries, glass insulation is glued onto it, after which it is necessary to pour another layer of concrete 5 cm thick;
- glass insulation is again glued onto the dried second layer, which is poured on top with a finishing layer of waterproofing concrete (to make it, liquid glass is added to ordinary concrete, which provides a high level of protection from moisture);
- if desired, you can also use compounds with penetrating properties, which will provide additional protection for the cellar floor (before using these substances, you need to make grooves in advance at the junction of the floor and walls).
The floor in a concrete cellar can be created using several methods, and if the work is done correctly, the result is a good design that has a lot of advantages and provides the cellar with the necessary characteristics. You can also make a floor hatch with your own hands; such a hatch will allow you to conveniently descend into the cellar.
Required materials and tools
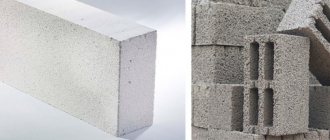
A cellar made of expanded clay concrete blocks or monolithic concrete involves preparing all the necessary tools and materials. For this you will need:
- bucket;
- shovel;
- grater and trowel;
- base rammer;
- container for concrete solution;
- sander;
- level;
- waterproofing;
- construction tape;
- reinforcement or steel mesh;
- beacons;
- rule for leveling concrete;
- grinder with stone discs;
- ironer
To perform such work, quarry sand is useful.
The following components are prepared from materials:
- cement M400;
- standard crushed stone;
- quarry sand;
- tap water;
- chemical additives that increase hydrophobicity and strength of concrete (if necessary).
Brick floor
The floor in a cellar is made of brick quite often, since this solution is quite convenient, looks nice, which can be seen in any photo of a brick cellar, and preserves food well.
Arranging a brick floor can be done in two ways.
The first one looks like this:
- first of all, prepare an even base layer;
- next you need to make a crushed stone or gravel cushion about 10-15 cm thick;
- Having compacted the layer of crushed stone, you can begin mixing the clay solution;
- the resulting solution is laid on the base in a layer of about 20 cm;
- a brick is laid on the clay layer (it is important to ensure that the dressing is adhered to, that the bricks fit tightly and that there are no bulges on them);
- After laying all the bricks, you need to wait for the clay to dry, and then the cellar floor is finished.
The main advantage of this method is the fact that it “breathes” and creates the most favorable atmosphere for storing food.
The second method is advisable to use in cases where there is a need to waterproof the coating:
- first, a sand and gravel cushion about 10-15 cm thick is laid out;
- Having compacted the pillow, you can start laying a clay layer or cover the floor with bitumen and roofing felt;
- in this case, the brick itself is laid on cement mortar (the brick should be embedded in the mortar to ensure maximum coverage with the mortar);
- After a few days, the frozen floor will need to be moistened, the joints will need to be filled with mortar, and the upper part of the joints will need to be filled with liquid mortar.
Basement dehumidification with ventilation
Sometimes it happens like this: the cellar was dry, and suddenly dampness appeared. One of the reasons is poor ventilation. First of all, check the cleanliness of the ventilation ducts. Clean if necessary. If everything is fine, but the dampness does not go away, it means the exhaust pipe is not working well. This happens when the air in the cellar is colder than outside. Heavy and cold, it will not rise up the pipe on its own. A paradoxical situation arises, at first glance: it was cold and damp outside, but it was dry in the cellar. It got warmer - drops of moisture hung on the ceiling, walls and objects, and a musty smell appeared. In this case, in order to dry the cellar, it is necessary to activate air movement. There are several solutions.
Sometimes increased air movement leads to the fact that the humidity in the cellar does not decrease, but increases. This can often be observed in hot weather. The reason is this. Heated air carries with it a significant amount of moisture in the form of vapor. Once in a cool cellar, the air cools down, and moisture condenses on the coldest surfaces: the ceiling, walls, and sometimes on shelves and jars. If this is exactly the case for you, then stop ventilation. Even close the supply pipe and slam the lid tightly, limiting the flow of warm air.
How to dry the cellar in this case? Wait until autumn, and when there is no rain yet, but the temperature is already about +10°C, start ventilation using one of the methods suggested above. Works. If your nights are cold in the summer, you can turn on the fan at night and close the ventilation ducts during the day. This way you can gradually reduce the humidity in the cellar in the summer.
Heating the cellar
If it is necessary to remove dampness during warm weather, and ventilation only worsens the situation, you need to heat the air in the basement so that it comes out on its own, carrying away moisture (the higher the air temperature, the more vapor it can contain).
Clay floor
Each cellar floor material has its own advantages and disadvantages. Clay also has its own characteristics: it retains water well, is environmentally friendly and provides the most suitable conditions for storing food. The only drawback is that finding enough quality clay is very difficult.
Sometimes poor clay is used to create a floor, but the result is always adequate. When choosing a material, you must definitely involve a good specialist who can determine the quality of the selected clay and help you choose the best option.
Laying an adobe floor is carried out according to the following algorithm:
- First of all, prepare the base layer;
- then a clay-crushed stone cushion up to 15 cm thick is filled in;
- the resulting cushion is covered with bitumen on top and becomes the basis for subsequent actions;
- a layer of waterproofing material is laid on the base with an allowance for the walls;
- now a layer of clay about 5 cm thick is poured over the waterproofing (if desired, crushed stone can be added to the clay);
- After the clay dries, cracks and tears may appear, which are filled with a solution of clay and lime.
Features of each type of work
The list of required work is directly dependent on what type of floor was ultimately chosen. Also, due to this, the necessary materials and devices will be determined. The master needs to make sure in advance that all the necessary tools and materials are at hand.
In this video we will look at the floor in the cellar:
Dirt floor
This type of floor will be the most inexpensive and simplest. But in terms of efficiency, this is not the best option, since it is not able to protect the cellar from mold or moisture. The same can be said about the appearance of the material, which looks very primitive. The sequence of creating such a surface consists of the following steps:
Concrete floor
If a person has doubts about whether it is possible to make a floor in a cellar or garage from concrete, he can calm down, since in most houses the coating is made of this material. This popularity is explained by the fact that products are stored very well in such premises, and as for the garage, it will have the necessary strength, since there is a need to withstand high pressure.
The only drawback that can be noted in this case is that it is unlikely that it will be possible to carry out such work on your own, since here you will have to take into account a large number of nuances, which only highly qualified specialists with extensive experience and skills in carrying out such work know.
Brick floor
Like concrete floors in the cellar, this option is considered one of the most popular. With the help of such elements, a person can create not only a very reliable surface, but also an aesthetically attractive one. The simplest installation method is the following:
Clay floor
Although this option may seem the most impractical, people use it quite often, and for a certain period of time it was considered one of the most acceptable floors for a cellar.
The most important thing is the use of a sufficient amount of material and its quality. Under no circumstances should you start working with clay if many questions arise about its origin. Then, most likely, the floor will have to be redone using a different technology, but if the material is of high quality, the procedure should look like this:
Wooden floor
The only condition that should be adhered to in this case is that the cellar should be located in the driest place. Only in this case is there a possibility that the wooden surface will not be subjected to any influences that could cause harm and provoke the need to carry out repair work every time.
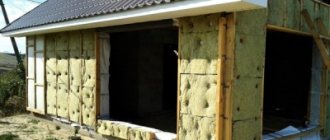
Use different materials for floor insulation
To successfully install wood, you must adhere to the following sequence of actions:
Natural stone and ceramics as options for the cellar
If you use ceramics or stone correctly to create a cellar floor, you don't have to worry about it having any weaknesses. Such a surface provides the room with the necessary qualities that every underground storage facility should have.
But in this case, do not forget that paving stones are very difficult to process. One of the most acceptable options in such a situation would be the use of decorative tiles, which are not always inferior in strength to natural materials.
The same applies to decoration - the owner of the house will have the opportunity to create an original design that will be very difficult to find from someone else.
Wooden floor
When arranging a cellar in a dry place, you don’t have to worry about moisture penetrating into it through the soil. In this case, the cellar floor can be made of wood, resulting in a fairly cozy storage area with a good atmosphere. To complement the picture, you can completely trim the cellar with wood.
The arrangement of a wooden cellar floor is carried out in the following sequence:
- first the base surface is leveled;
- crushed stone with an admixture of clay or bitumen is poured onto a flat surface, which will protect the cellar from the penetration of dampness from the soil;
- the next layer is waterproofing;
- then the logs are laid, which are usually made of 10x10 cm timber;
- If the logs are installed level, then boards can be attached to them using self-tapping screws.
Program releases
- Unusual kitchen-living room with a disappearing table 0+
December 1, 2019
- Eccentric kitchen-living room with honeycombs on the ceiling 0+
November 24, 2019
- Living room in the style of American classics 0+
November 17, 2019
- Space capsule, areas for children and relaxation in a fantastic garden 0+
November 10, 2019
- Grand remodel of the living room with fireplace and access to the garden 0+
November 3, 2019
- Cozy bedroom in the style of a tropical bungalow 0+
October 27, 2019
- Japanese living room interior with a library under the clouds 0+
October 20, 2019
- Spacious attic filled with light and air 0+
October 13, 2019
- Asymmetrical living room with optical illusions in the style of Salvador Dali 0+
October 6, 2019
- Attic with five recreation areas in the tower 0+
September 29, 2019
- Large recreation area on the cosmonaut site 0+
September 22, 2019
- Paradoxical interior of a kitchen-dining room with a gable roof 0+
September 15, 2019
- Minimalism and avant-garde in a country living room 0+
September 8, 2019
- Musical living room with home cinema and bar area 0+
September 1, 2019
- A gazebo with a swing, a concrete sofa and a large outdoor stove instead of an impassable field 0+
August 25, 2019
- Kitchen, bar and lounge area on the roof 0+
August 18, 2019
- Rope park in a birch grove and an open terrace on stilts 0+
August 11, 2019
- Bold interior of a multifunctional attic with a bathroom and a cinema 0+
August 4, 2019
- Attic under a roof for romantic dates 0+
July 28, 2019
- Relaxation area with a library and a huge bed in a small bedroom 0+
July 21, 2019
- Stylish relaxation area for adults and a treehouse with a climbing wall for children 0+
July 14, 2019
- Picturesque pier on the shore of a pond 0+
July 7, 2019
- Large-scale roof renovation for a large family 0+
June 30, 2019
- Second life of old things and a glass wall in a spacious attic 0+
June 23, 2019
- Gazebo with earthen roof and pier on a site near the lake 0+
June 16, 2019
- A bright and extravagant solution for a large attic 0+
June 9, 2019
- Stylish living room with library from an empty garage 0+
June 2, 2019
- Luxurious minimalism in the living room with a purple fireplace 0+
May 26, 2019
- Elegant brutality. Living room in knightly style 0+
May 19, 2019
- Sea blue and deck board in the kitchen-living room 0+
May 12, 2019
- Garden atmosphere in the bedroom with floating furniture 0+
May 5, 2019
- A bold solution for the kitchen-living room in blue and gray tones 0+
April 28, 2019
- Attic in the style of Belgian minimalism for princely daughters 0+
April 21, 2019
- Geometric harmony and shocking details in the living room 0+
April 14, 2019
- Fabulous living room with fireplace and library 0+
April 7, 2019
- Eternal lime summer, birds in the decor and a fireplace in a bright interior 0+
March 31, 2019
- Mint kitchen-living room with live fire 0+
March 24, 2019
- The atmosphere of Istanbul and luxurious palaces in a cozy country bedroom 0+
March 17, 2019
- Bedroom with dressing room based on American films 0+
March 10, 2019
- Spacious living room on 35 square meters 0+
March 3, 2019
- Multifunctional rooms in a castle for a little princess 0+
February 24, 2019
- Luxurious bedroom with bathroom and dressing room 0+
February 17, 2019
- Airy and light two-story living room with cork flooring and openwork mesh 0+
February 10, 2019
- Two-story children's room for a little Indian 0+
February 3, 2019
- Kitchen-living room on a warm veranda in chalet style 0+
January 27, 2019
- Cozy minimalism and a Parisian terrace in the bedroom of young parents 0+
January 20, 2019
- New Year's issue 0+
December 31, 2018
- Attic with kitchenette, recording studio and fireplace 0+
December 23, 2018
- Pop loft style with arches and lamps in the living room of an unusual house 0+
December 16, 2018
- Airy veranda for Maria Zakharova’s family 0+
December 9, 2018
Stone or tile floor
If you want to create a reliable and beautiful cellar, you can also use natural stone. It is able to provide the cellar floor with all the necessary qualities. When choosing a suitable stone, it is worth choosing smooth samples: pavers look better, but are very difficult to work with.
Another good solution could be ceramic floor tiles for the garage, which have excellent decorative properties. In addition, it has a lot of useful qualities: it is smooth, very reliable and protects the room well from moisture. To lay the tiles, you need to make a concrete base to which the material will be attached.
Conclusion
Using the instructions provided, you can select high-quality material and arrange the floor in the cellar. When choosing which floor in the cellar is best, you need to decide objectively, based on knowledge of external factors, the intended design of the cellar and individual preferences.
Proper execution of all work will ensure the safety of food and the absence of moisture in the room. In addition, a self-made floor in the cellar is a legitimate source of pride for any homeowner.
Grouting concrete
- Rough grouting of concrete begins from the place where it was poured.
- For work, it is recommended to use special concrete strengthening compounds or topping. Such compositions will improve the strength characteristics of the concrete base and extend its service life.
- If minor loads are placed on the concrete floor, then the topping consumption will be up to 5 kg per 1 sq. m. m.
- If the floor is exposed to medium and high loads, in this case the topping consumption will be large - up to 8 kg of mixture per 1 sq. m.
If you decide to install a concrete floor on the ground in the basement, then before starting such work, watch this useful video:
Pouring stages: what do they include?
Preparation
A concrete basement is an integral part of summer cottages or houses. Before starting construction, it is necessary to prepare the soil for pouring the floor and construct formwork for the walls. To prevent the possibility of concrete getting wet, a preliminary study of groundwater is carried out. If their level is quite high, then a deep cellar will not work. In addition, preparatory work includes the following activities:
- digging a pit;
- garbage collection;
- compacting the surface.
Concreting an old floor covering involves the process of dismantling the structure or puttingtying with a cement-sand screed.
Waterproofing
Increased soil moisture necessitates waterproofing work to protect against changes in groundwater levels. Waterproofing a concrete basement is carried out using roll products, but this method is often combined with liquid. In this case, the components are added directly to the solution before pouring. To waterproof a basement, bitumen or polyethylene film is most often used, which is laid overlapping. For flooring, the rolls are laid overlapping each other by 100-150 mm; on the wall this figure reaches 25 cm. To isolate the seams and secure the waterproofing sheets, the joints are taped. The microclimate in the basement depends on the quality of the work performed. Excessive humidity leads to property damage and mold growth.
Reinforcement
To fill a basement floor with your own hands, you must also take into account the loads on the floor. To prevent premature destruction of the coating, reinforcement of the screed is carried out. This allows you to increase the permissible load without destroying the concrete. Depending on the planned purposes of the structure, rods with a cross-section from 5 to 16 mm or reinforcing mesh are selected. Square cells with a side of 2-2.5 cm are formed from the reinforcement. The metal structure is placed in the middle of the screed level, since when placed low, the reinforcement loses its strengthening function, and a high-mounted fixture will be visible on the floor surface.