- House
- Garden Garden
Share
| Discover the best gift ideas for Men, Women, Girls and Boys. |
For many owners of private property, the garden is a place of rest and relaxation, which can be accessed without leaving the confines of their own yard. Here you can breathe fresh air, practice landscape design, and unwind with nature, surrounded by fruit trees and berry bushes.
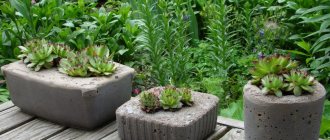
To make the garden even more beautiful and atmospheric, plot owners resort to the use of decor. They reveal their creativity and architectural skills by making stylish, original and spectacular concrete balls.
Compared to other crafts used by owners to decorate the garden, balls have several advantages. This is an unusual design that does not go out of fashion, a simple manufacturing process, affordability and the availability of all materials and tools needed to work on the decor.
- 1 DIY cement balls - step-by-step instructions 1.1 Preparatory stage
- 2.1 Mixture preparation
DIY cement balls - step-by-step instructions
A neat fruit garden with straight paths, decorative plantings on the site, decorated with winding paths, park alleys near the house.
All these areas will look good if you decorate them with balls of concrete. However, the universal scope of application is not the only reason explaining the popularity of this decor.
The balls are made quickly, the process of creating them can be done even by a fragile girl, and their service life is many years. It is also important that there are an infinite number of variations in their design, so each product can be given an exclusive look.
Preparatory stage
Before you make cement balls with your own hands, you need to visit the nearest hardware store and make a test purchase of materials. In order not to forget about important purchases, you should have this list at hand:
- concrete;
- paper;
- sand
- gravel or other suitable types of fillers (granite, crushed stone, river stone).
You will also need tools for the job. You need to have on hand a container for mixing the concrete mixture, a construction mixer for mixing it, and molds made of plastic, rubber or glass.
Trowels, spatulas, a hammer, a knife, and a screwdriver will also be useful. Personal protective equipment is required. To protect yourself from accidental injuries, you should start working in reliable closed shoes, gloves, and work overalls made of thick fabric.
How to effectively use garden crafts
Plan in advance where to place the figures in the garden. This will make it easier for you to determine the exact size and color of the garden figurine.
Decide what style your garden will be. No matter how beautiful your garden crafts are, they should be in the same style.
Don't overload your garden with crafts. A few simple but funny garden figurines in advantageous places in the garden will make a greater impression than an ill-conceived mass of the most wonderful and interesting garden crafts.
Coordinate the size of the figurine and the garden. Large open spaces require larger figures. And small garden figurines can be interestingly placed near tree trunks, near a small pond or fountain, along garden paths.
DIY garden crafts will add more interesting details to the overall look.
Source: delatsami.com
Choosing proportions for the mixture
To ensure that the balls are durable, have a neat and even geometric shape, and do not deteriorate as a result of exposure to moisture, loads and UV rays, the proportions of the components in the concrete mixture are carefully controlled. The reference values are the following recommendations:
- 3 parts of solid natural filler (crushed stone, gravel, etc.);
- 2 parts sand;
- 1 part dry concrete.
This ratio is time-tested, which is why practical and forward-thinking individual developers adhere to it.
Preparing the mixture
The cement mortar is prepared as follows. First, the required amount of dry ingredients in the appropriate proportion is added to the container - this is sand, concrete and the selected filler.
Then the components are thoroughly mixed. Water is added to the substance only at the end of the technological process, making sure that the mixture is homogeneous. Its consistency should be close to the consistency of liquid sour cream. This requirement can be easily satisfied if you gradually add water to the container, carefully controlling the amount of liquid in the mixture.
Product molding
It's easy to make concrete balls with your own hands. The most important work that craftsmen have to perform is molding products. However, you can cope with it with the slightest labor costs if you follow the following recommendations:
- Molding of products in glass blanks
Even thick tempered glass can burst under the weight of the concrete mixture. It is worth remembering this and carrying out all manipulations with extreme caution. The mixture is poured slowly, dosing it using a trowel or construction shovel.
- Using rubber and plastic molds
The easiest way is to pour the ready-made concrete mixture for balls into a rubber mold. These could be old children's balls. A small diameter hole is made in them with a knife, through which cement mortar is fed into the workpiece.
- Correct filling with mixture
Filling should occur in stages. New layers of the mixture are added to the mold after the previous layers have been thoroughly compacted. The mold is tapped on the table surface so that excess air is released from the mixture and it is distributed throughout the container in an even layer.
Following these simple rules is the key to creating neat balls with impeccable aesthetics on the first try.
What solution is needed
Architectural concrete is most suitable for forming decorative products. The manufacturing technology is as follows: 1 part cement, 3 parts sifted fine sand, purified water, special additives or plasticizers for architectural concrete, which are additionally purchased in construction stores. In their absence, some builders recommend adding a little gypsum to the cement-sand mixture.
You can also purchase ready-made decorative concrete. If desired, dyes are added to the solution to give the products different shades.
Choosing a place to dry garden decor
When the molding work is completed, the balls must be carefully laid out and allowed to dry. The place for this process must be selected correctly, because violation of the requirements for humidity and ambient temperature can negatively affect the final result.
The optimal choice is a hard and flat surface. On it, a ball with round geometry will not lose its outline. You can also place it on a bulk sand cushion.
It is convenient, practical and effective. Here the product is left for a period of 24 to 48 hours. The hardening time depends on many variable factors - air temperature, brand of concrete, type of filler. It is determined by the master individually.
Base pedestals for balls
1. Pedestal for a ball
- 320x320 Width, mm.
- 160 Height, mm
- 36 Weight, kg
- Price
- RUB 1,000.00 without coloring
- RUB 1,400.00 with stone chips
- RUB 2,000.00 with polished surface
- RUB 2,000.00 under granite
2. Pedestal for a ball
- 600x600 Width, mm.
- 240 Height, mm
- 190 Weight, kg
- Price
- RUB 3,000.00 without coloring
- RUB 5,000.00 with stone chips
- RUB 10,000.00 with polished surface
- RUB 10,000.00 under granite
3. Pedestal for a ball
- 1000x1000 Width, mm.
- 400 Height, mm
- 800 Weight, kg
- Price
- RUB 5,000.00 without coloring
- RUB 7,500.00 with stone chips
- RUB 14,000.00 with polished surface
- RUB 15,000.00 under granite
Dismantling of formwork
The concrete decoration of the garden must dry thoroughly, because it will delight the eye for many years on the alleys between the green spaces. When the time required for the concrete to completely dry and harden has elapsed, the formwork can be removed.
The easiest way is to extract the ball from glass blanks. You can simply break them with a hammer. If the master used plastic formwork in his work, then he needs to arm himself with a screwdriver with a sharp working part.
Carefully prying the ball with these tools, it is taken out of the mold. Rubber molds quite often replace plastic and glass counterparts. They are heard in a different way.
Using a sharp utility knife, carefully cut off the surface of the workpiece. When all the segments are removed, the master will see a smooth and beautiful ball in front of him.
Tools for work
Initially, it is advisable to decide what kind of ball will be made - hollow or monolithic, and then begin preparing the necessary equipment. It is worth noting that a hollow ball is easier to form, and it is also more practical for transportation, since it weighs significantly less than a cast one (the weight of such products can reach several tons).
To work you will need:
- dry cement;
- fine river sand without impurities;
- plasticizer - imparts plasticity to the concrete solution;
- pure water;
- shovel, bucket, mixing container;
- a set of frames (plastic, metal, wood, etc.) for making garden decorations;
- protective moisture-repellent compounds for processing finished figures;
- individual protection means.
The process of cleaning a concrete product
Decorative garden balls removed from the mold must be cleaned. If this stage is carried out responsibly, the finished concrete product will acquire a smooth, neat contour, a surface pleasant to the touch and an aesthetic appearance.
So, you should start by immersing the ball taken out of the mold into water. It is convenient to use an ordinary bucket. However, if the size of the ball is too large, any other container will do.
The ball is then thoroughly washed. This is done in thick rubber gloves that protect the hands from microdamages and scratches. The ball is inspected from all sides and, if necessary, large pores on the surface are masked with the remaining cement-sand mixture.
Series "Sport"
Soccer ball D=250 mm.
- 20 Weight, kg
- RUB 5,000.00 Price
Soccer ball D=300 mm.
- 32.5 Weight, kg
- RUB 6,000.00 Price
Soccer ball D=330 mm. on a pedestal
- 330x330 Width, mm.
- 490 Height, mm
- 84 Weight, kg
- RUB 10,000.00 Price
Frame sculptures
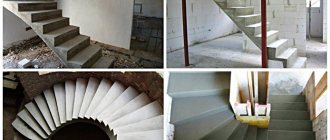
For those who have already practiced making concrete figures, there are more complex options that require the ability of an architect and the presence of spatial imagination. We are talking about framed objects made of concrete. Using reinforcement, you can form various compositions: from an angel to a fantastic castle .
First you need to weave the outline and base of the upcoming composition from wire. The more accurate the frame is, the more accurate the finishing figure will be. After the first layer of cement has been laid, you can form the appearance of the composition. Key texture components - facial details, lines, etc. - are formed when applying the 2nd layer. If the components are complex, a third layer may be needed for the smallest elements. If the sculpture dries, it can be painted in any tone or the necessary shades can be added.
Frame wrapping for decorative wood
The base of the crown of 8 out of 10 topiaries - the backing - performs 2 functions: it improves the gluing of materials, and is also a base decorative layer that masks the color of the ball.
Pre-winding or painting the base prevents the material from burning when gluing the decor with a hot glue gun.
Substrate manufacturing methods:
- Sisal wrapping.
- Twine.
- Wrapping with knitting or sewing threads.
- Gauze or fabric covering.
- Painting a topiary ball (required when gluing coffee beans).
- Apricot kernel base.
1. Wrapping with sisal 2. Wrapping with twine or yarn 3. Wrapping with thread 4. Covering with gauze 5. Painting the base 6. Backing with apricot kernels
Of course, a ready-made foam ball is the best choice for a base for a tree of happiness, with virtually no disadvantages. However, you should not neglect free methods: we recommend using a topiary ball made from newspapers - the best option, also without flaws and, moreover, with minimal costs!
Applying a relief pattern to the surface of a concrete ball
The possibility of decorating the internal and external surfaces of a concrete ball was mentioned above. Additionally, one more method can be proposed: applying a relief by stamping the concrete surface (this was partially used when processing an artificial boulder).
Another option is to use a plastic or knitted napkin (the same as when making a knitted plaster vase). The napkin is moistened with machine or vegetable oil and placed on the top of the balloon. Next, a layer of concrete is applied. After it hardens, the napkin is removed.
An embossed pattern remains on the inner surface of the product. To make it clearer, paint this surface as follows.
First: paint the entire surface with a brush. For example, silver paint.
Second: after the paint has dried, carefully apply this layer to the convex elements of the design with a sponge moistened with dark paint.
You can also use the old version, which was used when painting a netsuke figurine (here) and a crucifixion (here).
2nd method: using a balloon
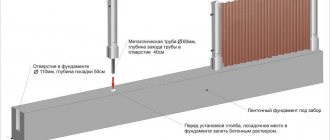
If we want to get a concrete ball of the correct shape, then we need to have a balloon of the appropriate shape.
Once the balloon is inflated, it is placed in a smaller plastic or metal bucket for stability (see photo).
If you use a metal stand, then it is advisable to insulate its top with plastic film.
To simplify, we prepare a regular cement mixture, but in the proportion not 1:3, but 1:2 (cement-sand). In this case, it is better to take fine sand and without stones. Then you can get a more even surface of the ball.
Using a cement mixture without polymer additives somewhat complicates the work and requires more patience and accuracy.
Place the first handful of medium-thick concrete on the very top of the ball. Then, gradually decreasing, we add additional “cakes” to the top. At the same time, we do light slapping in order to glue the parts of the concrete mixture.
If the mixture turns out to be too liquid and begins to slip, you can correct the situation by sprinkling it with dry cement. The sequence of operations is shown in the following photographs.
At the end of the work, it is necessary to cover the entire structure with plastic film, just as they did when making an artificial boulder from fabric (short video).
After the concrete ball has hardened and strengthened, the rubber ball can be deflated and removed from the concrete.
If you are not satisfied with the presence of a hole through which the deflated ball is removed, then you can do the following: deflate it a little, and then turn it inside the concrete one and seal this hole with the same cement mortar. But the balloon will remain there forever.
Usually the cavity of the ball is left open. Moreover, its edges are made uneven. By painting the inside of a concrete ball with gold or silver paint, you can get a beautiful decorative lamp.
The outer surface of the ball (hemisphere) can also be painted, pieces of colored tiles glued to it, or uncured concrete elements can be stuck on during the manufacturing stage and a decorative vase of complex shape can be obtained (short video).