When building a bathhouse on a site, the question arises of what material is best to make the floor from. Many, of course, will say that a concrete base will be cold and uncomfortable. And this is partly true. However, today technology allows you to make a warm concrete floor in a bathhouse with your own hands with step-by-step instructions without high costs. How to make a concrete floor in a bathhouse with your own hands will we look at in this article?
The main advantages of a concrete coating are its durability, resistance to mechanical stress, water resistance, and resistance to rotting and rapid destruction. And these qualities are extremely necessary for a bath room with high humidity.
Methods for installing a concrete floor
There are two methods for pouring a concrete floor base in a bathhouse:
- on the ground;
- on the joists.
The choice of filling method depends solely on the preferences of the bathhouse owners and the funds allocated for the construction or repair of the bathhouse.
Laying concrete on the ground
Laying concrete on the ground involves first removing a layer of turf from the surface of the ground, approximately 40–50 cm deep. A layer of gravel approximately 15 cm high is poured into the resulting hole. The surface is thoroughly compacted.
A layer of sand, approximately 30–50 cm thick, is poured onto the gravel layer and also compacted thoroughly. After this, you can pour the concrete screed, providing for a slope. You can pour one or two layers of screed, not forgetting the thermal insulation and waterproofing layers.
Laying concrete covering on joists
Laying concrete over joists is a slightly different pouring process. This option is quite good in that a well-ventilated space is formed under the floor of the bathhouse, which does not require the installation of additional ventilation systems in the concrete screed.
In this case, it is very important to pre-treat all wooden elements with antiseptic compounds. Then the dried logs are laid in place, creating a kind of grid of timber with a cross-section of 10x20 cm.
The rough plank floor is attached to the joists. The thickness of the boards should be 2 - 4 cm. Do not forget about waterproofing the surface, as well as a layer of insulation. Then a concrete screed is poured, which is reinforced with a metal mesh.
Preparatory activities
Before pouring concrete onto the floor, it must be carefully prepared. If this procedure is skipped, the characteristics of the finished layer will be poor.
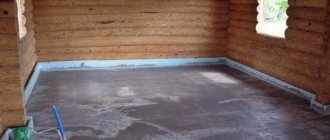
Alignment
Figure 2. Leveling the floor in the bathhouse
The specified procedure involves the following actions:
- Removal of the top layer of soil with organic residues to a depth of 40-45 cm.
- Leveling the base surface. At the same time, do not forget about arranging a pit in the center of the room. Water will collect in it.
- Installation of a drainage pipe with a diameter of 10-20 cm. It must be laid on a slope so that the liquid drains by gravity.
The quality of floor leveling can be checked with a laser or a regular building level.
Seal
Before pouring concrete floors in a bathhouse, the base must be thoroughly compacted. For this, a manual rammer or vibrating plate is used. At this stage, a cushion of sand (layer 5-10 cm) and gravel (layer 10 cm) must be installed. It needs to be compacted as much as possible. The cushion protects the concrete pie from heaving of the soil and rising moisture from it.
Diagram of a concrete floor
The installation of a concrete floor in a bathhouse requires compliance with a certain technology of work. There are many nuances that should be observed when pouring a concrete base.
The filling process can be roughly divided into several stages.
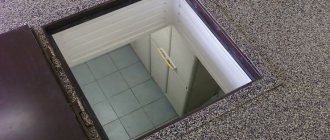
Step 1: creating a waste water drain
A bathhouse is a place with high humidity, which requires a well-established drainage system. The construction of a drain must be approached responsibly and planned in advance, at the design stage of a bathhouse building.
It is necessary to determine in advance the location of the drain and all items in the bathhouse. Drainage should not become a hindrance during bath procedures. The best option for its location would be a place located under the shelf.
Another important detail is the creation of a direct water collector, from which a pipe will flow into the main water collector. After straight installation, proceed to waterproofing and filling the surface.
Step 2: thermal insulation of the concrete covering
Concrete has the property of taking a long time to heat up, which is not very good in bath rooms.
To avoid prolonged heating, special attention should be paid to the insulation used in the concrete screed. Today there are several ways by which it is possible to insulate a concrete floor in a bathhouse. The choice is up to the end consumer.
Insulation methods
Firstly, you can make two layers of concrete screed, between which a layer of modern insulation will be laid. In this case, more time and physical costs will be required. This method is the most popular in the modern interior finishing market.
Secondly, you can put a layer of thermal insulation on a ready-made concrete screed. However, in this case it will be necessary to provide an additional layer of finishing floor covering. This will lead to additional financial and energy costs.
Most often, wooden flooring is chosen, which in conditions of constant humidity cannot last for a long time, even if it is coated with special compounds.
Step 3: pouring the first layer of concrete
Before directly pouring the first layer of concrete, the surface must be carefully leveled. If pouring is carried out on the ground, then it is necessary to carefully level the surface using crushed stone and sand, well compacted.
If laying is done on joists, use a building level to ensure that the surface of the joists is even. If this point is not observed, the concrete base may turn out to be uneven, which will lead to cracks and destruction of the reliable base in the future.
The first layer of concrete can have a thickness of 120 - 150 mm. It can be poured over the entire surface at once or divided into squares and poured in stages. After pouring, the concrete surface is leveled and left until completely dry.
We should not forget that the floor surface should have a slight slope towards drainage, otherwise water will stagnate on the floor surface and create trouble for the owners.
It will take several days for the concrete coating to completely harden and shrink. Only after waiting the necessary time can you proceed to the next stage of work.
Step 4: waterproofing and thermal insulation layers
For a bathhouse, the most appropriate option would be to install a double layer of waterproofing. Before laying the first waterproofing layer, you need to make sure that the concrete base is free of cracks, chips, unevenness and oil stains.
Several layers of liquid mastic are applied to the dried concrete. Each subsequent layer is applied only after the previous layer has completely dried. After complete drying, a roll of waterproofing material is applied to the mastics. There should be no cracks or gaps between the laid film fragments so that the surface is thoroughly protected from harmful moisture.
After arranging the waterproofing layer, you can begin thermal insulation of the concrete coating.
Today there are many insulation options. And also read the article: How to insulate the ceiling in a bathhouse. Materials such as foam concrete, expanded polystyrene, expanded clay, boiler slag or mats are well suited for a bathhouse.
To lay the heat insulator, the concrete surface must be smooth and free of defects. The optimal layer of insulation material is 50 – 100 mm. The choice of material depends solely on the preferences of the customer and his financial capabilities.
Step 5: pouring the second layer of concrete
After the waterproofing and insulation of the surface have been carried out, you can begin pouring the final layer of concrete coating. Smaller aggregate fractions are used for the mixture.
Provided that the bathhouse is small, finishing pouring can be done without additional reinforcement with metal mesh. However, if the area of the room is impressive, you cannot do without additional reinforcement. We also remember that concrete must be poured onto a clean and level surface.
The optimal thickness of the finishing layer of concrete coating is 100 mm. Don't forget also about the slope of the floor towards the gutters.
The top layer of concrete, like the bottom one, hardens within a few days. During this time, no manipulations are carried out in the bathhouse. After complete hardening after a few days, the concrete floor and bathhouse can be used for their intended purpose.
It should be noted that often the owners of a bathhouse resort to additional materials that are laid on a concrete base. For example, plank flooring is often used. In this case, you need to carefully treat the wooden floor elements with special antiseptics against rotting and fungus.
A good option for a bathhouse would be special wooden flooring, which can easily be taken out to dry after bathing procedures.
Finishing work
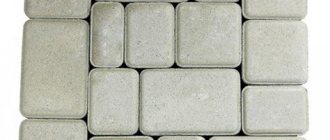
Ceramic tiles are a reliable basis for the finishing floor.
At the last stage of concreting the bath bases, they are finished. You cannot leave a concrete floor without finishing material, because in places with high moisture and high temperatures, even such a durable surface will soon begin to collapse. Ceramic tiles are often used as a finishing material. The tiles are installed with a special glue, and the tile itself should be selected with a textured surface to prevent slipping on it.
Return to contents
Drainage system in the bathhouse
As mentioned earlier, the drainage system and the necessary slope of the floor in the bathhouse must be provided in advance and without fail.
There are two options for installing drainage systems.
Directly under the bathhouse, if the screed is done on joists
This option is good because it does not require large energy costs on the part of the customer. In this case, a drainage hole meter by meter and about a meter deep is dug under the concrete base of the floor. The pit is filled with construction sand and large crushed stone.
It is important to provide an air exhaust system in the drainage pit so that accumulating wastewater does not create an unpleasant odor around the bathhouse building.
You can dig a drainage hole away from the bathhouse building. In this case, you will have to install a special drainage pipe.
This option is only good in cases where the concrete screed is raised above the ground surface. If concrete is poured directly onto the ground, this option for a drainage system is excluded.
Required materials and tools
A slab foundation can be made using the following materials and tools:
Slab foundation with waterproofing.
- shovels and bayonet shovels;
- scrap;
- hacksaws for wood and metal;
- grinder with cutting wheel;
- hammer;
- roulette;
- construction pencil;
- sledgehammer;
- jigsaw;
- tamping;
- cord;
- vibrator;
- concrete trowel;
- formwork panels;
- welding machine;
- electrodes;
- nails;
- geotextile fabric;
- pipes for sleeves;
- polyurethane foam;
- used oil;
- crushed stone fraction 5-20 mm;
- sand;
- polyethylene film;
- periodic profile reinforcing bars with a diameter of 12 mm;
- knitting wire;
- distancers;
- concrete B25 P4.
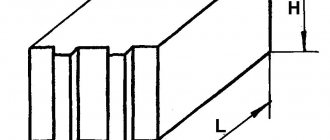
Recommendations for filling with your own hands
- The most difficult question is the thickness of the slab. Please note that if you decide to make a monolithic slab without any calculations, according to the principle, the thicker the better, then when choosing a base thickness of 20 cm, additional reinforcement may be required in some especially loaded places, since the weight of the building may be too big. The slab thickness of 25 cm allows the reinforcement frame to be knitted evenly, without additional reinforcement. A thickness of 30 cm will be quite strong and durable, but no savings will be achieved due to the large amount of concrete used.
- When making a sand and gravel cushion, pour the material in layers, no more than 10 cm each. Each layer should be thoroughly compacted. If you plan to use only sand to create a pillow, then each layer must be spilled with water.
- Before laying the insulation, the pillow should be covered with thick polyethylene to prevent water leakage from the concrete mixture. It is recommended to glue or solder the film at the joints or lay the sheets overlapping.
- Insulation boards must be at least 100 mm. Use extruded polystyrene foam as it.
- When creating a reinforcing frame, you should know that according to SP 52–103–2007, the slab reinforcement must be at least 0.3%. You can calculate this yourself: take a cut of the slab and calculate the total cut area of the reinforcing bars. After which, their percentage in the slab is calculated. It can be done simpler: as practice has shown, for low-rise buildings it is enough to make a two-tier reinforced frame with a rod thickness of 12-14 mm.
Using our recommendations and construction technology, you will certainly receive a high-quality and durable monolithic slab foundation for your future bathhouse.
Advantages and disadvantages
The main advantages of a monolithic foundation are:
- Low construction cost compared to other types of foundations. The slab is poured directly from a concrete mixer truck, without the involvement of highly qualified specialists and the use of expensive equipment.
- The good bearing capacity of foundations of this type is due to the large area and structural integrity.
- Thanks to the common slab on which the walls of the structure are located, their integrity is ensured, even during seasonal swelling of the soil.
- The design of the monolithic slab ensures the absence of large labor costs for excavation work.
The absence of large volumes of excavation work significantly reduces the estimated cost of the foundation being built due to the unnecessary use of heavy equipment (bulldozer, excavator, etc.) on the site.
One of the main disadvantages of a monolithic slab is the inability to combine the structure of this foundation and the basement.
For those who have groundwater close to their site, this is not necessary, but for dacha construction in the absence of groundwater, such a disadvantage can be critical.
The second disadvantage of this design is the high material consumption. Requires a lot of concrete and reinforcement.
The reinforcing mesh needs to be knitted, and in large volumes of slab bases this requires a lot of time.
And the third disadvantage of a monolithic slab is that pouring can only be done under favorable weather conditions.
But after comparing all the pros and cons, we can conclude that when constructing this type of foundation, there is a lot of savings on other materials and work, so such a foundation cannot be called particularly expensive.
How to make a drain cover
Drainage can be organized in several ways. This is either a funnel-shaped recess, or a slope in one direction and the installation of a gutter. A drain with a central pipe requires its presence, and it must be pre-installed at the construction stage.
This is not always possible; for example, in bathhouses with a concrete slab foundation, there is almost always no central drain. Then the second option is used.
A finishing screed is applied to the surface and it is given a slope. The gutter is also cast from concrete or taken ready-made, for example, from kits of products for storm drainage.
Construction technology
Monolithic slab foundations, as a rule, are built on difficult soils, and therefore the most stringent requirements are imposed on their design and construction, as well as on materials, which are regulated by the following regulatory documents: SNiP 3.03.01–87 and SP 50–101–2004.
The construction of all monolithic slabs is carried out according to the same scheme:
- Creating a project.
- Marking the contours of the future structure on the site.
- Preparing the soil for the construction of the foundation.
- Laying utility lines in the ground (sewage, water, etc.).
- Installation of a sand and gravel cushion of the required thickness.
- Laying a thermal insulation layer with its subsequent waterproofing.
- Creation of a reinforcing frame.
- Assembly and careful fastening of formwork.
- Pouring the “sole” with concrete.
If you decide to build a monolithic slab foundation, then you need to proceed according to the same scheme.