All experienced car enthusiasts know well: it is important that the area in front of the garage is properly equipped. Then it will be possible to enter and leave the garage in comfortable and safe conditions, without problems, quickly, regardless of the weather and time of year. Today we will take a closer look at how you can concrete and arrange the area in front of the garage with your own hands. We will note all the important points and give specific instructions.
The meaning of a garage entrance
It is known that our weather conditions are unfavorable most of the year. As a result, due to precipitation and temperature changes, puddles, ice, and dirt form in front of the garage. On an icy entrance, the car begins to slide, and the load on the suspension increases. In mud and water, slipping may occur. Ultimately, there is a risk of emergency situations occurring. In general, entering and leaving the garage often turns into a real problem.
Another negative factor is the accumulation of moisture at the threshold. There is an increased likelihood that water will penetrate into the room and materials will begin to dampen. The best solution is to make a garage entrance. You can install a screed or ramp, or a blind area.
Blind area
A good solution is a blind area. It is this that will allow you to get rid of the main problems, but at the same time do everything quickly, with minimal investment. The blind area is a strip of asphalt or concrete. At the same time, it is performed with a slope in the direction from the building in order to divert accumulating water from the garage space.
Be sure to ensure that the appropriate angle of inclination is maintained, otherwise the blind area loses its meaning. Experts write: it is advisable to adhere to an angle of 15-20 degrees, which is 20-30 mm per 1 meter of length. Thus, the end result should be a platform in front of the garage with a slope. You can determine the width yourself, but most often car enthusiasts prefer to make a platform of 1 meter.
From a design point of view, the tiled blind area looks great.
Ramp
A good convenient entry into the garage can be made if you build a ramp. The construction is simple and does not require large expenditures. Remember that it is easier to drive up a gentle ramp, but it will require more space.
You can choose a specific type of ramp, depending on the availability of free space, the location of the garage and house, gates, and driveway. For example, you can make a straight ramp or an entrance with a turn. Sometimes ramps are made not with an ascent, but with a descent. This is true if the garage is located in a basement or semi-basement.
The ramp parameters are as follows. The optimal length is 5 meters. The normal width is 30 cm larger than the size of the garage door.
Don't forget that you also need to think about the drainage system. So, immediately in front of the threshold there should be a collector for removing moisture, which must be closed with a grill.
Choose the material for your ramp.
- Metal. It is reliable and durable, but provokes strong slipping in the cold.
- Tree. The material is convenient to process, but is short-lived. Keep in mind that in a couple of years you will have to replace it.
- Concrete. It is advisable to choose this option. The material is more reliable and durable, and has a good price-quality ratio.
Craftsmen advise making a ramp from concrete. The main thing is to do everything correctly. Then it will last for many years.
Pay attention to the approved standards for the slope of the ramp in accordance with SNiP 21-02-99 clause 5.28: it should be no more than 10%. For example, if the height difference is 10 cm, the ramp at the bottom should be one meter long, that is, one in ten.
Screed
It is the screed that car enthusiasts use most often. This is a layer of asphalt concrete or cement-sand mixture. As a result, after laying the screed, you should have a solid, level area in front of the garage. Concreting areas in front of garages is widespread and enjoys great confidence among motorists.
It is necessary to make such an entry, especially if the soil itself is not sufficiently rigid.
Please note: even if the levels of the entrance and the floor in the garage coincide, you will always be able to raise the threshold and protect the garage from moisture. It is good to make a ramp with a slope of 25 degrees, and raise the threshold by 20 cm.
What is it for?
Everyone has seen the familiar and convenient entrance to the garage. But few people have thought about why it is necessary:
- Increasing safety and maintaining ease of entry and exit in any weather (the appearance of dirt, large puddles, ice, etc. is excluded).
- Creating an attractive appearance of a site or a separate object.
- Preventing moisture from getting inside the garage due to the absence of puddles, etc.
Let's compare different options for arranging the entrance to the garage
It’s worth looking at the differences between different types of garage driveways.
Paving slabs. The entrance, made of tiles, looks aesthetically pleasing. You can use special vibropressed tiles to make the structure more durable. There are also disadvantages. The tiles will freeze up; in addition, they do not cope well with the negative effects of salts. Therefore, after about three years it will still have to be changed.
Reinforced concrete slabs. When precast concrete slabs are used, they are placed on a bed of gravel and sand. The slabs are laid using a crane. Such a site will be durable, but it will be expensive to build. It is necessary to use technology, and it is not always easy to adjust the crane to the desired area, for example, when there are communications around it.
Asphalt. The material is quite practical: it is not afraid of salts, copes with bad weather, and is attractive due to its low price. This coating doesn't look very nice.
Screed. This solution is the most practical, and the screed will last for many years if everything is done correctly.
Many car enthusiasts place a screed in front of the garage. Let's find out more about her.
Decor
It’s far from the most functional addition, but together with lighting it can play a significant role in aesthetic design.
These can be plants, clay and other figurines, fountains, etc. As a rule, these are thoughtful parts of the landscape design of the entire site and their main role is to decorate. In the case of the zone in question, they should be comfortable and not interfere with check-in.
Also in this category it is worth considering a canopy. This is a part that will not only decorate the entrance, but will also perform a protective function - reduce the amount of precipitation that falls on the site and on the car, as well as reduce the influence of sunlight, etc. Such a canopy will also be convenient if the garage was originally intended for one car, but in the end two are used. Or guests often come by car.
We do concreting correctly
Now we’ll find out exactly how to properly concrete the area in front of the garage. Remember the recommendations and step-by-step instructions.
- The soil is removed to a depth of 40-50 cm. The pit must correspond to the size of the screed.
- The first layer is sand. It is compacted and watered.
- Then small gravel is laid.
- The formwork is made from boards. Boards 25 mm thick are suitable. The formwork is made evenly and secured. The boards need to be lubricated with a special composition so that they can be easily removed later.
- Insulation is placed on the crushed stone. The best option is polystyrene foam 5 cm thick.
- The concrete layer is poured.
- Then the reinforcing mesh is laid.
- Then you can pour the finishing concrete screed.
Remember that the screed must be leveled and then covered to prevent damage during drying. Such a concrete platform stands for about two weeks.
Composition of the mixture, how to calculate how much is needed
To concrete the site, you need to prepare a solution.
Materials you will need:
- Concrete. You should choose a brand no lower than M300, or better yet, M400 or M500.
- Water. About two times less than cement.
- Gravel, crushed stone. Without impurities and other debris, fraction – 1-2 centimeters.
- Sand. Should not contain clay impurities, because it can destroy concrete.
- Cement. With a high degree of resistance to moisture and frost.
The required thickness of concrete for a platform for a car depends not only on the weight of the car, but also on other existing loads. It is recommended to determine this indicator by referring to the technical instructions of GOST. A layer of at least 10-15 cm is considered optimal. According to the standards, you can select, including the thickness of the concrete, for a truck. The volume of the solution is determined by multiplying the depth, length and width of the base. The proportions are calculated from the fact that cement-sand-crushed stone/gravel-water is taken per 10 m3: 1: 2: 4: 0.5.
The components are mixed in a concrete mixer, where cement and water are first added, then sand, and lastly gravel/crushed stone.
Filling a slab in front of a 3 x 2.5 garage: tips from car enthusiasts
Let's consider the advice of car enthusiasts regarding durable pouring of the area in front of the garage with dimensions of 3 by 2.5 meters. This is what the garage guys offer.
- You can dig a trench to the freezing depth. Then 300 grade concrete is poured straight from the mixer. You will need to fill approximately 16 cubic meters. This is a good method that ensures longevity.
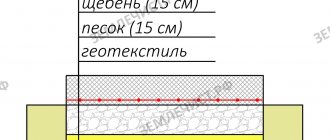
- A good solution is a reinforced platform. The soil is removed and the earth is compacted. Then geotextiles and a sand cushion 20 cm thick are laid. The reinforcing mesh is laid, and then concrete is poured.
- Some car enthusiasts even make a platform with piles. 6 piles are taken and installed below the freezing level. They are connected by a strip foundation, and a concrete slab is poured on top.
As you can see, there can be a lot of options.
Required materials and tools
Before pouring concrete on an inclined surface, you need to take care of all the tools, fixtures, and building materials that will be needed for the work. The process of pouring concrete at an angle is not easy and requires the most precise adherence to the proportions, conditions, norms and standards that make up the pouring technology.
Tools for pouring concrete at an angle:
- Construction level and cord for marking the surface and controlling the tilt height
- Concrete mixer for preparing mortar
- Several beacons installed as a guide during the concreting process
- Vibrating bar, mop or surface leveling rule
- Steel reinforcement to strengthen the screed
- Buckets and entrenching tools
Materials for pouring concrete at an angle: high-quality cement mortar (made independently from sand, cement, crushed stone and water or mixed from a purchased dry mixture).
Entry areas of different types
Let's consider what points you need to pay attention to when arranging the area in front of the garage in different cases.
- A private house. Here you have freedom of action. The most important thing is to ensure that the passage is always free. You should not be disturbed by other buildings. You also need to meet one more requirement: the road must be clearly visible to you when you leave the garage.
- Basement. Here it is necessary to maintain a slope: approximately 20 degrees. It is important to make the platform safe so that it does not slip. A good solution is to additionally protect it from precipitation with a canopy.
- Ramp in a garage cooperative. Here it is advisable for you to enter together. It should be level, with a slight slope and drainage system. The base can be made approximately 15 cm deep.
Lighting
Multifunctional element of the area in front of the garage. It can be presented with several options individually or as a complex of 2-3 solutions:
- A conventional lighting system consisting of several lights that are turned on together with street lights or separately from the garage or house.
- A system that can be activated remotely before arriving on site using a separate remote control or smartphone.
If the owner arrives at approximately the same time on weekdays, then special automation and programming systems can be used to automatically turn on at a specific time
- Lamps built into the ground or the site itself. This solution is often used in thoughtful landscape design, as it allows you to play with space in different ways.
- Motion sensing lamps. Also a practical and convenient option for those who arrive at different times and do not want to manually turn on the lights.
- Lights activated by a twilight relay that activates when the light level drops to a certain level.
Lanterns, built-in lamps or spotlights – it doesn’t matter. For the system to work, it is important to take care of:
- Protection from moisture. These should be either special lamps with water protection - now there are many options both in regular and online stores.
- Protection from vandals and thieves. Especially if the building is not on the site, but in a cooperative, etc.
- Color of light. White or yellow lamps are often used. One option looks more “sterile”, cold, and the second - warmer and pleasant.
Useful video: we make a blind area in front of the garage according to all the rules
If you decide to make a platform in front of the garage with your own hands, you will need not only instructions and recommendations. It is best to supplement the information received with visual material. Watch the following video clip.
The design of the blind area is discussed in detail here. It is quite possible to cope with such work on your own, to do everything as efficiently as possible. The main thing is to remember all the important points and act carefully.
Be careful: if you manage to make the right entrance to the garage, it will provide additional comfort and safety.
Stages of work
Before pouring concrete at an angle, you need to study the main stages of the work and strictly follow the order of their implementation. Ignoring even minor operations can ultimately lead to poor quality of the sloped covering and its inability to perform its functions.
Sequence of actions when pouring concrete at an angle:
1) Preparation of the base: thorough cleaning, marking the area
2) Installation of beacons, fixing them at the required distance from each other
3) Performing reinforcement to strengthen concrete
4) Preparation of a solution of the required brand, the consistency and strength of which are adequate to the degree of load of the future site
5) Pouring the concrete mixture at an angle, creating conditions for its effective setting and drying with strength gain