If you plan to build a house from self-made wood concrete blocks or monolithic wood concrete, then you will need wood chips. And in order to produce it, you can make a wood concrete chip cutter with your own hands according to the drawings. Using it, you will significantly improve the quality of the blocks, and subsequently, after completion of all construction work, it will be useful to you as a garden shredder for processing waste left after the autumn cleaning of the garden, as well as pruning shrubs and trees. You can make a wood chip cutter using a certain set of tools and available materials.
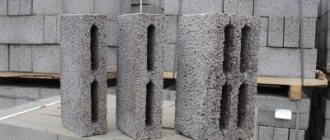
Arbolite blocks made from wood chips
After preparing the organic material, you can directly make wood-concrete blocks.
- The wood chips should be poured into a concrete mixer, water and cement should be added. The ratios should be as follows: four parts of water and three parts of cement are added to three parts of crushed wood.
- The mixture must be stirred until it becomes homogeneous and slightly crumbly in appearance. But at the same time, you can make a lump out of such a mass.
- The block mold is pre-treated with lime milk.
- The prepared solution is poured into a container in layers. Each ball must be compacted well.
- After the form is half filled with the mixture, you need to make one layer of ordinary concrete, put in a reinforcing mesh and fill it again with the concrete mixture. After this, the mold is completely filled with the mass with wood chips. You can make blocks without a mesh, but such blanks are much stronger and more durable. Each compacted layer must be pierced in several places with sharpened reinforcement. This will remove any air bubbles.
- When a couple of centimeters remain to the edges of the container, you need to fill in the plaster solution and smooth the surface well. This method will allow you to obtain finished blocks from the already plastered side.
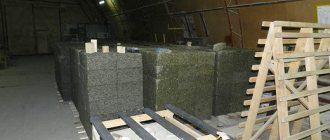
- This material hardens for a day.
- The finished block cannot be used immediately. It is better to leave it in the air under a film for fourteen days at high air temperatures. If the degrees outside are below 10, then the hydration period increases.
Aviary for dogs: photos of structures designed for a pack
To support a whole flock, you can build one structure that will take into account the needs of several animals. Such structures are necessary in cases where there are several dogs on the site or the owner is breeding them. Most often seen in the photo, enclosures for two dogs or more animals have the appearance of tunnel structures. They are good for keeping a pack, but are completely unsuitable for housing one pet.
How to make wood concrete with your own hands
After assessing the main operating points, you can begin the wood concrete production process
It is important to consider for what purposes the material will be used - private or commercial. In the first case, it is not necessary to buy expensive units and equipment
Equipment
The key unit for home production of wood concrete blocks is a wood chip cutter. You can build it yourself by ordering the main part from turners. In this case, costs will decrease by 4 times. The cutting elements should be installed at a minimum angle, and the neck for feeding chips should be secured vertically.
A homemade wood chip cutter consists of the following units:
- Car spring.
- Metal studs.
- 2 bearings per axle.
- Axis.
To make the last part, it is better to use a hexagon, having previously organized the seats for the bearings. There are a lot of training videos and instructions on the Internet for implementing such a project.
Creation of a hammer machine
At the next stage you will have to build a hammer machine. You need to make holes in 2 disks for the axles and secure a washer 10-20 mm wide. On one side of the axle, a thread should be cut for the nut. If you have a lathe, it is better to machine the shaft and remove the knife disk from it to create a rectangular protrusion for attaching the second disk.
If possible, it is necessary to organize 2 height differences for the discs, while the final shaft thickness should be at least 50 mm.
The finished shaft is mounted on bearings and a support. If the size of the outer casing is smaller than required, it will have to be replaced or remade. The outlet hole is sealed with a steel mesh with an optimal diameter.
Bins and forms
Industrial bins and forms are sold in standard sizes that correspond to the parameters of foam concrete. Wood concrete is characterized by dimensions of 20, 40 or 60 cm. Creating blanks with your own hands is problematic, so it is better to cut metal sheets with a grinder and prepare a typesetting mold.
Development of technology
The most difficult stage is developing the technology in order to determine all the intricacies of the equipment’s operation. It is better to divide the application of chemicals into several separate stages. To begin with, sodium chloride and aluminum sulfate are added, and the remaining additives are placed in the hopper before mixing.
Liquid glass is used later, when the wood chips are ready. The final solution is poured into molds, compacted and left for some time to harden. The setting process takes 2-3 days, after which the molds are dismantled and the blocks are placed to dry.
Requirements for crushing machines
Having prepared the drawings and diagrams of a wood concrete chip cutter, you can proceed directly to its manufacture. Individual elements of the machine are turned using turning equipment, and everything else can be done from improvised means at home.
First you need to find a suitable power plant that has a power of 4-5 kW. As for the parameters of the belt drive, they are determined taking into account the number of pulleys. In any case, the maximum permissible speed should be at least 1700-1800 rpm. To increase the operational safety of the device, all cutting elements must be protected with a continuous steel casing.
The presence of a clutch in the drive system is not provided. This is explained by the fact that when the machine is turned off immediately, there may be particles of wood chips left inside, which will remain in the gaps and significantly increase the starting torque of the engine. This phenomenon can lead to overheating and complete damage to the power plant.
Models made of thick sheet steel with a diameter of 10-12 mm are used as a cutting disc. In addition to its main purpose, this element functions as a flywheel, absorbing uneven rotation of the shaft when chips get stuck. The inside of the disc is carefully polished.
When creating cutting elements at home, tool steel under the grades U7A or U8A is used. The hardness of knives after sharpening should be 58-60 HRC. The sharpening should be one-sided, and the height of the working edge should not exceed the height of the mounting grooves of the disk. To make it easier to set up and adjust the tool, the mounting holes in the knives are made oval.
The sieve is created from high-carbon steel with grades starting from 40. Holes are made in the finished steel sheet through which the raw materials will be passed. When making chipping hammers, it is recommended to use spring steel. But excessive elasticity can lead to inertial tossing of the cutting elements during operation. Due to the high speed of rotation of the working shaft, this phenomenon can deteriorate the final quality of the product, so tool steel is the best solution for chipper hammers.
We make a wood concrete chip cutter with our own hands
To make a wood concrete wood chip cutter, you need to prepare all the necessary parts, after which you can begin assembling the unit. Some parts are worth looking for, others are quite possible to do yourself.
Disc with knives
The diameter of the disc should be up to 30-35 centimeters, thickness – 2 centimeters. To eliminate the possibility of jamming of hard/large pieces of raw material, the disk must operate on the flywheel principle, which is why it is made heavy.
You can take a metal blank or cut it out of a piece of sheet steel, then saw through one central hole in the part (to seat the shaft, taking into account the keyed fastening), and also make several mounting holes, 3 grooves, through which the cut pieces of wood will be sent under rotating hammers.
To make knives, take car springs, make 2 holes in each of the knives, then countersink them (you need to recess the screw heads as much as possible), attach them to the disk using bolts with a special countersunk head for a hexagon, due to which it is possible to create a reliable and tight connection . In addition, in this case the bolts will not be able to rotate when the nuts are compressed on the other side.
Hammers
This part is a flat plate up to 5 millimeters thick, located in the rotor. Hammers are responsible for additional grinding of raw materials; it is better to buy them ready-made. The distance between the hammers themselves directly in the crusher should be 24 millimeters.
Sieve for wood chips
To make a sieve, inside which the grinding chamber will be located, take a metal cylinder with a diameter of 30-35 centimeters, made from a sheet of metal 94.2-100 centimeters long.
In the cylinder itself, cells are made with a cross-section of 8-12 millimeters, preferably using a core or a punch (do not drill), so that the edges of the cells are torn or sharp.
Protective cover, funnel, hopper and frame
To create a protective casing and receiving funnel for the receiving hopper, sheet iron 8-12 millimeters thick can be used. The sheets are cut to size and welded according to the drawing. The parts are cut according to previously known sizes and “patterns” (they can be prepared in advance using thick cardboard). Stiffening ribs are made from pipes, channels or angles.
The cutting unit itself should not even minimally cling to the walls of the unit body; it is desirable to place it freely in the body, so the optimal diameter of the flywheel is made smaller in size by about 3-5 centimeters than the size of the body.
The main parts of the crushing unit: these are shaft journals on which support bearings, hammers and a cutting disc are mounted. To form the working shaft, it is enough to cut holes, inlet/outlet sockets intended for supplying raw materials and exiting chips.
The hopper for receiving raw materials is welded at an angle to the body. Electric or mechanical drives are mounted at the final stage: an electric motor is attached to the frame, then pulleys of the required size, and all components are connected by a belt drive. Usually, ordinary car belts of the appropriate diameter are used for this purpose.
Engine
The amount of operating costs and the productivity of the wood chipper will depend on the type of engine. An electric motor is considered the most environmentally friendly option; it is lighter than an internal combustion engine, produces less noise, but also exhibits lower power. It is worth remembering that an electric chip cutter will depend on surges in the voltage level in the network.
A device with a more powerful gasoline engine will work longer, be more productive, and does not require a network or outlet. But the internal combustion engine makes a lot of noise, significantly pollutes the air, and requires constant maintenance and regular refueling.
Provided that the assembled wood concrete wood chip cutter is designed accurately and there is no deviation in coaxiality, you can use a coaxial circuit instead of a belt connection, mounting the shaft connection through a coupling.
Basic parts for installing a homemade crusher
DIY branch chopper. This is a great way to acquire useful equipment for your garden plot, without extra costs. To install the unit, you must have professional skills and experience in plumbing.
The operating principle of a homemade wood chipper is similar to a regular household meat grinder: it is chopping wood into chips. The machine crushes the wood, and the output is chips. For the design, it is necessary to select a suitable motor and blades, housing elements and connecting parts.
Engine selection
A do-it-yourself chip crusher is mounted taking into account the type of operation of the device and its power. The grinding process can be carried out by either a gasoline or electric motor. Each of them has its own advantages.
The electric motor limits the operation of the crushing device to the access area to the power source. It does not produce exhaust, which allows the mechanism to be used in enclosed spaces. A gasoline engine does not depend on the electrical network and has higher efficiency and, more often, power.
When choosing an engine, it is necessary to take into account the power parameters:
- Motors with a power of 3 - 4 kW. will cope with chopping branches with an average diameter of up to 4 centimeters.
- Units with a power of 6 kW. Suitable for chopping large branches up to 15 centimeters in diameter.
Industrial wood chippers, depending on the model, are equipped with a milling system, a disk or disk-milling knife.
When a wood waste crusher is assembled with your own hands, simpler cutting elements are used:
- Set of circular saws.
- Knife - disk design or two-roll system equipped with 8 knives.
The most popular shredding system is circular saws.
Crushing system
When choosing circular saws, you should give preference to products with carbide tips; in this case, you can avoid frequent sharpening of the blades.
Chopper body
A do-it-yourself wood chipper is mounted on the basis of a welded frame structure made of steel pipes, inside of which the engine will be installed. In order to ensure the mobility of the unit, it is recommended to equip it with wheels. Sheet metal or galvanized steel can be used to make the casing.
A homemade branch chopper made by yourself may not have a presentable appearance, like an industrial unit, but the list of its advantages includes such important advantages as:
- Low cost.
- Ease of operation.
- Efficiency at work.
Recommended reading:
Recycling of construction waste
Industrial waste management system
Buy or make wood chips yourself
As soon as a private developer has decided to independently produce wood concrete blocks, the question arises whether it is more profitable to buy or make wood chips for construction blanks. If you plan to build a small country house, then purchasing ready-made raw materials will reduce working time and financial costs.
Specialized equipment for making wood chips is not cheap. Processing with chemicals takes time.
If you decide to produce wood-concrete blocks in large quantities, or to engage in construction activities, then it is more profitable to produce wood chips yourself.
The process of making wood chips for wood concrete with your own hands consists of the following sequence of actions:
- selection of suitable wood;
- obtaining wood chips using special equipment;
- processing wood chips with chemical reagents to remove sugars.
Requirements for wood chips for arbolite blocks:
- No foreign matter: stones, ice, clay, sand.
- No rot, mold or other damage.
- The content of tree bark is within 10%, pine needles - 5% of the total mass.
- Standard size 40105 mm.
When making wood concrete with your own hands, the presence of sawdust up to 30% is allowed. In this case, cement consumption increases, and the strength indicators of the finished material decrease. Arbolite blocks with an admixture of sawdust have increased heat-saving properties. Used as an insulating building material.
What sawdust is needed for wood concrete? Sawdust of coniferous and deciduous wood is used, as in the preparation of wood chips. For the purpose of purchasing, it is possible to contact woodworking enterprises.
What it is?
Wood processing waste is a valuable building material. After crushing to a certain size, they become a filler for concrete mixtures. Wood chips are used for wood concrete or, as it is called, wood chips. Arbolite blocks have a lot of advantages. Affordable cost plays a significant role. In addition, a house built from wood concrete practically does not require additional insulation.
Wood chips also have other advantages. The material is suitable for use as:
- fuel for stoves - in pure form or in the form of granules;
- decor - designers offer it in a painted and natural form for decorating summer cottages and even parks;
- component for the manufacture and decoration of furniture;
- an ingredient used in smoking various foods.
In production, fine fractions are used to make other building materials: cardboard, plasterboard, chipboard and fiberboard.
Formation of jumper blocks
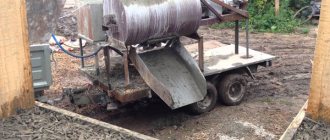
The solution is poured into suitable forms using buckets or shovels. The tamping device is created from timber and is used only after the container is completely filled with solution, forming a small slide on top.
There is no need to tamp after pouring each layer. The randomness of the mixture ensures high quality. When laying, you can slightly press individual sections so that the material is laid tightly. Tamping an incomplete form is a mistake and leads to separation of layers and poor quality of their setting.
The mixture should remain in the mold for 2-3 days, after which it must be dismantled and the contents placed in the open air to dry. If there are no financial restrictions, it is recommended to purchase a vibrating table that ensures compaction of the material in the molds.
Advantages and disadvantages of grinding
Stump grinding equipment is used only in cases where the goal is not to completely destroy large roots. Most often, the need to grind stumps arises during preparatory work before changing the design of a site or during the construction/repair of roads or pedestrian paths.
In addition, stumps are crushed in cases where their uprooting could lead to too much disruption of the soil structure.
For example, you cannot uproot a stump that stands next to the house, because there is a high probability that one or more roots pass under the foundation.
During uprooting, such roots can damage the foundation or loosen the soil underneath, which will increase the fracture stress inside the foundation.
Additionally, removing roots under the foundation creates cavities that then fill with water. If the foundation is installed above the freezing level of the soil, then during frosts the water in the cavities will freeze and severely damage the walls of the house due to frost heaving.
Grinding is also preferable when preparing a trench for the foundation, because extracting the roots loosens the soil, so you will have to repeatedly compact the bottom, adding earth and sand as the voids are filled.
In addition, uprooting is preferable where it is planned to grow cereals or fruit plants, because when plowing or harrowing the soil, thick surface roots can damage equipment or the tractor.
Production principle
The operating principle of wood chippers comes down to several stages.
First, waste - boards, slabs, trimmings, knots and other raw materials - are placed in the loading hopper. From there, all this is fed into a closed chamber, where a powerful disk rotates on a shaft. The flat disk has slots. In addition, several knives are attached to it. The knives move at an angle. Due to this, the processed wood is divided into small plates with an oblique cut.
Through the disc slots, the plates penetrate into the drum, where steel fingers carry out further grinding. The pins and plates are mounted on the same shaft as the disc. The platters are mounted very close to the drum. They move the ground chips along the inner surface of the drum.
The lower part of the drum is equipped with a mesh with cells that provide the specified dimensions of the chips. The cell size varies from 10 to 15 mm in diameter. Once the ready-to-use chips enter the lower zone in a vertical direction, they pass through the mesh into the tray. The remaining particles rotate, held by the plates, for another circle. At this time, their position is constantly changing. Having reached the bottom in the desired direction, they also end up in the pan.
Chip cutters can have both electric and gasoline drives. The engine power of a small device is in the range of four to six kilowatts, in more respectable ones it reaches 10-15 kW. The capabilities of the device depend on the power. With its increase, the volume of production per hour of operation of the mechanism increases.
Purchasing a device
If you want to purchase a wood chipping machine in a store, you need to understand that it can be very expensive. The average cost of a factory model is about 3 million rubles. Naturally, such equipment demonstrates high performance, but it is not advisable to buy it for domestic purposes. Instead, it is better to find separate units for drying, crushing and coloring wood chips, which will cost several times less.
Depending on the method of crushing the feedstock, crushers are disc and rotary. Representatives of the first group are equipped with sharp disk knives, while rotary models operate on the basis of a rotating working chamber or drums where the knives are located.
When choosing the appropriate type of crushing equipment, it is important to pay attention to the thickness of the housing. It is desirable that it be at least two centimeters at the site of the cutting unit. Otherwise, when operating at high speeds, the mechanisms may become deformed or even fail.
Otherwise, when operating at high speeds, the mechanisms may become deformed or even fail.
How to make a chip cutter with your own hands: drawings, design
At the final stage, the chips fall onto the sieve using the blades and fly out of the chip cutter through the unloading hole. At the entrance, the receiving hopper is made in the form of a funnel in order to simplify the supply of raw materials for processing and make this process safe for hands.
When the rotation speed of the shaft with the disk increases, a certain amount of wood raw material may naturally grind into dust; this is bad, although the productivity of the wood chipper increases.
The necessary drawings according to which a homemade rotary hammer crusher can be made for the production of wood concrete are presented below. Since the equipment is homemade, the dimensions of the parts will have to be selected based on your own material. Working drawings of different wood chippers may differ in size and the presence of certain components, but the operating principle remains the same. After voltage B is applied to the equipment, the electric motor transmits its rotation using a V-belt transmission to a drum with blades 4 through a pulley 14 and a shaft.
You only need to put wood waste into the feed hopper, which is immediately processed into chips of optimal length up to 25 mm. By assembling a wood concrete wood chip cutter with your own hands and maintaining the distance between the hammers in a wood concrete crusher, you can produce wood chips up to 25 millimeters long and about 5 millimeters wide. Such wood chips are ideal for making wood concrete blocks or preparing monolithic wood concrete. It is performed at a certain angle, due to which the branches are not thrown back.
If you plan to build a house from self-made wood concrete blocks or monolithic wood concrete, then you will need wood chips. Using it, you will significantly improve the quality of the blocks, and subsequently, after completion of all construction work, it will be useful to you as a garden shredder for processing waste left after the autumn cleaning of the garden, as well as pruning shrubs and trees. You can make a wood chip cutter using a certain set of tools and available materials. The main components of the machine are a chipping disk with knives and a rotor with hammers and blades.
Before constructing a wood chip cutter with your own hands, you need to prepare all the parts. To make the disk you will need a metal sheet mm thick.
What does a wood chipper consist of?
The diameter of the finished product should be approximately mm. A hole is made in the center where the key is placed, and symmetrical slots are made along the outer perimeter. Chips will be discharged through them.
Holes are prepared for fastening knives. You can assemble a wood chip cutter with your own hands using a ready-made disk. In any case, the disk will simultaneously act as a flywheel.
To prepare knives, each of which must have two holes, it is most often recommended to take springs from a passenger car. Chip cutter knives are secured with bolts that are unscrewed and tightened with a hex key. This fact is explained by the fact that the bolts under the screwdriver are not tightened so tightly. Hammers are flat metal plates, the thickness of which is about 5 mm.
They are located on the rotor. These are the parts that are better to buy ready-made. It is necessary to prepare a sieve. When installing knives into a chipper, it is necessary to ensure the required alignment of the knives beyond the plane of the disk.
The difference in the display of knives should not exceed 0.2 mm.
Grinding mode
The cutting edges of the knives must lie in the same plane, the gap between the cutting knives and the counter knives must be uniform 0. In order to increase the resistance of the cutting edge of the knives to chipping during operation, it is recommended:
After sharpening the knives to the required angle, carry out additional sharpening on the back side of the chamfer at a width of 0. After each sharpening, the knives must be kept at rest for at least x hours to relieve fatigue stresses. Note: Chipper knives made from other steel grades are accompanied by additional information in the instructions.
About company. Photo gallery Video gallery. Available in stock: 26 units. Shipment of the Junkkari hjg chopper to the city. Wood splitter hydraulic machine for splitting firewood Japa Finland Quantity: 1 pc. Firewood packer Palax Motti Quantity: 4 pcs.
Firewood packer Palax Packer Quantity: 2 pcs. HJ - Wood chipper from a tractor with hydraulic feed Quantity: 3 pcs. Sharpening machine - IRM Quantity: 1 pc. Band sawmill ZL-60V Quantity: 1 pc. W-Forrest - rotary mulcher with diameter up to mm. Quantity: 1 piece Ordering spare parts. Chippers Wood chippers. Wood splitting equipment Wood splitters and splitting axes.
Homemade wood chipper
The high cost of industrial equipment has led to the fact that many began to make a crusher at home from scrap materials. The principle of operation of a homemade wood crusher is similar to a conventional electric meat grinder, and to create it you need to have:
- Several metal corners or pipe sections,
- About twenty circular saws,
- A couple of pulleys
- Stud made of durable metal,
- Several bearings
- Belt or chain
- A few nuts
- washers,
- Metal,
- Balloon of paint.
For a home wood chipper, a diesel or electric motor is equally suitable. Electric is safer and easier. The downside is low mobility and dependence on the availability of electricity. The diesel engine is more powerful and can be used both indoors and outdoors, but it is noisier. The disadvantage of diesel is the release of exhaust gases during operation. If you plan to process twigs up to four centimeters thick, then a motor with a power of up to four kilowatts is sufficient. To grind larger material, you need a motor with a power of at least six kilowatts.
Circular saws are most often used as the cutting unit, but they can also be replaced with a two-roll device with knives, or by combining discs and knives. Working with circular saws is the easiest. For high-quality cutting, the thickness of homemade knives should not be less than seven centimeters.
The frame of the crusher is welded from metal pipes or a corner, and a motor is mounted on it. The body is made from a sheet of durable metal. Cutting discs are threaded onto a long pin, alternating them with washers. When the cutting unit is assembled, a pulley is put on the axle. You can use a pulley from any passenger car generator. And to ensure rotation, a pair of bearings are installed on the axis. The frame and casing are painted with protective paint.
What should the wood chips be like?
Wood filler for wood concrete has its own GOST. At the level of the state standard for wood chips, strict requirements are established.
Three main parameters are identified:
- length no more than 30 mm;
- width no more than 10 mm;
- thickness no more than 5 mm.
The optimal dimensions for width and length are also indicated:
- length – 20 mm;
- width – 5 mm.
New requirements appeared with the adoption of GOST 54854-2011. Before this, there was another GOST with lesser requirements. Then it was allowed to use longer chips - up to 40 mm. In 2022, “liberties” in the size of the filler are not allowed.
The standard also regulates the presence of impurities: bark, leaves, pine needles. The material should be cleared of soil, sand, clay, and in winter - from snow. The presence of mold and rot is unacceptable.
Operating rules
The key to long-term, trouble-free operation of a wood chip cutter is regular maintenance and proper operation. It is necessary to control the tension of the belts and clean the internal cavities of the chopper. The bearings are lubricated every 150 hours of operation. Knives are sharpened as needed, this is done 1-2 times a week.
It is important to follow safety precautions:
- Work clothes should fit snugly to the body. Hanging parts are not allowed. You must work in gloves, safety glasses or a shield, and headphones.
- Before turning on the equipment, the tightness of all components is checked. A visual inspection is carried out to identify any faults.
- You can only turn on an empty crusher. Wood is loaded only after it has been fully launched.
- You must not come closer than 5 m to the chip ejection zone. Cleaning of chopped wood is carried out only when the equipment is turned off.
- Wood dust is highly flammable, so you should not smoke during work and strictly follow fire safety rules.
Branch disposal
In the process of improving the plantings of city parks, during logging, while working on a personal plot, etc. wood waste is inevitably generated, the lion's share of which is ordinary branches. Their disposal today involves one of the following methods:
- Removal of branches to a landfill. An extremely irrational and outdated method, but one that still exists.
- Burning. A method widely used by all gardeners. It requires compliance with special safety regulations; as a result of the process, it allows one to obtain wood ash, which is used as a good fertilizer.
- Recycling. The most economically and environmentally sound way. It includes several different methods that are successfully implemented both in industrial enterprises and on the scale of private farming.
Garden wood shredders
Branches, bushes, and dried grass are collected at the dacha and garden plot. They need to be disposed of. A wood chipper can make your work easier. The advantages of the equipment are:
- Small dimensions.
- The finished raw materials can be used as fertilizer.
- Efficiency.
- Low energy or fuel consumption.
The choice of unit depends on the size of the site and the volume of work. Equipment for recycling wood waste is produced by manufacturers from different countries. One of the disadvantages is the high cost.
Russian industry produces shredders at affordable prices. If the installation is needed for seasonal use at a summer cottage, it can be rented.
Technical capabilities
The garden unit can be equipped with an electric or gasoline engine. Equipment that consumes electrical energy is silent in operation, light in weight, and small in size. But the need to have a power source on hand makes it not always convenient to use.
A gasoline shredder is more bulky and noisy during operation, but it can be used in any corner of the garden. It is more powerful than electrical equipment and processes a larger volume of wood.
Assembling the wood chipper
We carry out assembly in the following sequence:
- We assemble the chipping unit: we place bearings, a disk with knives and hammers on the shaft;
- we prepare the housing for installation: we cut out holes for the working shaft, receiving hopper and chip unloading; we drill the necessary holes for the assembly bolts and weld the receiving hopper funnel at an angle;
- We assemble the drive: we fix the engine on the frame, mount the pulleys and put on a belt (can be a car belt);
- We attach the chipping block to the frame and cover it with a protective casing (to avoid accidents);
- We perform an idle test run.
Advice! During the first week, it is recommended to use the wood chipping machine at minimum load and for a short time to avoid jamming of the bearings, which can occur as a result of their overheating.
Types of Garden Shredders
Machines for crushing wood waste are also called wood chippers, shredders, and wood chippers. Despite the different names, the units are designed almost identically. Any branch crusher consists of:
- Steel frame to which all parts of the mechanism are attached;
- The main drive is an electric motor or a gasoline (diesel) engine and a shaft with power take-off;
- Cutting mechanism;
- Main drive (mainly belt);
- Protective casing;
- Two bunkers - for loading branches and unloading wood chips.
In fact, homemade wood chippers have unequal cutting mechanisms; other parts can only have different sizes. If you study the drawings of crushing parts posted on the Internet, you can find several common options:
- Circular saws are fixed in the middle of the shaft; their teeth should be made of hard alloys.
- Designs reminiscent of jointer devices on circular machines. Several longitudinal grooves are made along the shafts (2-6, it all depends on the engine power) and chopping knives are secured (material: carbon steel). The branches are fed for crushing at an angle of 90 degrees to the knives.
- Disc crushers, where knives are attached to the planes of a steel circle located on a shaft. The branches are fed here at an angle of no more than 45 degrees; this is ensured by the design features of the bunkers.
- Chippers with two shafts with synchronous rotation. The cutting edges of the knives will converge at a single point during rotation. Thus, not only the branches are crushed, but also they are captured and self-pulled into the structure. The wood is fed perpendicularly to the knives, which rotate.
To increase torque and cutting force, homemade wood chippers use flywheels mounted on the free ends of the shafts. An exception is disc crushers, where a heavy metal circle acts as a flywheel, to which knives are attached.
Rules for choosing wood chips for smoking
Wood shavings, chips or sawdust are purchased or produced on your own.
When choosing, take into account the size, structure and type of wood, since the characteristics of the smoke smoke, taste and aroma of the finished dish depend on this.
Basic rules for making wood chips at home:
- The wood chosen is healthy, without mold, signs of rotting or damage by insects.
- The raw materials must be without bark, which contaminates the walls of the smokehouse and gives the smoke an unpleasant taste due to the high resin content.
- The wood chips should be moderately damp. If it is too damp, it will smolder poorly with the formation of a large amount of water vapor. If it is overdried, it catches fire easily, and an open flame melts the fat, making the dish tough.
- The optimal size of wood pieces is 2–3 cm.
You should not use coniferous wood for the production of firewood and wood chips, as it contains a large amount of resins and imparts bitterness to the dish. For the same reason - due to the high concentration of resinous substances - birch is rarely chosen for smoking.
Universal types of wood are aspen and alder. They produce clean smoke without dangerous impurities and are suitable for smoking any product.
Thanks to alder shavings, delicacies acquire a beautiful golden-brown color, slightly sour taste and rich tart aroma.
Multicomponent mixtures based on alder and aspen are also popular. To achieve the best result, the wood chips must contain at least 60% alder or aspen shavings or fruit tree wood.
Independent material procurement
When you have decided what to make wood chips from for smoking, it is time to move on to the next stage. Preparing wood chips is considered a painstaking task and requires a certain skill from the master. Errors will not lead to irreversible or fatal consequences if corrected in time.
Selecting wood is not that difficult. You just need to evaluate its appearance and make sure there is no mold or wormholes.
It is more convenient to prepare material for smoking with the help of special equipment, represented by machines for removing bark, grinders and crushers. But this method cannot be called accessible. The high cost of all devices makes it practically impossible to use them. Naturally, this approach is practiced on an industrial scale, but the volumes of raw materials are different there. If there had not been a more accessible solution to this problem, then this article would not have existed, so making wood chips at home is within the power of anyone.
First you need to prepare all the tools and materials so as not to be distracted during the process. When chopping wood chips, you need to maintain concentration, and the search for the next tool will be very distracting, so immediately place a small sharp hatchet, a log of wood from which you decided to make wood chips, and a container of water near your workplace.
- Using a hatchet, remove the bark from the log. It contains a lot of resin and tar, so when choosing wood, you need to start with the bark.
- Further actions depend on skill and convenience. If you have a board in front of you, then it would be more expedient to make strips of it 2 cm thick. The strips are made by cutting the board or part of it along the grain. The resulting blanks should be chopped in a perpendicular direction at intervals of 2-3 cm.
There is another more convenient way. The logs are cut into rings using a circular saw or chainsaw. The width of the ring should be 2-3 cm and still leave a margin for cutting (tolerance). The resulting rings are easy to chop into chips, since the cut was made across the fibers, and you will have to chop along the fibers.
To proceed to smoking, chopped wood chips must first be soaked. The issue of humidity is of key importance when processing foods with smoke. Practice shows that its average value should be in the range of 60-65%. Low humidity tends to dry out the fibers of the product, resulting in a dry and harsh-tasting product. Exceeding the established standards makes the smoke dense, and this is fraught with the appearance of a bitter aftertaste. Since it is sometimes impossible to measure the humidity of smoke, a fairly wide range is set for wood chips, it is 50-70%.
There is one algorithm that allows you to obtain the desired humidity without a special tool. The technology for its implementation is to measure the mass of wet and dried wood chips. First, the wood chips are soaked in water for 4 hours. It is believed that after this procedure its humidity will be 100%. Let's say we need to get a humidity of 75%. To do this, we sequentially perform the following:
- measure the mass of wet wood chips;
- multiply the resulting value by 0.75;
- exposing the chips until its mass becomes equal to the calculated value.
Despite the fact that this method allows only a rough estimate of moisture content, it is considered the most affordable, allowing the production and preparation of material for smoking.
The preparation of shavings or wood chips does not always occur before actual smoking. In this case, the issue of storing the material arises. First, select a room with low humidity. Then we pour the wood chips into a cotton bag so that air can easily penetrate through its walls.
However, no storage method guarantees moisture retention. After long-term storage, a test ignition is required. If the wood chips catch fire, you will have to soak them again. At high humidity it will not even begin to smolder.
Rules for assembling the machine
It is necessary to strictly adhere to the sequence of assembly operations.
- The grinding unit is assembled. A disk with knives, hammers and bearings inside their housings are “mounted” on the shaft.
- The lower stationary part of the body is installed on the frame.
- A grinding unit with a sieve together is inserted inside, the first must be inserted into the second.
- The chopper rests on the frame using bearings, which are immediately bolted to the frame.
- The sieve must be attached to the stationary part of the housing with screws or bolts. To do this, ears are welded to it in advance.
- A large pulley is mounted on the end of the shaft protruding from one bearing.
- The electric motor is installed and belts are put on the pulleys.
- The funnel is welded or bolted to the body of the wood chipper.
- The upper hinged part of the housing is mounted on hinges.
We can assume that the wood chipper for wood concrete is made with our own hands. All that remains is to carry out the electrical installation and the first start-up of the equipment. An electric motor requires three phases to be connected and an automatic machine selected for its power to be installed. There are two electrical installation options:
- assemble a separate unit and install it with a start button directly on the frame;
- Leave the button on the machine, and mount the machine in the distribution panel of the room.
The first option is better because it makes it possible to move the wood concrete chipper (with a used or new electric motor) to any place, like a full-fledged piece of equipment.
Materials and tools
Most of the components of the shredder can be selected from supplies available in the household. For example, the frame is perfectly assembled from metal corners, channels and pipes. An electric motor is usually purchased or taken from a mini-tractor. The cutter used must necessarily have large teeth, and the circular saws must have a diameter of 100 to 200 millimeters. If the work is done on a shaft, then gears are purchased in quantities of a couple of pieces, the same applies to the pulley, as well as to the shaft itself - there should be two of them. Knives can be made from car springs if you have a milling machine.
Pouring the monolith
To fill monolithic walls, it is necessary to use a solution with a superplasticizing additive. You also need to take care of reinforcement, as when installing monolithic reinforced concrete. Metal elements will protect the structure from spreading under intense load and provide it with improved strength properties.
Reinforcement is made using steel, fiberglass or carbon fiber reinforcement with a diameter of 16 mm (for vertical reinforcement) or 8-10 mm (for horizontal reinforcement). The frame must be secured before installing the formwork. Otherwise, connecting the elements to each other will become more problematic.
All available materials are suitable for arranging formwork.
It can be:
- Cement particle boards.
- Walls from old cabinets or doors.
It is also possible to use a permanent structure made of polystyrene or foam. However, they will worsen the vapor permeability of wood concrete. The best solution is fiberboard.
Principle of operation
To understand how a shredder works, you need to consider what it consists of. The chip cutter device is shown in the drawing below.
The basis is the chopping and crushing mechanism. It consists of a chipping disk on which radial knives are located. There is also a rotor with blades and hammers. The disk rotates due to connection with the shaft, which in turn is mounted in roller bearings. Through the receiving hopper, the wood reaches the knives. The cut parts fall down to the hammers, which crush the wood chips even larger. Due to rotation, centrifugal force is generated. Under its influence, the wood chips fall onto the sieve and are removed through the discharge hole.
The existing drawings of the wood chipper differ in some individual details. But the schematic diagram does not change. Since the parts may vary, the dimensions of some of them may have to be adjusted during assembly.
Useful tips
If you decide to take on the task of making high-quality and effective sandblasting yourself, then you should take on board some useful tips.
Experts who make such equipment at home claim that the device will work much longer if it contains a dehumidifier. If we are talking about homemade piston equipment, then at the input stroke it is recommended to install a system that will effectively filter the oil.
In this video you will learn how to make a small but powerful sandblast with your own hands.
Manufacturing technology
You can make a machine for chopping wood and branches into chips with your own hands using a grinder or jointer (electric planer).
From circular saws
The basis for the operation of the machine will be a grinder drive. To make such a machine, follow these steps.
- Cut off a fragment of the channel and reduce the height of its horizontal (longitudinal) parts.
- Mark the piece of channel modified in this way and drill 4 identical holes for the bolts. This can be done using a drill press or a drill.
- Place a pair of housing bearings on the formed platform, tightening them with bolts in the center. The bolts can be, for example, M12 size with a head for a hexagonal tubular key.
- Weld the resulting structure with bearings to a piece of sheet steel. Cut the plate, drill a hole in it and weld it to the resulting structure at a right angle.
- Make a shaft from a piece of thick pin that is perfectly round. Place a steel washer on it and scald it.
- Insert this shaft into the bearings. Here the washer serves as an additional support.
- Place wood saw blades of the same diameter and tooth pitch onto the shaft. It is not recommended to use cutting wheels of different diameters with different numbers of teeth. Install two additional spacer washers between adjacent disks.
- Cut out the second plate for the shaft. Weld it to the base.
- Weld a third one to the upper edge of the two plates. To add aesthetics, clean the welds using a grinder.
- Weld a stage to the base of the resulting structure, through which wood raw materials ready for grinding are fed.
- Make and weld fasteners for an angle grinder (grinder).
From the jointer
A jointer or electric planer produces shavings on its own with good performance. But this planing machine only works with straight cuts of boards and slats left after construction, finishing, and reconstruction work on the user’s site. Protruding as much as possible beyond the plane along which the planed board is aligned, an industrial electric planer produces coarse sawdust. To process wood and branches into chips, you will need a device that is slightly different in design. To make it, do the following.
- Make a frame with a wheelbase.
- Attach a motor of suitable power (for example, asynchronous) to it.
- Attach a rotating knife-plane, made in the image and likeness of what works in an electric planer, to the frame well above the motor. His knives should extend significantly beyond the diameter limited by the torque shaft.
- Install pulleys with a gear ratio of 1:2 or 1:3 on the shafts of the motor and chopper knife.
- Place a belt of suitable size and thickness on the pulleys. The rigidity (force) with which it is tensioned must be sufficient to overcome the slipping effect - this, in turn, would render the engine useless.
- Install a square-shaped feed horn (funnel). Its internal dimensions must be commensurate with the length of the working part (chopper) of the electric jointer.