Manufacturers of modern sanitary ware are ready to offer bathtubs made from completely different materials. In addition to standard cast iron and steel, people are now actively buying bathtubs made from: acrylic, kvarila, casting marmora and even ceramics.
But even such a large selection of models cannot satisfy all consumers. Loft-style interiors are now gaining enormous popularity And a concrete bath is the best design solution for such a bathroom. node. How to buy it, you ask?
In some loft studios, of course, you can find concrete fonts, but this is not so simple. And such products cost incredible amounts of money. But there is always a way out - you can make a concrete bath with your own hands. We will talk about this today in our article.
Concrete font - installed for centuries
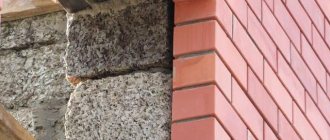
Now plumbing stores are ready to offer their customers a wide variety of bathtubs made from modern and classic materials. But some people are not satisfied with the available range of such products. They want to install a durable and truly unusual bathing structure in their home. A concrete or brick bath will probably suit them.
Such bathtubs can highlight the original design of the bathroom. And most importantly, you don’t need to spend a lot of money on buying any exquisite (and, naturally, expensive) bathtub. Self-made concrete fonts are lined with plastic or ceramic mosaics. It is also possible to use ordinary tiles for these purposes. But only for cases when you are building a bath without any special frills - with right angles or a classic configuration.
Concrete structures are uniquely durable.
Concrete font
They have been in use for decades. And the process of their construction takes relatively little time and is simple. The operation of constructing a concrete bath consists of the following stages:
- Development of a drawing of the font and purchase of the required materials.
- Preparation of the base and installation of the formwork structure.
- Forming the bottom and walls of the bathtub.
- Giving the bathing structure the desired shape and plastering the structure.
- Bath lining.
Important! You need to immediately decide what material (tiles, mosaics, liquid acrylic, paint) you will use for cladding the finished structure. The method of plastering the font depends on this.
If you use mosaic elements, the bath can be made with rounded shapes. But in the case of finishing the structure with ceramic tiles, it is better to avoid smooth lines, since it is almost impossible to fix a sufficiently large tile on such a font.
Please note that plastering the surface of a concrete bath that is planned to be treated with liquid acrylic or paint must be done using a special reinforcing mesh. In addition, it is recommended to add special additives to plaster compositions for such purposes. They will provide the mixture with the proper strength and at the same time the required plasticity.
Rough work
This stage of work begins after the concrete surface of the bathtub has completely hardened.
Initially, it is necessary to dismantle the formwork, cut off the protruding concrete edges and carefully trim the corners. In order for everything to turn out perfectly smooth and respectable, experienced craftsmen recommend making a template by which you can measure the gaps.
Now, apply a layer of plaster. After it dries, we arm ourselves with sandpaper and carefully clean out the uneven and chipped areas. To level the bottom and walls of the bathroom, you can make a solution from foam chips and tile adhesive - this composition is not only elastic, but also has excellent heat-saving qualities.
After the last layer of mortar has completely dried, you can proceed to finishing work.
Preparing and pouring the concrete mixture - how to do it right?
We will make the solution from sand and M-400 cement. The ratio of these materials is 3 to 1. Add water little by little to this sand-cement mixture and constantly stir the composition. As a result, you should get a solution that has the consistency of good (homemade) sour cream.
Before pouring concrete, decide on the points where the technological holes of the future bathtub will be placed. It is also worth making sure that there is enough space left for servicing the siphon during the operation of the font.
Pouring concrete and finishing plaster
We pour concrete into the formwork without interruptions
At this stage, the concrete bathroom you are creating with your own hands will already begin to take on its shape. To create a solution, you must use cement grade M-400 or higher and mix it in proportions of 1:3 until it becomes thick sour cream. Then we pour the solution first onto the bottom of the bath so that the layer covers the metal frame. Next, mix the solution with greater thickness and fill the wall of the future bathtub to the level you need. In order for the solution to fill the entire space and not form voids, after pouring it, you need to tap the formwork with a hammer in different places. The vibration created will help the solution to be distributed evenly.
Important. It is necessary to fill the bathtub mold without interruptions, preventing the layers from drying out. In this case, you need to either invite a partner to speed up the process, or rent a concrete mixer.
After the mold is filled, we leave the product for three days. This is certainly not enough for complete drying, but the concrete will already acquire the necessary strength for further processing. After this, carefully remove the formwork and proceed to the finishing plaster. The purpose of this event is to finalize the future shape of the font and level out straight surfaces. At this stage, you can already form straight or rounded corners on the inside using a trowel and a small rule. Upon completion of the plastering, the bathtub will be ready for priming and lining with finishing material, but for this you need to wait at least 7-10 days for the concrete to completely dry.
Bringing a concrete bath to condition - instructions
After 3 days, dismantle the formwork (the procedure should be performed as carefully as possible, remember that the concrete has not yet become completely monolithic) and plaster the font. At this stage of work, you level all the surfaces of the bathtub and give it the planned configuration. Activities are carried out using the rule of small geometric dimensions and a construction trowel.
After plastering, creating rounded or right angles and leveling the structure, treat it with a primer. Now you need to wait about 10 days. They are needed for final drying and hardening of the solution.
Plastering a concrete bath
There are mere little things left. It is necessary to properly tile the bathtub. Before doing this, apply a primer to all its parts (preferably in two layers). The mosaic gives the bath an attractive appearance. It is used for bathtubs with rounded corners. The mosaic is first mounted on a fiberglass reinforcing mesh, then the adhesive is applied to the concrete bath with a notched trowel and part of the mosaic is installed. It needs to be lightly pressed into the surface.
Then place the next piece of mosaic trim. The whole procedure will be quite long and painstaking. But you will have a font with an impeccable appearance. After installing the entire mosaic, grout the tiles (the seams between the finishing elements) with special compounds. You were able to make a bath with your own hands!
First stage
The area where the bath will be installed is cleaned, debris and dust are removed, and then a layer of primer is applied to improve adhesion to the concrete mortar. A drawing of the future bathtub is prepared, accurately indicating its dimensions.
Next, communications are carried out or their location is changed if required. All holes are firmly sealed with plugs made from pieces of wood to prevent the solution from getting inside when pouring.
Frame
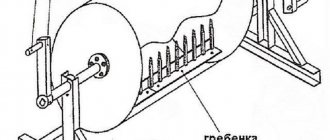
A frame made of metal reinforcement (diameter - 6-8 mm) is installed in the selected area. For vertical rods, holes are drilled with a drill of a suitable size, reinforcement is installed, then horizontal elements are tied to it with wire.
Formwork
Markings are applied to the floor and formwork is installed. To create it, any smooth lumber is used, and the parts are fastened together with suitable fasteners (screws, nails, wire, staples).
Important! It is necessary to ensure that the formwork is airtight, otherwise the solution will seep through it. It is best to line the inner surface with film, although you can use joint sealant.
Brick font - do you need such a design?
Brick baths are built quite rarely. They are usually built in the following cases:
- If you are planning to turn a standard bathroom into a combined bathroom.
- If the swimming room in your home is large (you can make not just a bathroom, but your own brick pool).
- If you want to create an exquisite and very original bathroom according to an exclusive design project.
Brick bath
Before you start building a brick bathtub, think carefully about whether you need it. This type of font has several serious disadvantages. Its construction requires knowledge of the rules for laying bricks. The operation itself takes quite a long time (especially when a structure of complex shape is being built). And caring for a brick bathtub is significantly more difficult than caring for a concrete, cast iron or acrylic product.
Preparing for DIY installation
Before installation, it is necessary to perform 2 basic procedures to prepare the room: arrange the base and provide communications.
When purchasing a new bathtub, you need to purchase a drainage device for it (it is not included in the product delivery package). The bath siphon must have an overflow device. To make it easier to adjust the product to bowls of different sizes, flexible hoses are now being made to drain excess liquid. Before installing the bathtub, you must purchase a drainage device.
It is advisable to immediately buy a suitable mixer design and linings for the drainage device. A necessary purchase will be new sewer pipes to replace the old ones to avoid leaks. To install communications, you will need a flexible water supply.
Alignment and connection of plumbing
First, the bathtub must be installed on temporary supports.
Bring the bathtub into the room and install it on temporary supports (bricks, bars), choosing a position so that the bottom tilts slightly towards the drain hole and the edges are horizontal. The planes can be aligned by level. Leave enough space under the bottom to install the siphon. Make marks on the walls and floor, remove the container.
Route the water pipes so that they can be easily connected to the tap with a flexible liner. If the purchased plumbing fixture has functions that require electricity (lighting, etc.), then the wires are enclosed in corrugated plastic hoses.
Before the final installation of the bathtub in the prepared place, a siphon is mounted on its bottom, immediately connecting it to the overflow hole. It is more convenient to secure the mixer after installation.
How to prepare a sewer
When laying a new sewer line from the drain to the main, the pipe is laid at a slope of 3-4° to ensure unhindered outflow of water. Joints must be made in a minimum quantity and carefully sealed. The sewer outlet is located in a place convenient for connection to the siphon.
Options for using concrete in apartment interior design
The use of concrete surfaces in various design solutions used in interior decoration allows the use of various materials, including those not used in finishing work.
Massive glazing allows you to add more light to the room
Materials and structures that allow the implementation of a wide variety of design solutions include the following:
- Pipes for various purposes. This interior solution is due to the combination of metal pipes and concrete surfaces, giving rooms, regardless of their size, an industrial look, harmoniously combined with the practicality and functionality of this option. Metal pipes are used for plumbing, heating, electrical, ventilation and other communications.
- Designs using massive glazing are perfectly combined with concrete walls, ceilings and floors. The greatest effect is achieved with glazing with a minimum number of dividing frames.
- Various decorative elements made of chromed or polished metal in combination with gray concrete surfaces allow you to implement a variety of design solutions. Nickel-plated furniture, metal baseboards and slatted aluminum ceilings also go well with concrete walls.
The combination of gray shades of concrete with various metal decorative elements and massive glass surfaces allows you to create cozy and comfortable rooms in the styles of minimalism, hi-tech and loft, which have been actively used recently in the design of interior interiors.
Finishing
After the concrete has hardened, it is time for rough finishing. What is it?
- Rounding corners.
- Leveling the surface in vertical and horizontal planes.
The template is applied to a layer of plaster and the surface is leveled. Crushed polystyrene foam or tile adhesive can serve as a leveling mixture.
Bathtub insulation during installation
A very important point allows you to significantly reduce hot water consumption, which is important given current energy prices. After heating the bath, in terms of heat savings, it is significantly superior to all expensive analogues available on the market.
How to insulate a bathtub
Step 1 The work must be done in an inverted position. It is recommended immediately after installing the siphon. Buy two or three bottles of polyurethane foam. The cheaper the better. The point is that cheap foam expands significantly as it cures, and that's what we want. More volume means more air bubbles, less heat loss. And the low price is due to the low compression force; this parameter does not play any role in our case.
Step 2 Clean the outside of the tub. Working with solvents is unsafe for health; it is important to ensure maximum ventilation of the room.
Step 3 After the solvent has completely dried, spray the bottom surface with a spray bottle. Moisture increases the coefficient of adhesion of foam to the bottom. In addition, water promotes an optimal way of chemical reactions, the foam hardens much faster.
Step 4 Shake the foam bottle well and begin coating the bottom with foam. This process will be faster if applied in upstream sectors. The foam should lie in identical rows at a distance of no more than a centimeter. If it is wider somewhere, this is not a problem; after hardening, the gaps are restored. If the surface dries out, moisten it with a spray bottle. Avoid touching the wet foam with your hands as this will cause nothing but other problems. The foam will no longer increase, and it is almost impossible to wash your hands afterwards. Have a long, tedious knife to scrape off the foam.
Step 5 Wait until the foam hardens, check the uniformity of the coating.
Step 6 Trim off any excess foam near the edge of the tub so that it does not interfere with the screen frame. The distance depends on the type and installation method of the screen.
Famous manufacturers
Many manufacturers have responded to customer demand: there are more “concrete-like” coatings on the decorative plasters market. Let's see what different brands offer.
Prof-Decor. Decorative plaster from the Hi-Tech line imitates concrete surfaces. The company is Russian, all products have quality certificates, and they provide a 5-year guarantee for their products.
What is Art concrete (decorative plaster)
Asti. Plaster from another Russian one with the effect of smooth concrete (grain size 0.1-0.5 mm). It has high strength indicators and is plastic. Aqua Forza binder and ACS Metrico toner (if needed) are sold separately. The site also offers a finishing coating - protective wax.
San Marco. This Italian brand offers microcement not only for walls, but also for floors. It can be used in conditions of high humidity. Another advantage is the company’s careful attitude towards the environment.
Isomat. This Greek company is represented in several countries around the world, including Russia. They have mineral, silicone, silicone-silicate and acrylic plasters.
Topciment. The Spanish company is famous for its strict quality control and specializes in microcement. Of the available products for interior wall decoration, STTANDARD MICROFINO with the finest texture is intended.
Real Home LLC. Again a Russian brand. The company offers budget putty microconcrete Reapol-S.
RustOnu Ironic. It stands out among other concrete plasters in that it forms a matte pearl finish.
Flex Concrete System. A wide range of polymer plasters and additives for them. They are distinguished by their pliable consistency, which can be given any shape and color. Allows you to perform not only a naturalistic imitation of concrete, but also wood, leather and other materials.
Advantages of making a shower tray from tiles
Self-arrangement of a shower tile tray has many advantages, and these include:
- Helps significantly save the family budget.
- It is possible to give free rein to your imagination and make a pallet from tiles of unusual sizes, as well as the required size.
- Choose the cladding that will match the design of the bathroom.
- It is possible to take advantage of all the advantages of choosing the equipment that you consider necessary for the bathroom in your own home.
- You can choose materials that will be beautiful and at the same time great for rooms with high humidity levels.
- You can make a custom shower enclosure, and its installation will not cause any problems.
Another quite significant advantage is that your apartment will have an unusual shower stall, and you definitely will not doubt its quality.