The use of foam is among such human conjectures as the use of tools, the mastery of fire, the invention of the lever, wedge and wheel. Suffice it to remember that the bread we eat is frozen foam. In modern life, foaming is widely used, as are foam generators - devices for producing it in large quantities. In this article we will look at how to make a foam generator with your own hands for a fairly narrow but relevant area of application - contactless car washing and other household purposes. And in this by no means wide segment, as we will see, various designs with their own characteristics are used.
Making penogen
The least labor-intensive method for making foam is to use a regular garden sprayer. This device is taken as a basis, after which it is supplemented with some elements. It was previously mentioned that the sprayer is very similar to car wash equipment, so it is ideal for creating a foam generator.
The simplest penogen design can be easily done at home. The master will have to take care of the availability of:
- Sprayer of any volume;
- Two cuts (one second of an inch);
- Nuts for drives;
- Air fitting;
- valves;
- Foaming tablets;
- Adapter for tablet;
- Metal tube.
A DIY foam generator for washing a car from a sprayer is made according to the following scheme:
- The pressure relief valve is removed from the base, as well as the fitting for attaching the hose;
- Squeegees are inserted into the resulting recesses;
- The bends on both sides are fixed with nuts using sealing gaskets;
- A tube is installed on either of the two ends. It must be arranged in such a way that it does not touch the bottom of the cylinder. A check valve and fitting are installed on the same outlet;
- An adapter is installed on the second drive, and the tablet is wound through it;
- The hand pump is turned off as it is not needed. In the finished foam generator it will act as a tank lid;
- A hose is connected to the outlet fitting of the foam concentrate;
- A spray gun is attached to the free end of the hose.
The equipment is completely ready. It should be mentioned that when making a foam generator for a car wash with your own hands, you do not have to make the drawings yourself - you can find them in specialized literature, or search on the Internet.
Operating a self-made penogen is a little more difficult than the factory version, but not so difficult as to abandon such equipment.
In order to wash a car using a self-made foam, you should:
Fill two thirds of the container with detergent; Connect the compressor and start pumping air into the container (it is important to control the pressure so that it does not exceed the standard); After the atomizer valve opens, air masses will direct the mixture and force it through the tablet. High-quality foam will come out of the gun. The main disadvantage of self-made foam is the need for constant pressure pumping, since a special regulator is not provided in this equipment
In addition, the master will not have the opportunity to regulate the strength of the outgoing jet.
The main disadvantage of self-made foam is the need for constant pressure pumping, since a special regulator is not provided in this equipment. In addition, the master will not have the opportunity to regulate the strength of the outgoing jet.
There is another way to create a foam generator for washing a Karcher with your own hands. It is not used as often as the previous one, but does not lose popularity among motorists. The execution technology is quite simple:
- You need to get a canister with a volume exceeding 20 liters;
- A compressor from the car should be connected to the inlet nipple (made of brass) from the tire;
- Next, you need to connect the hose (length - 6 m, diameter - 1.6 cm) to a pre-prepared gun;
- The elements can be fastened using rubber flaps, clamps and nuts.
Video tutorial:
VOLVO XC60 2022 – Swedish heart conqueror
How to decarbonize oil scraper rings?
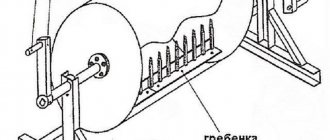
Foam generator: equipment structure
The effectiveness of cleaning the machine is determined by the characteristics of the foam used - the denser it is, the better the cleaning abilities will be. In addition, dense foam reduces the consumption of liquid and chemical components. And supplying foam is the purpose of the foam generator (the second name is foam).
The structure of this device resembles a standard garden sprayer. But unlike a sprayer, a foam generator operates under significant pressure.
Penogen consists of several elements:
- Balloon;
- Mixer;
- Hose used for connection;
- Gun.
Photo diagram
In the case when foam generators for contactless washing are made with your own hands using especially large containers (maximum container volume is 100 liters), they are installed on special carts - this allows you to move massive equipment without much difficulty.
Due to the fact that foam generators operate under high pressure, the containers are made of metal - stainless and ordinary. In this case, ordinary metal is necessarily coated with anti-corrosion compounds. Very often, factory-made foams have a measuring ruler installed on the cylinder. Thanks to it, you can monitor the consumption of washing liquid, as well as refill on time.
The equipment cannot operate independently, since it requires a supply of compressed air to operate. This feature determines the presence of a fitting on the container for connecting a compressor. The standard pressure for foam is 5 bar. To monitor the pressure, there is a pressure gauge on the cylinder; a specially designed regulator allows you to regulate the pressure force.
Before you make a foam generator for a car wash with your own hands, it is worth considering that one of the most important elements of equipment of this type is a tablet that forms foam. In fact, the tablet is a mesh of stainless wire with a fine mesh, compactly twisted into several layers. It is installed in a housing placed on the tank. A hose supplying liquid is connected to such a housing. The tablet breaks the supplied detergent into small particles, resulting in a particularly dense foam. The foam flows to the gun, which allows you to apply the product to the car.
We assemble it with our own hands: drawing diagram and manufacturing instructions
To understand the operating principle of the foam generator, below is a diagram. Water is poured into the container and detergent concentrate is added. Air from the compressor is supplied through the shut-off valve. To control the pressure in the container, a pressure gauge must be used. The output is a mixture of water and detergent. It passes through a foam tablet which produces a dense active foam.
A simple and understandable diagram of a foam generator helps to understand the principle of operation of the device
What you will need for assembly
To make your own generator you will need:
- Capacity.
- Pressure gauge.
- 1 shut-off valve (it only allows air to flow in one direction).
- 1 tap (they regulate the supply of finished foam).
- Metal tube.
- Reinforced hoses that can withstand pressure of 6-8 atmospheres.
- Metal clamps for reliable connection of hoses and fittings.
- Foam tablet.
First of all, you need to decide on the capacity. The main requirement is the ability to withstand pressure of 5–6 atmospheres. If it is possible to carry out welding work, then for the generator you can use a receiver from a truck or an old compressor. Weld two one and a half inch fittings and a filler neck onto the top of the body. The optimal volume is 20–30 liters, which is enough for personal use.
If you have an old water heater lying around in your garage or barn, you can use it to create a foam generator. In this case, welding work is not necessary.
Homemade unit from an old sprayer
Every summer resident's household must have an old sprayer that is a pity to throw away. With a little modification and using the drawing included above, it can easily be converted into a foam generator. Let's get started:
- Remove the hand pump. We plug the holes and it’s just a cover.
- We install two ½-inch (1.27 centimeter diameter) squeegees at the top of the sprayer body.
- We install a pressure gauge and a shut-off valve on the outlet through which air is supplied, and attach a tube inside the cylinder. Its length should be slightly less than the height of the container.
- On the second flow (foam outlet) we install a tap, a foam tablet and an easy-to-remove hose connector.
We buy a foam tablet in the store or make it ourselves. The main element of the tablet is a metal mesh. It is easy to make from a regular metal dish brush. It is sold at any hardware store.
Factory version - differences in manufacturing
You can assemble an alternative generator that will be closer in functionality to the factory designs. We take a hose or tube, fill it with a foam sponge, which is tied with thin wire (fishing line) for reliable fixation. We place a mesh stopper at one end to prevent material from penetrating into the nozzle.
Air must be supplied from the bottom of the receiver - for this the tube must have the appropriate length. To regulate the jet power, an adapter is cut into the tank. A foam tablet can be placed at the exit point of the finished composition. Next, the air supply hose is connected to the compressor.
We check the tightness of all connections, in particular threaded ones. To be able to control pressure, it makes sense to embed a pressure gauge into the structure. Thus, a conventional compressor for pumping and monitoring tire pressure will help to build a foam generator close to the factory one. A handle with a nozzle or a gun can be purchased in the gardening departments of supermarkets and department stores. Then everything depends on the user’s imagination and his ability to handle available tools.
In principle, the most inexpensive foaming nozzle from Karcher will cost 1,500 rubles and more. However, you can save even these funds by assembling a simple structure on your own and using available means. Some even manage to make a sink out of a garden sprayer. Today you could see this. Using such a device, you can even wash the engine and the pumped-up space, naturally following certain rules. The time has come to say goodbye - but new publications await you in the coming days. Let's stay in touch!
Every car owner has to go to a car wash. Water procedures help keep the vehicle clean, and special products that are applied during washing create an additional barrier to dirt and protect the paintwork of the body. For high-quality cleaning, thick active foam is used, obtained by foaming in a special device. Some car enthusiasts use homemade foam generators when washing.
How to choose?
Lada Kalina 1 and 2 station wagon do-it-yourself modification
If you need to buy a foaming agent for your own car wash, the vehicle will begin to shine with professional cleanliness, but only if you choose the right equipment.
When planning to purchase a foaming agent for a car wash, you should rely on some parameters described below.
- Nominal pressure. As a rule, it is equal to 5-6 bar - this parameter is enough to guarantee the unit sufficient power and assist in effective car washing.
- Volume of the tank. The more significant this parameter, the more obvious is the ease of its maintenance - the large tank has to be filled less often. However, the cost of the foam concentrate largely depends on this coefficient.
- Speed. For home car washes that are not intended for use at specialized stations, this coefficient is approximately 2800 revolutions - this parameter will be sufficient to bring 4-5 cars per day into ideal condition over a long period. If we take into account that the objective possibility of this is small, then the apparatus is provided with an excellent margin of safety.
- Weight. If you need to move the foaming agent around the area from time to time or frequently wash the car, then you should choose a modification that is a little lighter - the convenient use of such equipment is very important.
A review of the foam concentrate for a high pressure washer awaits you in the video below.
Making a foam generator from a garden sprayer with your own hands
To make a homemade foam generator, an old “Quasar” garden sprayer with a non-working pump or a pump-action “Beetle” is suitable. Buying a new sprayer for subsequent refurbishment will cost 500-800 rubles.
- To supply compressed air, drill a hole at the top of the sprayer body and insert a nipple with a check valve. If this option does not suit you, then you can unscrew the existing excess pressure relief valve from the housing and, by inserting the nipple, connect the hose from the car compressor to it. The quality of the foam depends on the pressure - the higher the pressure created by the compressor, the better.
- We disassemble the boom with the sprayer. We tightly pack the adapter tube with fishing line or steel wool for washing dishes to improve foam formation at the outlet.
- In the intake hose in its upper part, on the side of the sprayer outlet, we make 5-10 punctures for better foaming.
- We pour water with added car shampoo through the neck in the body in a ratio of 1:50 or select the desired concentration experimentally. The volume of the cleaning solution occupies 70% of the sprayer’s capacity. After turning on the compressor, we eliminate possible leaks and evaluate the quality of the foam.
Nuances when making your own foam generator
When making a foam generator with your own hands from improvised materials, take into account the power of the existing compressor and the volume of the tank. The ratio of volume of 20 liters and pressure of 6 kg/cm² will allow you to wash the car without additionally adding solution to the tank.
The foam tablet device (foaming agent) determines the quality of the foam. If you are not satisfied with the stability and expansion rate of the foam, then buy a ready-made foam kit or upgrade the design of a homemade foam concentrate.
Parts and components
The critical components of the foam generators described here and below are:
- passive bubbler;
- mesh filter;
- check valve;
- spray nozzle.
Bubbler
Passive bubblers for washing foam generators are sold under the name foam tablets. Hobbyists, as a rule, make foam tablets themselves from a steel kitchen sponge (scraper, “brush”). But - no need.
A high-quality branded foam tablet is a putanka (emphasis on the first syllable) made of round stainless wire, see figure:
Foam tablet for foam generator
Firstly, steel sponge is not designed for long-term work under pressure in an active environment. Secondly, it (the steel sponge) has a lot of thin sharp edges. Active foam “pinches off” microparticles of solid metal from them. Not a bad abrasive, right? And - on sparkling paint. The car begins to lose its appearance after 3-10 washes, depending on the quality of its painting.
Net
Strainer:
- begins foaming in the supercharged injection generator;
- serves as an active bubbler in a double bubbling foam generator (see below);
- can become the basis of a very good homemade passive bubbler, in no way inferior to the best branded one.
For the latter case, you will have to buy something, but quite inexpensively, in some hardware store ("Everything for the home", plumbing, etc.). There, however, they do not always know what it is. Often it’s just They put a price tag without the name of the product. So let’s take a closer look.
Unscrew the cap from the faucet spout of the kitchen sink or washbasin (arrow on item 1 in the figure below). This is done simply with your hand, if you hold the “gander” with the other. Examine what is unscrewed. Do you see the mesh (item 2)? Push it with your finger and the mesh filter will come out. Its lid can be removed if you pry it off with a toothpick, etc. in any of the side holes, arrow on pos. 3. The meshes are squeezed out with your finger in the same way (pos. 4).
Household tap strainer
Note : you might be surprised how much dirt there is! In such a case, the nets are cleaned with an old toothbrush under a weak stream of water. Signs of clogging - the stream from the tap jerks, breaks into drops early, and splashes.
Now let’s remember what to look for, or take it with us as a sample - to show it to a young, tolerant, politically correct, confident saleswoman. At home, we disassemble the “new, good” filter and cut off the stop from the cover (arrow on item 4). For what? 3-4 meshes are not enough for a foam generator. The missing ones can, firstly, be cut out from an old strainer from a Chinese teapot; stuff them as much as will fit. This thing is suitable for a filter, and instead of a foam tablet (installation diameters 20/18 mm) for a productive foam generator. The foam is a sight to behold - high-quality, thick, you could make snowballs out of it.
Secondly, you can supplement the filter with synthetic felt cut from a soft kitchen sponge (see figure). It is necessary to cut with a lack of thickness so as not to catch the adhesive layer. A filter with this addition is suitable for an active pneumatic bubbler and a passive one in a manual foam generator.
Valve and nozzle
Do-it-yourselfers install purchased reed valves in their foam generators or make them themselves “in the image and likeness” of standard ones. Which requires turned parts and some plumbing experience. And we will make a ball valve at home “on the knee”, that is, on the work table. Its throughput is lower, and its response delay is greater than that of a leaf valve, but we don’t need to turn a turbo drill, and the ball valve is very durable and reliable.
You will have to buy a bronze water tee for 1/4″ - 3/4″ (crosspiece, if the generator has a pressure gauge) with an external thread (type NNN), select a ball from a bearing of a suitable diameter and a piece of tube for it; drawings and proportions of a check valve for a homemade foam generator are given in the figure:
Ball valve drawing for foam generator
The assembly is done as follows:
- in the tee/crosspiece, holes for stops are drilled in one pass;
- one of the ends of the piece of tube for the valve seat is countersunk with a conventional twist drill;
- the saddle is placed in the tee/crosspiece and placed on the table with the saddle down;
- insert the ball and, with light blows of a hammer, drive it to the saddle through a hard wooden stick;
- the seat is secured from the outside to prevent it from falling out with silicone glue; the connecting fitting will not allow it to be squeezed out under pressure;
- place a stop, fix it with silicone or caulk it.
Note : a homemade ball valve may leak a little at first, but after 3-4 air starts/misfires, the ball will “beat” its seat until it is completely tight.
Drawings of the spray nozzle for the washing foam generator are given on the following. rice.:
Drawing of a spray nozzle for a foam generator
If the foam is simply supplied through a hose without a gun (which, of course, is inconvenient), instead of a threaded socket, a herringbone fitting is machined for the hose. It is not advisable to reduce the length of the nozzle, because it also serves as a “mint” stabilizer in the foam hose. Making a nozzle is quite complicated:
- through channel D6 is drilled;
- the threaded socket is turned out, the workpiece is turned to the shape from the outside;
- From the right (according to the drawing) end of the workpiece, 2 D6 holes are drilled at an angle, converging in a V-shape at 27 mm from the end. This is a complex and responsible operation;
- From the left end according to the drawing, channel D9 is drilled to a depth of 270. It is advisable to go through it with a reamer after drilling, because roughness in the channel strongly “hits” the foam expansion rate;
- Excess material is removed from the right end with a thin narrow cutter. This is the most delicate operation;
- The fit of the nozzle on the gun is checked and adjusted by grinding the left end, see fig.
Tank options
It is better to make an injection foam generator based on a powder fire extinguisher, and there is a pitfall here - its standard bubbler. The first powder fire extinguishers were plastic containers with a lid filled with self-foaming extinguishing powder when heated. Simple, cheap, but if it got on a hot metal surface, the powder could explode. In general, simple dry powder fire extinguishers have saved many more lives and property than they have caused harm; quite a few of them are still waiting in the wings to this day. But, of course, a possible explosion instead of extinguishing a fire is no good. Therefore, modern powder fire extinguishers (see figure on the right) are filled with microencapsulated fire extinguishing composition and pumped with an inert gas, which squeezes the powder through a steel sponge. The shells of the microgranules in it are destroyed, and the ready-made extinguishing mixture comes out. It’s complicated, a little expensive, the fire extinguisher needs to be checked periodically, like a carbon dioxide one, but an explosion is excluded.
So, the foam tablet enters the internal nest of the microgranules destructor. First, they naturally use a used-up fire extinguisher for the foam generator, and don’t buy the tablet. Why, it seems, if something that looks suitable already exists? But the fire extinguisher destructor is disposable; it will create dust with a steel abrasive even stronger than a kitchen sponge. Secondly, there is no aerosol chamber in front of the bubbler in the fire extinguisher, and without it high-expansion foam will not be produced, this is the first. However, this is “not fatal”; it is possible to modify a foam generator from a fire extinguisher to obtain high-expansion foam, see video:
Video: modifying a foam generator from a fire extinguisher
Note : for another version of a homemade foam generator from a fire extinguisher, see next. video clip:
Video: making a foam generator from a fire extinguisher
Options for the Beetle
A foam generator from a Zhuk type sprayer can be made with supercharging from a built-in pump or compressor. To wash a city car, 3-7 liters of foam concentrate are required. Garden “Beetles” are available in capacities from 5 to 10 liters, above in the figure:
Garden sprayers of the “Beetle” type and a foam generator from such a sprayer
To ensure that the foam “keeps its condition” and does not stagnate while the tank is being pumped up, you need to fill it with foaming agent no more than halfway (preferably 1/3). And in order to wash a large car with a small “Beetle”, you need to install a pipe in its tank to connect the air hose from the compressor (shown by the arrow below in the figure). If the compressor is homemade without a graduated gearbox and pressure gauge, then the pipe is needed with an internal inch thread. A tee with a check valve is screwed into it (see above). A pressure gauge is screwed onto the free arm of the tee; threaded joints are sealed with FUM tape. In order for the sprayer to be used for its intended purpose after modification, you will also need to buy a plug for the shoulder of the tee with a valve.
A little about the improvement
How can you make your foam generator work even better? Here we are talking about increasing productivity, that is, increasing the amount of foam created.
No complex repairs will be required. And you won’t have to open the generator drawing. The essence of the modification is to make the attachment work better.
I note that many foamers experience problems with mixing components due to the imperfection of the standard nozzle. The water is supplied under low pressure, so although the shampoo gets into the mixture, complete mixing does not occur. There are models with a too narrow hole through which shampoo is supplied. The water simply does not allow the detergent to push through there.
There are two methods by which you can improve the lack of factory foams.
- Replace the injector. You will need a screw nut. This is a fastener that is used in computers and holds the motherboard on it. The advantage is that the nut is soft and easy to drill. A drill with a diameter of 1 mm is required. At low speeds it makes a hole in the middle of the nut without damaging the thread. A slot is made on the end side for a screwdriver. The resulting device is screwed into the nozzle. That's not all. We take the same nut, but a little larger, and also a 2 mm drill. Make a hole and widen it to a cone with a file. Only on the side that will be facing the inside of the nozzle. Install the nozzle. Take a pen rod (preferably gel) and cut a tube 30-40 mm long. A hole of about 4.6 mm is made on top of the nozzle. This is ideal. This way the tube will fit tightly. Treat everything with sealant, wait until it dries and check the operation of the foam generator.
- For nozzles that have a mesh. It serves to break the flow of water and create foam. The problem is that the meshes wear out quickly. For modification, take a jet from a carburetor Zhiguli car and a mesh made of stainless steel. The jet is installed in place of the standard injector. Be guided by the sizes. The mounting hole will have to be drilled out to fit the jet. We remove the standard grid and make a new one using its template. It is advisable to choose a mesh whose cell diameter does not exceed 2 mm. 1.5mm would be ideal. Put it in place of the old one and try out the effect of the modification yourself.
The cost of such a modification may be zero if the necessary materials are available.
The most convenient high pressure washer for your car
Ease of use is another point that requires attention. Unfortunately, many “flaws” of manufacturers become clear only after purchase. To avoid disappointment, choose a model with these features.
1. Long hose. The longer the better. If the package includes a hose up to 6 meters long, it means that the manufacturer does not care at all about the convenience of the buyer. In addition, according to expert observations, models with such short hoses usually do not meet the stated technical specifications. The hose length is 8 meters - the required minimum. 10-12 meters is even better. Over time, the hose wears out and must be replaced.
2. Storage area for the hose. How did the manufacturer think through this issue? It is ideal if drum storage is provided, but this option is usually typical for professional models. Household ones may offer a special external holder, which is also good. It’s bad when there is no space for the hose. In this case, it is worth thinking about the quality of the sink or accepting this configuration as a “given”: while reducing the dimensions, it is impossible to maintain all the convenient options.
3. Indication of the depth of water intake. Household models are usually connected to a central water supply. But if this is not possible, when choosing, you need to make sure that the manufacturer has calculated the depth of water intake from the container. The absence of this parameter in the specification suggests that, most likely, the user will have to use the principle of “communicating vessels,” that is, the water tank should be located above the sink. Would it be possible to build such a structure at all? After all, if not, you won’t be able to use the unit.
4. Availability of attachments. A high pressure washer is a device that does not require many attachments. Therefore, if the manufacturer offered a whole set for various needs, this is simply a marketing ploy. The main attachment and a mud cutter are sufficient. The latter helps to quickly cope with serious dirt on the car body.
pixabay.com/
5. Built-in detergent tank. The design of the sink is such that under no circumstances should detergent be poured into the water collection container. This can easily damage the equipment. Therefore, the detergent must be poured into a special container. It is convenient when it is provided in the device body. After all, if it is not there, you will have to connect the fence from an additional “bucket”.
6. Engine cooling system. It can be implemented in different ways. Models in the highest price segment use water cooling, while mid-range and budget models use air cooling. In the latter case, the unit overheats faster and has to be turned off more often. But in any case, there must be an engine cooling system. Otherwise, its safe operation time will not exceed several minutes.
How to make your own foam generator for washing
Foam generator assembly
Considering the design of both types of equipment, you will notice that their main component is a foaming tablet, which can be purchased separately. This means that it is quite possible to make a foam generator with your own hands.
The easiest way to make it is to take a regular garden sprayer as a basis and modify it a little. At the beginning it was mentioned that the foam generator and the sprayer are structurally similar, and this fact is often used when creating homemade foam.
Next, we will consider one of the simplest designs of a foam generator, which you can make yourself from improvised means. So, you will need:
Squeegees for penogen
Foam tablet assembly
- sprayer (volume may vary);
- two ½-inch bends and nuts for them;
- check valve;
- air fitting;
- foaming tablet and adapter for it;
- metal tube.
Having all this, you can start remaking:
- We cut off the pressure relief valve and the fitting for connecting the hose from the sprayer.
- We insert the brackets into the resulting holes and secure them with nuts on both sides and using sealing gaskets.
- We install a tube on one of the pipes (so that it almost reaches the bottom of the container), a check valve and an air fitting.
- On the second run, we wind the foaming tablet through the adapter.
- The manual pressure pump of the sprayer must be completely turned off, since it will not be needed and will only serve as a tank cap.
Video: DIY foam generator
All that remains is to connect the hose to the outlet fitting of the tablet, and attach a garden spray gun to the other end. At this point the product can be considered ready.
Working with it is not as convenient as with factory equipment, but it is quite acceptable. To wash your car you need to:
fill the container with cleaning solution (2/3 full); connect the compressor and pump air into the cylinder (it is important to monitor the pressure and not exceed the permissible limits); after opening the sprayer valve, the air will squeeze out the solution, push it through the tablet, and at the exit from the gun we will get foam of quite acceptable quality;
Among the inconveniences of a homemade foam generator, one can note the need for periodic pumping up of pressure, since the homemade product is not equipped with a regulator, as well as the inability to adjust the output stream.
But the described design can always be improved by installing additional equipment to eliminate the shortcomings and improve the convenience of working with the foam generator.
This article describes the features of their design, how to make it for washing, and how to make a nozzle.
Car washing has a number of features, the main thing is not to damage the paintwork of the car. Modern car washes have low-quality guns that do not wash the car very well and often break. Gels are converted into foam using this device or dispensers. You can wash your car this way at home. It is worth making such a device yourself.
The device of "real"
For high-quality car washing, you still need an injection or “direct” ejection foam generator. Structurally, they are largely similar, so let’s look at both at once.
The structure of a supercharged washing foam generator is shown in the figure:
The device of a foam generator with pressurized supply tank
Foaming begins already in the supply pipe, since due to the so-called. throttling effect, the pressure behind the mesh filter drops and air microbubbles are released from the mixture. This is not foam yet, but there are many embryos of it. Amateur designers usually do not install a foam concentrate nozzle, passing the mixture ready to foam directly through the bubbler. But in vain: a sharp drop in pressure behind the jet does not produce an aerosol, but a “foam sol” of tiny droplets of high-expansion foam. In the bubbler they “swell” with air, almost without losing their multiplicity, and thick, sticky, almost non-draining “Nivea for cars” goes into the hose.
Setting up a supercharged foam generator does not require qualifications:
- the compressor gearbox is set to a pressure from 4 bar (min.) to 6 bar (max.) depending on the required foam flow;
- the boost and adjustment valves are fully open;
- turn on the air supply and set the foam ratio using the valve settings (visually, based on its density and fluidity);
- the boost valve sets the foam flow rate;
- If necessary (rarely), I adjust the quality of the foam using the adjustment valve.
An ejection-type foam generator (in the next figure) is also connected to the compressor through a pressure reducer; A check valve in this installation is not necessary; the standard one in the compressor will suffice. The design of an ejection foam generator is similar to an injection one, only the nozzle is moved to a different location.
The device of a foam generator without pressurization of the supply tank
But setting it up is more complicated:
- shut-off valves are closed;
- The air control valve is opened approx. half;
- the foam concentrate control valve is closed;
- turn on the air, open the shut-off valves;
- by smoothly opening the foam concentrate control valve, achieve the appearance of foam from the nozzle nozzle (see below);
- Operating the control valves alternately or simultaneously to achieve the desired consistency and foam consumption. The adjustments are interdependent!
Note : if you need to wash the same car, operated under the same conditions, with the same shampoo, then after adjusting the foam, it is better to carefully remove the handles of the control valves so as not to disturb the adjustment.
Design Features
The supply tank of the injection foam generator must withstand a pressure of at least 8-9 bar. The purpose of the check valve is rather technological: when the foaming agent has been used up for approx. by 2/3, the compressor can be turned off, and the rest of the mixture will be produced under residual pressure, because its fluctuations within 30-35% do not significantly affect the foam parameters. The diameter of the hole in the jet washer is 1-3 mm and is selected for a specific shampoo; You can get a set of washers with holes of different diameters. Length L of the mixing chamber of the injection generator is 120-180 mm; ejection 220-350 mm. Channel diameter resp. 8-20 and 9-12 mm.
Operating principle
So, we will design an air-liquid foam generator with a passive bubbler. This type of this class of devices is technically simple and accessible for self-production, and its performance and foam expansion indicators are sufficient for an individual car wash. Air-liquid means that the foaming agent is liquid (a solution of car shampoo in water), and the foam filler is atmospheric air.
The principle of operation of a foam generator of this type is illustrated in the figure:
Operating principle of a foam generator for car washing
Depending on the method of supplying the foaming agent and filler, this device can be structurally designed:
- Injection (supercharged) - the foaming agent and filler are supplied forcibly under pressure. The possibilities for adjusting the expansion rate and foam consumption are the widest. “Range” (see below) is the greatest. Air compressor – low or medium performance for a pressure of 4-5 ati (4-5 bar (approx.) or 55-70 psi). Shampoo consumption for washing a passenger car is 30-50 ml; water for foaming agent – 5-6 liters.
- Direct ejection (supercharged) - air is also supplied forcibly and sucks the foaming agent from a supply container with atmospheric drainage, as in a cologne atomizer with a pear. Structurally simpler than before. type (no need for a pressure vessel), but the ability to set foam parameters is somewhat narrower. Compressor for pressure from 2-2.5 ati (bar, or 29-36 psi); water and shampoo consumption approx. 1.5-2 times more than before. case. With a low-performance compressor (for inflating tires), it is possible to obtain only low-expansion foam. Most foam nozzles for washing guns are built according to this scheme.
- Reverse ejection - a jet of foam concentrate from the nozzle draws in atmospheric air. Its flow rate is determined by the pressure drop at the nozzle exit, which cannot be more than 1 atm (0.987 bar or 14.5 psi), so it is impossible to obtain high-expansion foam. The additional parameters relevant for a car wash (see below) are unsatisfactory, but using a model of such a device using a washing gun with a mud cutter and cutting a plastic bottle with a “waist” (below in the figure), you can clearly understand the principle of operation and learn how to adjust the foam.
Extra options
The performance of a foam car wash is significantly influenced by additional parameters of the foam generator:
- range of foam jet ejection (range) - the greater the distance you can “shoot” a given area, the less time it takes to wash and the better its quality will be, because the foam sprayed at the beginning has less risk of “overstaying”;
- homogeneity of the jet - washes the car preeminently. foam from the dense core of the jet, and the flakes that form the halo flow down more uselessly;
- transverse compression of the jet - washing foam with a compressed “shovel” results in much less loss of surfactants than with a “broom” that is round in cross section.
Injection generators “shoot” the farthest, 3 m and further. The uniformity and compression of the jet is largely determined by the spray nozzle, see below.
Another generator
Some foam nozzles for washing guns are produced with double bubbling, active pneumatic and passive. Air is pumped into the supply tank through a sprayer in the form of a stream of bubbles through a foaming agent, above the surface of which a cap of low-expansion foam is formed. When you press the shutter, part of it enters a chamber with a passive bubbler, which increases the foam expansion rate. Due to this, the range of jet emission sharply decreases, but a household pump sprayer can be very easily adapted to a generator of this type for washing small surfaces (see below), and the possibility of using it for its intended purpose is not lost.
This is interesting: We make anticorrosive for cars with our own hands
Which one should I do?
Types of homemade foam generators
The choice of the type of foam generator for self-construction is made based on the existing production and economic needs, the container for consumables and the allowable costs of creating the installation (see also Fig.):
- from a household pump sprayer - only a mini-generator with double bubbling. But with its help you can wash the most dirty places of the car: wheels, wheel arches and body sills (see figure below), motorcycle (sorry - bike), scooter/moped, bicycle, rubber boots after going out into nature or working in the garden;
Washing car wheels and wheel rims with foam - from a pump portable garden sprayer - the same foam generator without a compressor, but suitable for washing a compact city car. With a compressor - any of the types described above. The best base unit is the Russian “Beetle”, its tank can hold 6 bar without any problems;
- from a car fire extinguisher - a supercharged foam generator for washing a personal car or minibus/van of the Gazelle type. "Ford Transit", "Mercedes Transporter", etc. A compressor for inflating tires or from a refrigeration unit will do;
- from a stationary fire extinguisher - a foam generator for professional washing, incl. heavy vehicles. Compressor - with a capacity of 120-150 l/min (for example, based on an onboard ZIL-130);
- from a canister, bucket with a lid, etc. – ejection with supercharging. The generator parameters are determined by the type of compressor available.
Option No. 3 – foam generator from a plastic canister
Not every car enthusiast has the metal containers necessary to implement the first version of the foam generator. As an inexpensive alternative, you can use a regular plastic canister. To assemble the device you will need an angle grinder, wrenches, a nozzle, a compressor, pipes, pipe fittings and a gun. The work is carried out according to the following scheme:
First you need to cut a 50-centimeter piece of an inch pipe using a grinder. Inside it you need to stuff a sufficient amount of ordinary fishing line with any cross-section. This material will serve as a foaming agent (similar to the polyethylene sponge that was used in option No. 1). Plumbing plugs should be tightly secured at both ends of the pipe.
It is important that these fittings are threaded. A T-shaped adapter is attached to one plug, and a fitting is attached to the other. Flexible hoses with taps are attached to the T-adapter. One terminal of the foam generator will be connected to a container with detergent, and a tube coming from the compressor will be connected to the second. This method can be implemented in different variations
Below are possible options, among which you can choose a suitable modification at your discretion
This method can be implemented in different variations. Below are possible options, among which you can choose a suitable modification at your discretion.
Option No. 4 – foam generator from a garden sprayer
If you have a non-working or rarely used garden sprayer, you can use it to construct a homemade foam generator for washing your car.
Manufacturing procedure:
- The hand pump must be disconnected from the plastic tank of the sprayer. It will not be needed, and its hole will be used to fill the working fluid.
- We plug one of the holes in the upper part of the container. The second hole will be used to release liquid from the tank.
- To seal threaded connections we use FUM tape.
- We drill a hole in the bottom of the tank and install a regular car nipple. Through it, air from the compressor will be supplied to the tank.
We make a small hole in the plastic tube that is located inside the tank. This is necessary so that the liquid mixes with air. You can experiment with the number of holes to better mix air and liquid. Excess holes are wrapped with regular electrical tape.
The photo shows a hole in a plastic tube.
We use a metal mesh for washing dishes as a foam tablet. We install it directly in front of the sprayer.
The photo shows a small piece of hose inside which a foam tablet is installed.
After completing these operations, you can start using the foam generator. If desired, you can supplement the design with an automatic valve, which will maintain the specified pressure in the container and protect the plastic tank from bursting. This will greatly facilitate the use of the foam generator, since the user will not have to constantly monitor the pressure gauge.
You should also test the assembled device before using it. The reservoir needs to be filled approximately 2/3 full with water and diluted car shampoo, turn on the compressor and monitor all connections. If the threaded connections are not sealed sufficiently, air will escape through them and the pressure in the container will not rise to the required values.
Therefore, special attention should be paid to the tightness of connections
We upgrade the foaming agent for washing with our own hands to increase foam
This device can be upgraded to increase the volume of foam. Instead of a standard nozzle, you can make a new nozzle from two syringes with a volume of 5 mm. It is necessary to cut off approximately half of its length from one syringe, select the diameter of the washer, or cut off part of a cylindrical plastic tube from a standard nozzle to attach a new nozzle to the sprayer.
After this, it is necessary to connect the cut part and two syringes in any way, after placing the foaming material indicated above inside. It should be located closer to the sprayer outlet. The end of the syringe should remain empty to control the mixing of the foam.
If it is possible to purchase F110 nozzles (015, 02, 03, 04, 05) or flat-jet tips like HYPRO F80-06, then you need to cut off the extreme part of our homemade nozzle and install a flat-jet tip as a nozzle. By changing the tips you can achieve the desired spray pattern.
The air pressure needed for such a foam generator can be created using a foot pump by installing a nipple for a tubeless tire at the top of the tank. The pump should be pumped into the container without fanaticism, no more than 4 atmospheres, otherwise the spray tank will burst. Some sprayer models have a bypass valve. It needs to be adjusted to a pressure of 3.5-4 atmospheres.
After washing, do not forget to treat the body with liquid wax, since its varnish coating has a porous structure. These pores must be closed, blocking the path of corrosion. It’s easy to make such a foaming agent for washing with your own hands from a sprayer. It works for many car enthusiasts and suits them completely. The cost of such a device consists of the cost of the sprayer itself, a pair of syringes, and a car tire nipple and amounts to 300-400 rubles.
In a contactless car wash, the use of detergent mixture generators fully justifies its high initial cost. Few people can afford to purchase such expensive equipment for household use. Whereas anyone can construct a foam generator with their own hands. For this you need: straight hands, available materials and a little intelligence.
Scheme if you make the nozzles yourself
There are different types of nozzles. What tools will you need for this:
- Roulette;
- Bulgarian;
- Knife;
- Spanners;
- Pliers.
Prepare an inch pipe of at least one and a half meters and a washcloth. How to assemble - cut the pipe to at least 0.5 meters, the larger the pipe, the better the quality of the foam. But don’t forget, a large pipe also requires a powerful compressor. Next, you need to hammer the pipe with a washcloth and cut a thread at the end, screw a tee onto one end, and filler on the other. Install a large filter, put a plug on one of the tee terminals, and connect a water source with shampoo and a compressor to the remaining ones.
You can also adapt a regular garden sprayer and choose the right compressor. Remove the fitting and valve from it, remove the pump and install the plug. We will get 2 holes in the sprayer, screw in the clamps and secure them, install the gaskets. Screw a check valve with a fitting into one of the pipes and install a tank on the other.
When buying a foam sink, be sure to pay attention to the presence of a foam nozzle; if it is not there, you will have to do it yourself, maybe this will be a joy for someone, and it will also save significant money. And all the materials can be found at home in the garage, so making a foam generator with your own hands is simple and profitable
How to save on materials?
As practice shows, it is not always possible to find everything you need in the garage. There is only one way out - saving. To do this, proceed as follows:
- always buy new parts so as not to overpay several times later;
- Have a good rummage in your garage or your friend’s garage (with approval, of course). Most of the spare parts can be found in old “deposits”.
If the necessary elements are not available, the cost of purchasing a compressor will be about two thousand rubles. But you can cheat. For example, an option is to dismantle the necessary equipment from an old truck.
If you can’t find the equipment you need among your friends, you can look at advertisements for the sale of machines for spare parts.
As a last resort, you can go to a car scrapyard, where there are plenty of old ZIL-130s. At the same time, the necessary part can be obtained for “pennies”.
Please check the unit carefully before purchasing. There should be no oil leaks or other defects on it. Otherwise, working with the compressor is dangerous.
Even if you manage to start a foam generator for washing, made by yourself, but equipped with a defective compressor, 1-2 cleanings and the device will fail.
Application of professional foam generators
The units are used for:
- washing cars, passenger and trucks, trains, subway cars, air transport;
- cleaning office, warehouse, industrial premises;
- washing and disinfection of industrial equipment;
- cleaning containers and containers at food and chemical industry enterprises;
- cleaning livestock and poultry farms;
- washing the facades of residential and commercial buildings;
- removing contaminants from construction sites;
- processing of road infrastructure elements;
- removing scale and salt deposits from pipelines and tanks.
A little about the principle of operation
So that you understand how a foam generator from a sprayer or even a factory type functions. Compressed air enters the working container under pressure, thanks to which the foaming process begins. Next, this mixture must pass through the so-called “foam tablet”.
It is this that starts the active foaming process, resulting in the formation of a stable composition, which is needed for cleaning a car or other object. Thanks to the presence of plates in the regulator, placed at a special angle, the washer can regulate the supply power and the area of coverage with the foam composition.
Video: How to modify a foam nozzle or foam kit
The foam sprayer has special regulators:
- The first &minus is a wing-type one, located on top of the device. It is a special micrometric screw with a jet for adjusting the opening of the fitting and is used to regulate the supply of car shampoo to the mixing chamber.
- The second &minus is cylindrical, located in front and represents special “legs” like a duck’s beak, opening at an angle of up to 40. This allows you to turn a regular stream of mixture into a vertical fan and increase the spray area.
Another very important element of the spray foam & minus is the foam tablet
It is very easy to make it with your own hands, and this is important. The &minus tablet is a consumable item that requires periodic replacement, especially if the device is used incorrectly
Purpose and operating principle of a fine particle generator
During operation, the foam generator for washing, due to the high pressure inside the working cylinder, creates foam, which is applied to the body panels to clean them. The composition successfully combats the most persistent stains. In this case, the mechanical impact is minimal.
The use of the active composition of the foam allows for comprehensive cleaning of contaminants:
- dust and dirt;
- persistent organic compounds;
- microflora.
The main obstacle to individual use of the current type of design is the high price of a professional product. An expensive machine does not justify the cost when used periodically to wash one car. Therefore, homemade installations for contactless washing are popular.
WATCH THE VIDEO
Structurally, a foam generator for a car wash is similar to any overpressure unit - from a garden sprayer to a cylinder for pumping liquefied gas. The design of the device includes the following elements:
- High pressure cylinder.
- Foaming agent.
- A sprayer that provides flow and fineness of spray.
- Connecting hoses are of sufficient length.
The source of foam formation is a special foam tablet. This element is a finely porous mesh made of corrosion-resistant wire. After passing through the tablet, a liquid fraction with a high specific gravity is formed.
Advantages and disadvantages of foam generators
- The entire washing cycle (pre-washing off dirt and dust, applying a layer of foam, final car wash, drying) takes 15-20 minutes.
- The absence of contact with the surface of the body during the washing process eliminates the appearance of microdamages, stains and clouding of the paintwork.
- High-quality washing in hard-to-reach places of the car body is ensured due to the fluidity of the foam and the surfactants it contains.
- The formation of a thin protective anti-corrosion film after washing off the foam protects the paintwork.
The cost of a low-pressure foam generator is measured in tens of thousands of rubles. Sprayers and dosatrons are cheaper, but the cleaning quality is worse. A foam generator (foam kit) is an inexpensive device, but requires connection to a high-pressure machine, the cost of which is from 50 thousand rubles. It’s easier and cheaper to make a low-pressure foam generator yourself.
conclusions
Thus, making a spray gun with your own hands is a doable task. For more complex painting processes and frequent use, it is advisable to make a powerful electric spray gun from a compressor - such a unit is not inferior in performance to ready-made models. And for small one-time painting jobs with water-based paint, a simple sprayer from a pen or an aerosol can is quite suitable.
Thus, having a material with unique properties available to solve a huge range of construction problems, we are still left with these problems face to face, since we have practically the only opportunity to use polyurethane foam for installing windows and doors. What if you need to insulate a balcony, garage, attic or water supply? Or does the cellar require waterproofing and insulation? If the soundproofing of the wall separating your bedroom from your neighbors’ bedroom does not stand up to criticism, and the square footage of the apartment does not allow for the loss of 15 - 20 cm of area along the wall to create intimacy? You can, of course, contact a company that has industrial installations for spraying polyurethane foam, and all problems will be solved. True, you may be unpleasantly surprised by the price: when planning expenses in this case, the cost of the coverage itself should be increased by 40% - the work of specialists is valued quite expensively.
We are pleased to offer you another option: a foam sprayer, ideal for your custom construction and renovation needs. To spray polyurethane foam, compressed air is used, so a compressor is required. The handle of the foam sprayer has a fitting through which compressed air is supplied to the annular slot located in the spray formation zone. Polyurethane foam is also supplied there from a professional cylinder, connected to the sprayer using a threaded adapter located on top, just like in a regular gun.
The sprayer is equipped with a check ball valve, which prevents foam from leaving the sprayer through the adapter when changing the cylinder and from entering atmospheric moisture, which can lead to the formation of polyurethane directly inside the foam supply channel. The supply of foam to the spray point is regulated by a shut-off needle. On the spray head itself there are additional, diametrically located holes, the air supply into which is regulated by screws on the body. Thanks to these holes, you can change the shape of the spray plume to an elliptical one, which allows you to cover large surface areas with spraying at once. From one cylinder of professional polyurethane foam with a stated volume of 50 - 70 liters, using a foam sprayer you can get a heat-insulating layer 5 - 7 centimeters thick on one square meter of surface.
Just? Very simple! And how easy this sprayer is to use! It is held with one hand: we adjusted the spray pattern and... what problems did we have there? Insulate? Let's insulate! Need waterproofing? Let's do it! Provide soundproofing? We will provide! By the way, low-density coatings have the best soundproofing properties, so don’t forget to reduce the foam supply - and sex is guaranteed!
Now we can use those wonderful properties of polyurethane foam that we talked about earlier: it really holds perfectly well on any building material, and thanks to our sprayer, we can apply the coating to surfaces of any configuration, achieving the required thickness and density.
And one more important plus: if you are short on money, having such a sprayer can be cost-effective. You don’t need to invest a large amount in repairs at once - it’s enough to buy several professional cylinders of polyurethane foam from each salary. And the result will be no worse than when contacting a specialized company