Every time we complete a renovation, we throw away the rags frozen in cement. And then one smart person came up with the idea of deliberately soaking old things with cement mortar. It turned out both original and unusual. We present to your attention a chic master class on creating inexpensive and beautiful do-it-yourself concrete flowerpots for your garden and dacha.
The use of concrete flowerpots belongs to the palace traditions of park art. The summer residences in which high society lived were unthinkable without amazing alleys, and the alleys themselves were unthinkable without large concrete bowls in the Empire or Baroque style.
So, slowly moving from one century to another, flowerpots turned out to be in demand today, having received a permanent place of residence in city gardens and parks, at the front entrances of houses. Designers love them: flowerpots can be used to highlight the greenery and decorate the space of the site. Let's consider options on how to build a bowl, vase or flowerpot with your own hands.
What will you need?
Of course, each craftsman has his own set of components from which he prefers to make garden flowerpots. As for the optimal or universal option, the work most often requires:
- gray cement or white Portland cement grades M 400 or M 500;
- sifted and washed fine sand;
- clean or settled water at room temperature;
- color for concrete or a special dye for it;
- container for mixing the working solution;
- electric drill with mixer attachment;
- drill for drainage holes;
- polyethylene film or release grease (solidol);
- form for a future vase;
- fabric (kitchen or terry towel, jute burlap, tulle).
In addition, depending on the type of model, you may need ties, with which you can give the future vase a special shape. The prepared container for diluting cement must be clean and grease-free
It is also important to take care of the cleanliness of the workplace, for which it is worth preparing any covering material (old cardboard boxes or the same thick film, used large-sized plastic bags will do)
As for the material of the mold for the future vase, it can be different. A metal bucket, an old flower vase, or even a plastic basin will do. Some people use rectangular containers for seedlings, as well as cardboard boxes, to make garden cement flowerpots. At the same time, sometimes such bases are specially crushed to obtain a more unusual shape. You can use anything that can be easily removed later, separating the frozen fabric and the form.
Some tips
- To drill drainage holes in a concrete pot, you need to use a special stone drill.
- Before painting the concrete surface, it is necessary to level and plaster all defects. To paint a flowerpot in light colors, you will need to first apply white primer.
The combination of concrete containers and benches is a great idea for the garden.
- To make the concrete solution harden faster, lime or gypsum is added to it.
- You can change flowers in outdoor flowerpots every season. In spring, bulbous plants are planted in them, in summer - viola or cineraria, in autumn - asters and petunia.
- Concrete flower beds are usually installed along garden paths, near the porch or stairs. In an open space, such a flowerpot can become the center of a flower garden.
Fantasy structures made of concrete and flowers can become a real attraction
Modern trends in landscape design
Landscape designers agree that concrete flowerpots give special presentability to the owners of a garden, dacha or cottage. Bowls for flowers both decorate the area and serve as a practical platform for placing green plants almost anywhere. Trends in decorating local areas require flowerpot owners to make containers made of materials that closely resemble natural materials.
Decorating lawns from natural stone is too difficult and expensive. A practical direction in their creation is the use of materials for a monolithic composition: concrete and cement.
Design artists find concrete planters especially functional.
With the help of such massive bowls:
- a special aura of a suburban or urban local area is born;
- Concrete flowerpots zone the space and collect its details into a single picture.
Massive vases are actively used by decorators in private households, parks, squares, at the entrance to cultural sites, as well as in administrative buildings.
- environmental friendliness and mobility: plants grow excellently in such flowerpots; for capricious flowers, you can choose an exclusive place to install the bowl;
- outdoor flowerpots can be made in the style preferred by the customer (from modern to classic);
- Concrete can be painted and finished, so flowerpots can be easily decorated in any color scheme.
Where and how to install
Concrete bowls can be placed in both public places and private properties. There are many options. They look great in squares and parks, near cultural institutions and in gardens, in parking lots, inside office buildings, near houses, in personal gardens, and in summer cottages.
The size of the bowl is of particular importance; its mass and mobility depend on it. These parameters affect its appearance and installation method. There are stationary and portable models. The first option is characterized by long-term basing in one place. Massive structures are quite stable; sometimes additional fastening is used for fixation. The second type is characterized by lighter weight and dimensions. The pot can be used year-round or seasonally.
Making a vase from concrete
Ready-made cement structures can be easily bought in the store, but we will make concrete vases with our own hands. All you have to do is decide what shape you want to make and prepare the material.
Forms for pouring concrete
You can choose any mold that you like. When choosing a mold to pour, decide what element your finished decor will be. What forms are there:
- from a plastic or glass bottle;
- made of cardboard or wood;
- from a disposable cup;
- from fabric.
Concrete vase can be made from miniature molds, all the way up to tall pots.
Tools and materials for concrete pots
The next step is to prepare the material and tools. You can buy all the components for working with concrete at any hardware store.
What you need to prepare for work:
- cement, preferably grade M-400 or M-500. You can also use a ready-made cement-sand mixture;
- ordinary quarry sand;
- fine crushed stone 5-20 mm;
- water;
- frame (mold for filling);
- gloves and spatula;
- container for mixing concrete;
- film.
Step-by-step instruction
We have prepared the main tool, we have learned what forms there are, and now let’s proceed to the step-by-step instructions on how to make a vase from cement:
- mix cement, sand and crushed stone with the addition of water. The ratio of cement and sand should be 1 to 3, and crushed stone - 25% of the total mass. Mix the whole mixture well. You can also use a cement-sand mixture or ready-made concrete B 25 with the addition of water;
- Cover one part of the mold with film so that at the end of the process it is easy to separate the frame;
- pour the made concrete onto the bottom of the mold, the layer should not exceed 4 cm;
- then level the layer with a spatula;
- use a regular metal pin or fittings as a drainage tube;
- Attach a second form to the tube, which serves as a weight. Load crushed stone or sand into it;
- after – pour the mixture between the frames and level the mass with a trowel (spatula);
- when you finish the concreting process, until the concrete sets completely, you need to spray it with water from a spray bottle and cover the form with film;
- After your vase is dry, remove all unnecessary frame elements. Do this very carefully so as not to damage the concrete.
The entire concrete drying process can last for two weeks. While your mold is drying, you can make several of these elements. We hope that our method will be useful to you to make concrete vases with your own hands.
Types of concrete flower girls
Today it is not difficult to purchase a ready-made concrete product created as part of industrial production. Outdoor flowerpots made of concrete are no exception. Most often they are produced according to a typical factory design and consist of a bowl, a support leg and a base. They can be from thirty to sixty centimeters in height. However, buying this decorative element is not always the best option, especially for a demanding owner, because the main characteristics of such vases are unoriginality, low stability, and unreliability. In view of this, there is a need to create concrete flowerpots with your own hands, which would be unique, original, and creative.
Creativity in everything!
Depending on the target direction, garden flowerpots made of concrete can be of different configurations, depths and thicknesses. For bouquets of artificial plants, you can make a vase of small depth, as for natural representatives of the flora, in this case, the deeper, the better.
As for the external appearance of the vase, the main criterion here will be only the personal preferences and impulse of the customer’s imagination.
To create the desired product with your own hands, you can use old glass or plastic bottles, various boxes, and sometimes even a ball will do. An important role is played by the fact which form is needed in the end. The concrete solution easily takes on the intended shape, and when it reaches its standard, it is distinguished by its integrity and special strength.
Necessary tools and mixtures
For the work process that is carried out in the summer, you will not need many materials if you decide in advance on the appearance, think through the raw materials, decor and frame. Depending on the specific case, cement, sand or a ready-made mixture are used. Water and the composition should always be at hand: sometimes the composition turns out to be dense, so it needs to be brought to the desired consistency
If the sand is not uniform, you may need a special sieve for the job. It is preferable to choose cement of at least M-400. This composition will work well and will not cause difficulties during the work process. In addition to this, you may need:
- polyethylene film;
- frame raw materials (what will serve as the basis or form);
- ready-made stencils, anti-stencils;
- gloves, spatula;
- metal pipe (for drainage);
- container for mixing concrete;
- non-stick spray (VD-40 grease or motor oil);
- paints and brushes, as well as a knife for cutting and adjusting the pattern.
Some home craftsmen even use tile adhesive left over after laying wall or floor tiles. Due to perfectly balanced proportions and homogeneity, this material mixes well with other components without forming lumps.
Everyone chooses their own finish: it is enough for one to decorate the surface with pebbles of different shapes, leaving the dominant place for decoration to fresh flowers. Others undertake work to demonstrate design skills, decorating the surface with carved patterns, for example, in an Indian theme. At the same time, plants in this tandem look no less stylish.
How to make: step-by-step master class
The steps will depend on how big the pot you decide to create. Let's look at a specific example.
For a large product, you need a plastic mold with parameters of approximately 53 cm in diameter and 23 cm in height. The solution is made up of white cement, perlite (agroperlite) and peat in a ratio of 2: 1: 2. A one and a half liter ladle can serve as a measuring container. Dilute the mixture with water until a thick mass is obtained.
This is a heavy lawn, it is better to do it right away in the place where it will stand permanently. Keep the plastic mold (inner) ready. Place a solution 4-5 cm thick on the bottom (easily measured with a toothpick). We install a wire frame for strength. Due to the size of the container, four to five batches of the cement composition will be required.
We insert a plastic pot wrapped in cellophane film into the first mold and straighten the folds. Place the solution around the pot. It is necessary for such a bulky structure to dry completely (it will take at least 8 days). Then the flowerpot is removed from the mold and treated with a brush. Rinse and dry again. Cover with damp burlap or a piece of cloth and leave to harden further until the material acquires a light shade: this is a sign that the bowl is ready.
You can make a small concrete flower pot for the garden with your own hands using cement mortar and an ordinary rag.
The sequence of actions is as follows:
- Old towels or any thick fabric work well as fabric. Use an old bucket for the initial form (be sure to wear gloves on your hands).
- Turn the cement into a creamy consistency. To dry the flowerpot, turn the bucket over and cover it with polyethylene, otherwise you won’t be able to remove your product.
- Dip a towel or rag into the container with the solution until it is completely saturated. Then take it out and straighten it.
- Place a towel in cement on an inverted bucket and smooth the bottom. What is now the bottom of the bucket will later become the bottom of the vase. Let the folds hang down; you can give them any shape you want.
- The fabric with cement dries in this form for two days. Take the bucket out from under the frozen flowerpot: here you have the simplest flower girl.
Forms for concrete flowerpots
As for the forms, here, who knows, there are a lot of ready-made prefabricated and monolithic forms on sale, allowing you to get a variety of decorative flowerpots. However, their use is rare, both due to their decent cost and due to the excellent imagination of our homemade craftsmen who are able to turn almost any available device into a masterpiece.
- Containers - boxes, boxes and boxes of everything, more or less suitable.
- Plastic containers - bottles, canisters, eggplants, buckets of food and finishing materials.
- Household plastic and utensils - basins, buckets, baskets, tubs, saucepans, cups, pots, etc.
- Prefabricated forms - made of wood or metal.
- Fabric forms - burlap, towels, rectangular or oval rags.
- Things and shoes - most often children's and adult rubber boots, but there could be any old boots, shoes, or even bast shoes.
By and large, almost any object that catches your eye can become a form, if it can actually be adapted for filling at least once. They even manage to dig holes in the ground/sand, lay a film, and on top - a large leaf of burdock for texture and concrete. You can’t make a full-fledged flowerpot this way, but a bowl for succulents or decor for decoration will work out great.
One of the participants of our portal makes urns from concrete, but they can also be flowerpots if the shape is slightly modified. And in the original version, you can reorient the design for flowers.
IrinaZb Member of FORUMHOUSE
My trash can is made of concrete - I made a trapezoid from old scraps, if you prefer, you can use a square. The size of the figure should be larger than the diameter of the container (I use a bucket) that is inserted into the middle of the wooden form. Then I nailed the wooden base to the sides of the mold. I covered the walls, the bottom of the mold and the bucket with plastic wrap and secured it with tape.
We make beautiful flowerpots from fabric and cement for the garden and cottage
To make flowerpots or flowerpots you will need:
- Cement (for a high-quality solution, it is advisable to add fine gravel and expanded clay, as well as a little sand),
- Pieces of fabric or old towels (waffle or terry)
- Container for mixing the solution and water
- A bucket or other container for drying the pots (to give it the desired shape),
- Paints, brushes and decorations
Let's start working on the flowerpots.
First you need to prepare a cement solution. It is better to do this in seals.
In order for the mixture to be of high quality and the flowerpots to turn out beautiful, the following proportions must be observed: mix 2 parts of sand and one part each of cement and gravel. The gravel should be fine (from 3 to 7 mm), but if you want the flowerpots to be lighter, some of the gravel should be replaced with fine expanded clay.
Gradually add water to the dry mixture; the consistency should resemble liquid sour cream.
Wrap the bucket on which the flowerpot will dry with polyethylene so that nothing sticks to it.
Dip the selected piece of fabric or towel into the solution. It needs to be completely saturated with cement. Then we take it out and straighten it.
We lay the fabric on a bucket standing upside down and straighten the folds so that it is beautiful. The bottom should be smooth, as shown in the photo:
The flowerpot will dry for about 2 – 3 days. After this, it can be removed from the mold, painted and decorated to your liking.
Beginning of work
In order to start working on a flowerpot, you must first create a drawing of the future product. After this, you can cut out a shape based on it, which will be determined by the prepared template or the one you created yourself. The workpiece is glued together. To make it durable, the entire surface is coated with glue.
- Initially, a composition of a certain consistency is prepared. It is important that the solution does not spread. To do this, take two parts of cement and 3 parts of sand. Add a little water to them. All components are thoroughly mixed until smooth.
- Once the mixture is ready, you can pour it into the mold.
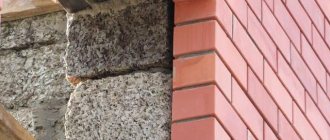
- If you suddenly want to create a luxurious garden bowl from washed concrete, it is important to take into account the specifics of this material. Washed concrete contains naturally occurring stone. These are travertine, marble chips, quartzite, granite crushed stone and pebbles. It also contains artificial components. These are cast iron shot, smalt, glass chips.
It will be possible to create a durable and very beautiful texture.
But this can only be achieved through certain manipulations.
A mixture of concrete with the additives we listed above is placed in a mold. The half-hardened product must be removed and the top layer washed under water pressure. Cement. the sand will leave, the stone will appear.
It looks very unusual. But it is better to implement such an idea with professionals. You will create a product that is unique in color.
Flowerpot manufacturing technology
- For convenience and the ability to remove the product, the mold under the flowerpot is carefully covered with stretch film.
- Preparation of cement mortar. Before preparing the cement mortar, a fabric blank is placed in the container. A mark is made on the inner wall to indicate how much space it takes up. The workpiece is removed. Pure water is poured into the container “to the mark” or slightly above the mark. Cement is added to the water while simultaneously stirring the mixture with a mixer attachment. Cement is added until a consistency between milk and sour cream is achieved;
- When the cement lait is ready, dip a cloth into the container and allow it to be thoroughly soaked in the mixture. Before removing, you should make sure that there are no dry areas left on the fabric;
- The workpiece is removed from the container and thrown like a rag onto an inverted bucket. Having learned “the wings-walls of the pots are carefully laid out in beautiful folds, and the fabric on the bottom is carefully straightened so that there are no folds;
- After three days, the pots are removed from the mold and painted with concrete paint from the above list.
Do-it-yourself cement vases in your summer cottage should look natural, in accordance with nature; they should be somewhat different: natural, monolithic. In other words, the material of such products should be close to natural, be appropriate - rough and inexpensive. A cement vase perfectly meets all these requirements. You can grow both annuals and flowers in it, which will delight you with their blooms for many years. Plants in such cement creations can be left in the rain. It’s not difficult to bring this idea to life by making everything out of cement with your own hands.
Materials and tools for work:
- cement, sand, water, stones;
- carton boxes;
- plastic bottles;
- scotch;
- container for mixing cement mortar;
- spatula for working with concrete.
Scheme for preparing cement mortar.
- They come up with a design for a future product. Cut off the excess part of the plastic bottle. The design is transferred from the head to cardboard. The latter is formed into the required shape by gluing the joints with tape. They glue on the folds and corners with special care, making sure that there are no gaps left.
- When the molds for pouring are ready, they proceed to making the mixture. The cement is poured with water (in the proportions indicated on the packaging), some stones and sand are added. The mixture is not too liquid, but not very thick - medium. Such that it flows, filling the space between the forms.
After mixing well, begin to pour into a cardboard form. The mold is filled approximately halfway with the solution. Immerse a second, smaller plastic container in the solution. Lower it so that a small bottom remains (about 2-3 cm).
After installing the second form into the solution, it is pressed down with a weight. This is necessary so that under the pressure of concrete the plastic does not rise upward, which is completely undesirable. Leave until morning. In the morning, take out the plastic form. Do not touch the cardboard container until the concrete is completely dry. And one more nuance: until the solution has completely set, drainage holes are drilled from the bottom. The future vase is placed in the sun and dried for several days.
After the product has dried, get rid of unnecessary cardboard. The vase is either left as is, which is very harmonious in color with the existing landscape, or painted in the desired color. How do they do it?
Composition of the mixture for concrete grating
To obtain openwork concrete flowers of sufficient strength, we use the same composition of fine-grained concrete, but with the addition of polypropylene fiber. Fiber length 10-15 mm. The recommended amount is about 0.05% by weight of the mixture. This is approximately one or two pinches, but if desired, you can weigh it more accurately. You need to add it at the very end of the kneading and finally mix it together with the fiber for another 5-10 seconds.
Concrete flowers in test castings were made of different thicknesses (0.7 and 1.5 cm) and with different amounts of black pigment (1-5%).
After 7 days, each casting was subjected to strength testing using a hammer and pliers. This is far from professional measurements, but gives a very clear idea of the difference in the quality of the samples.
Naturally, as expected, the sample with a thickness of 1.5 cm and with the least amount of introduced pigment turned out to be the most durable. The remains of the samples after testing can be seen in the photos below.
Since the main purpose of using an openwork lattice of flowers is not as a load-bearing structure, but as a decorative overlay, special strength is not required. But, if you make the thickness larger, then the gratings can be used as separate elements.
Concrete flowers will look good on the walls of garden flowerpots made from colored concrete using the usual “box-in-box” method, as well as on concrete stands near benches and other small architectural forms in the garden.
Concrete flowers can easily be glued to the supporting structure with ordinary cement adhesive for exterior use. You can purchase it at a hardware store or make it yourself. How to prepare the adhesive composition yourself will be discussed in the following articles.
Solution for making outdoor garden vases
Peculiarities
We will talk about products that imitate stone - they are the ones that look the most stylish and can last a long time. Carving out a stone flowerpot is very time-consuming and difficult, and the costs will be high. It is much easier to cast a vase using cement or gypsum mortar. Successfully decorated, it will look no worse than stone.
The form into which the solution will be poured can be purchased ready-made - they are sold. Or use available materials for this purpose: boxes, plastic buckets, large tin cans. More about this below. By the way, we will talk about technology that does not require the use of a form at all.
- For a long service life, you should select high-quality cement for the solution, which provides sufficient water resistance (after all, an outdoor vase will have to successfully withstand more than one winter and summer).
- Gypsum products are treated with a moisture-proofing compound.
Read below about how to make a solution from cement and concrete, plaster for such vases, sculptures for the garden.
Don't know what type of vase to choose for your garden? Then watch the following video carefully:
Creating a print
For manufacturing you will need the same material that was used in the glossy product. To create a print, you need to take printed fabric with various patterns, wallpaper or newspaper.
The cardboard is laid on a flat surface, a film is spread on top, then the location of the print is marked, taking into account that the form will be in the center. The location of the pattern is generously lubricated with silicate adhesive, fabric, newspaper or wallpaper is placed on this area, the outer side is placed on the film, and the inner side is connected to the fabric.
The inner side is also generously lubricated with adhesive; this work can be done while the main fabric is soaked in cement. Leave space for up to 10 minutes for complete impregnation, while ensuring that small folds do not form.
A rag soaked in the mixture is spread on the foam, a bucket or other prepared form is placed in the central part, then it is turned over so that the fabric remains on top of the container. Beautiful edges are formed and left until completely dry, then the product is removed. To create a product with a bright and colorful color, white sand and the same cement are used, and the necessary pigment is added. It is worth considering that such materials may be more expensive than conventional standard types.
You can trim the edges with a simple hacksaw, but the cuts will stand out from the main color, so they are sanded with an emery mesh for plaster.
How to make
If the method using a rag and mortar was chosen to create a vase, then everything is quite simple. However, before you start mixing the solution, it is better to carefully study all the stages and watch the master class.
How to make a concrete vase using fabric:
- Wrapping the mold with plastic wrap (it will make it easier to separate the product from the base)
- Installing the form on the workplace (firmly and reliably)
- Preparing the fabric, lowering it into the solution, thoroughly impregnating it
- Laying textiles on top of the mold so that the edges of the fabric hang evenly on the sides, forming neat folds, gartering with cords or ropes until the solution sets
- After the fabric has dried, it is separated from the mold, holes are made for drainage in the bottom and decorated
When creating flowerpots from cement, you should make sure that the forms are on a hill and the edges of the fabric hang freely. But if desired, the edges can be made rounded, placing them around the container on the ground in the form of folds and flower petals.
If lace is chosen for work, it is better not to make folds. Textiles without texture look more advantageous if they are beautifully straightened. By twisting the fabric, you can make diagonal folds.
You can use anything as a form - even a square or round tabletop, any object. While the concrete is drying, it is advisable to moisten it with cool water; the process usually takes 1-3 days. After removal from the mold, the product is still dried and processed with sandpaper.
Vases for the dacha are made from two molds and burlap: they take two containers of different sizes, place a smaller one on the bottom of the larger one, pouring cement mortar inside the edges. When the mixture dries, the mold is taken out and decorated with cement-impregnated burlap and coarse knots.
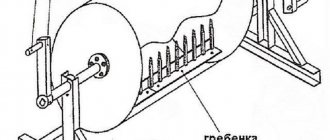
If you don't have a mold, you can learn how to make concrete vases using a method similar to pottery.
Making a vase for a garden without a mold:
- Creating a template from plastic or metal - an iron pin and a piece of material attached to it
- Inserting a pin into a wooden base so that it does not change its position when rotating
- Fixing the template, rotating it along the sand slide until a flat surface is formed
- Filling the sand mold with mortar, leveling with a trowel
- Rotate the template around its axis, pour the mixture onto the surface
- When the vase is perfect, you can add clean cement mortar (without sand) and bring the product to the desired look
- Cover with plastic wrap, spray with water, wait for drying time
- When the product is dry, you need to pour out the sand and clean the inside of the vase
A beautiful concrete vase (flower, small) can be made from a bottle. Here the sequence of work is as follows: take a glass bottle with a wide neck or cut off the bottom from a plastic one, close the bottles, make holes in them for an object (a candle, pencil or test tube that will be inserted into the thickness of the concrete and make space for flower stems), make liquid concrete mixture, pour concrete into bottles, insert the selected object, knock to remove air.
After the concrete has stood for a day or two in the container, it needs to be emptied (carefully break glass through a cloth or cut plastic), remove the middle, dry it and use it.
Using the same principle, vases are made from cardboard boxes and various containers, filling them inside and inserting various objects to create space inside.
Product Features
Concrete vases can rightfully be called a successful decorative technique with which you can aesthetically transform your garden area. This type of decor very clearly characterizes the taste preferences and respectability of the owner of the estate.
Simple, practical and tasteful - concrete products on your site
Most landscape design specialists agree that to make stone flower bowls it is necessary to use the raw materials that are closest to natural. This is important so that the so-called concrete pots have an aesthetic appearance and fit harmoniously into the overall picture.
It is worth noting that making stone flowerpots for the garden with your own hands is not an easy task. In view of this, to create such landscape elements, special attention must be paid when choosing the appropriate material. Most often this is concrete or cement mortar.
How to decorate your vase?
If you like the idea of making decorative flower pots and definitely want to build such flowerpots for the garden, you can safely get to work. Handicrafts always attract a lot of attention; you can proudly show them to friends and acquaintances. But sometimes you want something more unusual or bright. You can decorate homemade flower beds the way you want.
For example, you may not like the rough outer surface of a homemade flowerpot. You can turn it into glossy after a little modification. To do this, when preparing the mixture, choose cement and sand of fine fractions or add Rotband dry plaster to the mixture. To dilute the mixture, use silicate glue instead of water.
Polyethylene is used to form a glossy surface. The following additions to the basic manufacturing method will be needed:
- 1Get a large thick piece of cardboard. Lay greenhouse covering material on it and straighten it so that all folds are smoothed out.
- 2After soaking the fabric with the solution, spread it on cardboard and smooth it well so that the towel adheres better to the surface.
- 3Then the bucket chosen to create the shape is placed in the center, after which the entire structure must be carefully and very quickly turned over, while holding it by the cardboard. The fabric should stick to the bucket along with the film.
- 4Form the folds of the future product to your liking. You cannot make deep creases - it will be difficult for you to get the film out of them. From the already frozen structure, you can try to burn out the pieces of film stuck there with a lighter.
The desired gloss has been achieved, but the product still has some minor defects. How can this be fixed? Take a brush and coat the dried vase with silicate glue without diluting it. This way you can hide all the defects. You can additionally add paint to the adhesive composition - this way you will get a pot of the desired color and add shine to its outer surface.
Stone
Flowerpots made of stone are highly durable and durable. They are very decorative and are able to retain moisture in the soil well. Their large mass allows them to remain stable, but deprives them of mobility. Choose the location of the stone flower girl in advance.
Making a stone flowerpot by hand requires skill, patience and the appropriate tools. Below is a master class that should help a beginner cope with this task.
When choosing a stone, it is better to give preference to sandstone or limestone.
You will need:
- bushhammer;
- bit;
- a piece of sandstone or limestone;
- support for installing stone;
- pencil;
- brush;
- Bulgarian;
- Grinder.
Manufacturing process:
- Draw the outline of the recess in which the plants are supposed to be planted. To prevent the edge of the flowerpot from collapsing, leave 50 mm between the line and the border.
- Drill out the hole using a hammer and chisel.
- Use a brush to sweep away stone chips and dust.
- Using a grinder, make cuts, gradually deepening the tool along the edges.
- Make a drainage hole in the resulting bottom.
- Sand out rough grooves.
Stone processing is made easier by using special power tools, see video.
It is much easier to make flower modules decorated with smooth river stones.
You will need:
- river stones;
- plastic pot;
- glue gun
Manufacturing process:
- Turn the pot upside down.
- Using a glue gun, gradually attach the stones to the walls. Try to select them so that there are no empty gaps.
Flowerpots decorated with pebbles
There are many different ways to make flowerpots with your own hands. Some are easy to make from scrap materials, others will require more preparation and experience. When creating a flower girl yourself, you can use your imagination and develop a unique design that will suit your personal tastes.
Author of the article: Elizaveta Baryshova
How to easily and simply make outdoor vases from cement and fabric with your own hands
Cement and fabric planters are the most remarkable way to create beauty in the garden.
What you need to create a beautiful flower container
It is best to use Portland cement and natural fabrics. Even unnecessary terry towels with holes will do just fine, just not synthetics.
In addition to fabric and cement, you need a container as a frame, polyethylene, water and sand.
Work process
First, mix a solution of cement, sand and water in a 1:1 ratio. It should not be thick, because they will have to saturate the fabric properly.
The prepared container must be wrapped in plastic wrap and placed upside down. A cloth soaked in the solution is hung on it and straightened.
There shouldn’t be a single wrinkle at the bottom of the container, but you can straighten them along the edges as you please.
2
Wood – simple and accessible for use
Wood is not very suitable for outdoor use: rain and snow reduce its life, but it is available and easy to process. Without protective treatment, the surface will soon turn gray and begin to rot. It is better not to use paint, but to use a stain, which will reveal the texture of the wood and emphasize its beauty. After staining, coat the product with clear varnish.
The lumber used is boards and beams. We cut the blanks to the required length and put together a box from them. The wooden box will soon begin to rot if it comes into contact with the ground. To prevent this from happening, we lift it on legs. The simplest option is four boards in the corners. If you have imagination and skills, we make them into shapes. We don’t fit the boards very tightly: on the street they will begin to swell and expand, but we also don’t leave large gaps so that the earth doesn’t wake up.
If slats are used as a frame, they simultaneously serve as legs. We cut four identical pieces to which we attach the side boards and the bottom. To prevent the nails from splitting the wood, we drill holes at the fastening point that are 1–2 mm narrower than their diameter. Instead of boards, you can use thick moisture-resistant plywood. It is better to fasten everything with self-tapping screws. We also drill holes for them in the plywood and slats at the same time, stepping back 1 cm from the edge. Beautiful legs come out of metal corners, especially stainless steel.
If you have 6x6 or so lumber, it can be used to make beautiful planters. Their sizes depend on the strength of the slats. For example, the desired height is 8 bars: 48 cm. Length - 1.5 m, width - 0.6 m. We cut 16 long bars of different lengths: 8 1.5 meters each, 8 more minus the double thickness of the bars - 150- 16 = 138 cm. We cut short ones according to the same principle - 8 by 60 cm, another 8 by 48 cm.
We are expanding the structure. We lay out the next 4 bars differently: longitudinal ones - those that are shorter, lateral ones - those that are longer. We attach them in the corners to the bars below. We additionally strengthen the long sides in the middle with one or two nails. We lay out the third row similarly to the first and then alternate the arrangement of the beams until we reach the top. All wooden flowerpots can be combined in one design with a bench. We install it in any suitable place in the garden or at the entrance.
Advantages of concrete forms
Due to the versatility of concrete and its resistance to any weather factors, which wood and polymers cannot boast of, objects of any shape, size and functionality, including flowerpots, are cast from it. And with the advent of various plasticizers and dyes for concrete in the public domain, it became possible not only to improve the characteristics of the solution and the finished product, but also to immediately obtain a presentable appearance. It’s no wonder that polished concrete floors, which look like an expensive, exclusive coating, are becoming increasingly popular. To make concrete flowerpots, they practically do not use ready-made adhesive mixtures, although they are presented in abundance, but rather a homemade solution based on Portland cement is mixed.
Frame sculptures
For those who have already practiced a little in making concrete figures, there are more complex options that require sculptor skills and spatial imagination. We are talking about frame products made of concrete. Using fittings, you can create any composition - from an angel to a fairy-tale castle.
First you need to weave the contours and base of the future composition from wire. The more accurately the frame is reproduced, the more accurate the final figure will be.
Monolithic works of art are made by applying cement directly to the frame. And to obtain a hollow form, the frame is wrapped with construction mesh and covered with cement.
After the first layer of cement has been laid, you will be able to formulate the general appearance of the future composition. The main textured elements are face details, turrets, lines, etc. formed when applying the second layer. if the elements are complex, a third layer may be required for the smallest details. When the statue dries, it can be painted in any color or the necessary shades can be added.
Shapes and sizes
Concrete is flexible, so the bowl is easy to shape. It is important that the created design is combined with the overall style of the dacha or garden plot. For example, like this:
- English style. Concrete products are endowed with smooth, curved ornate contours, where there is no room for sharp or right angles.
- Rustic country style. At first it may seem that the bowls and flowerpots are somehow tasteless and made with carelessness. The products are made in a cylindrical shape, which resembles a bucket, basin, tub, tub.
- Moorish style. Square-shaped models are installed, and less often round products are installed. The outside of the Moorish-style bowls is lined with Arabic mosaics (pieces of glass, bugles, etc. are used).
- Classic style. Vases, along with a sculpture and an artificial waterfall, are located in the center of the composition. Concrete products are made in different versions. Standard models have a perfectly round base with a bowl on its leg.
The selection of pot size is influenced by a number of factors. Consider its purpose. Based on the functions of the vase, all products are divided into indoor, decorative and outdoor. Decorative and outdoor options are characterized by large bowls and flowerpots.
For outdoor products, the area of a summer cottage or garden plot is also important. In a small courtyard, a huge bowl of flowers will be inappropriate, and, conversely, in a vast area, small vases will be invisible.
The shape and size of vases are not limited by anything except the tastes of the owners. Products that are produced on industrial conveyors are made according to the standard: the bowls are equipped with a reinforced concrete frame, base, and sometimes a leg. The height of the products usually reaches 60 centimeters. With your own hands, of course, you can make a vase of a more original shape and the required size.
For planting flowers and ornamental crops, concrete vases are given substantial depth. Any form can be specified: the concrete solution accepts the parameters that are determined for it. I like the hexagonal bowl - everything is doable, you just need to construct the frame of such a bowl from wood, cardboard or plywood in advance.
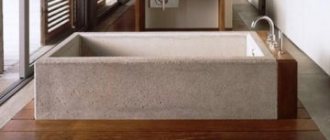
Rectangular and square flowerpots are practical and original. Round large bowls look elegant and beautiful on the site.
Unusual concrete products involve the use of bowls, basins, boxes, even bowling balls as filling. To make a product from concrete mortar, you will need two forms: one - internal, the second - external. They must be different in size so that concrete can be poured between them.
When the solution hardens, the inner frame is removed or carefully broken.
Once again! When deciding what size to make a bowl with your own hands, determine the place where you will install it. There is no need to plan a huge vase for a small area with already growing flowers: all harmony will be disrupted. But even a made vase the size of a plastic bottle will simply get lost if you place it in an area where tall flowers are planted.
Show your talent as a landscape designer and make a vase that will be in harmony with the surrounding buildings and green spaces.